If it is impossible to postpone bathroom renovations, and you don’t have enough money to spend too much, don’t despair. It is quite possible to arrange a bathroom inexpensively if you do everything yourself and awaken your imagination. Designing a room consists of design, ergonomics of all items, and functionality of the bathtub. Premises for use by a family are completed taking into account the wishes of all members; for a single person, the design is drawn up only in accordance with his requests. So, let's look at the renovation of an economy class bathroom in more detail.
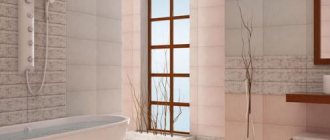
Finishing walls, floors and ceilings
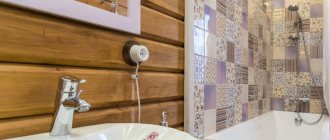
A budget option and the best option for a budget bathtub design project is to use tiles, PVC panels and suspended ceilings.
Bathroom finishing with plastic panels
Bathroom finishing with plastic panels
Bathroom finishing with plastic panels
Bathroom finishing with plastic panels
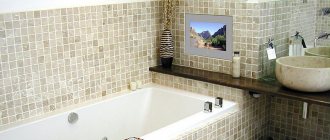
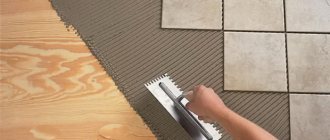
Bathroom tiling
Bathroom tiling
Bathroom tiling
Bathroom tiling
Renovation ideas
To bring this or that idea to life, you first need to evaluate the features of the room. For example, not all ideas are suitable if space is very limited. But you can refine other design ideas so that the decor matches the given format.
You also need to focus on your financial capabilities, since most design ideas require significant expenses. For example, to install new modern plumbing you will need to pay a ready salary. Therefore, it is important to draw up an estimate correctly; it is advisable that not all the money is included in it. During the course of repairs, expenses that were not calculated will inevitably arise, or you will need to purchase additional materials due to incorrect calculations.
We select plumbing equipment
Of course, you can’t save on plumbing, but you can choose easier and cheaper.
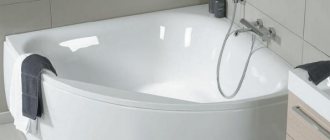
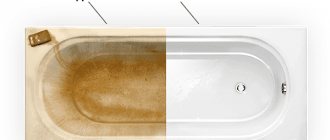
Bathroom. In order to save money when choosing a bathtub, instead of cast iron, we recommend buying acrylic or steel ones; they have proven themselves excellent in terms of wear resistance and maintenance.
Acrylic bathtub
Acrylic bathtub
Acrylic bathtub
Acrylic bathtub
Toilet. We recommend purchasing not a wall-hung toilet, but a regular floor-standing toilet. It costs several times less. We advise you to study the manufacturing companies in detail, because in case of defects, all your repairs will be down the drain.
Floor-standing toilet in bathroom design
Floor-standing toilet in bathroom design
Floor-standing toilet in bathroom design
Wall-hung toilet in bathroom design
Wall-hung toilet in bathroom design
Wall-hung toilet in bathroom design
DIY wall painting
Painting walls is considered one of the easiest and least expensive finishing methods. It is important to choose the right paint and prepare the surface of the walls.
Painted walls in the bathroom
Bathroom decoration
Advice! Create a design project for your bathroom. It is not recommended to paint absolutely all surfaces; it is advisable to cover the areas near the bathtub and sink with moisture-resistant panels or trim them with an apron made of inexpensive ceramic tiles.
Step 1. Choosing paint for the bathroom
Bathroom paint should have antibacterial properties and be moisture resistant. Otherwise, the appearance of fungus and peeling of the coating cannot be avoided.
Moisture resistant paint
Moisture-resistant paint for walls and ceilings
Moisture-resistant paint for walls and ceilings “Optimum”
Moisture-resistant paint for walls and ceilings matte Tikkurila Luya (Luja Tikkurila)
Due to their low cost and excellent performance characteristics, latex, silicone, and acrylic paints are most widely used. At the same time, water-based mixtures do not have an unpleasant pungent odor, and silicone paints can act as a water barrier.
NovaTech Interior paint for walls and ceilings
Traditional oil paints do not have this advantage, and also quickly become covered with cracks, so it is better to immediately abandon this option.
Oil paint
When choosing shades, remember that it is inappropriate to paint small bathrooms in dark colors, as this will visually reduce the space even more. Do not overdo it with the number of bright spots or complex patterns and their quantity so that the interior does not look vulgar. Soft pastel colors will visually expand the room and fill it with light.
Choose shades from the manufacturer's catalog
Please note that paints can be matte, glossy or semi-gloss. Of this variety, it is matte enamels that best hide small defects on the walls, while drops and streaks are clearly visible on glossy surfaces. However, if you cannot make a choice, consider a combination of glossy and matte surfaces. This technique will make your bathroom modern and stylish without significant costs.
The photo shows a combination of matte and glossy paints
bathroom paint
Step 2. Preparing the walls for painting
Don’t forget to remove all the furniture from the bathroom, remove the mirrors, cover the faucets with masking tape, and cover the plumbing fixtures with film or newspaper, because preparing the walls for painting is the dirtiest and most time-consuming stage.
You should not apply new layers of paint over the old peeling one, nothing good will come of it. If you have a drill in your arsenal, get a couple of sanding attachments for it and clean off the old paintwork from the walls. Remember safety precautions.
Removing paint with an angle grinder
Don't have a drill? Use paint strippers, a scraper and a putty knife. The method is effective, but it is better to work with a respirator and thick rubber gloves.
Remover for old paint
Chemical paint removal
Scraper
If the paint on the walls was applied a long time ago, chemicals will not cope with it.
You can remove paint using thermal methods, for example, using a torch or a hair dryer. Heat a section of the wall and scrape off the peeling coating with a narrow spatula.
Removing old paint from walls using a gas torch
When all the old paint has been removed from the walls, it is necessary to repair cracks and potholes and knock down protrusions.
Fill cracks and gouges in the wall
Crack repair
Step 3. Preparing materials and tools
Prepare paint and tools, follow manufacturer's instructions. To apply paint you will need a roller, brushes, if you have a spray gun - great. Before purchasing, measure the area of the surfaces to be coated and adjust the amount of material taking into account the volume. For high-quality painting, it is better to apply two layers, keep this in mind when purchasing.
Brushes, rollers, cuvette
Step 4. Preparing the workplace
Clear the work area near the walls of unnecessary objects; if you are not going to redo the flooring, then cover it with film or paper. Carefully protect the bathtub and sink from contamination.
Protect surfaces with masking tape
Surface protection when painting walls
Start your work from the most inconspicuous corner, in this place you can learn the properties of the paint in practice and, if necessary, dilute it to the optimal consistency. We recommend painting the walls with a roller, and using a brush to treat only hard-to-reach areas, corners and borders of joints of different colors. Panels in the bathroom are still in fashion; if you plan to make them, mark the height on the wall and draw a horizontal line.
Step 5. Start coloring
Apply a deep penetration primer to the wall. It will not only improve the appearance, but also increase the durability of the coating and reduce the likelihood of paint peeling.
Applying primer
Allow the primer to dry for 3-6 hours
Apply a second coat of primer over the first and wait 24 hours
Pour a portion of paint into a special plastic tray for rollers. Dip the roller into it, turn it several times, remove excess paint on a horizontal surface.
Practical advice. To minimize the chance of paint getting on the floor, give the roller a spinning motion before blowing it out of the tray.
Step 6. Painting technology
First paint the surface with a brush along the edges
Start painting from top to bottom, this method reduces the likelihood of drips forming, they are immediately smeared, and the roller “rolls” over them. Paint carefully, do not allow any omissions. Don't be upset if the first coat looks ugly, this is expected. The fact is that there are areas on the wall with old and new plaster, remnants of un-removed coating, etc. They all absorb paint differently, which is reflected in the appearance. The second coat will correct all problems, the finish will be uniform.
Apply the first coat
How to paint walls with a roller
Paint in small areas, correct difficult areas immediately with a brush. The paint should smooth out lint marks on its own. If this does not happen, add solvent to it. Pay attention, so that he is conscientious, read the instructions for use. If in doubt, test the solvent for compatibility with a small volume of material; if the paint has curled, change the solvent.
It is advisable to apply the second layer when the first one is not completely dry, this increases the adhesion coefficient between them. It’s easy to check the readiness of the surface - run your fingertips along it, they should not get dirty, but only “creak” a little.
Paint application scheme
Level the paint along the ceiling by rolling the roller long horizontally without loading it with paint.
If you are making a multi-colored panel, then you need to paint the surface in the second color only after applying two layers of the first. In this case, start working from the top of the wall; the panel is finished last. This way you will be protected from paint getting onto finished areas. Apply masking tape along the border line. Make sure that the paint does not flow under it; paint only with a brush, moving in the direction opposite to the tape. Never apply tape to paint that is not completely dry, this is very important. If you glue it to a freshly painted surface, then during removal it is likely that part of the paint will be removed along with it, and you will have to redo everything.
Marking a wall for striped painting
Apply masking tape
Apply paint
Creating stripes
Stripes can also be horizontal
Original wall decoration
The color transition is achieved by using color and a regular sponge
Example of non-standard wall painting
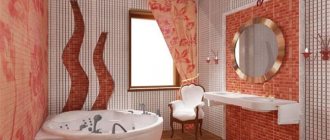
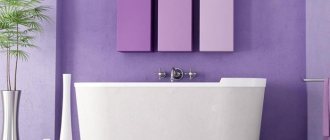
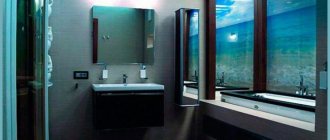
Budget bathroom design - interior options
It is necessary to select a design that requires less cost. An excellent option would be minimalism, hi-tech and modern style. These areas are characterized by a minimum of things and decor.
Bathroom design in the photo
Bathroom design in the photo
Bathroom design in the photo
Bathroom design in the photo
Bathroom design
Bathroom design
Bathroom design
Bathroom design
Bathroom design
Tiling
Budget renovation also includes the use of tiles for wall cladding. The main thing is to choose an inexpensive product with decent quality. Advantages of the solution:
- the material is resistant to temperature changes;
- not afraid of high humidity, withstands prolonged contact with water;
- washes well;
- resistant to mechanical damage.
The following negative aspects may become an obstacle to use in the bathroom during budget renovation:
- Additionally, you need to purchase a mixture for fixing to the wall and a grout joint;
- walls with old paint need preparation; the coating must be removed;
- the process requires some experience and not everyone can do it themselves; inviting a specialist will increase the repair estimate;
- It takes more time to cover than when wallpapering or painting.
The best option when renovating a bathroom with a budget project is to combine cladding. The area near the bathtub and sink is decorated with tiles, and for those less exposed to water, a simpler and more economical covering method is chosen.
Budget bathroom design in the photo
Budget bathroom interior
Budget bathroom interior
Budget bathroom interior
Budget bathroom interior
Budget bathroom interior
Budget bathroom interior
Budget bathroom interior
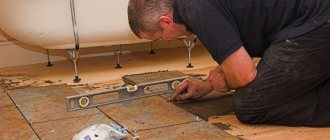
Floor covering
The finishing option depends on the repair estimate and the condition of the old bathroom flooring. Sometimes just refreshing the appearance of the tiles is enough. To do this, you will need to remove the grout and select a new one that matches the color of the tile.
It is quite simple and cheap to lay linoleum, but this measure will be temporary. An increased level of humidity in the bathroom provokes the development of mold on the linoleum.
Comment! Avoiding negative consequences during budget repairs will allow you to purchase linoleum based on PVC or without a base at all.
When renovating a bathroom, tiles are more practical, even at a budget price. The cladding is carried out without dismantling the old tiles. The screed will require labor and time. To renovate a bathroom floor, choose tiles with a rough texture to avoid slipping and cause injury.
If you have an extremely limited budget, the most economical option would be to purchase a large rubber mat that will maximally cover the free space of the bathroom floor. It can be changed much more often than any stationary coating, and a fresh look for the interior will be ensured at minimal cost.
Helpful Tips for Cutting Costs
The question of how to make cheap bathroom renovations with your own hands worries many owners. To prioritize between savings and quality of room design, you should adhere to the following recommendations:
- Doing the work yourself . It is advisable to carry out most of the repairs yourself, since the prices for specialist services may exceed the cost of materials. It is better to carry out all dismantling work on your own.
- Having your own tool. It is necessary to think through the design features of the repair in such a way as to minimize dismantling work. A basic set of tools will help make the task easier and faster. In addition, this will significantly reduce financial costs. It is recommended to acquire at least a minimum set, which will include a drill with a set of drills (preferably an impact drill), a hammer drill with bits, and a cutting grinder with discs for metal and concrete.
- Economical materials. Purchasing budget building materials will help you save significantly. But there are things that you shouldn’t save on, since subsequent replacement may cost more than the initial purchase of quality products. But in some cases, you can reduce costs wisely.
Reducing financial costs for bathroom renovations
If you need to renovate your bathroom cheaply and efficiently, pay special attention to scrupulous cost planning. A detailed estimate will help you save a lot of money. It is necessary to conduct a thorough comparative analysis of the market pricing policy. In addition, on the Internet, as a rule, you can purchase many materials at a significant discount, especially when purchasing in bulk.
Even from inexpensive but high-quality materials you can create a cozy and stylish interior
To enliven a boring interior and diversify the static surface, experts recommend purchasing inexpensive accessories and little things that will add coziness to the room and become an appropriate addition to the design. Additional convenience and decoration can be shelves, hooks, soap dishes, rubber mats, curtains and other decorative elements.
You should not buy building materials and equipment from well-known manufacturers, since you will have to pay extra for the name. Branded items are a priori more expensive. It will be much more profitable to purchase building materials produced by domestic companies, as well as those produced by our closest neighbors - Poland, the Czech Republic, and Finland. These will be high-quality, certified products. Of course, we are not talking about low-price goods from China. However, their products of average cost will be quite good. Remember that you cannot sacrifice quality and aesthetics for the sake of savings.
Related article: How to connect an infrared heated floor
Pasting walls with glass wallpaper will help save money on bathroom renovations