Technology for making self-leveling floors with your own hands with photos and videos of the main stages. Options for designing 3D floors in the bathroom. Design technologies never cease to delight with original new floor coverings that can act as a full-fledged element of the interior. 3D self-leveling floors, the striking difference of which is the artistic nature of the coating, are capable of realizing any design ideas, playing a dominant role in the interior of living rooms.
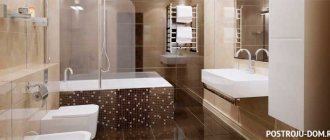
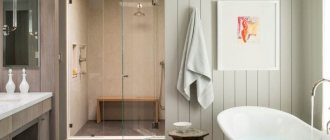
Self-leveling floors are a practical way to decorate the interior of a bathroom
This finishing material is also perfect for the bathroom. And the fact that the bathroom is characterized by high humidity is not a problem for 3D floors. The technology for creating a polymer coating is a rather labor-intensive process, but if desired and following the recommendations of the masters, it can be done with your own hands.
Technology
The technology behind 3D flooring is not that complicated. The desired image is applied to the base of the floor, then filled with epoxy resin. This is a monolithic version without seams. It is considered to be as strong and durable as possible.
Who is suitable for 3D flooring in the bathroom? For extraordinary and bright personalities, families who love strong emotions and know how to surprise friends.
3D flooring is considered one of the most spectacular techniques in apartment design projects; it is quite rare and strikes the heart! 3D flooring is a world of interesting people with great imagination.
Advantages
Until recently, only ceramic tiles were used for wall cladding in the bathroom, and plastic was considered an economy-class material, unsuitable for renovating the finishing of rooms with a difficult microclimate. Modern panels made of PVC and aluminum at an affordable price have become a real alternative to ceramics, not inferior in terms of service life and decorative potential.
Easy installation and inexpensive, and the 3D panels look beautiful
This material has the following advantages:
- High installation speed. You can cover bathroom walls with this material without the help of professional craftsmen. In addition, before installing the panels there is no need to perform thorough and lengthy surface preparation. If necessary, they can be fixed even over the old finish, which speeds up and reduces the cost of the repair process.
- Affordable price. The price of 1 square meter of 3D panel coating is on average cheaper than finishing with decorative ceramic tiles, so the use of this practical material can reduce repair costs.
- Long service life. High-quality textured plastic can last more than 15-20 years, and aluminum panels last even longer.
- Current design. Three-dimensional finishing material opens up inexhaustible possibilities for creating a modern, attractive bathroom interior.
Original appearance of the panels
Experienced craftsmen say that it is important to determine the required “dose” of 3D panels in the bathroom interior. It is not necessary to cover all the walls; you can select only one surface or even a small section of the wall in order to correctly place accents.
What kind of drawing could it be?
There are a great many options for drawings. Ideas for 3D flooring for bathrooms lie, one might say, on the surface. To do this, you need to use a little imagination and creativity, and also think about those pictures and images that will delight you for many years and will not get boring.
It is best to choose topics that can evoke peace and pleasant emotions, as well as warm memories. What drawings appear most often?
- Hand drawn drawing;
- Imprint on vinyl film;
- Graffiti;
- Decorative fresco.
Interesting and little-known facts from the history of 3D flooring
Such an amazing idea did not arise by chance. In ancient times, one rich nobleman decided to play a prank on his subjects and noble guests. He asked his artist friend to depict non-existent doors, windows and decorative elements on the walls of his fortress.
It is worth paying tribute to the great master; he depicted the count’s fantasies so masterfully that the guests actually tried to open the painted doors and close the curtains. This is how a new style of art arose - mannerism or drawing images in 3D style.
After this, the style of drawing was adopted by urban artists, who created visual illusions on the walls of buildings and structures.
The streets were filled with unimaginable images. The pictures were so vivid that it seemed as if the walls did not exist at all.
After some time, the Street Painting style (Madonnari) emerged. The idea is to create a 3D design on the asphalt that, from a certain distance, will appear realistic and three-dimensional. From other angles, the picture looks stretched and awkward.
Only after going through such a complex and long path did 3D drawings appear in public and residential buildings. In the last 10 years, 3D floors in the bathroom have become popular - and this new product does not plan to go out of fashion.
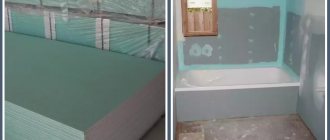
Base
Before work, it is important to fill the floor, make a screed and carry out all the work that will ensure the most even floor possible.
Between the completion of the main preparatory work and the creation of the 3D floor, experts advise you to wait a month. After the coating has been formed, it must be sanded and thoroughly vacuumed.
Preparing the base
Next, upon completion of the preparatory work, you need to prime the surface. The primer should be applied as evenly as possible, without lumps. Afterwards, start pouring the first layer. To do this, study the instructions for the polymer mixture.
Start work from the far corner of the bathroom and move towards the exit. The mixture dries quickly, it is important to remember this. Use a needle roller to avoid voids and bubbles in the coating.
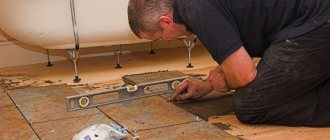
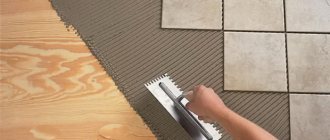
Making a concrete screed
The concrete screed is applied either to the repaired base after dismantling the old coating, or on top of the waterproofing. To create a smooth and neat surface, a “zero level” is formed using beacons. Its height from the base is 1.5 cm.
Video guide to creating a screed
Cement marked M200 is optimal for screeding. The prepared mixture is poured onto the base and leveled with a toothed roller. The use of this tool allows you to eliminate small bubbles in the solution, which can cause a deterioration in the strength of the leveling layer.
Attention: The humidity of the cement base should not exceed 4%. It can be determined experimentally by covering the screed with plastic wrap overnight and securing it with masking tape. Drops of condensation that appear overnight indicate high humidity in the base.
Combining ventilation with heating the room using a special dehumidifier helps speed up drying.
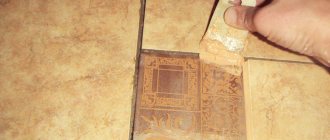
Fill
The drawing is filled with epoxy resin. After spreading the pattern over the surface in an even layer, you can fill the floor a second time. The floor takes up to a week to dry.
Afterwards, polish and vacuum, and then cover with a protective solution. So floors with a 3D effect will last up to fifteen years!
Application of a polymer layer
To install a 3D floor, one- or two-component compositions are used:
- Polyurethane - one-component ones are sold ready-made;
- Epoxy - consist of epoxy resin and hardener. To be mixed immediately before pouring.
To increase the strength of the material, quartz sand is often mixed into the epoxy resin, and colored additives are used to obtain a decorative effect. When preparing a solution for self-leveling floors, the polymer and solvent are mixed in a wide container in a 2:1 ratio.
Application of polymer coating
To obtain a composition of uniform consistency, it is better to use a construction mixer for mixing the components. Since in the process of mixing the components a chemical reaction occurs, accompanied by the release of heat, for safety reasons it is better to place the container with the mixture in a low container with cold water.
Tip: The polymer solution can set quickly; it takes no more than 30-40 minutes to harden. Therefore, when treating a large area, it is better to dilute the solution in parts.
When planning to decorate a 3D floor with a bright pattern, you can print the image in a printing house, choosing a scale that matches the area of the room. The first layer is a film with a printed image. This work is done as carefully as possible, trying not to damage the contours of the drawing. After this, the finished composition is poured in small strips onto the prepared base, allowing it to spread over the surface. The thickness of the coating is about 1.5 mm. For uniform distribution over the surface, it is better to use a squeegee - a tool equipped with a gap, the adjustment of which allows you to adjust the thickness of the self-leveling floor.
Scheme: self-leveling floor device
A needle roller will help eliminate air bubbles formed when mixing components. It is rolled on the floor, moved around the room and buried in the solution for 15-20 minutes.
Attention: All work is carried out at a temperature not lower than 15°C with windows and doors tightly closed. Fluctuations in temperature can slow down the response of components, degrading the mechanical performance of the self-leveling floor. The drying period of the self-leveling floor depends on the polymer manufacturer. On average it is several days.
Pros of 3D coating
Like every gender, 3D floors have their own tangible advantages that some might not even think about:
- The coating does not slip - this is important in conditions of constant humidity; such a coating is excellent in a house where there are small children;
- Thermal conductivity – simplifies the operation of heated floors;
- Durability - the coating is difficult to spoil, and the design will not fade over the years;
- Variety - you can choose any color and pattern. The only limitation is the imagination of the bathroom owners;
- This flooring is not afraid of fires and is resistant to fire.
Kinds
To achieve a multidimensional effect in the manufacture of facing materials, various compositions and methods of applying patterns can be used. Knowing such nuances will help you make the right choice in favor of the most suitable coating option.
Heavy-duty glass stereo tiles
To create such a coating, microlens technology, polycarbonate and glass are used. The filling of the decorative layer of 3D tiles can be different:
- 3D drawing . The thinnest transparent plates refract the incident light, a film with a pattern is located between them, and the surface of the tile is protected from mechanical stress by durable transparent polycarbonate. A 3D drawing allows you to decorate a room with views of nature, photographs of city streets in perspective, and geometric three-dimensional figures. There is no limit to the imagination of authors and designers.
- Gel . In addition to a drawing or photograph, a liquid multi-colored gel is used to fill the tiles. When pressure is applied to the surface, the gel is redistributed under the transparent coating, each time creating a new, unique pattern.
- Phosphor . Another way of original 3D decor is to use phosphor in the cavity of the tile - paint that glows in the dark. This effect is created due to the ability of particles to accumulate a charge from daylight or artificial lighting.
In complete darkness, the paint releases light energy, painting the room in the specified colors and patterns.
The multidimensional effect in stereoscopic tiles is achieved thanks to the refraction of the pattern in microlenses. The image “comes to life”, the illusion of movement is created, the picture seems to move depending on how the observer changes his position.
From all of the above, it is clear that 3D tiles should be used taking into account its visual features, that is, on the surface where it can “show” itself. Gel patterns are suitable for flooring and horizontal surfaces - tabletops, bar counters. “Live” drawings will look great both on the floor, ceiling and walls.
Embossed
Three-dimensional ceramics are the exact opposite of the previous coating. Such tiles are made using a different technology based on ceramics or reinforced concrete. The coating material is opaque; its task is not to convey a multidimensional image, but to create volume with its texture . From various options for relief coating, you can choose wood, gypsum or tiles.
In terms of texture, 3D relief tiles can have a wide variety of patterns: convex abstract hemispheres, honeycombs, wavy tints, and floral patterns. The choice of relief ceramics is also increasing due to various structure options. It can be rough to the touch, glossy or matte.
One of the disadvantages of relief ceramics is the difficulty of cleaning it. Dust and fumes accumulate in a rough surface and are more difficult to clean than a surface with a smooth base. Therefore, such tiles are not recommended for cladding kitchen walls near the stove and sink, as well as in small bathrooms . In addition, the relief tends to visually conceal space.
Tools
What will be required to complete the work? We make a checklist of the necessary tools:
- Mixer - for preparing the concrete mixture used when pouring the screed;
- Drill - to remove defects and perform basic preparatory work;
- Grinder with diamond discs - for the preparatory stage;
- A roller with needles for leveling the coating is an excellent solution for leveling the epoxy composition, allowing you to avoid voids and air cavities in the coating;
- Common brushes;
- Hammer;
- Print (vinyl based, painted version or mosaic);
- Primer – to prevent the appearance of dampness and fungus;
- Mixture based on epoxy resin - for pouring the coating;
- Paint shoes - for moving along the poured floor during the drawing stage and the second stage of filling with epoxy mixture.
When thinking about a self-leveling 3D floor in the bathroom, try to think through the design of a bathroom with a 3D floor that is suitable specifically for your family.
Follow the technology and choose a design with your heart. Such floors will last for decades and will delight their owners every day!
Installation of waterproofing
To mitigate deformation during thermal expansion of the supporting structures and the main screed, a deformation tape is laid around the perimeter of the room. When carrying out work, the humidity in the bathroom should not exceed 50%. If this value is slightly exceeded, it is worth taking care of waterproofing.
Second stage: waterproofing coating
This can be done by laying roofing material or polyethylene film with a density of 150 microns and higher. The insulating material is laid in two layers, placing them overlapping. Waterproofing is applied to the walls, covering them from the floor to a height of 8-10 cm. To insulate vertical surfaces, it is convenient to use edge tape.
Photo of 3D floors in the bathroom
Tell your friends