For what reasons can the bathroom be cold?
One of the walls in the bathroom is external - or opens into an unheated room. Usually there is external insulation of the house, but sometimes it is not always effective, and if in other rooms there may be no elementary cold bridges, or due to the radiators this deficiency is not felt there, then in an unheated bathroom everything is different.
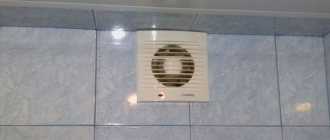
Often the cause of low temperatures is poor performance of the heated towel rail, the presence of powerful natural draft that simply removes air from the room, or the presence of cracks in wall structures. If the latter are present, it is necessary to seal, and perhaps this will be enough to prevent unnecessary heat loss.
Important! In apartment buildings, usually the walls of bathrooms and toilets are not combined with the outside, but open into the entrances. The latter are usually not heated, and in winter they are often quite cold. And if the fate is that the internal walls of the house are usually made thinner, then large heat losses are not surprising.
Preparatory work before pouring the floor
It is important to properly prepare the base before making a poured floor in the bathroom with your own hands. To do this, you should carefully dismantle the old floor covering and the leveling screed underneath.
Next, the concrete coating is carefully removed from dirt, dust and foreign objects. If there are cracks, they must be widened and filled with epoxy mortar or cement mixture, and then carefully leveled. Once the cracks have been sealed and the solution has dried, you can begin preparing the waterproofing mixture.
What are the dangers of low temperature in the bathroom?
It doesn’t matter whether we are talking about the walls in a wooden house or concrete structures - the combination of the high humidity characteristic of a bathtub with low temperatures, as well as insufficient ventilation, leads to the formation of fungus. And the active growth of mold on the walls not only spoils their appearance, but can also have a detrimental effect on human health. We wrote about this, as well as about methods of combating mold, in one of our previous articles.
Waterproofing by gluing
Waterproofing a bathroom using the gluing method will cost more than using only bitumen mastic. Yes, and doing it yourself will be more difficult. However, this method has many fans among builders.
Tip: Before laying rolled waterproofing for the bathroom, it is recommended to seal all joints with waterproof tape or coat them with mastic. For additional reliability, you can apply a thin layer of mastic to the entire surface of the floor, extending to the walls.
The material is laid overlapping. Each subsequent sheet should overlap the previous one by one-fifth of the width. In this case, it is necessary to overlap the walls by approximately 15–20 cm.
After cutting the sheet to the required size, the protective film is removed from it. The material is laid on the floor and rolled with a heavy roller. The procedure is repeated for each subsequent sheet.
The welded roll materials are preheated using a torch, rolling out gradually. When laying rolled waterproofing, the greatest difficulty is caused by the places where pipes and various communications have to be bypassed.
The holes for them should be made slightly smaller than the required size to create some kind of sides. Special rubber seals are also used. All places at such joints are additionally coated with mastic and reinforced with waterproof tape.
After installation is complete, you can immediately begin pouring the final screed under the tiles.
Tip: after laying the tiles, all seams can be treated with sealant before grouting for additional protection - this will allow you to create multi-layer waterproofing for the bathroom floor with your own hands.
Features of internal wall insulation in the bathroom
In addition to the fact that internal insulation is always less preferable than external insulation, in the case of a bathroom there is another difficulty - a high level of moisture. Consequently, the material used for this must not be afraid of moisture and not become saturated with it, reducing its performance characteristics.
Important! It is often necessary to insulate not only the walls, but also the ceiling, since large heat losses also occur through it.
In addition to this, you must also keep in mind the following:
- When insulating walls in a bathroom, the vapor permeability indicator is often violated, so you should install a good ventilation system in the room;
- Before finishing with insulation, walls should be treated with antifungal impregnations. It doesn’t matter whether we are talking about a wooden wall structure, or brick or concrete, the risk of mold formation is equally high;
- The formation of cold bridges must not be allowed, so pay close attention to the absence of gaps between the insulating boards;
- To prevent moisture from affecting the insulation, it is necessary to use a water barrier.
Preparing the base
Do-it-yourself waterproofing of a bathroom floor begins with preparatory work. What needs to be done at this stage?
Important! When choosing a primer, pay attention to its compatibility with the type of waterproofing.
After the primer has completely dried, you can begin applying or laying waterproofing materials.
We insulate the walls in the bathroom with various materials
First of all, you should abandon mineral wool, as it absorbs moisture and increases its heat transfer capacity. If you use rolled material, it is better to use basalt wool, which is mounted in a similar way, but almost does not absorb moisture. However, such material still needs an effective vapor barrier. And therefore, after reading the construction forum, you will find advice to take a closer look at other methods. Now let's look at other insulation materials:
- Styrofoam. An excellent option for the bathroom. The high fire hazard in the case of this room does not play a role, since fires almost never occur in the bathroom. But low cost, environmental friendliness and ease of installation are the undoubted advantages of this choice. Its thermal insulation qualities are excellent, and the foam is not afraid of moisture. However, the material almost does not “breathe” - it has low vapor permeability. Placed on pre-cleaned and leveled walls using an adhesive composition;
- Polyurethane foam. This polymer layer is sprayed using a special apparatus, and it is better to trust the process to professionals. Like polystyrene foam, polyurethane foam is not afraid of moisture, and its adhesion is great with almost all materials. On the material side there is high vapor permeability, fire resistance, insulating qualities and environmental friendliness. Usually sprayed on walls with a pre-arranged frame. The latter helps in further finishing;
- Warm plaster. It differs from the usual one by the presence of filler in the form of polystyrene foam, vermiculite or sawdust. The goal is to reduce thermal conductivity by using less dense materials or air cavities. The advantages are that we not only insulate, but also at the same time level the walls for further finishing. Manufacturers talk about the high thermal insulation quality of their products, but in reality the effectiveness of such plaster is not so high, and it should be applied in a thicker layer, which is more difficult and expensive;
- Cork insulation. Before use, the material is waxed to make it more moisture resistant. Mounted on pre-prepared walls using a special adhesive composition. The disadvantage of such insulation is its high price;
- Extruded polystyrene foam. The most attractive insulation for indoor and outdoor use, and not just for the bathroom. Low thermal conductivity, minimal moisture absorption, low specific gravity. It is superior to regular foam in almost every way.
Once the floor is ready, you can lay the tiles
Floor tiles and adhesive should also be purchased in excess. I also recommend buying a tile cutter; making the cut will be much more convenient; the only thing I couldn’t do was break the tiles. It kept cracking in the wrong places.
The solution to this small but unpleasant problem is the following: place the tile on the threshold along the fault line, stand on one edge of the tile, and press or hit the other - you're done.
Laying tiles on the floor is not difficult, the only thing you should pay attention to is to look at the best place to start doing it. The bathroom is not quite rectangular in shape, so I laid the tiles from the threshold and hid all the unevenness behind the bathtub.
I recommend doing the grouting at the very end of the renovation, since more than once you will have to collect water and dust, and in the end all the work will go down the drain, this is especially noticeable when using white grout.
DIY bathroom floors
How to properly and competently make a bathroom floor yourself if you simply don’t have enough money for a specialist at the moment. You can easily handle the preparation and laying of the flooring yourself.
To do this, you need to study certain information that can be found on the Internet or in specialized literature.
Next, familiarize yourself with what the flooring manufacturer recommends, while being sure to follow the technology for laying flooring in the bathroom.
First we need to decide on the design and furnishings of the bathroom, and then decide what material the bathroom floor will be made of.
It is necessary to take into account that the materials will be constantly exposed to steam and moisture. We choose a coating that is reliable and beautiful.
Insulation of the ceiling in the bathroom
Important! If we are talking about a private house, then the ideal solution would be to insulate the floor on the floor above. In this case, when finishing the ceiling directly in the bathroom, you can limit yourself to a vapor barrier followed by hanging drywall, taking into account the ventilation gap.
For interior ceiling decoration, the best material would be polystyrene foam or polystyrene foam. The process looks like this:
- The ceiling is pre-leveled, cleaned of dirt and old finishes;
- Special glue is applied to the insulation sheets. It is better to coat the elements around the perimeter with a slight deviation from the edges, as well as in the middle with a zigzag;
- The sheets are pressed against the ceiling and fixed for a minute until the glue sets. It is better to carry out further work, including processing of cracks, no less than an hour later;
- A fiberglass mesh is installed on the material and putty is applied with a waterproof compound;
- The final finish can be water-based paint. It dries quickly and withstands high humidity well.
Installation of a coating hydrobarrier
How to ensure that the waterproofing of the bathroom floor, made by yourself, is of high quality and durable? The algorithm of actions will be as follows:
Important! The waterproofing coating is applied in 2–3 layers. After applying each layer, you should take breaks to dry it, each of which should last at least a day.
After the mastic has dried, prime the surface again and then make a screed.
Laying tiles on a cement-adhesive mixture without a screed is only possible when using coating materials based on acrylic or cement.
Insulating the floor in the bathroom
This part of the bathroom can be insulated using heated floors, but we will consider the option with foam plastic. For this purpose, you should choose foam with a density of 25 kilograms per cubic meter or higher. We will mount the sheets on the floor with tile adhesive, after gluing damper tape on the sides. In this case, reinforcement in the form of a mesh is laid on top of the foam plastic and the screed is poured with a layer of at least 3 centimeters. The latter will be the basis for the final finishing - most often with tiles.
Before pouring the screed, it is important to make sure that the foam sheets do not spring, otherwise the finish here may crack in the future.
https://www.youtube.com/watch?v=xc7T99cXd6E
How many materials were required and what was the cost of the concrete screed?
For 4 square meters of toilet and bathroom floor, approximately 10 bags were required, each weighing 25 kg (the floor level rose by 4 cm). The self-leveling mixture required 3-4 bags, which raised the margins about 1 cm more. The tiles and adhesive added about another centimeter.
The cost of a concrete (cement) floor screed for a bathroom and toilet together with tiles was about 6-7 thousand rubles.
By the way, you can order the floor in the bathroom to be poured if you don’t want to bother with it yourself. It is not difficult to ensure that a high-quality screed is made in such a small area. The only thing is that not everyone takes on small amounts of work.
Pour the polymer mixture onto the base
At this stage, the poured floors in the bathroom are installed, photos of which you can see on the Internet.
First of all, you need to prepare the solution strictly according to the instructions, then stir it thoroughly until it has a homogeneous consistency. Next, the first layer of floor is poured and carefully leveled using a spatula - at this stage it is important to correctly adjust the thickness of the first layer, as well as promptly remove bubbles on the surface using a needle roller. The second and subsequent layers are poured in the same way as the first, each new layer is poured only after the previous one has dried.
You can start using the poured floor 6-12 hours after the finishing layer has dried.
The floor covering can only be fully used after a week - until then you need to be more careful.
Now you know how to make a self-leveling floor in a bathroom with your own hands - videos of the process, which you can find in abundance on the Internet, will help you clearly understand exactly how to arrange such a floor.
How to lay a floor with tiles
1Types of installation
On old tiles. Before laying tiles on the floor, vacuum the tile surface and wash it with an alkaline detergent. Chip the old tile if its surface is too smooth.
If necessary, treat the surface with a primer. If the floor is uneven, level it with a leveling mixture.
Laying: Use special glue and make sure that the new seams do not coincide with the old ones.
2Installation materials
Primer. Additive. Self-leveling leveling mixture. Apply with a roller or brush before leveling or facing.
Used on poorly absorbent porous or wooden surfaces, it creates a layer between the base and the glue. Allows you to strengthen the adhesion of the tile to the base. It is added to the adhesive to enhance its adhesiveness and ductility. Allows you to compensate for unevenness of the base. Apply using a leveler in order to achieve a smooth surface of the base.
3Marking
It is necessary to lay the tiles in such a way that each new row of tiles ends at the entrance door to the room or at the main entrance.
- 1. Laying should begin, focusing on two strictly perpendicular axes. In order to understand how to properly lay tiles, using a marking cord, draw 2 perpendicular axes on the floor, passing through the center of the room or through the center of the main entrance.
- 2. Before laying the tiles, lay the tiles, without gluing, along the drawn axes to the walls of the room.
Don't forget to take into account the width of the seams. This adhesive-free trial of tiles, called a "test run," will allow you to select the optimal tile placement and avoid unnecessary cutting. In order to understand how to lay tiles correctly, start by gluing the tiles near the wall opposite the entrance.
4Laying
5Applying glue and gluing
Laying tiles yourself using the gluing method is the easiest way to lay tiles. All steps described below (1 to 6) must be repeated for each surface area measuring 70 x 70 cm.
1. Using a trowel, apply adhesive to a small area of the floor (70 x 70 cm) and level it with a notched trowel. Hold the spatula at an angle of about 60° to distribute the adhesive evenly.
2. Place the tiles on the adhesive. To lay tiles measuring 20 x 20 cm or more, apply two layers of adhesive: on the floor and on the tile.
To glue the tiles, just apply a thin layer of glue to it using a trowel.
3. To ensure that the width of the seams is the same, use plastic crosses. The width of the joints depends on the size of the tile and the intended appearance.
4. How to lay tiles evenly? Check the flatness of the surface of the laid tiles. Level any protruding tiles using a rubber mallet or wooden block.
The wooden block should be placed on several tiles at the same time.
5. Don't forget to remove the plastic crosses before the glue hardens.
6. Remove excess glue.
7. Before grouting, leave the tiles to dry for 24 hours. Avoid walking on newly laid tiles.
6Tile cutting
1. Use a tile cutter to cut straight.
2. Place the tiles on the adhesive. To lay tiles measuring 20 x 20 cm or more, apply two layers of adhesive: on the floor and on the tile.
To glue the tiles, just apply a thin layer of glue to it using a trowel.
3. For rounded cutting: Apply adhesive tape to the surface of the tile to be cut to prevent nicking of the enamel, and drill holes along the perimeter of the intended rounding using a carbide drill bit (tungsten carbide). Then, using wire cutters or tile tongs, carefully break off the desired portion.
7Seams
At this stage of the work, the plastic crosses must be removed from the seams.
Advice! Before grouting, wipe the surface of the joints with a damp cloth to ensure better adhesion of the mixture to the joints. Using a soft rubber trowel placed at an angle, apply the grout mixture to an area of approximately 1 m2 of tile and spread it so that it completely fills seams.
After a few minutes, wipe the tiled surface with a damp sponge. Attention: Do not fill the joint between the tiles and the walls of the room with the mixture. This expansion joint will be hidden by the baseboard along the entire wall.
8Finish
9Additional tips
Use tiles from different packages at the same time to ensure a more uniform color.
If you want to understand how to lay tiles on an outdoor floor, cladding with marble or other non-standard materials, consult with our consultants, they will provide you with the necessary information. Wipe the tiles with water and cleaning agents that do not scratch the surface and do not contain grease. And then rinse with clean water.
Well, now it's time to finish the article. All the material I wanted to share has been reviewed. I hope it will be useful to you, and you will use it if you need to make a bathtub floor with your own hands. Improve your own practical skills and gain new knowledge, as they say: “It’s never too late to learn!” That's all, thank you for your attention, successful and easy repair!
Arrangement of waterproofing of the base
To ensure that the floors last as long as possible and do not deform during use, before making a matte self-leveling floor in the bathroom, it is necessary to install waterproofing.
For better adhesion of the waterproofing to the prepared concrete base, it is necessary to first apply a primer - this is done in two layers. The second layer is applied after the first has completely dried. When the second layer of soil is dry, it is necessary to prepare a mixture for waterproofing (if it is done using coating insulation).
The waterproofing mixture is carefully applied to the surface of the primed base with a brush or roller, carefully leveled, and bubbles are simultaneously removed using a needle roller.
Next, a special tape is applied to the insulation surface, which in turn is also coated with the mixture. It is necessary to apply two layers, the first 4-6 hours after the first has dried. It is possible to continue work on pouring the polymer floor only a day after the waterproofing of the base has been installed.
Do-it-yourself self-leveling flooring in the bathroom, videos of which can be found in large quantities on the Internet, will not look high quality if you neglect the arrangement of the screed. Instructions for forming a screed:
After the screed has dried, you can make a poured floor in the bathroom.
Self-leveling floor
Self-leveling floors appeared quite recently and quickly earned a high reputation. This type of flooring is distinguished by its strength, durability, does not conduct electricity, is resistant to abrasion, has no seams, the design of such a floor can be made at the discretion of the customer, even the most intricate or unimaginable. For example, it could be a 3D drawing.