One of the seemingly insoluble problems that arise when renovating a bathroom has always been and remains the problem of arranging the floor and flooring in the room. For a concrete base, the choice of floor finishing options is quite large; you can use traditional tiles or even warm floors, but what to put on a wooden floor in the bathroom, given the fact that wood and water have been and remain irreconcilable opponents?
What should be the flooring in the bathroom?
Almost any good quality wooden floor has a universal character; it can be installed in any residential building, be it a house or an apartment, a cottage or a guest house, except for a bathroom. Putting a simple wooden covering in a bathroom means it will rot in a few months. Therefore, it is necessary to change the structure of the floor, for example, lay an additional layer of plastic or ceramic on a waterproof base, or use a material for a wooden floor that is not susceptible to the destructive effects of water.
But, before laying decorative tiles or any other floor finishing option, it is worth considering some specific qualities of the wooden base:
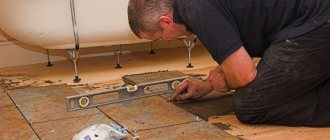
- It will be necessary to strengthen the floorboards, which sag under the weight of a person, even if plywood or OSB sheets are placed on top of them. The deflection may not be noticeable during daily use, but it becomes obvious the first time you try to lay hard tiles;
- A wood base is not the best option for a floor; in addition to the fact that it needs to be protected from rotting, the structure of the material can change in size even with the slightest change in humidity, not to mention the fact that wooden floors can simply arch in the humid atmosphere of the bathroom ;
- All of the above is a serious problem that has to be solved. For example, when arranging a bathroom in a wooden house where there are no concrete floors, the floorboards lying on the beams are, at best, protected by a layer of basalt thermal insulation. In such conditions, it is not enough to put a waterproofing layer; you will need to carry out a whole range of protective measures.
Therefore, no matter what material you plan to put on a wooden base, the bathroom floor must be protected from water by all available means, namely:
- Lay a double layer of waterproofing;
- Thermally insulate wooden parts from sources of water vapor;
- Provide high-quality ventilation for the subfloor, with air intake from the nearest dry room.
If you simply lay down a decorative coating with waterproofing, then due to the water vapor accumulating in the space around the wooden floorboards, even under the waterproofing layer, the wood will rot and rot.
Advice! Instead of ventilation ducts, several kilograms of powder with good absorption of water vapor can be placed under wooden floors. This will help remove most of the water and protect the insulation from waterlogging.
It is the leakage of water vapor through the corner seams that causes rapid failure of the insulation. Paired with an absorber, you can safely put crushed expanded clay or even mineral wool. All this will make wooden floors not only durable, but also safe.
Oddly enough, there is another way to preserve wood, for example, by installing a heating system in the base of the floor. Any heated floor on a wooden base in the bathroom can be used not only for heating, but also for drying some of the condensation and remaining water on the surface of the floorboards.
What to make a wooden ceiling from in residential premises
In conditions of normal humidity, the choice of materials is limited only by considerations of decorativeness, ease of installation and budget. Optimal results are achieved when finishing ceilings:
• Standard (12-25 mm in thickness, 150 in width, with tenons up to 5 mm) and eurolining (12.5 mm, up to 96 mm in width, with a deeper tongue-and-groove connection), mounted in one layer in any direction. This group is represented by materials “C”, “B”, “A” and extra quality class, used in dry residential premises without any restrictions. • Tongue-and-groove or parquet floorboards no more than 25 mm thick. • Block house - rounded varieties of lining, mainly chosen when arranging apartment premises in eco-styles. • Special ceiling panels made of solid wood.
Advice! It is best to use calm lining for the ceiling if you have a limited budget.
An alternative to solid profiled materials is a regular unedged board (subject to the removal of bark or surface treatment), stuffed in 2 layers because of the cracks, sanded or laminated plywood, combined with wooden fillets or patterned elements, panels based on wood chips or shavings with coatings from veneer, wooden wallpaper.
At the request of the owners, the wooden ceilings in the apartment are decorated with thick timber or false beams.
The length of the moldings is selected based on the size of the room and the selected installation scheme. Due to limited space in the apartment, it is not recommended to buy excessively long products, but solid stripes on the ceiling look more stylish and beautiful. As a rule, lining, board or plank is purchased with a 30 cm margin or delivered sawn.
What modern materials can be placed on wood in the bathroom?
There are not many options for flooring that can be used in the humid atmosphere of a bathroom, since material manufacturers focus primarily on concrete bases, which are the most common in modern house construction.
If you exclude the most extreme method of dismantling the wooden floor, boards and joists, you can put a covering on the floor in three basic versions:
- Screed the wooden bathroom floors and lay tiles;
- Lay waterproof laminate or linoleum;
- Leave the old plank version as the subfloor of the bathroom, on top of which lay a wooden panel made of moisture-resistant wood.
For your information! A wooden floor, made using modern tracing paper from traditional and new materials, has stunning beauty, while in terms of durability and consumer qualities it is not inferior to ceramics and plastic.
Disadvantages of tongue and groove larch boards
The main disadvantage of natural wood coating is its high cost. The price category is justified by the increased durability of the material. Read about all types of tongue and groove boards and their installation.
Untreated larch tongue and groove board
Another drawback is the low fire resistance characteristic of all types of wood. The flammability of the floor can be reduced by using special impregnations that make the wood resistant to fire.
Classic wooden flooring in the bathroom
To avoid problems with warping and rotting of wooden structures, the floor in the bathroom is made in the image and likeness of the structure used in the steam room of a bathhouse or the deck of a fishing schooner. In fact, the wooden floor is double:
- The lower subfloor is also called wet; it collects all the water, dirt and residual detergents that fall on the bathroom floor;
- The upper wooden floor should be made from waterproof types of wood, preferably ash or oak.
Larch is considered to be the most resistant, but in practice there are not many people who want to install and walk on a dark and not very attractive surface in the bathroom, so bleached and tinted oak is best suited.
The lower subfloor must be thoroughly waterproofed. To do this, you can use liquid rubber as the first layer, or a special coating butyl-styrene waterproofing used to insulate the bowls of swimming pools, ponds and large concrete tanks.
If the subfloor is made of boards, then before installing waterproofing, it is necessary to sew the floorboards at the joints with nails or screws, remove the paint and sand the surface with coarse sandpaper.
The base of the subfloor is impregnated with an antiseptic and thoroughly dried. If the base is concrete, then you will need to insulate the bathroom floor with polystyrene foam, lay down moisture-resistant plywood, install support joists for the finished wooden floor in the bathroom, and only after that apply coating waterproofing.
After the insulation layer has dried, all that remains is to lay the top finishing floor. Pre-planed boards treated with waterproof varnish are laid on joists on tenons or wooden pins. You cannot hit nails or screw screws into wood. Even if you put a layer of protective varnish on top, the attachment points will rust.
The result is a very beautiful and durable bathroom floor.
Varieties and prices
There are different categories of flooring that vary in cost. Belonging to a particular grade depends on the quality of the wood, the presence of knots, and the tendency to crack. The price also depends on the thickness of the floor board:
| Wood type | Price range (RUB per m2) |
| Extra | 1350 — 2500 |
| Prima | 1250 — 2300 |
| Category A | 1050 — 2000 |
| Category B | 900 — 1700 |
| Category C | 700 – 900 |
Wood finish options for bathroom floors
The age-old problem of how and what to put on the bathroom floor can be solved in a fairly simple way. To create the most beautiful, warm and environmentally friendly coating, you only need to use special types of wood-based materials or waterproof wood species:
- Larch;
- Oak;
- Ash;
- Thermostatic wood.
All of the listed types of wood cope well with water. You only need to waterproof the base using coating mastic and lay a thick plastic film. The wooden floor can be laid on slats or glued directly to the base.
To prevent moisture from seeping through the joints, molten mastic based on pine resin is poured into the seams. Next, you will need to put a fiber cord into the joints and fill the seams with polyurethane varnish or epoxy glue. The service life of a wooden floor in a bathroom is at least 10 years.
Caring for larch boards
Larch floors require proper care and periodic renewal of the surface. Layed wood needs to be refreshed on average every three years. The frequency of repairs and the consumption of varnish for larch floors are determined by the traffic flow of the room.
Varnishing a larch floor using a roller
You can update not the entire surface of the room at a time, but only certain areas. The application of the protective agent is preceded by cleaning the worn-out floor area.
It is advisable to carry out cleaning without household chemicals. It is better to wash the floor not with a wet, but with a slightly dampened cloth. Then it is advisable to wipe the surface dry. If wet cleaning is not required, simply clean the surface with a vacuum cleaner. Rugs help preserve the floor and reduce abrasion.
Wooden floor and ceramic tiles
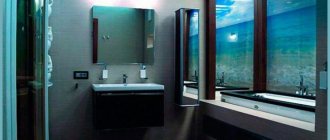
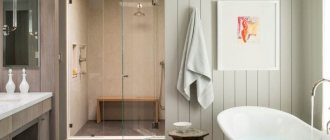
Wooden flooring in the bathroom is not designed for heavy loads; wood can be laid on the floor only for large bathrooms where there is good ventilation and airing of the room, ensuring the effective removal of water vapor and surface moisture.
If the dimensions of the room are within 2x3 m, or the room is used quite often so that the moisture on the walls and floor does not have time to dry out, in this case it is best to lay tiles. Laying tiles over a wood bathroom floor will require significantly more effort and expense, but it is the only way to make the most durable bathroom floor possible.
If it is important for the room to maintain the appearance of a wooden floor, you can select and lay porcelain tiles with imitation parquet or floorboards. To ensure that the seams do not reveal the real origin of the flooring material, you will need to lay tiles with a seam width of 0.5-0.8 mm. In this case, it will look like real floorboards.
Wooden ceiling in an apartment and a house, pros and cons
Let's consider the issue of a wooden ceiling in an apartment, the pros and cons.
The advantages of this design of ceilings in an apartment include:
• Good indicators of breathability, insulation, strength and environmental safety. • Attractive and original appearance. Wood paneling makes the room comfortable and stylish, differing favorably in this regard from faceless painted ceilings. • Possibility of hiding heat and sound insulating materials, ventilation ducts, lamp bases, protective ducts for electrical wiring and other communications. • Simplicity of installation and painting operations. • Variety of arrangement and decoration options. Wooden ceilings can be solid, slatted, coffered, decorated with beams and glass inserts. Their surfaces are covered with both transparent or tinted paints and opaque paints with any color and degree of gloss. A properly equipped wooden ceiling will last at least 15 years if the antiseptic protection and paint coating are updated every 5-7 years.
Attention! My personal opinion is that a wooden ceiling, especially in a house, is the solution that will allow your interior to age gracefully; this is exactly what all the right designers strive for, so that your interior ages gracefully over time.
The disadvantages of wooden ceilings are manifested in:
• High costs for lumber from valuable wood species and means for their decoration and protection. • Reducing the height of the walls by at least 5 cm, risks visually reducing the space. • Increased requirements for protection from dampness, biological hazards and fire. • Low compatibility with a number of modern apartment design styles.
The last limitation is eliminated with the correct selection of the type and color of the wooden ceiling. Thus, the problem of visual reduction of space is solved by partially finishing the ceiling or transitioning wood paneling to the walls, using light wood types or painting it white.
But in general, this method of finishing is more appropriate when decorating an apartment in eco, chalet, Provence, country, Japanese and Scandinavian style interiors than for high-tech or modern.
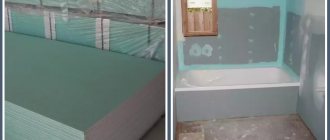
How to lay tiles on a wood bathroom floor
The principle of arranging waterproofing under tiles is no different from the previous method, the only difference being that two layers will have to be laid under the tiles. The main problem of how to make the base rigid and flat can be solved in three ways:
- Laying self-leveling floors based on ready-mixes;
- Cement-sand screed;
- Lay cement bonded particle board.
Cement screed and self-leveling gypsum-acrylic coatings are very simple to make, but their reliability for wooden floors is questioned by many experts. It is best to lay ready-made cement particle boards on waterproofed floorboards.
If you plan to install a warm electric floor in the room, then instead of DSP you can use flat slate. Today this is the most reliable and durable type of tile base.
The sheets must be laid in two layers with the seams coated with coating waterproofing. Serpyanka tape must be placed at the joints. A 2 mm gap is left around the perimeter of the room, which is filled with polyethylene and filled with silicone. All that remains is to apply a deep penetration primer to the base and lay the ceramic tiles using traditional technology.
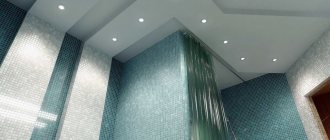
What to make a wooden ceiling from in wet rooms
Unlike dry and well-lit living rooms, in rooms with high humidity there is no point in using either top-class wood (the number of knots or similar defects is not as important as the quality of processing of edges, grooves or tenons) or budget lumber from the outer layers of blanks .
Profiled products made from the core of Canadian red cedar (arborvitae), larch or alder have suitable characteristics.
A budget-friendly, but not ideal, alternative is lining made from solid linden (not darkening, but prone to streaking) or aspen (silvering over time without rotting or warping).
It is better to avoid using darkening oak, beech, ash or loose pine in humid areas.
In addition to the type of wood and the quality of processing, when choosing lumber for a bathroom, attention is paid to its moisture level. The use of materials that are dried in natural conditions is fraught with warping of the ceiling in the very first months of service.
The best moisture resistance indicators are lining that meets European standards DIN 68126/86 with a moisture content of no more than 8-12%, parquet boards and planks.
According to the technology, these materials are used in combination with waxes, pastes and waterproof varnishes.
Advice! It is best to use larch materials for ceilings in bathrooms and toilets.
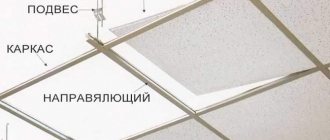
Technology for installing wooden ceilings in an apartment
Work begins with drawing up a layout of the lining or its analogues (transverse, longitudinal or diagonal depending on the area of the room) and calculating the material. Conventionally, the entire installation process is divided into separate stages:
• Surface preparation (removal of old materials, filling of cracks, rough leveling, priming). • Marking the frame attachment points and preparing its elements. • Fastening the frame from the profile and slats to the base. • Inspection, cutting and fixing of lamellas. • Finishing corners and joints, installing lamps and baseboards.