If you have reached the stage of finishing the ceiling, the repair may take some time. The reason is the choice of facing material. The fact is that ceiling tiles for the bathroom are presented in a wide range of textures, textures, and colors, and there are also a lot of materials for making cladding. If you want to do it the old fashioned way - with tiles, it is practical and reasonable, but a little heavy - ceramics have an increased mass, which is not always possible in our homes. We will understand the entire range, quality and practical indicators of ceiling tiles for bathrooms.
What is the difference between ceiling tiles?
Depending on the manufacturing method, ceiling tiles will differ significantly from each other. This article, as you probably understand, will only talk about tiles glued to the ceiling - not about suspended structures.
So, foam sheets that are obtained by casting have a significant thickness (up to one and a half centimeters), as a result of which they can have a more expressive relief, whereas on three-millimeter extruded plates you won’t get much speed with the “stucco molding”.
Next is strength. Despite the fact that “injection”, at first glance, looks noticeably more powerful, this is not at all reality. A bathroom ceiling lined with extruded tiles is more resistant to damage, easier to clean, and generally withstands operating loads noticeably better.
But on the other hand, thin laminated material is more demanding on the quality of the rough base, while cast tiles can easily hide minor defects.
IMPORTANT
Many owners are worried about the possibility of painting laminated ceilings. There is a myth that such a surface cannot be painted. This opinion is wrong. Extruded ceiling tiles are painted no worse than their cast counterparts, and most often even noticeably better, that is, the process itself requires noticeably less labor from the master.
Recommendations for selection
Craftsmen recommend adhering to the following rules for choosing ceiling tiles:
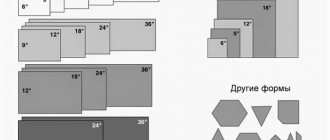
- To ensure the quality of the material, check the configuration and dimensions of the products in the store. So, for square tiles, all sides should be equal, and the corners should be strictly right. Place several tiles together and evaluate how their dimensions and shape match.
- Assess the strength of the slabs (this only applies to foam products). To do this, take one element by the corner and hold it in a horizontal position. The plate should not bend or deform. Poor quality products break or crumble after this procedure.
- Be sure to evaluate the surface of the product. The drawing should be clear and bold. There should be no defects on the surface - chips, scratches, creases and other imperfections.
- When purchasing painted or laminated boards, pay attention to the lot number. Buy slabs from the same batch, because the color of the coating may vary slightly.
As you can see, among a large assortment of ceiling tiles, you can always choose a product that, with its operational and technical characteristics, suits the difficult conditions of the bathroom and the interior of the room. It is important to be guided not only by the criteria of aesthetic appeal, but also to take into account the properties of the material.
How long will it last?
“How long will tiles glued to the bathroom ceiling last?” This or a similar question can often be read on any construction forum or heard in any construction hypermarket. The answers are very varied - it all depends on the operating conditions of the material and the presence of a protective coating on it.
Expanded polystyrene has a design life of 50 years. Elevated temperature, humidity, aggressive environment, and mechanical stress can significantly reduce the life expectancy of this material, so the promises of PR people should be treated with a certain degree of caution.
Foam tiles
To decorate the sanitary room, you must use only high-quality ceiling tiles.
The best option would be tiles made from durable and reliable extruded foam or polystyrene foam under high pressure conditions.
An important feature of this material is the presence of a laminated protective coating that prevents the penetration of moisture.
Original foam ceiling
It must be remembered that sealants or adhesives used for gluing elements must be resistant to high humidity.
It is best to use Moment Liquid Nails adhesive or a special Titan adhesive for gluing foam-based tiles. Before gluing such elements, it is advisable to carry out not only preliminary preparation of the ceiling surface, but also to perform priming, which will improve adhesion.
Can I use cheap pressed tiles for a bathroom ceiling?
The question of whether it is possible to use cheap tiles in bathrooms should be rephrased a little: “Will such a ceiling turn out to be really cheap”? The fact is that:
- Firstly, budget ceiling material is very fragile and you will definitely end up with excess consumption of building materials precisely because of its damage during transportation or installation.
- Secondly, due to its “tenderness”, the ceiling under such material will have to be “licked” without fail, and this is an additional expense.
- Thirdly, pressed ceiling tiles, unlike laminated ones, must be painted, and with high-quality paint at that. At the same time, it is the costs associated with the purchase of paints and varnishes that can constitute the main item in the repair budget.
As a result, cheap foam panels can often result in a rather expensive ceiling. However, if you approach the problem “smartly” and carry out all the construction work yourself, with maximum diligence and responsibility, then you can really save money on pressed polystyrene foam tiles.
How to choose quality products
Injection products with ideal geometry
Be sure to pay attention to the following parameters to choose truly high-quality ceiling tiles:
- Polystyrene bathroom products have a smooth surface, without sagging or depressions. If there are such defects, then this will indicate a violation of technology;
- You need to pay close attention to the edges of the tiles - this is very important if you want a seamless ceiling. Tiles with defective edges cannot be aligned smoothly, as a result of which the appearance of the ceiling will suffer;
- Look at the inside, assessing the structure of the material - high-quality seamless tiles are made from polystyrene raw materials with granules without voids or inclusions;
- Seamless tiles must be extremely durable. Grab one of the corners and try to hold it - if it works, then everything is fine.
Which glue to choose?
Another important problem that a home master faces when deciding to install not a PVC ceiling in the bathroom, but ordinary polystyrene tiles is the choice of a good glue.
Let's make a reservation right away - there are no universal solutions. There are adhesive mixtures that are best suited for your situation and those that will not be rational to use.
- It is for the bathroom that the logical requirement for the glue will be its moisture resistance. A composition that loses its properties under the influence of moisture is definitely not needed in the bathroom.
- Another mandatory characteristic for the mounting mixture will be its chemical neutrality to styrene. That is, you need to be sure that the glue will not have a destructive effect on the ceiling tiles.
Then everything is strictly individual. So, for an uneven limestone surface, you will need a thick-layer adhesive that would “cling” well to both the plaster and the foam. An example would be a putty paste like Shitroka.
But for finishing a smooth plasterboard sheet, thin-layer polymer adhesive, such as, for example, “Dragon”, or polyvinyl acetate “Bustilate” and “PVA” is suitable.
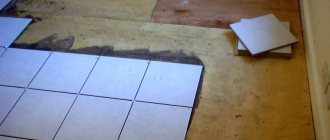
Installation work
These works require precision and accuracy. They should be performed in the following sequence:
- Draw the plane of the ceiling, because extruded ceiling tiles (like any other) are glued to it strictly according to the intended guidelines. First, determine the number of entire panels that can fit in one row.
For example, the tile has a size of 33x33cm, and the ceiling width is 150 cm. This means that 4 whole tiles (132 cm) will fit in one row. They will have 5 connecting seams of 3 mm each, we retreat from the walls by 5 mm (total we get 2.5 cm). We determine the width of the outer tiles - (150 -132-2.5): 2 = 7.75 cm.
- Start installing the panels. Control the thickness of the seam using crosses, which have a thickness starting from 1 mm. When choosing element thickness, consider the following points:
- the presence of a seam makes the surface more expressive;
- thin crosses are used for perfect tiles;
- if you are a beginner, then the best option would be devices with a thickness of 3 mm or more.
- Mark the ceiling based on the calculation received. Since you can start work either from the center or from one of the edges, draw a control line in one of these places. It is done with a painting cord or chokeline.
Installing ceiling tiles requires patience and care - Apply the adhesive to the tiles using a comb. Use the same spatula, as each one has different tooth sizes. You can apply glue to the ceiling, not ceramic products, although material manufacturers advise lubricating both.
- During the installation process, make sure that the tiles are laid evenly. Use a long building level or rule for control.
Ceiling tiles - repair in an hour!
The statement that you can make a ceiling from polystyrene foam tiles in just a couple of hours is somewhat exaggerated. Installation of facing material is not the whole job.
There are stages such as
- Preparation,
- finishing (painting),
- installation itself
It is really possible to install a ceiling made of polystyrene material in just an hour. A standard bathroom consists of 10-12 ceiling elements; gluing them will not take much time, even if you have never done such work before.
Advantages
The main advantage of such a ceiling covering is that it is very easy to glue foam tiles to the ceiling, and even an untrained person can handle it.
In addition, the following advantages can be noted:
- Light weight allows the tiles to be used on ceilings of any design.
- The tile has sound and heat insulating qualities, and is not afraid of changes in temperature and humidity.
- The light weight of the tiles makes it possible to use simple glue that does not have ultra-high strength, and, therefore, a high price.
- This ceiling covering will allow you to save not only on material, but also on work - because it can be done independently.
ATTENTION! Foam ceiling tiles can change their physical properties (melt) when exposed to high temperatures, so installing powerful lamps in close proximity to them is not recommended. It is better to use pendant lamps and place them at a distance of at least 20 cm from the surface of the tile. The tile can withstand the temperature of hot water without changing its shape, so it can come into contact with the pipes through which heating occurs.
Installation of skirting boards
After painting is completed, you can begin gluing the ceiling plinth. This matter has its own tricks that make the work easier:
- It is more difficult to hold a baseboard against a wall than a tile because it is longer. Therefore, the plinth, greased with glue and put in place, is fixed with small nails every half meter, driving them into the wall. After a day, the nails can be removed and the holes from them can be sealed with acrylic putty.
- It is very difficult to join parts of the plinth that meet in the corners of the room. To make them look beautiful, you need to use a miter box - a special carpentry device for cutting material at an angle. The angle is set to 45 degrees. After gluing the plinth, the cracks in the corners are coated with acrylic putty.
- The final stage of work is painting the baseboards using water-based or acrylic paint.
Stretch ceiling
The design of suspended ceilings is considered an elite option for ceiling decor. The most modern option. It is relatively new on the ceiling coverings market, but has already gained popularity. In 3 out of 5 rooms, a suspended ceiling is now installed. An easy way to finish the ceiling space. The downside is the high cost. Nevertheless, there are a lot of advantages.
Ceilings with stretch coating have an ideal surface and are able to hide asymmetrical shapes in a room, hide all errors, and hide communications.
If trouble happens to you, your neighbors flood you, then rest assured that your suspended ceiling will withstand such a blow of fate. The coating can withstand large masses.
The material is moisture-resistant, so you can make suspended ceilings not only in the bedroom, but also in the kitchen or bathrooms.
The variety of designs will satisfy any fantasy. Any color, texture. Or photo printing, various effects, decorations, etc.
And the main disadvantages of such coverage are quite insignificant compared to the advantages.
Stretch ceilings are considered the most expensive type of ceiling finishing.
To install such a coating, you must have special equipment (gas gun). Accordingly, only a professional with the appropriate skills can perform such work.
This coating is very susceptible to mechanical damage. It is very easy to accidentally puncture it and thereby ruin it.
Looking at all the variety of options for finishing the ceiling, you realize that the design of the ceiling space has long ceased to be a routine job, but has become the most basic touches in the design of a room, often requiring the help of a real designer.
We hope our article will help you make your choice in favor of the best option for decorating the ceiling covering just for you. After all, as you can see, the choice of ceilings for the room is very large. You can find not only a beautiful design option, but also one that suits your wallet.
Preparation
Before you start working with foam ceiling tiles, it is necessary to carry out surface preparation work.
- The package of tiles must be opened several hours before starting work. During this time, it will relieve itself of the stress deformation that appears as a result of packaging in polyethylene, and will take on the temperature and humidity of the room where it will be glued.
- The old coating from the ceiling does not need to be removed if it is smooth and durable, in other cases it is necessary to get rid of it. The tiles will not stick to whitewash; they must be removed without fail.
- If there are significant defects on the ceiling - potholes, cracks, they need to be filled. Small defects do not need to be repaired; the tiles will cover them.
- Before you start gluing the tiles, the ceiling must be primed with a roller to ensure better adhesion of the two surfaces. The primer should dry for at least three hours, or even better, four. After this, you can begin marking.
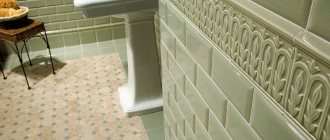
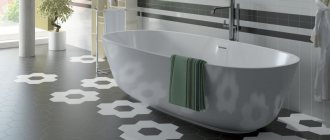
Design and texture
Seamless tiles are guaranteed to be a beautiful solution for decorating the ceiling surface in any interior. The tiles have many texture options, and the color solutions attract with their diversity. Therefore, it is worth thinking carefully about the compatibility of texture and color so that the result does not disappoint and is acceptable in each specific case.
In particular, this applies to small rooms, the decoration and design of which should visually increase their area. Colored products can serve as an excellent assistant in solving this problem.
There are a number of win-win ways to visually increase the space of a room, which are used by many designers:
- a combination of tiles and mirror panels on the ceiling, as well as on the walls or wardrobes;
- decorating walls with wallpaper in light colors;
- decorating the ceiling with light-colored tiles.
As for harmonious color compatibility, for example, it is better to combine blue with warm colors, and it is better not to use bright red shades when decorating ceilings, since they create the effect of a low ceiling in the room.
Elegant stucco molding looks very luxurious on the ceiling, and seamless tiles can imitate such decor.
In this case, it is better to opt for light and warm shades.
A wide range of colors and textures of seamless tiles allows you to decorate the ceiling in any style, which is an obvious advantage of the material.
Extruded tiles are presented in a wide variety of various types of decor, among which imitation of natural materials, mirror surfaces, as well as modern 3D format are in great demand.
It is impossible to list all the options for patterns, textures and colors that exist today, since the range is constantly updated with new models, shapes and shades. This trend is only gaining momentum every year, so it is already quite difficult to find someone with similar ceiling tiles.
Supporters of classical trends in interior design prefer materials with a smooth surface - such models are always relevant. Among the traditional options, one can highlight patterns that repeat sea waves, or a checkerboard pattern made with rhombuses or triangles. Floral arrangements are also consistently popular, because the beauty of small buds or large blooming flowers can captivate buyers of ceiling tiles.
Seamless tiles perfectly replicate brickwork and are designed with various abstractions, both with deep and surface relief. White tiles with a gold or silver sheen amaze with their luxury.
Natural materials always remain in trend, which is why ceiling tiles that replicate the texture of wood or marble are receiving increased attention. For maximum similarity, tiles are usually painted in a natural color.
Tool
You need few tools to work with foam tiles, and they are all quite accessible.
You will need:
- painting cord for marking the ceiling before gluing;
- scissors or a special mounting knife for cutting tiles;
- spatula (as well as putty) for leveling the surface of the ceiling before gluing;
- application roller and primer;
- thread, tape measure and pencil for marking tiles;
- a brush (or gun) for glue, a clean cloth to remove excess glue.
Marking
Before gluing foam tiles to the ceiling, you need to outline how they will be positioned. This is done as follows:
- Determine the center of the ceiling. To do this, draw diagonals from the corners of the room through the ceiling, and mark the center of their intersection. This must be done in any case, whether you are going to glue the tiles parallel to the walls, or diagonally to them.
- On each wall, find and mark the middle, and stretch a thread between the parallel walls - from one mark to another. The thread should pass through the center point.
- Perhaps the walls will be of different lengths, and the thread will move - then you will have to make an adjustment.
- Draw lines along the stretched threads with a pencil - they will serve as a guide when gluing the tiles.