Affordable PVC tiles for the bathroom have become an excellent alternative to expensive ceramics. It is unpretentious when tiling bathrooms and looks great indoors, imitating cladding with natural tiles or wood. Its range is wide and allows you to choose any color, shade and pattern.
Only buyers should take into account some features so that there are no difficulties during facing work and its further operation.
What is vinyl tile made from?
Vinyl floor tiles are a durable multi-layer finishing material. Previously, PVC products were used for kitchen and bathroom floors.
Vinyl floor in the bathroom
The new generation tile contains pigment throughout its entire thickness, so traces of abrasion and mechanical damage are not noticeable on it. The front surface is protected by a transparent PVC layer that neutralizes the effects of ultraviolet radiation and a transparent wear-resistant polyurethane layer. When installed correctly, vinyl flooring can last up to 20 years.
Vinyl tiles are available in thicknesses starting from 2 mm and are divided into classes depending on wear resistance.
Advantages and disadvantages of finishing material
In application, plastic panels will delight you with many advantages:
- ease of installation and cleaning;
- a variety of designs imitating any natural materials, ceramic tiles, natural stone and more;
- affordable price;
- the ability to change a boring pattern or build a new panel without great expense;
- The moisture-resistant material of PVC panels does not harm others.
When choosing vinyl tiles for the bathroom, you need to pay attention to the negative aspects of the building material:
- The panels for the walls are mounted on a sheathing that takes 4 cm from the wall, so the size of the room is reduced.
- The cost of additional sealing increases.
- Weak strength, so if defects occur, the panel will need to be replaced completely.
- Do not leave open areas for moisture to penetrate.
- Heat can deform PVC products, so it must be installed no closer than 30 cm to a lamp, water heater, or radiator.
Many buyers increasingly prefer this building material, because it has more advantages than disadvantages. With its help, finishing of bathrooms is carried out quickly and efficiently.
Types of Vinyl Flooring
There are two types of vinyl finishing materials available – vinyl laminate and rolls. The fastening also varies. Vinyl can be secured with locks, like parquet, or glued to a base, like laminate.
In addition, vinyl coatings differ in manufacturing technology and composition.
- Vinyl pressed tile is a mixture of vinyl, resins, stabilizers and plasticizers. On average, the thickness of such a coating is 3 mm.
- Vinyl quartz tile is a mixture of vinyl, quartz and additives.
In this case, the amount of quartz reaches 80%. This coating is durable, hard, and does not conduct electricity. Thickness from 1.5 to 3.5 mm. Vinyl tiles in different colors - Self-adhesive vinyl tile is a flooring with an adhesive backing. At the same price range, such tiles are installed faster and easier.
Distinctive Parameters
The difference between such tiles in terms of selling price is small. For example, ordinary plastic tiles will cost three hundred rubles per square meter, and imported ones will cost about six hundred rubles. In addition, you need to purchase the necessary glue and joint compound for the job. In order to begin installing ceramic tiles, you will need to hire a professional to level the walls first - this is an additional cost of about one hundred - two hundred rubles per square, and payment for the work performed on laying ceramics will be in the amount of two hundred fifty - three hundred rubles per one square meter. In contrast, plastic panels will cost only one hundred and sixty rubles per piece, and two hundred and forty rubles per square. Panel installation at financial costs will be about one hundred twenty - one hundred and forty rubles per square. The main advantage is that you can install these panels yourself.
After all, before carrying out installation work, alignment of the walls is not required. You just need to have a good level at which to set the frame, which is fixed to the ceiling and walls. When this work has been successfully completed, the direct installation of these panels begins.
There are certain rules for fastening plastic panels. This is what is required to constantly adhere to this order:
- The first panel is attached from the very beginning;
- Then, using locks, the second panel is connected to the first.
The remaining panels are installed in this order. When decorating bathrooms with plastic panels, you can save money and, in addition, carry out repairs in a fairly short amount of time.
The production of plastic panels has a very wide range of colors. This type of material used for cladding work has unique positive aspects. The main advantage is the property that makes it possible to process this material with any substances, even chemicals.
Properties of vinyl tiles
Vinyl flooring has many advantages. It is durable, withstands high mechanical loads and chemical exposure. At the same time, scuffs and scratches are not noticeable on the vinyl.
This material is non-hygroscopic. It does not absorb moisture and is not deformed under its influence, and therefore does not create a breeding ground for the formation of fungus and mold. Vinyl tiles are non-slip even when wet.
Laying such tiles can be done by a non-professional. The easiest way to install self-adhesive tiles. Vinyl floor repair usually involves replacing defective areas with new ones.
Vinyl has sound and heat insulation properties, which compares favorably with ceramics.
For wet areas, vinyl tiles are an excellent choice.
Additional advantages:
- Easy to maintain and use;
- Fire safety;
- Environmental friendliness;
- Huge selection of colors and textures.
The latter property allows you to choose tiles for almost any interior.
Caring for polymer tiles
The facing tiles will retain their appearance for a long time if they are provided with good care. A few tips will help increase service life:
- During wet cleaning, it is necessary to use special detergents or a simple soap solution with the addition of an antistatic agent to reduce the electrical resistivity inherent in this type of material.
- To remove dirt, you should avoid using dry powders containing strong organic solvents and abrasives.
- Do not allow the surface to come into contact with wet newspapers, as stains from printing ink may remain.
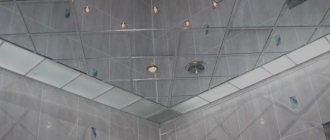
- Wipe off dust from the ceiling with a slightly dampened cloth or use a vacuum cleaner with a brush.
- Do not direct the stream at the cladding surface when using Dichlorvos or Insect Prima.
- Felt pads glued to furniture legs will protect their PVC floor covering from damage.
- It is better to place heating devices and lamps at a distance of at least 30 cm from the surface lined with plastic tiles.
- Periodic treatment with mastic and wax will protect against premature cracking, loss of color and destruction.
- To increase the service life of tile flooring, it should be treated with a polymer dispersion or waterproof emulsion.
Compliance with all of the recommendations listed will make it easier to care for the polymer coating and help maintain its original appearance for a long time.
Decorative vinyl tiles
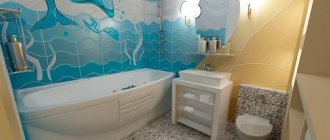
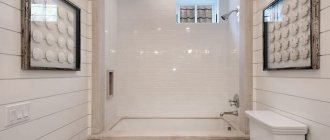
Thanks to modern production technologies, vinyl coverings can be selected to suit any design. There are vinyl imitations of all kinds of natural materials on the market. The floor or wall in the bathroom, made in the form of sea pebbles, looks original. Thanks to the surface transparent layers, the pattern on the wall or floor will look three-dimensional.
A wide range of sizes is also convenient. The tiles are available in square or rectangular shapes. The imitation border looks impressive. Smooth, clear edges allow you to obtain continuous smooth surfaces.
Laying vinyl tiles with adhesive
Features of PVC tiles and its main types
In the manufacture of plastic tile coverings, various types of materials are used with the obligatory addition of polyvinyl chloride (PVC). In production, 2 types of cladding are obtained from different mixtures using pressing:
- single-layer (homogeneous);
- multilayer (heterogeneous).
Thanks to polyvinyl chloride in the surface of single-layer products, good strength is achieved, in no way inferior to multi-layer tiles. However, in the choice of colors, a heterogeneous coating for bathroom cladding has a significant advantage.
Manufacturers use quartz vinyl in the manufacture of plastic floor coverings to enhance wear resistance. It contains fine river sand without foreign impurities and pure shell rock. With their help, PVC finishing acquires the properties of a durable coating, which is important for the floor.
The range of vinyl tiles for ceilings, walls, and floors is quite wide. It varies in shape, relief and size. With its help you can create a stylish interior in your shower. The material is difficult to distinguish from natural wood or stone. Designers use this advantage in places where difficulties arise when finishing with natural materials.
Vinyl floor installation
The installation process determines the chosen type of fastening: glue or using locks.
Installation using the locking method is not much different from laying laminate flooring. Therefore, let us dwell in more detail on laying tiles using an adhesive, mastic.
Installation is carried out on dry concrete screed, chipboard, plywood or fiberboard floors. The smoother the floor, the stronger the contact between the two surfaces. The tiles are joined so that straight lines are formed, or tied together (like brickwork).
To begin, mark a central point in the room. Moving from this point towards the wall, determine the place from which installation begins. First, the tiles are laid out on a dry surface to calculate their number and determine the number and size of the cut tiles.
The mastic is applied with a trowel. Laying tiles begins with the marking line. The quality of installation of the entire floor depends on the accuracy of the placement of the first tile.
Self Adhesive Vinyl Tiles
First, whole tiles are laid out. For the remaining unfilled spaces, tiles of the appropriate size are marked and cut. In order to cut the tile evenly, use a ruler to mark the cutting line. Then make an incision with a knife and break it off. After this, the tiles are laid in place on the mastic.
In damp rooms, it is recommended to seal the gaps between the floor and baseboards. This can be done conveniently with silicone sealant using a dispenser syringe. This procedure can be carried out carefully using masking tape applied along the baseboard and on the edge of the floor. After the sealant has hardened, the tape is removed.
How to tile walls
Before you begin decorating vinyl wall tiles, you need to prepare the surface. So, the walls must be thoroughly cleaned of remnants of the previous material - tiles, wallpaper, panels, etc. Then you need to level the walls.
Important! Vinyl tiles are flexible. Therefore, it will repeat not only the contours of the decorative elements, but also all the unevenness of the walls. Therefore, it should only be placed on the most flat surface possible.
Then the primer is applied. If this room has not yet been renovated, and smooth, fresh plaster has been applied to the walls, you can do without priming and stick the tiles directly onto it. You can apply the material to a plywood base or drywall. If a primer is still needed, then it must be thoroughly dried before gluing the tiles.
Self-adhesive vinyl tiles are a finishing material that even a beginner can handle. No need to fuss with glue, mortar, or grout. It is enough to remove the protective layer and literally “stick” the material where it is needed. But in order for the result to please you, it is better to first apply markings to the walls; you should not rely entirely on your eye. Accordingly, you will need a tape measure, a corner and a pencil.
To install regular vinyl tiles, you will need glue, preferably acrylic, since its composition is closest to the composition of the material itself. It is applied in a thin layer to the base of the tiles. If you need to cut the material into pieces, ordinary, strong scissors can handle this.
The corners in the room are not always straight, unfortunately, therefore, in order to avoid obvious distortions, many advise starting to glue the material from the center of the wall and then in a circle. After all the tiles have been laid, they need to be rolled with a roller and the protruding glue must be removed. You can wash the walls two days after finishing. The entire installation process can be seen in the video below.
|
Styling tips
Important points:
- The surface on which the tiles are laid must be dry and level.
- In damp rooms, after installation, the joints between the floor and the baseboards must be sealed. This is necessary to prevent water from getting under the flooring.
- When applying mastic, it is necessary to periodically remove its excess before it hardens.
Thus, vinyl tiles are a universal covering for walls and floors. Due to its price and practicality, it is not inferior in popularity to other types of coating.
Installation
If you have decided that plastic tiles will become the basis for repairing the ceiling or walls of your bathroom, then you have made a fairly correct, successful choice. At least this material is not much inferior to tiles, and in some respects it is even superior to ceramic tiles.
The installation process looks quite simple and does not require special skills or knowledge. The work is completed in several steps.
- First, you need to properly treat the surfaces using a special primer, which will provide protection against the formation of mold and mildew.
- It’s not superfluous to install additional thermal insulation, as well as a waterproofing layer. Even if it is mainly laid on the floor, sometimes it comes in very handy on the walls.
- After treating the surface, you need to fix the slats on it with a distance between them of no more than 50 centimeters. Sheets of drywall are fixed to the slats. Be sure to make sure that the drywall is moisture-resistant, otherwise your work will not last long, since the drywall will begin to deteriorate under the influence of moisture. And with it comes your entire wall.
- Treating the plasterboard surface with a special primer will ensure effective adhesion of plastic boards to walls or ceilings.
- Choose a specialized adhesive designed specifically for installing tiles made of plastic.
- After installation is completed, which can be done literally in one day, since there is no need to wait a day for reliable adhesion of each subsequent two rows (this is a prerequisite for installing ceramic tiles), it is necessary to carry out additional waterproofing. For this purpose, the joint is coated with sealants, as well as special grouts.
In fact, this is the entire installation process, consisting of fairly simple steps. After installation is completed, you must wait a few days, and then you are allowed to begin active use of the plumbing unit.
Location of plastic tiles
Unfortunately, this material cannot be called ideal. Even if the tiles are not afraid of moisture, steam, temperature changes due to changes in water flows in the taps, the relationship between the plastic material and heated surfaces is still not the best.
The point is that it is undesirable to lay plastic tiles in close proximity to elements that heat up to high temperatures. We are talking about hot water pipeline areas, as well as heating radiators and heated towel rails.
This problem can be solved, but partially. So, in the case of a heated towel rail, the distance from the tubes to the tiled surface should be at least 4 centimeters. If this condition can be met, then it is permissible to use plastic material in the dryer area.
As for the area of valves and pipes, it is better to immediately provide for the possibility of finishing with a different material. Ceramic tiles made in the same style, color or shade as plastic tiles are ideal.
Of course, you can go the other way by providing some kind of zoning for the bathroom. So, the part where the washbasin and bathtub are located should be finished with ceramics, and the rest of the area with plastic. This will allow you to seriously save on the purchase of materials, and will also reduce work time, since dealing with ceramics is much more difficult.
There are many options today, so choosing among all this variety is the main task of any owner of an apartment or house where a plumbing repair is planned.
Whether you choose plastic tiles or follow the classic scheme using tiles is an individual decision for everyone. We just want to say that ceramic tiles are far from the only finishing option that will look great and also serve you and your bathroom, toilet or any other room for a long time.
When decorating walls and floors inside a house, tiles are of great importance. Thanks to the variety of finishing options, which have different properties and characteristics, it becomes possible to use tiles even for wet rooms. As a person who is directly involved in laying tiles, I want to talk about how walls are tiled. We will look at options such as plastic and cork tiles, and also find out whether it is possible to glue them to OSB and how to do it correctly.
Bathroom tiles
Installation of PVC tiles on the wall
Plastic panels can imitate any natural material. But in order for the finishing to be of high quality, it should be done strictly according to technology. This is the only way that decorative PVC elements will make the apartment cozy and attractive.
Material calculation
It is not difficult to make the necessary calculations. Typically, wall tiles are produced in widths of 25 cm and lengths of 3 meters. In addition, a special corner profile is used for joints in corners. To determine exactly how many slats will be needed, divide the perimeter of the room by the width of the slats and add 10%.
This is what it looks like in a simple example:
- room parameters - 5x6 m;
- ceiling height - 2.5 m.
Based on these data, the perimeter of the room is 30 m. Now we need to divide this figure by the width of the panel 30: 0.25 = 120 pieces. Add 10%, you get 132 pieces.
Necessary tool
Before you start finishing the walls, you should prepare special tools:
- jigsaw or small circular saw for cutting material;
- miter box - for the ability to accurately cut elements at a certain angle;
- stapler - if the sheathing is wooden;
- rubber mallet;
- measuring instruments and pencil;
- construction level;
- corner;
- self-tapping screws, dowel-nails, clamps;
- perforator;
- screwdriver
Preparing walls for cladding
Before you start covering the surface, it should be carefully prepared:
- remove all old trim;
- mask all defects - cracks and potholes;
- treat with antiseptic compounds and deep penetration primer.
If you plan to install the panels with glue, you will have to level the surface using a plaster compound, which will take some time to dry.
Laying sequence
Tiles can be installed in several ways:
- vertical;
- diagonally;
- horizontally.
The most popular method of wall cladding, which involves vertical installation of panels.
First you need to build a frame from a profile or wooden blocks.
The work algorithm is as follows:
Using a construction level, mark the plane. To do this, cut a straight line on the ceiling to install the guide element.- Using a plumb line, place marks on the floor perpendicular to the line on the ceiling and draw a line.
- Attach the guide profile to the dowel-nails in 25 cm increments on the ceiling and floor surface.
- Cut the wall profile into elements of the required length.
- Install them at intervals of 50 cm from each other, screwing the “seeds” from the bottom and top onto metal self-tapping screws. If the distance from the sheathing to the base is large, then it is necessary to use straight hangers - they will prevent the elements from sagging. For 1 profile of 2.5 meters, 3 pieces are enough.
- If the height of the room is large, install jumpers from the rack profile in a checkerboard pattern - this will give the structure the necessary rigidity.
- Installation of the panels begins from the corner, screwing them onto the profile with self-tapping screws (it is important to align the first element strictly level, since the quality and appearance of the entire finish depends on this).
- After installing the first lamella, insert the second element into the groove and secure it.
- Approaching the opposite corner, trim the plank if necessary.
- Mount a corner profile that will close the cut and make the joining of the elements more attractive.
- The remaining walls are finished in the same way as the first. After all the walls are lined with PVC panels, install plinths on the floor and ceiling.
When installing panels without a corner plastic profile, the joints in the corners can be masked with transparent or white sealant.
Step-by-step instructions for laying PVC tiles in the bathroom
Laying PVC tiles is a fairly simple task that anyone can handle, but it requires compliance with some rules and step-by-step instructions for performing the work.
How to calculate the number of tiles?
Calculating the required number of tiles can be done in several ways. First you need to calculate the area of the room: take the necessary measurements, sum up the length of all the walls and multiply the result by the height. From the resulting figure, subtract the area of door and window openings, then determine the area of one tile (multiply the length by the width) and divide the area of the bathroom by the area of the tile. In the same way, you can calculate the number of tiles needed for the floor covering. Do not forget that in both cases you need to add 10% to the result for the margin.
Calculation of the number of PVC tiles
How to choose tile adhesive?
A high-quality adhesive mixture is one of the defining characteristics of bathroom finishing. To install PVC tiles, you can use any glue, but special compounds (dispersion, two-component, contact) are best suited for these purposes. When choosing an adhesive, it is necessary to take into account a number of factors, including the material from which the base is made, the dimensions of the tiles, the presence of a heating system, etc.
| Glue type | Peculiarities | Manufacturers and brands |
Two-component (reactive) | Made on the basis of two components (for example, polyurethane and epoxy resin), it is resistant to moisture, plasticity and a high degree of adhesion | Thomsit R 710, Mapei Adesilex G19, Keralastic T |
Contact | The main components are synthetic rubber and solvent. The composition can be used in places with a high degree of load and on uneven surfaces. It sets quickly, which may create some inconvenience during the work process. | Forbo 233 Eurosol Contact, THOMSIT K 182, KIILTO KESTOPREN |
Dispersive | It consists of water, acrylic and special additives that improve the performance characteristics of the mixture. It is non-toxic, practically odorless, but its degree of adhesion is lower than that of contact or two-component mixtures | THOMSIT UK 400, Forbo 528, Homakoll 208/248, KIILTO GRIP |
It is also necessary to take into account that the conditions in the bathroom are not the most favorable, so the mixture should include fungicidal additives that prevent the formation of mold and mildew.
Important: for bathroom tiling, it is recommended to use tiles with adhesion of at least 0.5 MPa - you can see this characteristic on the packaging.
Kiilto Grip Specification. File for download
Kiilto Grip
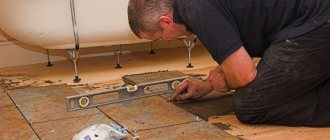
Stage one. Preparing the base
In order for the finishing of the bathroom to be durable and attractive, you need to prepare the base accordingly - it should be as smooth as possible, without strong differences and cracks. The complexity and amount of work depends on the material from which the base is made, as well as on its condition.
Base for laying PVC tiles
- Tree. If the base is wooden, you should make sure that there are no rotten boards and large (more than 2 mm) differences or serious defects. If necessary, they should be sealed with a special putty, and then the wood should be treated with an antiseptic. If the condition of the floor covering is poor, it is better to use fiberboard or chipboard slabs, which are fastened with ordinary self-tapping screws at intervals of 40-50 cm.
- Concrete. The concrete surface must also be smooth, without cracks or waves (small defects can be filled with gypsum putty). If the base has strong differences in height, it should be well leveled. In the case of flooring, you can use a regular cement-sand mixture or a composition for self-leveling floors, and on the walls you will need to make lathing or cover them with plasterboard.
Laminate, linoleum, and carpet cannot serve as a basis for laying PVC tiles. Remove these coverings in advance
You can check the evenness of the base with a level
Cracks and unevenness on the floor must be repaired with a repair mixture.
Clean the room to remove dust and dirt
- Tile. It is not necessary to rip out the old tile finish - if it is still reliable and strong enough, PVC tiles can be laid on top. Otherwise, remove the tiles and level the floor.
You can lay PVC tiles on tiles
Features of laying PVC tiles on tiles
It is better to remove the baseboards and doors so that they do not interfere with work. Immediately before laying the tiles, the surface must be thoroughly cleaned of dust, dirt and stains, then treated with a primer and dried. This significantly increases the level of adhesion, making the cladding durable and attractive.
Stage two. Preparing tools
To lay PVC tiles you will need the following set of tools:
- notched trowel (it is not recommended to use a regular tile trowel with rectangular teeth);
- industrial dryer;
- tape measure and construction ruler;
- construction knife with replaceable blades;
- mallet or heavy hammer.
A set of necessary tools
In addition, you will need to prepare twine for marking the future finish and a stationery knife, which will be used to remove excess glue from the surface.
For reference: if you don’t find a notched trowel in the store, you can make it yourself. You can take a regular spatula (40 cm wide), place it on a hard surface and make several cuts with a triangular file (2-3 movements in one place will be enough).
Stage three. Surface marking
PVC tiles can be laid on the floor in different ways: in rows, diagonally, herringbone, deck, etc. Sometimes work starts from the far wall, but professionals advise starting installation from the center. To do this, pull the ropes from opposite corners and find the point of their intersection. Draw lines from it to the walls or corners - it is along these lines that the installation will take place.
It is convenient to carry out markings using a tape measure or tapping cord
Marking scheme
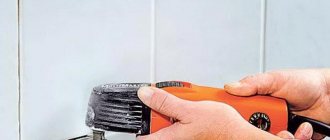
After this, you need to lay out the material as it will be laid, cutting off individual tiles in the right places. Trimming is done with a construction knife, and to make cutting easier, you can preheat the tiles with a construction hairdryer.
Tile cutting
It is not recommended to break the product at the cut, otherwise the edge will turn out uneven and it will be very difficult to fit the tiles together tightly. When all the tiles are laid out, they need to be numbered on the back side - this will allow you to maintain the correct order when laying.
When installing tiles on walls, it is better to start from the bottom row and move up. After laying 2-3 rows, the glue must be allowed to “set”, otherwise the material will slide under the weight of the upper rows. To ensure that all cladding elements lie evenly horizontally and vertically, the wall can be pre-drawn.
Stage four. Laying tiles
Before laying PVC tiles, they need to be allowed to rest indoors at a temperature of 18-22 degrees on a flat surface.
Recommendation. Leave the PVC tiles in the room for 24 hours for the material to adapt
In addition, you need to make sure that the base is absolutely clean and dry, after which you can proceed directly to installation.
Step 1. Prepare the adhesive mixture as indicated in the instructions.
Prepare the glue. For office premises or for home, the adhesive mixture is selected individually
Step 2. Using a spatula, apply a thin layer of glue to the surface of the base to the width of 2 and the length of 4-5 tiles.
Applying glue
The glue must be applied evenly
Step 3. Apply glue to the back side of the tiles and lay them according to the previously outlined pattern, tightly joining the edges together. At the same time, you need to make sure that no debris or air gets under them, otherwise the cladding elements will not stick tightly. Some manufacturers draw an arrow on the back of the tile that indicates in which direction the products should be laid to maintain the desired visual effect.
Laying tiles
Step 4. Tap the laid tiles with a mallet, paying special attention to the edges. Excess glue should be removed as quickly as possible with a utility knife (after drying, it will be almost impossible to get rid of it). It is not recommended to use rags for these purposes, as they will only spread the glue over the surface.
Using a rolling roller for better adhesion of PVC tiles
Step 5. After laying 2-3 square meters, roll the tiles with a roller to press them as much as possible to the base.
Step 6. Lastly, the gaps near the walls are filled, and it is recommended to leave a gap of 5-10 mm wide between the tiles and the wall for thermal expansion of the material.
It is better to leave a small compensation gap between the PVC tiles and the wall
Gaps are filled with sealant
After work, surfaces lined with PVC tiles should be left for 24-72 hours (depending on the brand of glue), after which it is recommended to wash them with soapy water.
Wait for the glue to dry
Attention: when laying PVC tiles, the tightness of the elements is very important - the elements must adhere to the surface as tightly as possible so that mold or mildew does not form under them.
How to properly lay PVC tiles in the bathroom is described in the video.
Laying tiles with interlocking joints
If tiles with a locking connection are used for cladding, the elements should be joined together as provided for by the design, snapping the locks. The tiles are cut from the reverse side.
Check each tile for defects
The tiles do not need to be fixed to the floor with glue or screws
Start installation from the corner of the room. Lay the tiles so that the protrusion of the locks faces you
Leave a gap of 5 mm
Join tile locks
Cut the last tile of the first row to length, allowing for a 5mm gap
Rows of tiles are laid offset
Insert the tile into the longitudinal lock, snap it into place
When installing, do not use a hammer to avoid damaging the locking joint.
Lay tiles throughout the room
The last row of tiles may need to be sawn lengthwise
Installation of PVC tiles is easy and quick
Laying self-adhesive tiles
This type of material has an adhesive side protected by a paper backing. The algorithm for performing the work (preparing the base, marking the surface) is no different from laying tiles with glue. You need to remove the paper, then press the tile tightly to the surface and wait a few minutes.
Self-adhesive PVC tiles
Attention: self-adhesive PVC tiles have an expiration date, after which the adhesive side may lose its characteristics, as a result of which the cladding will quickly fall off.
Why PVC tiles
Often this finishing material is used to decorate bathrooms, toilets and kitchen spaces. It is used for several reasons:
- hermetic installation of the material prevents the penetration of dampness onto the surface of the walls and ceiling, and mold does not form;
- plastic tiles are lightweight, so they do not exert additional load on the base. For example, if you use foam plastic tiles on the ceiling, then to install them you do not need to mount a frame - they are glued directly to the base;
- wall slats have different textures and colors. You can choose a material that imitates tiles, stone, wood and other natural surfaces, or decorate a beautiful panel with an exotic pattern on the wall.
PVC panels are an excellent option if the renovation budget is limited.