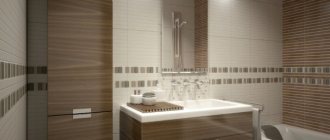
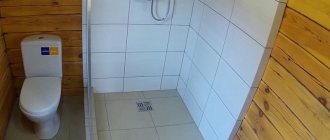
Stalinka is a fairly common type of layout. The first associations that come to mind: comfort, large area and spacious bathroom. Created according to a standard design, Stalinist apartments had both combined and separate bathrooms. At the same time, the bathroom area was from 10 sq.m.
The layout was created in the form of squares 3*3 sq.m. and rectangular shape 2.7 * 3.3 sq.m. These are common sizes, but aspect ratios may vary.
Work plan
First you need to carefully assess the condition of the bathroom and draw up a renovation plan. The main and most expensive item is replacing plumbing and sewer pipes. Over the years of operation, the pipes rusted and became clogged, the paint peeled off, and indelible rust stains appeared around the risers. Dismantling cast iron elements will require a lot of effort and time, and care must be taken not to disrupt the general sewage system in the house.
Assessing the condition of the walls is very simple: if the surface has minor defects, small cracks or chips, but the finish is holding strong, this means that cosmetic repairs can be done. If the cracks in the walls are deep, the finishing is falling off in large pieces, or there are noticeable irregularities, then more serious measures will be required. You also need to carefully examine the condition of the floor in the room.
Bathroom layout drawing.
It is not necessary to change a durable and even coating; it is enough to update it with paint. Major repairs and complete replacement of the covering are necessary where the floor creaks heavily underfoot, the cladding is only partially present, or there are deep gouges and cracks. Very often it is necessary not only to change the coating, but also to make a new screed, otherwise the new floor will quickly become unusable.
Ceiling decoration has its own nuances. Since Stalinka has ceilings of at least 3 meters high, any surface defects can be covered with plasterboard or a tensile structure. When choosing finishing materials, it is important to take into account the high humidity of the room, so that later you do not have to redo everything again. Drywall, putty, paint, primer - all this should be as waterproof as possible.
Plumbing, furniture and accessories
The main piece of furniture is, of course, the bath itself, which can have not only different sizes, but also the shape itself. The main thing is that the font is comfortable, functional, “works out” the area occupied by itself and creates a harmonious space. Often the bathtub is replaced with a shower stall or shower corner, which saves even more space.
Furniture is used to a minimum, that is, you will have to learn to make do with shelves, open hanging shelving, a vanity cabinet and corner sections. Other accessories are usually represented by holders for towels, toilet paper, glasses, faucets, baskets, candles and other decorative and functional paraphernalia.
Preparing the premises
After drawing up the plan, they proceed directly to dismantling. First, turn off the water in the system, take out the bathtub and, using a welding machine or grinder, cut off all the pipes and risers that have become unusable. Do not knock out the remains of pipes from the walls and floor too intensively, so as not to damage the communications in the house. Having closed the sewer holes to prevent debris from entering, remove the old finish from the ceiling, walls and floor. It is recommended to clean the surfaces down to the concrete base, then the new finish will stick much more reliably. Layers of paint and plaster are removed with a metal brush; tiles and ceramic tiles are easier to remove using a hammer drill. To reduce the amount of dust, the walls and ceiling need to be moistened.
If a complete replacement of communications is being carried out, you should decide in advance how the pipes will be attached. Most often, longitudinal grooves are punched into the walls, in which the pipeline will be located. There is another way: the riser pipes are transferred from the bathroom to the plumbing area of the toilet, then there is no need to punch grooves in the walls. When the surfaces are cleaned, you can begin the main process - leveling the floor and walls.
Floor
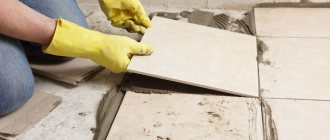
The design of a Stalinka bathtub suggests a small selection of floor coverings. The cheapest option is linoleum. However, from an aesthetic and practical point of view, it is clearly inferior to other, more modern finishing materials, so experts recommend choosing the same ceramic tiles for bathroom design. It is produced in a wide range and can be of various configurations and sizes. This makes it possible to purchase the most suitable option, simplify the installation process and limit yourself to a minimum of waste.
Waterproofing and screed
Bathroom waterproofing diagram.
The bathroom floor needs better waterproofing than all other rooms. This will not help avoid flooding, but will reduce damage to a minimum. Waterproofing is laid before the floor is poured with mortar, directly onto the floor slabs. To work you will need:
- putty or tile adhesive;
- primer;
- waterproofing material;
- putty knife.
You need to start work by cleaning the surface from dust and sealing the joints. Mix the putty and fill it with all existing cracks, gaps between the slabs and near the walls. Instead of putty, you can use tile adhesive: it firmly adheres to the surface and prevents cracks from expanding. When the putty has dried, the base is coated with a primer. Now you need to cover the floor with waterproofing film. It is laid so that it completely covers the floor and extends onto the walls by about 20 cm around the entire perimeter. Since Stalinka bathrooms are spacious, a whole piece of film may not be enough, and you will have to add another piece. The material must be overlapped and the seam taped.
There is a more effective and durable method of waterproofing - coating the base with a special mixture. To do this, the joints between the slabs and along the perimeter of the room are taped with waterproofing tape, and the base is primed. The dry mixture is diluted with water in a 1:1 ratio, stirred thoroughly and spread over the floor in a not too thin layer. The walls are also covered by 10-15 cm, trying not to leave gaps. After 6 hours, the coating is repeated. You can start making the screed only after a day, when the waterproofing is completely dry.
For screed in the bathroom you should prepare:
Bathroom floor screed diagram.
- solution container;
- cement M 400;
- sand;
- drill with attachment;
- level;
- rule;
- slats for lighthouses.
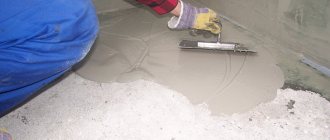
To prepare a high-quality solution, you need to pour 1 part of cement into a container, add 3 parts of sand, stir well and add water in small portions. Using a drill, knead the mixture until smooth and creamy. Before pouring the mortar, beacons are installed on the floor, securing them with a small amount of mortar with alabaster. The distance between the slats should not exceed 1 m; the slats are installed so that they are in the same horizontal plane.
The solution is poured onto the floor between the beacons and leveled with a rule so that it reaches the top edge of the slats. The recommended thickness of the screed is about 4-5 cm; When pouring, it is necessary to distribute the mixture evenly over the entire area, avoiding the formation of voids.
While the screed is standing and compacting, it should be periodically moistened to avoid cracking.
You can walk on it within a day, but it is better not to put any load on the base for at least 3-4 days. It is recommended to lay the topcoat after 28 days.
What law governs the installation?
The main documents that you need to rely on when installing gas equipment in your home today are:
- Code of Rules SP 62.13330.211 “Gas distribution systems”. Updated version of SNiP 42-01-2002;
- Code of Rules SP 60.13330.2012 “Heating, ventilation and air conditioning”. Updated version of SNiP 01/31/2003.
Sections of the “Building Codes and Regulations” issued before 2003 concerning the use of geysers in multi-apartment residential buildings are considered not relevant, so you can ignore them.
Restoration of ceiling and walls
Bathroom ceiling primer scheme.
While the base of the floor dries, you can continue renovating the bathroom. It is necessary to start from the ceiling, otherwise it is easy to damage the coating on the walls. The ceiling has already been cleaned down to the concrete base, so now you need to remove dust, seal cracks, prime and putty the surface. The primer for these purposes is of deep penetration with a water-repellent effect; the putty must also be water-resistant. If the ceiling is covered with plasterboard, after sealing the cracks, the entire surface is primed and covered with one layer of putty. After this, markings are made for the profiles and drywall is attached.
If the ceiling is not planned to be covered with anything, the surface treatment is carried out more carefully. The first layer of putty should be sanded with sandpaper and primed again. Next, apply finishing putty, sand again and prime the surface. You can start painting after the initial finishing of the walls, then you won’t have to wash the ceiling of dust and plaster.
In Stalin, the walls were made primarily of brick, but the internal partitions consisted of boards. When renovating a bathroom, you should replace rotten wood structures with plasterboard partitions. Load-bearing walls should be leveled with cement-based plaster and then covered with tiles, decorative plaster or simply painted. But all finishing work should be carried out only after new communications have been laid. So, first the wall is leveled with mortar, dried, and then the excess plaster is removed and primed. While the ceiling and walls were being put in order, the screed had time to set well, so it was time to pull out the beacons and rub the seams with mortar.
Features of installation in the proper room
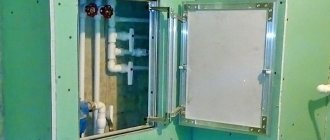
The geyser is the main problem during renovation; you can make the bathroom modern and beautiful by hiding or decorating this equipment. Turn this item into an interesting interior design.
An easy way is to buy a designer speaker model in a certain shade. There are also more sophisticated ones - with patterns and designs. The only and main drawback is, of course, the price, but you simply don’t want to hide such a speaker.
Financial costs play an important role in the choice of repair . If you don’t want to spend money, you can simply decorate the geyser, but major repairs will be significantly expensive.
Another option that will help maintain a unified style is to disguise the speaker in the closet. It will not stand out, it will give the room the necessary comfort and the awkwardness of the unit will no longer irritate you.
Plumbing installation
Bathroom pipe installation diagram.
Now the bathroom is ready for finishing, it’s time to start arranging communications. The hot water supply riser in a Stalin apartment usually passes through the bathroom from the upper apartment to the lower one, which is not very convenient for residents. Cold water pipes are walled up in the wall behind the toilet, at the location of the plumbing closet. For convenience, you can move the riser from the bathroom to the technical area by replacing cast iron pipes with plastic ones. When cutting the riser, pieces of pipe up to 4 cm high are left under the ceiling and above the floor. Special corners are welded to them, in which new pipes are attached. After this, the wiring is connected in the plumbing cabinet and closed.
If moving the riser is not planned, the pipes are simply replaced with new ones and secured in prepared grooves on the walls.
You can strengthen communications using clamps. If the old pipes are in good condition, there is no need to increase repair costs and replace them. In this case, it is enough to clean them with a wire brush, prime and paint.
Then all that remains is to bring in the bathtub and install it correctly, and then connect all the necessary systems.
Combined or separate bathroom in a Stalin building?
If the space allows, and in Stalin buildings it did, then it is better to have a separate bathroom. Thus, a family with many people living in it will not be able to depend on each other. The advantage of a separate toilet is also the elimination of unpleasant odors from penetrating outside the room.
The disadvantages of a separate bathroom include the need to spend more materials during renovations than with a combined one. These are the same doors and wall cladding. However, if the owners are not embarrassed by the simultaneous use of a bathroom as a hygiene room and a toilet, then it is quite possible to make a large and spacious room that can accommodate all the necessary elements: a bathtub, washbasin, toilet, bidet, linen closet and hanger.
Medium renovation
Is the floor creaking? Will need repairs
The following often happens to floors, especially in Stalinist apartments: in a certain place they begin to creak and sag underfoot. This means that the lag has rotted in this place or the board itself has become unusable. The defect that has arisen will have to be eliminated. If the floor is made of edged boards, then simply remove the nails from the faulty floorboard and remove it. We examine the board. If it is in good working order, then the lag is to blame. In this case, there are several actions you can take.
Replacing damaged boards
Change the lag completely. To do this, however, you will have to dismantle the entire floor. If the log has become unusable in only one place, then there is no need to disassemble it. In a problem area, you can place a lining under the joist. Then adjust the floor level. You can cut out the problem area and select a piece of timber of the same size. Then install it and lay the board. Next, level the floor. We fasten the board to the joist using self-tapping screws or screw nails.
Video - Repairing logs in Stalin buildings
Before moving on to the next step, let's return once again to the faulty board. If the board has become unusable, you will have to choose another one that matches it in size. The board must first be dried and treated with an antiseptic. We lay it in place of the faulty board and fasten it to the joists.
Dependence of the distance between the logs on the size of the board, type of wood, span length of the floor joists
If the floor is made of floor slats, the faulty board can be cut out with a jigsaw and replaced with an edged board of the same size. If the lag under the lath has become unusable, you can either cut out the lath or completely dismantle the floor. Then remove the defective lag and install a new one. The lath floor is disassembled as follows: first, the nails are removed, then each lath is moved to the side, freed from the groove of the next lath. It is removed from the logs and put aside. This is done until the entire floor is dismantled.
Replacing floor boards
Replacing floor boards
Replacing floor boards
Now let's get back to the final step of the repair. After the boards or slats are laid, leveled, and the gaps between them are filled with putty, the floors can be sanded. We have already described this operation when we talked about minor repairs.
Finally, painting the floors. We have already described this procedure above. Therefore, we will not return to what has already been said.
The very last and most enjoyable stage is cleaning. We remove all dust and dirt. We wash the floors, preferably with cold water. Then they will acquire shine.