Do-it-yourself bathroom renovation costs 1.5-2 times less than the same renovation done by a team of workers. Therefore, if you have the necessary knowledge, skill, free time and want to save money, then this option is for you. But remember that inexpensive DIY bathroom renovations may be inferior in quality to renovations done by professionals.
How to decide where to start renovating your bathroom
Bathroom renovations can be divided into 2 types:
- Unplanned. Such repairs are necessary under force majeure circumstances, for example, a pipe burst in the bathroom, or the neighbors flooded the apartment. Unplanned repair work also includes replacing the bathtub itself, since in most cases this will entail the installation of new pipes, plumbing, and tiles;
- Planned. In turn, the planned renovation of the bathroom, depending on the complexity and financial costs, is divided into capital and cosmetic. The second option is easier and cheaper to start and do, but this repair can only be carried out if the water supply and plumbing are in good working order, and you also need to make sure that there is no fungus. During cosmetic repairs, floor, wall and ceiling coverings are changed, and faucets are updated. For a more global repair, although not a major one, serious preparation and a systematic approach to work are needed.
If you want to start renovating the bathroom in your home, first think about what it should be like and how it should look. Initially, you should decide which color scheme will prevail in the room, since renovation involves choosing a specific layout and color scheme. You should have a clear vision of the future room before your eyes. Common bathroom colors in Moscow are blue and blue, peach and beige, as well as plain soft colors.
Next, you should decide on the materials that will be used in the repair. Traditional finishing methods are:
- tile;
- porcelain stoneware;
- mosaic;
- plastic panels.
If you decide to change your plumbing fixtures, start by choosing a new fixture option, having studied everything in advance.
You need to start taking measurements of the room, write down the width, length and height, and calculate the area. A plan drawn up in advance will also help you determine the location of all devices. It is difficult to change something at the end of the renovation, so everything needs to be thought through from the beginning.
Sequence of work
In order to carry out a quality bathroom renovation, you need to carefully study the details of each stage. Now we will briefly describe the sequence of these stages, note the key points and talk about the finishing options that are most popular.
In what order are repairs carried out?
- A detailed project plan is drawn up. The design of the bathroom is being developed, both the main points and minor details are thought through. In accordance with the drawn up project, the repair budget is planned - specific materials are selected in the required quantity.
- Materials are purchased. This is one of the most important stages - here you need to carefully compare offers from different manufacturers and prices, study reviews of materials, and understand what the difference between them is.
- The repair itself begins with the floor . The old covering is removed, a new screed is poured, waterproofing is applied, on top of which a new porcelain stoneware floor is laid.
- After installing the floor, it is recommended to do electrical wiring - in order to replace it, you need access to the rough walls. After installing the wiring, you can proceed directly to wall cladding. Also, if the water supply and sewerage pipes are planned to be hidden, at this stage they need to be “walled up” in the walls.
- Then they move on to the ceiling and ventilation. Since the bathroom is a room with high humidity, it is fundamentally important not only to install a new ventilation grille, but also to make sure that the ventilation hole has sufficient draft.
- The penultimate stage is the installation of water and sewer pipes - if they pass over the walls.
- And finally, the very last step is to install fresh fixtures and other equipment in the updated bathroom.
See also: Interior design of a bathroom, size 5 sq. m.
Let's look at each point in a little more detail.
Selection of plumbing fixtures and finishing materials for bathroom renovations
Having decided to renovate the bathroom themselves, the owners think about where to start and purchase new plumbing equipment and finishing materials. However, one of the most important stages in starting a renovation is determining the color scheme, calculating the required amount of finishing materials and choosing the brand and type of appliances.
Before the renovation itself and the purchase of plumbing, you need to make sure whether it will suit your room in size and color.
Recommended articles on this topic:
- Arrangement of a small apartment
- Stages of renovation in an apartment
- Turnkey cosmetic repairs
It is best to purchase all appliances and finishing materials in one store, since if you purchase a large number of goods you may be offered a good discount. To start renovating a bathroom, it is preferable to purchase everything in advance, since it will be inconvenient to look for missing materials, again wasting time.
Where to start next when renovating a bathroom?
The renovation should begin by disassembling the room. The best option is that there is nothing left in the bathroom except concrete walls and a floor with a ceiling. It may also be useful to have professional help in dismantling or replacing sewer pipes and hot and cold water systems.
- Removing tiles
- Removing plaster
- Dismantling in a concrete sanitary cabin
- Dismantling the screed
- Removing paint from walls
Old Soviet-era plaster comes off the bathroom walls the easiest way. It is distinguished by a thick layer of cement. To start dismantling it, any tool that can work as a lever will be useful; it is not necessary to have a hammer drill at home. Disassembling such tiles will not take much time; they come off the walls very easily.
It is also easy to dismantle tiles laid with lime for painting. Any tool, such as a chisel, will be useful for this.
The most difficult thing is to start dismantling old tiles laid on mortar without an expiration date. This is a very strong and reliable material that stays very tightly in the bathroom. It is especially durable if the previous repair was done conscientiously and the master soaked the tiles with high quality. In this case, you will often wonder which tool will be more effective for quick dismantling.
A hammer drill in the case of such tiles will not be very useful in the sense that it will not dismantle it completely, but will only crush it into a large number of small parts, which will be scattered throughout the bathroom. The best option to start dismantling such tiles would be to throw a fragmentation grenade into the room more than once. Next, a broom will be useful to remove all the fragments, and the same hammer drill to complete the work with those parts that have not moved away from the walls.
Only the owners of brick walls will have to dismantle the plaster. If prisoners or captives started laying bricks in a room, then this layer can reach many meters. This is, of course, a joke. But a layer of five centimeters can be easily encountered. Therefore, it is necessary to devote more time and effort to this dismantling and start collecting unnecessary durable garbage bags. Here you should take into account that you won’t be able to simply dump the trash in trash cans; you will need to call in special equipment and loaders.
It is worth noting that when dismantling the plaster, which is the support for the bricks, the walls can easily fall apart, so you should be careful.
All concrete panel houses built before 1998 have a plumbing cabin. In Soviet times, builders glued the mosaic directly into the concrete of the cabin, and it holds very firmly. In order to begin dismantling this tile, you will need a chipper or a concrete breaker.
If we cannot remove the mosaic, we can offer you 2 options for further repairs.
First: start by degreasing the surface, then apply Concrete Contact, install a masonry mesh on top and fill it all with a leveling screed.
Second: dismantling the entire plumbing cabin. This stage of repair includes not only the demolition of walls. The floor and ceiling also need to be dismantled. Then the renovation will begin, one might say, all over again - building new walls, then pouring the floor and stretching the ceiling. And as a result of our actions, we will get an extra square meter in the bathroom. Considering the price per unit area, this repair item is justified.
If you rejected the offer to dismantle the plumbing cabin in your renovation, then most likely you will have to start solving another problem - what to do with the baseboard. Concrete baseboards are part of the cabin structure. They are horizontal (along the perimeter of the floor) and vertical (in the corners from floor to ceiling). These skirting boards are very durable and have reinforcement with a diameter of about 10 mm.
Concrete plinths are dismantled using a jackhammer or hammer drill. You need to start with perforation along the entire length of the baseboard. The reinforcement will need to be cut out with a grinder.
You can, of course, use a grinder to cut out the baseboard, equipped with a diamond blade. But in this case there will be so much dust that it’s hard to imagine.
Depending on the number of renovations that the bathroom has undergone, we can make an assumption about the number of layers of screed. These layers are material on the history of the room’s renovation.
After removing the tiles from the bathroom floor, you may see cracks in the screed. You also need to pay attention to whether the screed “bounces” - after knocking on its surface, you may hear a sound as if you were hitting a hollow object. This sound indicates that the screed is not adhered to the floor slabs, therefore, it is necessary to begin dismantling it. The screed layer can be quite thick. You should be especially careful when doing this work - sometimes water supply pipes pass under the screed.
Also in Soviet times, there was a tradition regarding concrete walls - the color of the bathroom should be blue. The paint was applied in a very thick layer, comparable in strength to slate. It is said that several layers of this paint can withstand a burst from an AK-47, and that the components of this paint are used to create body armor. But let's get back to dismantling.
You can start with the most effective option for removing paint - dissolving it. But the disadvantage, or rather the danger, of the chemical method is that there is a high probability of inhaling reagents during work.
Other dismantling methods are safer, but more difficult and longer. For example, you can start peeling off the paint with an axe. Such cutting will rid the wall of the interfering coating by 60–70%, but to achieve this result you will have to make more than one thousand blows.
It is easier to use a hammer drill - charged with a wide chisel, it is capable of removing from 80 to 90% of the surface of the walls. If the paint of the bathroom does not hold up well, then you can start working with a hammer drill equipped with a crown (used when creating niches for socket boxes) without a centering drill. The teeth of the crown dig into the paint well and remove it from the bathroom wall.
If the walls of the room were covered with drying oil before painting, then the paint can only be removed with a hammer drill.
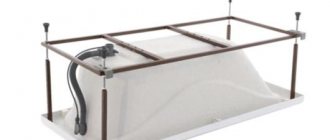
Brick bath
A structure made of brick or foam concrete blocks can replace a standard bathing bowl. The masonry technology is based in such a way that you can create a bowl of any shape and size. The use of a shrink mold is not required.
Most often, a homemade brick container is placed in the corner between two walls. The design allows you to make a comfortable font that takes up little space.
The individual masonry process consists of 4 stages:
- supply of plumbing communications;
- masonry of the structure itself;
- waterproofing;
- external cladding.
Advantages of materials
The advantages of brick baths are as follows:
- high strength and wear resistance;
- soundproofing properties;
- low level of moisture absorption;
- naturalness and environmental friendliness;
- material density;
- comparative ease.
Which brick is suitable
Bathtubs are made of ceramic, sand-lime brick or foam concrete blocks. If you follow all technical standards, you can make a strong and reliable font from any brick. The design can last for many decades. Construction industry experts recommend giving preference to standard ceramics. It is a little more expensive than its opponents, but its consumer properties cover the difference in price.
Preparatory work
Before starting construction work, it is necessary to prepare all tools and materials.
The list includes:
- level;
- putty knife;
- square;
- jointing;
- trowel;
- mopping;
- brick;
- cement;
- plaster;
- waterproofing mixture;
- tile;
- grouting of joints for swimming pools.
You also need to dismantle the old bathtub and floor down to the floor slabs in advance. Communications are double-checked and installed before construction work begins, since it will be almost impossible to correct this in the future.
Step-by-step construction instructions
In order for the design to comply with technical standards and regulations, you must follow the step-by-step instructions:
- Install a drain for shower cabins. This will increase the convenience of subsequent plumbing maintenance.
- Lay out the bottom and walls of the container using standard masonry mortar. When building walls, they use the “half-brick” technique, or use blocks with a minimum thickness.
- Apply plaster, which will help smooth out all the unevenness, and round the corners if necessary.
- The next layer is waterproofing. For these purposes, polymer and combined ready-made compositions are chosen. They are laid in a thin layer, but at the same time have a high degree of water resistance. Also, the walls and bottom can be plastered with cement mortar, which includes liquid glass.
It is not recommended to apply roll or bitumen waterproofing, as it prevents the durable installation of the facing material.
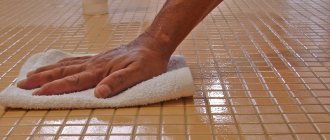
Final finishing and cladding
The final stage of construction is the external and internal finishing of the structure. Whole tiles, mosaics made of ceramics or porcelain stoneware are used as cladding. The material is attached with waterproof glue. After the installation has dried, begin grouting the joints with epoxy.
Judging by the photos of the finished products, the mosaic cladding looks much more impressive. In addition, due to its small size, the material can be easily placed under any inclination or bend of the container.
Where to start with piping and major bathroom renovations
If you have started renovating your bathroom, you don’t need to take equipment at random and think that everything will fit anyway. Initially, you need to think over a plan for future wiring. It seems that this is not a very important stage and there is no need for it. But it is with the help of a plan that it is possible to calculate everything, determine the location of plumbing equipment and select the necessary finishing material and other elements.
First you need to make a list of the materials and equipment that you plan to place in the room. To start doing this, you need to know all the dimensions and parameters of the bathroom. It is also important whether the bathroom and toilet are located separately or together. If they are located separately from each other, then a wiring plan must be drawn up for two rooms, since their communications are very closely connected and do not exist separately.
Once you have decided which plumbing fixtures you need, you need to mark which ones you need to run pipes to.
Plumbing fixtures, shut-off valves and meters must be present in a competent bathroom piping plan.
The classic scheme is:
- Any type of bath or shower. Both hot and cold water supply, as well as sewerage, are provided here.
- Washbasin-sink. Hot and cold water supply plus sewerage are provided.
- Bidet. This part is connected to cold and hot water and sewerage.
- Toilet. Connects to cold water supply and sewerage.
- Washing machine. Sewage and cold water supply are provided.
The outline of the basis of the future project will be the next step. It is necessary to make all the calculations, measurements and build a diagram based on them. It is best to draw the diagram to a suitable scale on graph paper.
All measurements must be very accurate to create a good, competent diagram. Plumbing fixtures are measured in the same way. The dimensions of the appliances are needed to accurately fit them into the bathroom.
There is one interesting method for those who have not yet decided how exactly to arrange all the plumbing equipment in the room. Taking into account the scale of the constructed scheme and adhering to it, you need to start by placing on paper a diagram of all the devices that you intend to place in the bathroom.
To do this, you can cut out all the devices from paper and roughly arrange them on the diagram in search of the best layout option.
There is a certain sequence in which all appliances are placed in the bathroom. It must be taken into account when drawing up a wiring plan. For example, the toilet should be located closest to the riser.
It is also important not to forget a few nuances. The toilet is installed first from the sewer riser. It is best when the toilet outlet is connected directly to the riser using a fitting. A large distance between the toilet and the riser, as well as the presence of turns, can lead to blockages and will periodically make themselves felt.
The best way to prevent blockages is to position all drains from plumbing fixtures so that used water passes through the pipes following the toilet drain.
Low-flush shower stalls and bathtubs should also be located as close to a sewer drain as possible. This is necessary to avoid problems with slope. The remaining appliances according to the scheme can be placed in the bathroom in the way that is most convenient.
It is important to study in advance all the technical specifications and documents for connecting all equipment before you start installing them. With a standard connection, which involves a single-level installation of the pipeline and the axis of the sewer outlet of the device, difficulties should not arise. However, if a non-standard connection is provided, it is necessary to once again familiarize yourself with all the information additionally and take into account new features.
Once you have installed all the plumbing fixtures, you can begin to install the appropriate piping to them. Here it is important to adhere to the originally constructed diagram and its scale; this is the only way to correctly install the pipework in the bathroom.
When placing all the equipment and running all the pipes, do not forget that the doors should open freely, and each device or element could be easily used.
Which type of utility wiring to choose when renovating a bathroom?
Before starting a wiring project, it is better to familiarize yourself with the options for such circuits and choose the one that is most suitable for you. There are not many of them, three types, but one with pass-through sockets is very rare, so we will not touch on it.
- Serial type wiring
- Collector type of wiring
In this type, taps from cold and hot water supply are installed to the first consumer. Next, the first consumer connects to the second, the second to the third. At each water collection site a tee is installed to which the consumer is connected. This classic scheme is designed for bathrooms where there are few water consumers.
The main disadvantage of serial-type wiring is that when several consumers are used simultaneously, the pressure in them will be weak, which can affect their functioning.
However, for small bathrooms in apartments with one bathroom, this type of wiring is best suited. The only downside that can be noted is that it will be difficult to disconnect one of the plumbing fixtures to repair or replace it, since everything is interconnected.
Serial type wiring is easy to install, but it is not very convenient to use in large apartments and bathrooms. However, this is the best solution for small rooms with one bathroom.
In this type of wiring there is a main element that distributes all water flows, called a collector, through which all consumers are connected to the main line.
It is also possible to install a shut-off valve in each collector outlet. In this case, it will be very convenient to use.
This can be explained as follows. When several taps are turned on at once, the water pressure will not drop. All consumers will have the opportunity to function at maximum capacity.
If for some reason the pressure has decreased, you can solve this problem by briefly turning off the water supply to one consumer (for example, to the toilet). Then the water pressure in the rest of the plumbing equipment will increase.
The collector type of wiring is more convenient to use than the serial type. There are rarely problems with water pressure, since each consumer has a separate line. But this system requires some effort in design and installation.
An important point can also be noted that in the collector type of wiring it is possible to replace or repair individual equipment without turning off the water in the entire bathroom. This system is more reliable, since each consumer is connected using a separate pipe without other unnecessary elements.
If any problems begin with one of the devices, a leak can only be noticed at the collector or device itself; in these places it will quickly become apparent. Therefore, installation can be carried out safely using a hidden method.
The advantages also include ease of use. If one of the consumers is damaged, there is no need to look for the cause by crawling under the sink and disassembling the entire system. It is necessary to call specialists and close the shut-off valve on the collector of the damaged equipment that has leaked.
This can be done by anyone, both an elderly person and a very young child. If one of the devices is turned off, the others will function properly.
Choosing tiles for floors and walls
Most often, ceramic tiles are used for tiling in the bathroom. But here too there is plenty to choose from.
First of all, you need to pay attention to the following points:
- moisture resistance;
- resistance to temperature changes and abrasion;
- thickness;
- surface smoothness.
You should not take tiles with a rough surface, especially if they have defects in the form of dots or cracks - dirt will accumulate very quickly and mold will grow. When purchasing, also be sure to ask the seller to show several samples from different boxes and check them for chips, surface curvature and size matching.
There are several types of ceramic tiles:
- Monocottura is a product of single firing. One of the most stable and reliable types.
- Bicottura is a double fired tile. This material is not suitable for floor finishing.
- Clinker is one of the strongest finely porous materials produced using special technology.
- Porcelain tiles are high-strength tiles that are excellent for flooring.
The nuances of installing wiring when renovating a bathroom
When laying out plumbing pipes, you need to start by choosing one of two installation options: open or hidden.
- Open gasket
- Hidden installation of utilities
One of the advantages of this installation is the ability to continuously monitor the condition of the pipes. All engineering communications are visible, which means there will be no unnoticed leaks.
When listing the advantages of this renovation, you can start with a fairly simple organization, since all the elements are connected and fastened in place. This work will generally not be difficult for an inexperienced plumber to handle. Therefore, another advantage of open installation will be minimal installation costs.
Among the disadvantages of such installation is the possibility of mechanical damage to the pipe. But this applies to a greater extent to plastic parts, while steel pipes are quite durable. It is also worth mentioning the aesthetic component - it is not very beautiful when the pipes are in plain sight. Therefore, we need to start looking for the most hidden place for laying pipes and take this into account in the wiring design.
Hidden bathroom piping means the installation of elements into the voids of building structures. These voids are sometimes specially provided for, otherwise you should make them yourself. You can, for example, hollow out grooves slightly larger than the diameter of the pipes that we will lay.
Laying pipes in a screed, when the parts are covered with concrete mortar on top, is another example of hidden laying.
Creating grooves, whether cutting or sawing, is not an easy job. Therefore, you need to start by drawing lines on the bathroom wall where the grooves will go. Then you need an accurate calculation of the size of the niches for the pipes.
The main advantages of this installation are the protection of the pipes and the aesthetic appearance of the room. Pipeline outlets are located in the floor or on the walls; they are made in the form of sewer sockets/water outlets. Engineering communications are not visible.
Among the significant disadvantages, we highlight the high cost of the work, its labor intensity, as well as the impossibility of monitoring the condition of the pipes.
Sometimes there is a need to supply communications to a bathtub that is located at a great distance from the wall, for example, in the center of the bathroom. In this case, you will have to start with an idea of how to hide sewer pipes under the floor. But due to their large diameter, it will not be possible to place them in a screed, since it will come out high and have a lot of weight. The floors may not be able to withstand such a load, so the best way out of this situation is to build a so-called podium. There is enough space underneath for the room's utilities; The design of such a podium can be block or frame.
Book a discount on repairs up to 10% for 15 days!
Enter your number and we will reserve a personal discount for you
The repair technology does not depend on the location and purpose of the pipeline: you need to start by placing all the components of the pipeline in a special casing pipe. Then this pipe is placed in a technological cavity prepared in advance.
After laying the pipeline, it is necessary to seal the cavities, then level the base plane. If necessary, apply topcoat.
The main disadvantage of hidden installation is the inability to control the condition of the pipes in the bathroom. In this regard, rational installation is important, and all components of the pipeline must be firmly connected and resistant to corrosion.
Plastic, metal-plastic and copper pipes are the best option for hidden installation, as the practice of bathroom renovation shows.
After we have laid the pipeline in the cavity, we need to seal the grooves. For this, cement mortar is used, then the plane is prepared for subsequent finishing.
The formation of condensate is one of the catalysts for the destruction of the pipeline structure. Therefore, when laying hidden, it is necessary to prevent the possibility of moisture affecting the pipes.
Therefore, it is recommended to place the hot water pipe above the cold pipe. Thermal insulation material, for example Merylon, around both pipelines will definitely not be superfluous.
Choosing tile adhesive and tools
There are different adhesive compositions, but choosing them is not difficult; everything will depend on how the working surface is treated. If the walls are smooth, then you can use thin-layer adhesive for ceramic tiles (layer less than 10 mm), but in case of an uneven surface, a thick-layer adhesive is required.
More expensive options are epoxy and fungicidal adhesives. But they are waterproof and prevent the formation of mold and mildew at the joints of the tiles.
To lay tiles you need spatulas of different sizes, tile cutters, laying templates, etc.
If the glue package contains recommendations for choosing a spatula, then it is better to listen to them, but if nothing is said, a tool with teeth up to 6 mm is suitable.
Where to start laying electrical wiring in the bathroom
Safety and functionality are the two main criteria for bathroom electrical installations. Nowadays they no longer install a lamp in the center of the bathroom, and switches with sockets are not required to be placed outside the room. Modern electrical accessories and automation are produced in a waterproof design, so human protection from possible electric shock is ensured at the proper level.
The basic requirements that bathroom wiring must satisfy are as follows:
- mandatory presence of a grounding loop;
- separation of protection devices: a circuit breaker must be installed on a group of lamps, and an RCD on a group of sockets;
- all components of the bathroom electrical wiring must be protected from moisture;
- the potential equalization system must include a bathtub, sink, risers, housings of electricity consumers and a ground loop bus;
- It is recommended to choose 12-volt lamps for bathroom lighting, for example, LED lamps - high luminous flux, low electricity consumption, long service life.
There are no strict restrictions in the regulatory documentation regarding how to install wiring in the bathroom. The method of installing cables on walls can be external or hidden. There is only one mandatory condition for open installation - the cable must be of a special design for rooms with high humidity.
Compliance with these requirements guarantees the absence of problems with the room’s electricity and safety after repairs.
We recommend using the following materials when renovating a bathroom:
- Cable: copper, three-core. The cross-section is selected as follows: 1.5 mm2 for powering lamps, 2.5 mm2 for sockets, 4 mm2 for household appliances, for example, a water heater. The best brand of cable is considered to be the foreign brand NYM, but the Russian analogue VVGng is not much inferior in quality at a lower price.
- To attach the cable to the bathroom wall, it is most practical to use dowel clamps.
- Switches and sockets: degree of protection no less than IP44. They must also have a grounding connection and a splash guard.
- spotlights in the bathroom . Their advantages include appearance, easier installation, and the ability to be powered from 12 V.
- Potential equalization system: power wire PV-3 1 x 6 complete with lugs is suitable.
You need to start laying cables in the bathroom by creating special grooves for the cables in the walls. These grooves are called grooves; they must be made according to the wiring diagram of the room. In addition to the grooves, you need to make recesses for the junction box, sockets and switches. They can be pierced with a drill with a crown (diameter 68 mm).
Then we install the socket boxes and the box in their places, sealing them with mortar.
The next step is to fix the wiring in the grooves. This can be done using the above-mentioned dowel clamps. There is another time-tested method - apply a solution every 200 mm of cable. After fixing the wiring, we strip the ends of the cable from insulation and thread the cable to the socket boxes.
Now we will install the cores of switches and sockets in the places intended for them. In order not to stain the decorative cover during repairs, it should be installed after completion of the work.
After fixing the wiring in the wall, you can begin installing the RCD and the machine. But we will connect the bathroom protection devices only after checking the correct electrical installation of the room.
Also an obligatory stage of repair is checking the line for the absence of a short circuit. If there is no short circuit in the network, then you can begin finishing the bathroom walls.
An important task that needs to be solved when renovating a bathroom is the creation of a potential equalization system. You need to start by connecting the bathtub, sink, water risers, washing machine housings and water heater to each other using the PV-3 1 x 6 single-core wire that we talked about earlier. Then we connect all this to the grounding bus, which is installed in the input electrical panel.
An important point: if you have a two-wire electrical wiring system in your apartment, that is, there is no PE bus, then you must start replacing it with a safe three-wire one.
Additionally, I would like to say about heating. In the bathroom, the best option would be an electric heated floor under the tiles. It is not difficult to lay such a floor on your own.
At this point, the process of electrical installation work in the bathroom can be completed with a clear conscience.