Connecting the sink to the sewer can be done independently, as a result of which you can save personal money on calling a plumber. However, in order to connect the sink correctly, you will need to know and be able to do something.
Let's try to consider what it means to connect a kitchen sink or bathroom sink to the sewerage system. If we take into account the technological part, then connecting a sink in the kitchen is identical to the procedure for connecting a sink in the bathroom.
Types of siphons
Modern devices in this category are made mainly of metal or plastic. Metal products are more expensive, require more careful maintenance, and are usually preferred in cases where communications are not hidden behind a cabinet or wall, but remain visible.
Metal siphon
Plastic analogues are more practical and therefore have become widespread. This option combines strength and light weight well. Such products are easy to install, and their replacement does not require significant costs. In addition, they are much less demanding to maintain and use than models made of metal.
Siphons made of plastic
Water seal options
The main options for water seals are represented by three main types:
- bottle
- corrugated
- pipe
Bottle type is traditionally in demand due to its simple and effective design. The bottle-shaped part provides a water seal, which reliably prevents the penetration of unpleasant odors from the sewer. Modern models allow you to connect not only a sink, but also a dishwasher and washing machine to the drain.
Bottle water seal
Corrugated - represented by a flexible corrugated tube connecting the drain hole to the entrance to the drain. When using this scheme, it is important to lay the tube in the correct double-bent position, due to which a hydraulic plug will form. The flexible hose takes up very little space and can be used in any limited space, such as a small bathroom. Such models are cheap and easy to install and use, but they cause criticism due to the accumulation of dirt in the folds of the corrugation. If a blockage occurs, this part will require replacement.
Corrugated siphon
Pipe - a current, higher quality, but also more expensive analogue of a corrugated hose - a pipe connection. Instead of corrugating the water seal, it is replaced here with a curved pipe, the material for which is metal or polypropylene. The cost of such models is higher. They are sometimes difficult to install due to the need to accurately align the rigid pipe with the drain socket, so before connecting the kitchen sink to the sewer system or providing drainage for the washbasin, the serious and responsible task of choosing and purchasing suitable equipment is solved. Careful measurements must be taken to ensure that all plumbing parameters match the piping system being purchased.
Pipe water seal
Basic tips for purchasing the necessary items
In addition, if you strictly follow the technology, this does not guarantee an excellent result, the fact is that the fittings for a kitchen sink must meet a number of requirements, which we will consider:
| Suitable design | All components must correspond to the design of the sink; be sure to ensure that both the type of connection and the size of the fasteners are suitable for your sink. It’s best to buy everything comprehensively, then sellers will independently select the necessary design options in accordance with the features of the sink |
| High level of product quality | As for the mixer, it is better to choose bronze options - they are heavier in weight and much more reliable than structures made of powder alloys; there should be no flaws on the surface. As for the selection of a siphon, it is better to choose either an option made of polypropylene (its price is low) or bronze - this type of structure is more expensive, but can withstand warm water |
| Availability of sealing materials | To ensure system reliability and functionality, all connections must be secure. To seal threaded connections in flexible hoses, a special Unipak composition is used, and to seal sewer units, silicone sealant with antifungal additives is used |
| Set of necessary tools | In fact, you only need a couple of simple tools to carry out all the work at a high level: a plumber's wrench for clamping connections and two screwdrivers - flat and Phillips |
Advice! You should not skimp on quality, since not only the comfort of use, but also the durability of the assembled system depends on the reliability of the fittings - any malfunction can lead to leaks and flooding.
Connecting plumbing in the bathroom
Today, when deciding how to connect a sink to a sewer in a toilet, it should be taken into account that washbasins are now, as a rule, equipped not with a single outlet pipe, but with a full-fledged drain and overflow system. In this configuration, the drain pipe is supplemented with a tube leading from a hole located high in the side wall of the plumbing, above the mixer, with a drain channel.
Thus, when filling the bowl, water will not overflow, falling through the drainage tube directly into the siphon.
Sink overflow drain system
Dismantling
The first step in installing a drain when replacing a washbasin or bathtub is to dismantle the old device. To do this, remove the holding screw located in the center of the drain grid installed in the washbasin. Due to long-term use, parts of this structural element sometimes become stuck to each other.
In such a situation, the solution is to dismantle the lower flask of the siphon apparatus: then, in the process of turning the upper part, the coupling of the screw and the grille will most likely be loosened. There is also the option of using a special product - a solution, which will help remove old contaminants that adhere to parts.
After the siphon flask or pipe is dismantled, it is necessary to clean the drain pipe and then plug it while installing new equipment, for example, with a rag - if you do not want the open riser to stink and poison your existence throughout the entire repair process.
How to connect a washbasin
Before starting installation work, it is worth considering that modern models of washbasins do not have one drainage pipe, but a system that overflows and drains separately. The drain pipe of such washbasins has another tube that goes from an opening on the side of the sink wall to the general drain system. This system prevents the bowl from flooding; water that reaches the drain hole on the side of the bowl immediately enters the siphon.
Removing an old washbasin
Before installing new plumbing, you will have to dismantle the old one. Unscrew the screw on the sink drain grate that holds the device. Due to rust and limescale, structural elements are tightly bonded to each other. Sometimes it is necessary to disassemble the lower flask in the siphon, then by turning the upper element, it is possible to loosen the grip of the grille with the screw. You may need to fill the screw with a chemical anti-rust solution. Having finished dismantling the siphon pipe, we clean the drain pipe from dirt and plug the hole with a rag until the new sink is installed.
Preparatory work for installing a sink
- If new plumbing is being installed, before starting work, it is necessary to mark the place where the sink will be installed.
- First we determine the installation height of the sink.
- How to determine the mounting height for a washbasin.
- If the washbasin does not have any accessories, then it is customary to install it at a distance of 85 centimeters from the floor. We measure the required size using a building level and draw a line on the wall where the upper part of the washbasin will be located.
If the bowl has a bedside table or a leg, then there is no need to measure the height; it will be equal to the size of the pedestal or cabinet.
How to mark attachment points
On the fastening line, mark the points for the holes for attaching the sink to the wall. To do this, you need to attach the bowl to the line and mark the holes with a pencil or pen.
Attention! To make the process easier, it is better to take measurements with an assistant.
Installation of fasteners
After you have marked the points of the holes on the wall, you need to prepare them for fastening. We drill the holes themselves, hammer in the dowels of the required size, then screw the studs into them for fastening.
Features of the stud for fastening
Studs for fastening, nuts, dowels, and plastic inserts are also included with the sink. As a rule, studs with a plastic dowel are used.
In the process of screwing the studs into the dowel, you need to calculate the required depth; it should be convenient for hanging the washbasin and tightening the nut. Thus, the pin should protrude from the wall to a length that is greater than the thickness of the sink and have a margin of one and a half to two centimeters to tighten the nut.
Connecting the sink
Assembling the water seal
How to connect a sink to a sewer with your own hands? The next step is to assemble the water seal - most often, manufacturers provide this device with instructions in the form of a picture. If it has a flask-shaped structure, the sequence will be as follows. First, it is tried on at the installation site in order to establish compliance with the parameters and the necessary marks are made.
Then they check how reliable the fastening of the bottom plug is. It must be unscrewed and determined whether the integrity of the seal underneath is maintained. This control operation is very important, since it is this part that is subject to constant pressure when using the pipeline.
Poor quality connections often contain defects such as burrs. They must be disposed of, otherwise there is a risk of damage to the sealing gasket.
Water seal glass
After making sure that all parts are in good condition, assemble the water seal cup. To do this, first of all, the lower part is screwed on. The spout is equipped with O-rings and tightening nuts, then it is placed in the hole intended for it in the upper “floor” of the body and secured here with a nut. Care must be taken to ensure that the fasteners are not over-tightened; otherwise there is a risk of damage to the fastening.
Overflow assembly
The nuances of assembling the overflow depend on its design features. Today, manufacturers usually provide a telescopic overflow tube: its size can be easily adjusted to accurately match the drainage height to the specified installation parameters of the washbasin.
Corrugated hose
Another option is a corrugated hose: it is stretched to the required length and mounted to the connecting points. Connecting joints are sealed with the included or additionally purchased gaskets. Tightening of threaded parts must be carried out without overtightening.
Installation of drainage equipment
Next, the installation of drainage equipment is carried out. Before connecting the siphon to the water supply and sewerage pipelines, a grate is first installed in the pre-cleaned and grease-free drain hole of the bowl of the plumbing fixture, which serves as a filter during operation.
How to assemble a siphon
The upper socket of the outlet tube is equipped with an O-ring and is connected to the hole in the lower part of the washbasin. The socket mount is fixed to the grille using a long screw. After this, the other end of the pipe is inserted into the water seal flask.
Connecting a drainage system to a drain of a larger diameter is usually done using a special cuff: this method guarantees a tight fit of all parts, the absence of even a minimal gap and prevents the penetration of fetid gases into the room.
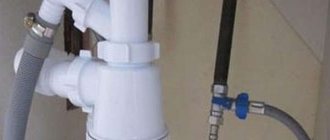
Connecting a siphon to the sewer
Stage #4: connecting the sink to the sewer ↑
How to connect a washbasin to the sewer? This stage is final. A siphon is connected to the plumbing fixture, to which a pipe is attached - corrugated or rigid with a bend. Then the pipe is connected to the sewer. If its diameter does not coincide with the sewer outlet, use a special rubber adapter.
When the work is finished, all that remains is to check the tightness of the connections. To do this, open the taps and run them through the pipes with a dry hand or a white napkin. If everything is normal and there are no leaks, the plumbing is ready for use.
Connecting the sink siphon to the sewer
Installation of kitchen equipment
Connecting a mortise or counter-mounted sink to a sewer system in the kitchen differs from similar work in the bathroom in some features related both to the nuances of installing the equipment and to its design characteristics.
Water sealing devices
Water seal devices installed in the kitchen area, in many cases, have a standard appearance, but varieties are often installed that have:
- two sockets for double sinks;
- several outlets for connecting household appliances;
- garbage shredder;
- flattened wiring;
- other new models.
Accordingly, the methods for arranging a kitchen drain will also not be the same. The necessary operations here include pre-assembly or direct construction of the pipeline during installation work. In any case, this stage is usually started last.
If the structure is complex and its parts are made of plastic, before connecting them you should make sure that all components are of high quality, free from flaws and will ensure the tightness of the drainage structure.
Flask
The standard algorithm of actions at this stage includes supplying the water seal flask with a gasket, attaching the lid, combining the “glass” and drainage tube using a union nut and sealing gaskets, and, finally, connecting the siphon to the kitchen drain and fixing it.
Outlet corrugation
Then the outlet corrugation is placed in the drain and the assembly is sealed. If there is an overflow, its fixation is carried out in a manner similar to the method described above for arranging a drain pipeline in the bathroom.
Siphon with two bells
To properly connect a kitchen sink to the sewer system if there are two compartments and install a faucet, a special siphon apparatus with two sockets is used. Its connection, in essence, differs from that described above in the need for more precise fitting and standard joining and sealing operations with both connecting funnels.
In cases where it is necessary to ensure the drainage functions of a dishwasher or washing machine, two drain fittings are usually used.
Dishwasher hoses are arranged in one pattern or another depending on whether the fitting is mounted straight or at an angle. We connect the sink with our own hands.
Everything useful about sewerage -
GidKanal | Yandex Zen
Conclusion
Completing work without outside help is not as difficult as almost all people think. The video in this article will clearly demonstrate some of the features of the process and will help you understand the topic much better.
How to connect a sink to the sewer system. Connecting the sink to the plumbing system is the final stage of renovation work in the apartment. You can connect the sink to the sewerage system yourself, without calling specialists. The main element in this process is the siphon, which serves as a water seal,
...is a filter of sewer stench from sewage and prevents large elements from entering the drainage system.
Content
Installation of a sink in the kitchen and a washbasin in the bathroom is carried out approximately the same way, because the purpose of the devices is similar. Most often, the home owner can do all the work himself. There are general rules that must be followed when installing plumbing; you should definitely know them. However, if you do not have the skills to handle tools or are planning a complex plumbing installation, it is better to call a specialist.
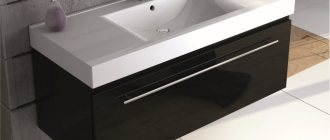
Installing a sink in the bathroom