One of the essential plumbing fixtures for a bathroom is a sink. Bathroom washbasins differ in shape, configuration, installation method and connection to communications. One of the most used options is to install a sink with a cabinet in the bathroom, since this model allows you to organize the storage of towels, detergents and various useful items in a convenient place.
Features of sinks with a cabinet
The advantages of washbasins with a cabinet include the fact that in addition to providing storage space, the cabinet perfectly covers all supply lines, even if they are located slightly away from the bowl. In addition, cabinets are made in various styles and design options, so they can serve as an additional decoration for the bathroom.
Note! The cabinet is supplied both assembled and disassembled. The disassembled cabinet is accompanied by a drawing and step-by-step instructions for its assembly.
Types of wall tables
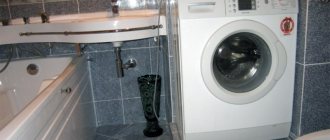
Hanging vanity with bathroom sink
Over time, the variety of bathroom furnishing options has increased. Each item is now selected from the point of view of not only practicality, but aesthetics, functionality and compatibility with other elements.
A wall-mounted vanity is a piece of bathroom furniture in which a sink bowl is built into the design and mounted on the wall of the room. Based on the characteristics of the bathroom and the wishes of the buyer, you can choose the most suitable model:
- a regular bedside table with a wall mounting method, designed for storing linen, clothes, and household items;
- wall-hung design with washbasin and built-in faucet;
- large cabinets with the ability to accommodate 2-3 sink bowls with internal storage system.
Modern manufacturers present a wide range of cabinets, differing in the following characteristics:
- dimensions;
- colors;
- body materials, finishing: wood, plastic, metal, acrylic, MDF, chipboard;
- the presence and complexity of the internal storage system;
- functionality: adding a sink, faucets, mirror, lighting, drawers, shelves, and a section with a wastebasket to the cabinet.
At first, wall-mounted cabinets were the best option for arranging small bathrooms in city apartments. But over time, the product range was expanded. This made it possible to select options for spacious rooms and even for public places with high traffic volumes.
Types of sink cabinets
Floor-standing washbasin cabinets can be divided into two types according to the type of design:
- Rectangular: considered a classic and the most common option. Suitable for bathrooms of any size.
Compact rectangular washbasin.
Wide sink with cabinet for large bathrooms. - Corner sinks are a more interesting and individual option. In small bathrooms, such sinks allow you to optimize and save space, and in large rooms they emphasize style and status.
The compact corner sink allows you to optimize space as much as possible.
Premium corner basin for large bathrooms.
Important nuances
Attaching the cabinet and sink to the wall is advisable if it is strong enough.
In other cases, it is important to use a supporting frame. The installation height of the washbasin is selected individually, the average range is 80–85 cm. To make the sink comfortable for children to use, you can install it lower, and higher for tall people. Plain paper will help to identify minor leaks after installing the washbasin (or make sure there are no leaks). It must be placed under the threaded connections and left for half an hour. If the paper remains dry, everything is fine. If wet spots appear, disassemble the connections and repair any leaks.
Read our previous article about which countertop to choose for your bathroom.
Section not found
Criterias of choice
In addition to the installation method, when choosing a washbasin and a stand for it, the following aspects are taken into account:
- Overall compatibility of the bedside table and sink with the bathroom design.
- The material used to make the sink table is waterproof and can withstand temperature changes and high humidity.
- All fittings (handles, hinges, legs) are made of plastic or stainless steel so that they do not become rusty during operation.
Advice! It is recommended to purchase a set consisting of a bowl and a bedside table for it. In this case, installation will be quick and there will be no problems, since the seat of the stand ideally matches the shape and design features of the sink.
Attention is also drawn to the functional features of the cabinet under the washbasin. The following additions will be useful:
- A laundry basket attached to the door will further save space in a small bathroom.
Cabinet with laundry basket. - Fastenings for internal shelves should have several positions so that it is possible to adjust the height of each shelf to the size of stored items or detergents.
- The height of the sink table should provide comfort when washing for every family member, regardless of his height.
- It is desirable to have adjustable legs, which will allow the stand to be leveled and allow cleaning underneath it.
Note! If the bathroom has a heated floor, high legs for any furniture are simply necessary to ensure heat transfer from the heating system.
High legs not only provide the ability to clean under the table, but are also necessary for air convection when installing heated floors.
Instructions for installing a hanging cabinet in the bathroom
Hanging sinks and cabinets are not allowed to be mounted on plasterboards and other finishing materials with low strength characteristics. It is best to mount them on ceramic tiles laid on a concrete or brick base. Instructions for installing a hanging cabinet largely depend on the features of the chosen model. But if you do not take into account minor differences, the process of installing a wall-mounted bedside table is as follows:
- Mark the ceramic tiles using a long level and a pencil. Draw a line horizontally along the level of the top bracket on the wall.
- Position the brackets clearly in the middle of the line and mark points for making holes for the dowels.
- Make the holes. Drill the tiles carefully, using special drills and avoiding getting into the seams. If necessary, the installation height of the cabinet with a sink in the bathroom can be slightly changed.
- Install the brackets.
- Hang the cabinet on the brackets and check its position.
- Install the washbasin. Mark the position points of its fastenings. Remove it.
- Make the holes. Secure the sink with studs and nuts.
- Assemble and connect the mixer. Attach 2 flexible hoses to it. Screw them in by hand and tighten with an open-end wrench, avoiding excessive force. Screw 2 studs into the mini-holes under the faucet, put on the gasket and place the faucet in the hole provided for it. Place the moon spacer and washer on the studs. Screw it firmly with the nuts.
- Assemble the siphon and connect it to the sewer system. Attach the top cover to the drain hole and place the screw in the center. Place the inlet pipe with a seal at the bottom. Screw the cover and pipe. Place a coupling nut with a cone gasket onto the pipe, screw on the top of the “bottle” and the siphon cap.
- Make sure connections are tight. If leaks are detected, eliminate them.
Determining the optimal installation location
One option is to install a new sink in the same place where the old plumbing was located. But this is not always possible, since the cabinet box most often does not fit into the previously allocated space. And moving the location of plumbing fixtures during repairs is not uncommon. Therefore, it is best to think through the location of all plumbing fixtures, as well as pieces of furniture, at the renovation design stage. To do this, the bathroom is conditionally zoned into several areas, in each of which a device is installed (bathtub or shower, toilet, sink, washing machine).
Based on the planned location of the plumbing, water supply and sewerage pipes are laid, because the optimal supply points are different for each plumbing fixture. When supplying hot and cold water, the location of the fittings for connecting flexible hoses must be calculated so that they are located between the shelves. This will ensure convenient connection and replacement of hoses during operation.
As for the siphon and connecting the corrugated sewer pipe, you often have to cut holes in the shelves to connect it. It is for this reason that it is better to calculate everything in advance and bring the sewer pipe to the level of the connection points to the water supply.
To avoid having to cut holes in the shelves of the cabinet, all supply points must be brought out in advance to a place convenient for connection.
Installing a sink: what is needed for this?
How to attach a stainless steel sink to a cabinet so that it holds well and the installation itself does not take too long? To do this, you need to have accessories and tools, thanks to which installing the sink on the cabinet will not be much of a problem.
You can attach a sink with sealant without additional equipment if it is light. If the overhead sink is heavy, then installing it on the sealant will lead to the collapse of the structure. In this case, it must be fastened with self-tapping screws.
The classic tools and accessories used for such purposes are:
- Drill, screwdriver;
- Screwdrivers;
- Ruler;
- Pliers;
- Drills (for wood);
- Self-tapping screws;
- Sealant (we will pay special attention to it later);
- Masking tape;
- L-shaped corner.
The above items are also suitable for installing a sink on a countertop.
But experienced craftsmen only need a sealant and corners.
Installation technology
After communications have been connected to the sink installation site, installation begins. Let's consider the main stages and nuances of installing a sink and a floor cabinet with your own hands.
Step 1
If the stand was delivered disassembled, it must first be assembled, strictly following the manufacturer's instructions, which indicate the order in which all elements should be assembled. For the work you will need a set of screwdrivers of different sizes, as well as a hex one.
Step 2
The next stage is assembling the sink, which includes connecting the mixer and siphon.
The mixer is installed in the following order:
- Flexible hoses are connected to the mixer and tightened with a wrench.
- The supplied O-ring is installed in a special groove on the base of the mixer.
An O-ring is installed in the groove on the back of the tap. - The hoses are passed through the hole in the sink, and on the back side the mixer, depending on the model, is fixed with two or one mounting pins.
Attaching the mixer to the washbasin. View from below.
Note! To secure the faucet to the sink, a horseshoe-shaped metal washer and a rubber seal are used.
Horseshoe washer and seal for attaching the faucet to the sink.
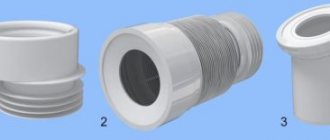
Then a siphon is attached to the sink:
- On the upper side, a metal mesh with a plastic pipe is fixed with a long bolt.
The upper part of the siphon is screwed to the sink with a long metal bolt. - A bottle siphon is screwed to the pipe from below. Fixation is carried out using a plastic nut and a conical washer, which is first placed on the pipe.
The body of the bottle siphon is mounted on a pipe coming out from the bottom of the sink.
Important! Siphons are supplied both assembled and disassembled. You need to assemble it according to the diagram that usually comes with the kit. If you don't have a diagram, watch the video below.
Step 3
The sink with a siphon and mixer installed on it is installed on the cabinet. Most often, the sink is additionally fixed to the cabinet with sealant or double-sided tape. But an option is possible when the kit includes fasteners from the manufacturer. Fastening the bowl to the wall with studs is not required, but it is better to secure the bedside table with a pair of dowels to the wall through the back wall to avoid displacement.
Then the assembled structure is moved to the wall in the planned location and leveled using adjustable legs. If such an option is not provided and the bedside table is unstable, place plastic pads of the required thickness under the legs.
Note! If pipes interfere with the correct installation of the cabinet, it is necessary to carefully cut out the cabinet in this place and make a recess for communications. This is done based on the specific situation, some examples are shown in the photo below. Be sure to treat the cut areas with sealant or wax to prevent the chipboard from swelling from moisture.
Step 4
When the cabinet with sink is installed, the communications are connected: a flexible hose of the siphon to the sewer outlet, and flexible hoses of the mixer to the end fittings of the water supply.
After this, the cabinet doors are hung (it is recommended to install them last so that they do not interfere with the connection). To hang the doors, furniture canopies are used, which make it possible to adjust the closure density and the gaps between the doors.
The tightness of closing the doors and the gap between them can be adjusted using furniture hinges.
The finishing touch is to fill the seam between the wall and the edge of the bowl with white sealant. This will prevent water from flowing behind the sink, damaging the walls and cabinets, and will also prevent the formation of mold in hard-to-reach places.
If you follow the above recommendations, installing a washbasin with a floor cabinet yourself will not cause any difficulties. But, despite the apparent ease of the process, installation must be approached responsibly, since mistakes made often lead to various problems: leaks, unpleasant odors and other sad consequences.
Advice! If you need bathroom renovation specialists, there is a very convenient service for selecting specialists from PROFI.RU. Just fill out the order details, the experts will respond and you can choose who to collaborate with. Each specialist in the system has a rating, reviews and examples of work, which will help with the choice. Looks like a mini tender. Placing an application is FREE and does not oblige you to anything. Works in almost all cities of Russia.
If you are a master, follow this link, register in the system and be able to accept orders.
Practical advice
When installing various plumbing fixtures and equipment, the same problem can be solved in several ways. Which one is better is up to you to decide. We give only professional advice from masters, but there is no consensus among them.
Options for sealing a sink with a wall
- Silicone is applied on the outside around the perimeter of the sink. The traditional method is used in most cases. Disadvantages - low-quality material peels off over time, dirt gets into the gap between it and the sink and becomes very noticeable. You have to periodically remove the old silicone and apply new one. After a year or two, black spots appear on all types of silicone, even on the most expensive ones with antiseptic additives. In addition, over time, it changes its original color, becomes dull, and various stains appear on the surface. It is impossible to eliminate this drawback by cleaning or washing; you have to completely remove the old silicone and apply new one.
You can apply sealant to the joint between the bowl and the cabinet
Advice. Match the color of the sealant to the color of the ceramic tile, not the color of the sink. Due to this, it is possible to make deviations in the width of the gap invisible.
- Silicone is applied around the perimeter of the sink from the back side until it is fixed to the wall. The thickness of the layer and the location of its application are selected in such a way that after pressing against the wall, excess does not appear on the surface. The disadvantage is that over time the cracks have to be cleaned of dirt.
Applying sealant to the back of a sink
- Using rubber seals for windows and doors. They have glue on one side, a thickness of approximately 5 mm, and are characterized by high elasticity and long service life. The seals are carefully glued around the perimeter on the back side of the sink before installation, and after pressing they ensure a complete tight fit. Many professional plumbers consider this sealing method to be the most optimal. Nothing peels off, accumulated dirt can be easily removed if necessary, and the service life of the seals is practically unlimited.
Eliminating the gap between the cabinet and the sink
Some washbasins do not have a lip over the side surfaces of the hanging cabinet; water can get into the ends. Responsible manufacturers complete their products with special self-adhesive tape; it is glued before installation on the sink cabinet and closes the cracks. Unfortunately, for various reasons, the thickness of the tape is not enough to compensate for all the gaps.
It is recommended to use rubber window sealant instead of tape, the same as we recommended above. It is glued around the perimeter of the cabinet, after which the sink is put in place.
Seals
Adhesive sealant
The sealing is complete, the possibility of water ingress is completely eliminated. It is not recommended to use silicone sealant for the same reasons. The disadvantage of this method is that there is no additional fixation of the sink to the bathroom. Factory tapes hold the structures together quite firmly, the cabinet and sink work as a single unit.