Creating a reliable and efficient wastewater system is extremely important; every trouble and malfunction in it is very undesirable. Based on this, you should treat this type of work responsibly and use only high-quality components. Let's consider what you need to pay attention to when choosing a siphon and what specific tips should be taken during the installation and assembly of the system in order to ensure its performance for as long as possible.
Preparing to connect the sink
Determining the installation height of a plumbing fixture (for more details: “Installation height of a sink - at what height to install it correctly”). The sink, not equipped with additional accessories, is located at a height of 850 millimeters. At this level, draw a horizontal line - it will be the guideline for installing the washbasin. The top surface of the plumbing fixture must correspond to it.
If there is a support leg or when the sink is installed in a cabinet, there is no need to determine the height of the plumbing fixtures. This parameter depends on the size of the leg or cabinet.
Marking mounting locations on the wall.
Before installing the fastening system, it is necessary to make appropriate markings on the wall. The sink bowl has mounting holes for connecting the sink to the sewer. The plumbing fixture is applied to the wall, as in the photo, its upper edge is aligned with the drawn line and the places where the holes for fasteners will be located are marked.
This work is easiest to do with two people. One person should hold the washbasin near the marked line, and the second at this time can mark the places for fasteners from below. If there is a leg or a supporting cabinet, installation work is simplified - the plumbing fixtures are placed on a support and the mounting points are marked on the wall.
Types of plumbing siphons
Siphons have different shapes. Each plumbing fixture has one siphon form suitable for it. On the plumbing market, these devices are presented in plastic or metal. A metal structure is more expensive and more problematic to maintain; you should choose metal over plastic if the siphon is installed in sight and not behind a wall. Plastic analogues are common in everyday use, as they are the most practical and easy to use. The plastic device is lightweight and durable at the same time. Anyone can install a plastic structure; if you need to replace an element of the drainage system, it will be cheaper.
Water seals
There are three different types of water seals:
- 1.bottle type.
- 2.corrugated type.
- 3.pipe type.
The first option is a simple design. The bottle-shaped water seal provides a sealed structure against the penetration of odors from sewer pipes. The latest variations of bottle water seals allow you to install both a washing machine and a dishwasher in the drain system.
Corrugated pipe
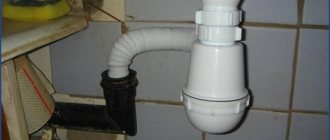
The second option is a corrugated tube, which is inserted into the drain hole at one end and into the drain hole at the other. During installation work, the main thing is to place the tube in the correct position; it must be bent in a certain way in two places and form a hydraulic plug. The flexible hose system saves space; it is advisable to use it in a small bathroom. Despite the convenience of using water seals of this type, they have the disadvantage of accumulating runoff sediments in the corrugated walls of the pipe. If a hose becomes clogged, it will have to be replaced.
Flexible
The third option is a pipe connection; of the three water seals, it is considered the highest quality, and at the same time the most expensive. The flexible water seal of this model is replaced with a curved pipe made of metal or polypropylene material. Their installation can be limited by the complexity of the impossible connection between the drain pipe and the waste socket. Before connecting the sink to the water supply, you need to take into account all the nuances and choose the right water seal model.
Installation of sink mounts
Perform this work in the following sequence:
- holes are drilled in the wall according to the markings;
- dowels are driven into them;
- then special mounting pins are screwed in.
Instructions explaining how to connect a sink in a bathroom or kitchen involve the use of dowels, nuts, mounting pins and plastic inserts that are included with the plumbing fixture.
When screwing in the studs, you should pay attention to the depth of their installation, since it should allow you to hang the washbasin bowl and screw the fastening nut. This means that the part of the stud protruding from the wall should be of a length that is slightly longer than the thickness of the sink and has an extra centimeter and a half for tightening the nut.
The principle of operation of a siphon with overflow
Why do you need a siphon with overflow? The main role of this device is to create a water barrier that would prevent foul-smelling sewer gases from entering the kitchen or bathroom.
The configuration of such a device includes the following elements:
- Protective mesh with 5 holes.
- Rubber gaskets with a thickness of 5 mm. When purchasing an inexpensive device, the gasket is black; if the siphon model is expensive, then the gasket is white.
- A drain pipe equipped with a small lip to allow installation of the gasket.
- Connecting screw.
- Siphon body.
- Sewer outlets.
- Nuts.
To make a siphon, materials such as plastic and metal are used. The first option is considered the most economical. They have a simple design and a small number of connections. Plastic siphons can be made from polyethylene or polypropylene. The latter option is characterized by greater rigidity; they hold their shape better, forming a reliable connection. For polymer siphons of complex shapes, polypropylene is used.
In the video - a siphon for a sink with an overflow:
To connect the element to a washing machine whose drain has a high temperature, you should also use this type of plastic. The reason for this demand is due to the fact that it is not afraid of high temperatures. After operating the washing machine in boiling mode, the siphon may leak. In this case, the problem can be solved by tightening all threaded connections.
The second material that is used to produce a siphon with overflow is metal. As a rule, such devices are used when installing sinks and sinks. The cost of metal siphons is much more expensive than plastic ones, but their service life is also longer. To obtain the product, brass and bronze can be used. On the outside, the alloys are treated with galvanic coating. A metal siphon is also produced based on stainless steel. However, such a product has not become widespread due to its high cost.
The video shows how to remove the siphon from the sink:
Connecting the washbasin to the water supply
Mixer installation
. When connecting a sink to a sewer in a bathroom or kitchen, you can install the faucet after attaching the plumbing fixture to the wall, but experts recommend doing this work before attaching the washbasin. The fact is that all connections to it and the fastening process are made from below (read: “How to choose a faucet for the kitchen - types, features, principle of operation, selection rules”).
Mixer installation work is carried out in the following sequence:
- depending on the type of mixer, one or two pins are screwed in;
- Before installing the faucet in the kitchen, install the hoses supplying hot and cold water and tighten them using an open-end wrench. Tightening is carried out with moderate force and very carefully, taking into account that after installing the mixer on the sink, they will no longer be able to be tightened;
- according to the washbasin connection diagram, you need to route water supply hoses through the holes in the sink;
- On the back side of the studs, sealing rubber bands, a pressure washer and fastening nuts are put on, which are tightened with a wrench.
You should pay attention to how correctly the mixer spout is positioned - the product is installed at a right angle relative to the mounting wall or the side of the sink adjacent to it.
Water sealing mechanisms in the kitchen
Most often, standard water seals are used in the kitchen, differing in some elements:
- 1. A water seal with two sockets is used for double sinks.
- 2. The water seal has several drainage outlets for different electrical appliances.
- 3. A water seal that has a waste shredder.
- 4. The water seal has a flatter layout.
- 5. Hydraulic sealers of new models.
Due to the above features, the installation work of the kitchen drain will be different. In some cases, preliminary assembly of the elements is required, and in some cases, the assembly of the drainage system occurs during the installation of the sink itself. If the sink drainage device has a complex plastic design, it is worth checking the elements for cracks and burrs, so as not to break the tightness of the water drain.
Installation of the flask
When installing the flask, the water seal is equipped with a gasket, the lid is attached, and the drain pipe is connected to the water seal glass using a nut and sealing gaskets. Next, the siphon is connected to the sewer pipe and secured.
Installation of corrugation for outlet
The next step is to install the corrugation, which is inserted into the drain to prevent leaks. If the sink has an overflow system, then the installation is carried out according to the same scheme that is used to install a washbasin in the bathroom.
Installation of a siphon with two sockets
If the kitchen sink is equipped with two compartments, then you need to use a siphon device that has two bells. A special feature of the installation work is a more thorough check of the connecting elements of the device and carrying out hermetic work with the two openings of the sink.
To connect a dishwasher or washing machine to the siphon, you must purchase two fittings for drainage. The hoses leading from the dishwasher to the drainage system are fastened according to a certain pattern; the method of fastening depends on how the fitting is mounted, with an angle or straight.
Mounting the washbasin on the wall
The sink is secured after completing the connection to the water supply:
- the sink with the mounted mixer is placed on mounting studs that are screwed into the wall;
- insert plastic inserts into place;
- Finally, tighten the nuts.
As for washbasins that have a support, their connection begins with installation on a pedestal or bedside table.
Connecting hoses to the water supply system
. A gasket is placed between the tap and the sealing nut. The nut does not need to be tightened too much, since the rubber gasket usually seals well. It can be tightened after the test (after turning on the water supply). If a leak occurs at the connection, the nut will need to be further tightened.
Corrugated and tubular siphons
It is not without reason that this design is considered the simplest of all types of siphons. Externally, it looks like a curved tube. Its fixation is carried out not with the help of threads, but with clamps. On the one hand, this allows you to avoid minor leaks, but on the other hand, it complicates installation and dismantling.
Corrugated siphon
Dropping small change into such a structure will definitely create a headache for yourself in retrieving it. At the same time, a large number of bends and the plasticity of the material make it possible to install it in almost any hard-to-reach place.
- The bottle siphon can be placed in a place with a certain height from the sink to the floor. With regard to a corrugated appliance, the position of the sink makes virtually no difference. Made from corrugated plastic, the siphon bends easily, and its water seal can be placed even away from the sink, thereby saving space.
- On the other hand, a bendable tube clogs faster. After all, the corrugated surface of the tube is not only on the outside, but also on the inside. If such a siphon becomes clogged, you will have to dismantle all its elements. In this sense, manufacturers offer their customers combined models, which at the same time partially consist of corrugated tubes and a bottle siphon.
- A tubular siphon is best installed under the bathtub, however, it is also suitable for sinks. It has a strong, rigid pipe that prevents rapid clogging, but is much more difficult to install. This sink siphon with overflow will require a certain position of the sink in relation to the floor. Often this design simply takes up a lot of space, and if there is a need to install a small sink, then this model should be abandoned immediately.
A few important notes
Before you start connecting the sink, you need to take into account some of the nuances of the work:
- to connect the kitchen sink to the sewer, you do not need to tightly tighten all the connections, since in this case the rubber sealing gaskets can be damaged;
- in the case when, when checking the quality of connections between the pipe and the cuff, there is a leak, then it is necessary to remove the cuff and thoroughly dry the surfaces that are to be reconnected. Then the dry cuff is lubricated with sealant and the connection is made again;
- To connect a double kitchen sink, you should purchase a special siphon that has an outlet to two pipes.
Every home craftsman, subject to the installation rules, can connect a sink or kitchen sink with his own hands.
How to replace an old siphon?
Let's look at how to change the siphon in a sink step by step. Since bottle-type plastic siphons are most often used in bathrooms, installation instructions will be given specifically for this type of piping.
Removing the old siphon
- Turn off the water supply so as not to accidentally flood the room.
- A bucket is placed under the siphon to collect dirty water flowing from the siphon.
- The siphon sump cup is unscrewed and removed, then the connection at the sink drain is disassembled. At the same time, all sealing gaskets are removed.
- The last thing to do is disconnect the pipe from the sewer.
Complete set of bottle-type plastic siphon
- An outlet pipe connected to the drain hole. This part is made of plastic with a metal threaded part pressed into it.
- The nuts are plastic.
- A tension screw that is used to secure the decorative grille that is installed in the drain hole in sinks.
Advice! The best option is to purchase a model in which the tension screw is made of stainless steel.
- Siphon body.
- Steel decorative cover for the drain hole.
In addition, the package includes gaskets for the sink siphon:
- A gasket that fits over the exhaust pipe. It is made of rubber and has a thickness of 3-5 mm.
- Rubber cuff in the form of a cone. Used when connecting the outlet pipe to the housing.
- Decorative rubber gasket in white. Installed from the front side to the drain hole.
- O-ring made of rubber. Installed on the lower pipe of the siphon.
Advice! Other parts may be included in the package. For example, a plug for closing a sink drain hole, etc.
Siphon installation
As a rule, the siphon is accompanied by assembly instructions with a detailed diagram; installation should be carried out in accordance with the manufacturer’s instructions. The work goes like this:
- The fit of the grate on the sink drain hole is checked. It should not protrude upward; on the contrary, a normally installed grille is somewhat “recessed”. If the grate is positioned too high, the water will never drain completely, forming a puddle around the drain hole.
Advice! If the drain hole in the sink has too small a stamping, then it is better to replace the washbasin model (you should agree in advance with the store about the possibility of exchange). In extreme cases, you will have to install the grille without a gasket, using only sealant.
- A thick rubber cuff is installed in the outlet pipe, having previously been lubricated with sealant.
- The mating surfaces of the threads on the parts are checked. If burrs or burrs are noticed on them, these defects must be removed with a sharp knife.
- A grate is installed in the sink using a thin white gasket. An outlet pipe is attached to the back of the sink. The docking screw is tightened.
- A gasket is inserted into the groove of the settling body, and the bottom part of the glass is screwed to the top.
- Next, you need to take the outlet pipe and first put a plastic coupling nut on it, then a cone gasket. The gasket should be positioned so that there is 3-5 mm of space between it and the edge of the pipe.
- The pipe is inserted into the “flask” of the siphon and the nut is tightened. The nut must be tightened by hand, as it is easy to tighten it with a wrench, which will damage the siphon. In addition, you need to make sure that the pipe is not inserted into the flask all the way to the wall, otherwise the water will simply have nowhere to go.
- If there is a pipe on the siphon body for connecting the drain from the washing machine, but it will not be used yet, then you should install a plug on the pipe.
- A rigid or corrugated outlet pipe is connected to the siphon body. A connection is made between the exhaust pipe and the sewer socket. If the diameters of the parts do not match, use transitional connecting cuffs made of rubber.
Checking the functionality of the siphon
The last stage of work is checking the build quality. It’s not difficult to do; just turn on the water at full power. If no drops are seen on the floor, then the connection is made efficiently.
So, a sink siphon is a necessary element of the sewage system, thanks to which unpleasant-smelling gases do not penetrate into the premises. It is quite possible to install it yourself, the main thing is to carefully study the instructions and assembly diagram. If everything is done correctly, the assembled siphon will serve for a long time without requiring replacement.
Bowls without drain-overflow system
If you are purchasing a standard sink without accessories, a siphon will not be so difficult to purchase. If you choose a designer model, it is advisable to purchase a siphon included.
In the photo: siphon A750114CR from Daniel Rubinetterie.
Bowls on the tabletop.
The design of the bowl may be hampered by an extra hole, or due to its unique shape there is nowhere to mount a drain channel, and not all sinks can be equipped with a built-in system. Most often, there is no “drain-overflow” in bowls that are placed on the countertop, visible from all sides, or, for example, in sinks made of colored glass or natural stone.
Alternative.
Such bowls will necessarily (this is the norm for manufacturers) be equipped with a regular drain, which cannot be blocked - although it has a “cap”, its function is only decorative. When choosing fittings for such a drain, take into account the minimum and maximum thickness of the entire structure (sink, countertops in the place where the drain is installed).
- 1 of 4
On the picture:
Errors made during the installation process that can cause pipes to become clogged
- Pipes from sinks, sinks and other plumbing fixtures must be mounted on a connection at a right angle of 90 degrees. If two devices are installed and the drains are drained towards each other, a blockage may occur in the tee of the pipe, which goes directly into the drain pipe. In this case, it makes no sense to clean the pipes from the side of the sink or washbasin using a spiral or hydrodynamically using a hose. If it concerns two sinks connected next to each other, then it is clear that from one sink the hose will pass to the second sink, but it will not be able to turn in the direction of the main drain pipe. One way or another, it will be quite difficult to clean the sewer.
- Another important mistake is that the drain pipe coming from the washbasin or sink is too high in the bathroom. As a result, the process of draining wastewater into the sewer pipe becomes difficult. Many people decide to move pipes and plumbing fixtures, which include bathtubs, sinks and sinks, to another location that is not provided for in the project. If pipes are changed, the main problem may be that the outlet to the device will be rigidly tied to the outlet of the pipe in the riser, and the situation is very difficult to change. When connecting sinks and sinks, everything should be fine, since there is a certain height reserve, taking into account the fact that plumbing fixtures are suspended at a height of approximately 90 cm. But despite this, many inexperienced installers may not take into account or think through such a detail. It is easier to make a mistake with the height when connecting a bathtub and shower. Often the drain is located above the floor surface. It is quite difficult to lift a heavy bathtub yourself, so a simple solution is to install the drain pipe above the siphon outlet. Thus, the pipe is often laid without the required slope, which can also cause clogging of the sewer.
- You can often encounter a problem in which pipes that are supposed to be attached to the wall from the outside are not fixed correctly. Products may sag, and counterslopes and other practically irreparable cases often form. Of course, this does not in any way affect the proper functioning of the sewer system, but this feature can cause blockages, which will require frequent cleaning of the pipes.
If you have started building your house, or have planned to carry out major renovations in your apartment, then you will have to face the need and, of course, the selection of materials. In addition, you need to draw up a project in order to calculate the correct number of pipes. The main parameter that needs to be correctly determined is the diameter of the sewer pipe, the slope, the number of angles and the method of joining the pipes to each other.
Can we start with what should be the diameter of the sewer pipe? By generally accepted standards, a pipe with a diameter of 100 millimeters is used in the toilet, and in the bathroom from 40 to 50 mm.
Kitchen Sink Installation
Kitchen sinks also differ from each other by type:
- Overhead, that is, mounted on top of the cabinet;
- Mortise, embedded in the tabletop;
- Recessed, built into or directly placed under the countertop.
The installation of sinks of the latter type should be entrusted to professionals, since they are often one piece with the countertop.
Installation of an overhead sink
Installation of an overhead sink is carried out directly on a kitchen cabinet of a suitable size. The ends of the sink are located along the perimeter of the cabinet. First, you should try on the sink and mark the mounting holes, screw the screws into the end of the cabinet, onto which the kitchen sink will be attached. It is worth pre-fixing the mixer and siphon, which after installation will only need to be connected. When installing, do not forget about the sealing gaskets located between the countertop and the sink body. They act as a sealing material to prevent leakage under the sink.
Installation of a mortise sink
Today there are kitchen sinks with two bowls. Their installation is carried out in exactly the same way as conventional ones. However, you will need a special siphon with two terminals. For a drop-in sink, you need to cut a hole of the appropriate size. Please note that you should step back at least 6 cm from the front edge of the countertop, and at least 4 cm from the back edge. We apply a sink to the countertop and make a marking, to do this we outline the sink, we step back 12 mm from the resulting contour, it is along the second line that the cut will be made. We use a jigsaw. The end of the cut is coated with sealant, this will protect the tabletop from moisture and further swelling. A siphon is attached to the sink, a mixer and a water supply are connected. Special fixing tabs are attached to the bottom. After this, the entire structure is installed in place, the pipes are connected to the liner, and the siphon is connected. That's it, you can check the quality of work.