In older apartment buildings, the number one problem is often faulty drainage. Agree, it’s unpleasant when the acrid smell of sewage spreads throughout your home, blockages constantly form, or your neighbors are flooded due to leaking old sewer pipes. Replacing the sewer system in the apartment can correct the situation.
If you involve specialists, updating the sewer system can cost a pretty penny. But you can deal with this issue yourself. And we will tell you how to do this in our article - we will talk about how to choose suitable pipes, and also provide detailed instructions with visual pictures on replacing the riser and pipes in the apartment.
Sewage device
Before replacing the sewer riser in an apartment, you should briefly familiarize yourself with the design of the drainage system. It consists of receiving devices from sources of water consumption, filters and sedimentation tanks, fittings and fittings, pipes of different diameters.
In an apartment building, a common device is a riser that collects wastewater from all floors of the building. Dismantling the old riser must be carried out taking into account a number of nuances.
Slopes
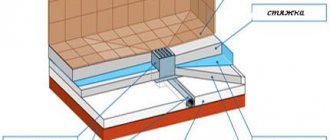
In five-story buildings, where cast-iron drainage systems still remain, there is a free-flow sewer system. Its principle is based on the movement of liquids by gravity under the influence of gravity. To do this, the pipes are given a slope of at least 3%.
Neighbors and areas of responsibility
Replacing the riser involves temporarily suspending the use of the drainage system at all levels. It is not always possible to agree on this with neighbors in advance. To eliminate possible problems during the repair process, you should submit an application to the service company to replace the riser, indicating the time for the work.
A few days before the installation of sewerage in the apartment, it is necessary to post a notice about this near the entrance.
Blockages
Pipelines become clogged for the following reasons:
- getting rags, cardboard and other large objects into them;
- animal hair collecting at joints;
- formation of plaque on the walls due to insufficient slope;
- settling of fat on the walls.
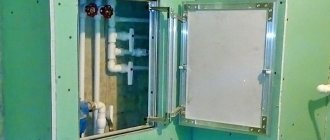
In order to prevent blockages in the existing sewer system, inspection hatches and check valves are installed.
Repair and replacement
It is better to resolve all issues with sewerage before redecorating the apartment.
The process of dismantling the old drainage system is associated with the formation of a large volume of dust and debris. The cast iron risers themselves deteriorate over time and can cause residents a lot of trouble.
Turnkey sewerage in a private house
Communal amenities in a private house are just as necessary for life support as in a high-rise building, but the owner himself must ensure their availability. Creating an autonomous sewer system or making a connection to a municipal sewer requires a competent approach; before carrying out the work, you will need to create a project, select materials, and select implementation methods.
Involving specialists will reduce the time and cost of work, ensure ergonomics and convenience of pipe routing, a high level of reliability of connections, and durability of the system.
Common problems and how to solve them
In an old pipeline, over many years of operation, corrosion develops, plaque and deposits appear. The gasket material loses its quality, the line loses its tightness.
Due to the shrinkage of the building, the pipes crack, chips and through holes appear on them.
Let's consider how to deal with this or that problem.
Bell leak
In such places, the pipes are connected to each other and to the tee. The occurrence of a leak is associated with a violation of the structure of the gasket or its complete destruction.
Elimination of the problem is carried out in the following ways:
- pouring cement mortar;
- adding silicone or liquid nails;
- sealing cracks with flexible rubber tubes.
Before sealing, you should clean the socket as much as possible, remove crumbs and grease from it.
Leak in the ceiling
The cause of this problem is a violation of the integrity of the tee or pipes located in the slab array. Damage occurs due to wear of gaskets, exposure to solvents or damage due to shrinkage of the building. This problem can only be solved by replacing the cast iron sewer tee with a more efficient plastic product.
Blocked riser
This is the smallest nuisance associated with the operation of sewerage systems in apartment buildings. The blockage is removed using a cable with a hook at the end. The cable is inserted into the inspection window below the clogged area and fed upward. After this, foreign objects are removed from the fan fitting.
What are compensators
When the temperature changes, pipelines undergo linear deformation. To compensate for this, flexible elements are installed on communications. Due to their elasticity, they compensate for thermal expansion and part of the pressure when it sharply increases, returning to their original form after the cessation of exposure. Devices for polypropylene pipes are usually made in the form of a loop, but depending on the installation conditions, other designs are also used. Such products can be purchased at the store or made independently.
Which pipes to choose?
The plumbing market offers a wide range of pipes and fittings for drainage. They are made from different materials, each of which has its own pros and cons.
Ceramics
Ceramic pipelines are resistant to corrosion, aggressive liquids and temperature changes.
They have smooth internal and external walls that do not form plaque. Installation of ceramics is carried out in the bathroom, shower and other places where the aesthetic component is important.
The disadvantage is the fragility of ceramics.
Polymers
Polypropylene products are popular among builders.
Plastic pipes are lightweight, they are easy to join using rubber reduction, the material is resistant to corrosion, vertical and horizontal loads.
The downside is that at subzero temperatures the plastic becomes brittle, and when heated strongly it becomes deformed.
Metal
For the construction of sewers, pipes made of cast iron and steel are used.
As for cast iron, it does not rust, but has rough walls and fragility. Steel is strong, bends easily, but is susceptible to corrosion.
The choice in favor of metal is made when building houses from timber and logs, which shrink strongly.
When are compensators needed?
Since polypropylene has a high coefficient of thermal expansion, pipes made from it must be equipped with protective devices. Compensators are installed:
- on the water supply;
- when installing heated floors;
- on the sewer;
- in heating and hot water supply systems.
The devices are installed on horizontal and vertical pipes in residential buildings, industrial and administrative buildings. Their use provides:
- long trouble-free service life of the pipeline;
- turbulence damping;
- stability of pressure in pipes during pressure surges;
- protection against water hammer;
- no distortion due to thermal expansion.
Work order
Installation of a new riser is carried out in a certain sequence. In order for this process to proceed without complications, it is necessary to provide for a number of points.
Precautionary measures
Carrying out plumbing work involves the use of electric tools, contact with toxic fumes, and sharp and heavy objects.
The following safety precautions must be observed:
- ensure good ventilation of the bathroom;
- use an insulating or filtering gas mask;
- perform work wearing protective gloves, goggles and an assembly helmet;
- use proper electric tools.
You should decide in advance how to secure the riser from above so that it does not fall along with the tee onto the repairman during the repair process.
How to prepare for the replacement process
In order for the installation of a new riser to be completed quickly and efficiently, it is necessary to carefully plan this work. You should check in advance the possibility of dismantling the toilet, draw up a diagram of the location of the tee sockets, inserts, fittings and adapters.
Everything should be at hand so as not to interrupt work to go to the store for missing items.
Devices tools and materials
In order to change the riser, the following tools and materials are needed:
- perforator;
- hammer;
- Bulgarian;
- oil level;
- screwdrivers;
- putty knife;
- chisel;
- pipes with a diameter of 50 mm and 100 mm;
- sealing agents;
- clamps;
- plastic dowels and screws for them.
It is advisable to prepare garbage bags and boxes, rags and buckets to collect dirt and water.
Replacing a sewer riser in a private house
The sewer system tends to wear out, and it is simply necessary to change it. In order to replace existing pipes with PVC or plastic, contact us. We will carry out all the necessary work as quickly as possible with a quality guarantee. All that is required of you is to obtain the consent of your neighbors. We will do the rest. We carry out work inside the house and, if necessary, outside it. Naturally, a complete replacement of sewer equipment is not always required; we diagnose and fix problems, for example, we replace pipes, adapters, rubber gaskets or clamps. The amount of the bill you pay depends on the correct diagnosis. We use modern equipment and will instantly detect the cause of the breakdown or completely replace elements between floors.
Dismantling the old cast iron system
The old riser will not be reused, and no delicacy is required when dismantling it.
To remove it from the tees, you must perform the following steps:
- disconnect the toilet from the floor and the drain socket and remove it from the bathroom;
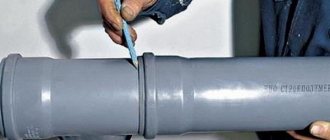
- Use a grinder to make first a lower and then an upper cut across the pipe;
- connect the cross sections with vertical cuts;
- insert the chisel into the slots and apply several strong blows with a hammer;
- loosen and remove from the tee first the upper fragment, and then the lower pipe;
- clean the upper bell and wrap it in cellophane.
After this, you need to remove all remains from the riser from the bathroom and wipe the floors.
How to properly dismantle the riser?
Before installing a new section of sewer pipe, you need to dismantle the old one.
There are two options:
- the work does not affect floor slabs;
- replacement is carried out with the capture of the area between the floors.
The procedure for dismantling the pipe itself is no different in both cases. The difference lies in the need to open the interfloor ceiling before dismantling the pipe in the second case.
Algorithm for dismantling the sewer riser:
- At a height of 1 m at least from the adjustable fittings, an incision is made on the cast iron pipe with a grinder and the section is removed from the lower socket.
- If the pipe cannot be loosened using a nail puller or chisel, you can try heating it to soften the old sealant.
- The riser is analyzed from top to bottom, from connection to connection.
We recommend that you read: How to make a chimney from a steel pipe with your own hands?
The opening of floor slabs between floors will need to be agreed upon with the neighbors. Dismantling of ceilings is carried out either with a hammer drill or using a crowbar, chisel and hammer.
Note! Work should be carried out without strong impacts, using rocking, heating, and gentle tapping. Excessive physical impact on a cast iron riser can split it.
Installation of a new riser
This stage of work begins with cleaning the bells from old plaque, dirt and degreasing the internal walls.
After this you need to do:
- Mark the outline of the new riser section on the wall. Drill holes and secure clamps in them.
- Attach rubber cuffs to the upper pipe and lower bell.
- Cut out the blanks and try them on.
- Insert the bottom of the pipe into the tee. Attach an inspection hatch to it. Secure the riser fragment to the wall with a clamp.
- Assemble the top of the riser using a compression fitting.
This is where the rough editing ends.
Features of the sidebar
Before repairing the sewer system in an apartment, you need to warn your neighbors in the riser so that they do not use plumbing fixtures. After this, collect all the necessary tools and materials (compensator, sealant, hacksaw, file, and in the case of welding techniques, a soldering machine). Then the water supply is turned off and the technical area is cleared of unnecessary items.
Inserting a fitting made of polymers is also possible for a non-professional if you proceed sequentially:
- The part of the pipe to which the sewer pipe will be connected is trimmed. The cut is processed with a file or coarse sandpaper to remove burrs.
- The upper part of the pipe is coated with silicone.
- The compensator is put on all the way.
- The lower part of the riser is covered with sealant.
- The device is secured with the plant into the socket of the pipeline, where the presence of a rubber seal is checked.
- The system is connected and the riser is secured.
Reliable fastening of the pipe is carried out by rigidly fixing it to the wall with a detachable clamp on a stud. The fastener is placed on the pipe above the compensation device, close to it.
Connection by soldering
To increase the strength of the connection of polymer pipe sections with thick walls, a welded tapping technique is used.
For a high-quality connection, you will need a welding machine for soldering polypropylene. The process goes like this:
- The end of the compensation device entering the plastic pipe is carefully cleaned of burrs and irregularities.
- The soldering machine is connected to the mains and heated to a temperature of approximately 260 degrees. When the device is ready for welding, its indicator will go off.
- The prepared end of the pipe and the end of the compensator are put on the nozzles of the welding machine, suitable in cross-section. When they soften, they are combined.
The plastic parts are combined so tightly that their molecules penetrate each other's layers. This is called the diffusion method. During hardening, both parts must be firmly fixed. Do not rotate or move them, otherwise the seam will lose its tightness.
Nuances of installation work
To install the compensator correctly on the sewer pipe, you should take into account certain installation nuances:
- pipes are cut using a fine-toothed hacksaw, so there will be fewer burrs on the cuts;
- grinding and sealing are carried out only after cleaning and drying the parts;
- All formed cavities are sealed with silicone sealant.
The silicone sealing composition has increased elasticity and will not interfere with compensatory movements, and will also maintain the integrity of the structure during temperature changes.
The compensator allows you to repair the sewer system without complete dismantling. Installing polymer models is not difficult. You don't even need plumbing experience to install the device.
How to connect pipes
The technology is almost the same for products made from all materials.
The straight part of the pipe is inserted into the socket, inside of which there is a seal.
Sealing
This process is carried out using the following materials:
- tow;
- jute rope;
- automotive lubricant;
- silicone;
- Teflon tape;
- self-adhesive film.
Additional sealing is needed in cases where the riser will be sheathed with a rigid stationary box.
Checking for leaks
This procedure must be carried out to ensure the quality of the work performed. A dense material tied to a rope is inserted into the inspection hole and moved below the tee in the floor. After this, the drain is filled with water and a pause is maintained for 20-30 minutes.
If there are no leaks, then the final installation was carried out efficiently.
After this, the riser can be closed, not forgetting about installing sound insulation.