Connecting a heated towel rail: DHW or heating
Before installing a water heated towel rail in the bathroom, you need to decide on the method of connecting it.
Two options are available:
- Connection to the DHW system . The method guarantees year-round heating. The device heats up when hot water is consumed - the heated towel rail cools down overnight even when turned on directly through the riser.
- Connection to the heating system . This option is relevant in the absence of a centralized hot water supply network. Thanks to the forced circulation of the coolant, the coil remains warm around the clock. The disadvantage is that the dryer functions only in the cold season.
When replacing a heated towel rail in an apartment building with a change in the way it is connected, a project will need to be developed and approved by the housing and communal services department. It will take about a month to complete the package of documents.
The insertion points of the water device into the heating or hot water riser can be hidden behind a screen or box constructed from plasterboard
How to connect a heated towel rail to a hot water supply riser
Heated towel rails are connected to hot water supply with centralized hot water supply year-round. It is possible to connect the units to independent year-round heating systems. In this case, it is necessary to install shut-off valves that allow you to turn off heated towel rails in the summer.
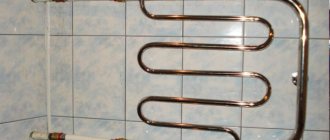
Increasingly, iron pipes (cast iron, steel, copper) in homes are being replaced with plastic ones. Almost all apartments now contain polypropylene. Let's connect the heated towel rail to the plastic pipeline.
This is what the connection node looks like in a closed scheme:
The units are connected to the DHW using couplings. They are available in the following sizes:
- 1′′×1/2′′ or 1′′×3/4′′;
- 3/4′′×3/4′′ or 3/4′′×1/2′′.
Connection node according to an open circuit:
In the direction of movement of the coolant, make a slope for the supply to the heated towel rail. Along the entire length - from five to ten millimeters. If the eyeliner is less than fifty centimeters, then it can be strictly horizontal.
The axis of the heated towel rail and the supply pipe can be removed from the surface of the facing tiles or plaster by:
- 3.5 centimeters – with a pipe diameter of up to 23 millimeters;
- 5-5.5 centimeters - with a pipe diameter of 40 to 50 millimeters.
The liner and the unit must fit snugly against the supports and be firmly fixed. In this case, the heated towel rail and supply pipeline are not welded, but placed on brackets or supporting hooks. A “hot” pipe is subject to thermal deformation. Anyway. If you weld, the load on the wall will increase.
The heated towel rail must be clearly aligned horizontally. Otherwise, an air lock may form inside, preventing the coolant from filling the entire unit. To prevent such troubles, Mayevsky taps are added to the connection diagram.
General installation requirements
Installation of a heated towel rail with a “water” operating principle is carried out subject to a number of conditions:
№1. The diameter of the pipes of the device must correspond to the diameter of the riser; narrowing from the installed fittings is unacceptable.
№2. A jumper must be provided between the drying outlets. The bypass performs a number of tasks:
- maintaining the speed of water circulation throughout the riser;
- separation of coolant flows allows you to save heat for subsequent water intake points;
A significant advantage of turning on the closing sections, bypasses, is the ability to turn off the heated towel rail for repairs without stopping the operation of the system as a whole.
№3. It is prohibited to install shut-off valves on the pipeline section up to the bypass and directly on the jumper.
Failure to comply with the requirement entails:
- slowdown of water circulation through the riser and drop in coolant temperature;
- deterioration of pressure in apartments located in the direction of water supply.
The closing sections can be equipped with the usual ball valves on the bypass and supply line or with more functional three-way valves that allow the coolant to be directed either to the bypass or to the radiator.
№4. The recommended height for placing towel dryers according to SNiP is 120 cm from the floor.
№5. Maximum distances between the heating device and wall cladding:
- 3.5-4 cm – if the coil diameter is 2.5 cm or less;
- 5-7 cm – for pipe cross-sections larger than 2.5 cm.
If a bypass is provided in the installation diagram, then it is permissible to install shut-off ball valves at the outlet and inlet of the device.
Using a bypass in a heating circuit allows you to divide the total coolant flow into two parts. One of the parts goes into the battery, the other is supplied to the following devices, due to which all radiators receive coolant at almost the same temperature as the first (+)
Attaching a new heated towel rail
Installation of the heated towel rail is carried out as follows:
- The American counterparts are screwed into the purchased heated towel rail. All joints are sealed.
- The coil is applied to the wall, and attachment points are marked.
- Holes are drilled in the wall for attaching brackets, which are usually mounted on dowels.
- The heated towel rail is connected to the riser, after which the fastenings are fixed to the wall. It is recommended to first level the coil. Connections must be tightened carefully so as not to damage the threads. But their insufficient compaction can lead to the system leaking.
- To check the tightness, we fill the coil with water. The taps must be opened smoothly to avoid water hammer.
- If leaks are detected in the pipes, we turn off the shut-off valves and eliminate any deficiencies.
Thus, knowing how to replace a heated towel rail, you can do the work yourself or supervise the work of professionals.
Recommended and unacceptable insertion schemes
The operation of the coil is based on the principle of a “gravity pump”. Proper insertion ensures natural circulation and functionality of the radiator. The development of a do-it-yourself installation diagram for a water heated towel rail is carried out in accordance with the design of a specific model and the location of the riser in the bathroom.
Lateral and diagonal connection
For most devices, the optimal option is a connection with coolant supply through the top outlet and outlet from the bottom. This is achieved with universal connections, the diagrams of which are given below.
Lateral and diagonal connections without narrowing or shifting the bypass are equivalent options. The circuits function well with coils of different shapes (+)
Advantages of a universal insert:
- performance does not depend on the direction and speed of water supply in the riser;
- after turning off the circulation, bleeding of air is not required;
The universal insertion option allows you to place the heated towel rail at any convenient installation distance from the riser.
Conditions for the operation of the scheme:
- The lower insertion point is located below the connection pipe to the radiator, and the upper insertion, accordingly, is above the upper outlet. The slope of the supply pipes is 2-3 cm per meter. A horizontal connection is permissible for pipes with a cross-section of 32 mm, and also if the distance to the riser is less than 2 m.
- Supply pipes - without bends or humps. Otherwise, the system becomes airy and natural circulation stops.
- Optimal diameter of supply pipes: ¾ inch steel, 25 mm – reinforced polypropylene.
- It is advisable to insulate the pipes. This requirement is especially relevant for hidden installation of a plastic pipeline.
A completely workable side/diagonal insertion scheme with a narrowed bypass. Plumbers resort to this design on a previously installed heated towel rail if there is no need to completely change the design of the riser.
Between the leads to the device, the jumper is narrowed by one diameter size. The insertion option is only suitable for water circulation in the direction from top to bottom
Shifting the bypass is justified if you want to preserve the old connections to the riser. With this connection method, it is not recommended to use a narrowed jumper. The main requirement is the top supply of coolant.
Tolerances and installation requirements for tapping with an offset bypass are the same as for lateral or diagonal connection with a flat jumper (+)
Some dryer models are designed for bottom connection. The insertion is carried out according to three main schemes.
The circuits are operational in any direction of coolant flow. When the water is turned off, the system is aired out, so a drain valve must be located on the vertical manifold. As a rule, it is included with the device (+)
Requirements for implementing the bottom connection:
- The lower outlet must be located below the heated towel rail.
- It is advisable to insulate the supply pipes.
- The upper outlet of the riser when using an offset or narrowed bypass is located below the point of connection to the device.
The optimal slope is about 2 cm per meter of pipe. Fulfillment of this condition ensures that the circuit is independent of the direction of water flow.
Possible forced insertion options
When connecting laterally, some deviations from typical recommended circuits are allowed.
Pipe routing if a non-standard location of the liner is required. The operation of the device is equally effective in different directions of the coolant (+)
The basic conditions of the tie-in remain unchanged. The difference is in the connection points between the heated towel rail and the riser, as well as in the presence of vertical sections at the inlet and outlet of the device.
An alternative sidebar option is shown below. The top of the heated towel rail is located above the top outlet. After turning off the water, you will need to bleed the air from the coil.
The connection diagram requires the installation of an air vent on the device. Due to the design “step”, when the water supply is stopped, an air lock is formed in the system (+)
The lower inset may also be somewhat modified. The need to place pipes from the riser at a minimum distance to the floor forces us to increase both ascending connections. If all requirements for the lower connection are met, the system operates without failure.
The requirements for installation work when inserting with extended vertical sections of the lower line do not change. Different directions of water circulation are allowed (+)
Incorrect connection diagrams
Inexperienced craftsmen sometimes do not adhere to the recommended schemes. As a result, the dryer remains cold with an uninterrupted supply of hot water. Examples of possible omissions are displayed below.
Incorrect execution of the side and bottom inserts leads to a stop in the water circulation in the heated towel rail (+)
In both options, the device is located below the lower outlet from the riser. The coolant that sinks down cools and becomes trapped. The water is not pushed back, since there is pressure from the coolant flow from above.
Side cut with a loop at the top. The scheme is implemented by craftsmen in order to hide communications behind the suspended ceiling
Air accumulates in the resulting “hump.” Over time, the air lock blocks the circulation in the radiator and the heated towel rail cools down.
The option presented below combines two errors at the same time. The scheme is obviously not working.
The combination of the lower and upper threshold impedes natural circulation. This design is typical when craftsmen try to hide the upper supply behind the ceiling, and the lower one in the floor screed
Threading and pipe fastening
To connect to the riser, the remaining parts of the pipe must be threaded. It is most convenient to use a lever mounted on a ratchet with a long handle. You must first apply any lubricant to the pipe. It is important to ensure that the leech goes in smoothly.
The thread is cut as follows: half a turn forward – a quarter turn back. There is no need to rush during this operation.
Which pipes are best to use?
- To supply water to the heated towel rail, it is more convenient to use reinforced plastic pipes. It is not necessary to buy a soldering iron for welding; you can borrow it from friends or rent it
- You can use steel pipes, but connecting them will require quite complex welding work. They weigh a lot and are susceptible to corrosion.
- Copper pipes do not rust, but they will have to be connected by soldering, and they cost a lot.
USEFUL INFORMATION: Dimensions of washbasins and sinks in the bathroom
Fittings are screwed onto the resulting threads on the pipes. For compaction, use flax tow and Unipak paste. There are recommendations to use waterproof sealants, but then the connection will be permanent.
Installation of polypropylene pipes is simple. To connect them, various fittings, angles and couplings are used. The welding soldering iron comes with instructions that describe in detail the entire process of pipe soldering. There are several important points:
- When soldering plastic pipes, it is strictly forbidden to rotate them.
- It is not recommended to use tow to seal polypropylene pipes.
- The supply line must be installed in such a way as to provide the heated towel rail with a distance of at least 35 mm from the wall. With a coil diameter exceeding 23 mm, the offset increases to 50 mm.
- Tightening plastic fittings should be done with special strap wrenches; using gas ones can lead to damage to the connecting element.
- It is imperative to install a Mayevsky valve into the system to bleed air.
- Shut-off valves on pipes must be reliable.
- During installation, it is better to use “American fittings” (fittings that allow you to connect system elements by tightening a union nut), so that later you can easily disassemble the entire system if necessary.
Step-by-step installation of a water heated towel rail
The technology for installing a water heated towel rail with your own hands is the same for different connection schemes. The step-by-step progress of work includes dismantling the worn-out device, supplying pipes from the riser, installing taps and fastening the coil.
Preparation of tools and materials
The set of tools required to install and replace a heated towel rail depends on the type of water pipes in the room. For installation through polypropylene pipes you will need: ball valves; mounting brackets; polypropylene pipes; soldering iron and knife for cutting PP pipes.
The standard equipment of the heated towel rail includes:
- transition corners;
- silicone gaskets;
- locking units;
- telescopic brackets;
- Mayevsky crane.
It is advisable to use components from the same metal in the system to avoid electrolytic corrosion.
All connections are sealed with gaskets, threaded detachable units are sealed with plumbing tape (+)
Dismantling of old equipment
Before dismantling the outdated coil, it is necessary to coordinate the actions with the house management organization. Disconnecting the riser from the water requires special permission.
Following actions:
- If the towel dryer is not integral with the hot main, then the threaded connections must simply be unscrewed.
- If the device is welded to the riser, then it should be cut off with a grinder. The remaining portion of the pipe connection should be sufficient for threading.
- Remove the used device from the brackets.
The height of the cutout in the riser must exceed the distance between the pipes of the new device by the length of the couplings and bends required for inserting the bypass jumper
The size of the dismantled area must be determined with maximum accuracy. It’s better not to cut a little, and after “trying on” the device to the installation site, adjust it according to the fact
Installation of bypass and ball valves
The coil can be mounted without installing a bypass, but experts recommend providing a jumper in advance. Ball valves are installed at the ends of the heated towel rail. If necessary, the coolant supply to the device can be shut off, while water will circulate freely through the riser.
The bypass is inserted into a riser made of PP pipe using tees and couplings (+)
To install valves on pipe sections, cut a new thread using a die of the required diameter. If after dismantling the old device the thread has survived, then it is enough to “drive” it with a die to improve the connection. Install shut-off valves on the prepared pipes.
Installation of the jumper in the steel pipeline is carried out by welding. The bypass diameter is equal to the cross-section of the riser pipe
Attaching the heated towel rail coil
The procedure for “hanging” and connecting the device is as follows:
- Apply markings on the wall for the brackets - it is necessary to ensure that the placement of the coil is horizontal.
- Prepare the holes and insert dowels into them.
- Screw the brackets to the heated towel rail, place the device against the wall and secure with screws. It is important to adhere to the recommended distance between the radiator and the wall cladding.
- Connect the unit to the valves on the jumper using fittings, seal the connections with linen wrap.
Depending on the type of connection, straight or angled threaded fittings are used.
At the end of installation, inspect the tightness of the joints and smoothly open the taps to check the functionality of the device. There should be no leaks or drops
Types of structures, materials
The heated towel rail, whose direct responsibility is to ensure that laundry dries quickly, also plays another role - it serves as a heater.
Principle of operation
All devices are classified according to the type of coolant.
- Mermen. This is a classic - coils through which hot water passes. More often they are connected to a water riser, less often (usually in private houses) - to a heating system.
- Electrical. These heated towel rails are heated by electricity. Advantages: no need to install them in a specific location (next to the pipes), the ability to adjust and turn them off to save energy.
- Combined - water and electric at the same time: two coils, one of which can be rotary, have different heat sources. They are distinguished from previous products by their increased price.
Self-installation is possible if a water model is purchased. In this case, outside help will not be needed. Electric or combined heated towel rails require skills. The simpler the design itself, the easier it is to handle its connection yourself.
Materials
The cost and reliability of heated towel rails depends on the materials used for their production. These include:
- Regular steel. This is the most budget option. Its disadvantages are relative: it is massive and not very attractive. However, the first disadvantage turns into an advantage, since these heavy structures are durable, the second is eliminated by painting.
- Stainless steel. This is an undoubted leader when it comes to price-quality ratio. These heated towel rails are durable, reliable, and look impressive without any decoration. They also don’t care about corrosion, temperature changes, or pressure.
- Brass. Copper. Such models often have complex shapes; they are resistant to corrosion, but are not able to withstand pressure changes as unshakably as steel. Copper is distinguished by its high speed of drying towels, but the high price is the other side of this coin.
When choosing a heated towel rail, the operating principle and attractive appearance are not the main criteria. It is necessary to take into account the maximum permissible pressure in heating or water pipes, because the material must withstand potential troubles - water hammer.
Features of installation of electric models
Unlike water models, electric dryers can be installed anywhere, since they do not depend on the location of heating pipes and hot water supply. In this case, special attention should be paid to the quality of the electrical wiring.
Requirements for installation of electric heated towel rails:
- The installation location is selected taking into account the level of protection of the device from moisture. The distance to the bathroom or washbasin is at least 60 cm.
- The minimum distance to the floor is 20 cm, to the wall – 30 cm, to the surface of furniture – 75 cm.
- The heating device must not be placed directly under the outlet.
Connection to the electrical network is carried out in accordance with the international standard NFC-15-100.
The optimal location is zone No. 3. When installed in zone No. 2, protection of the device from splashes is required (+)
Electrical wiring under the heated towel rail is carried out in compliance with electrical safety standards in rooms with high humidity:
- connection via a three-wire cable with grounding;
- Only hidden electrical wiring is allowed;
- the socket must have a rubber seal and a cover covering the contact holes;
- Copper wires of the VVGng and VVGng-LS brands are used for the electrical network.
A prerequisite for the installation and operation of electrical devices is the use of an RCD that turns off the device when the current operating characteristics are exceeded.
Oil heated towel rails require rigid fixation, while cable radiators can be installed in any position
Where to connect and where to hang
You can connect a water heated towel rail to both the hot water riser and the heating system. If both of these options are available, DHW is usually chosen
There are three reasons for this: there is less hassle with permission to connect, you can connect at any time of the year (agree with the management company to turn off the riser and that’s it) and, most importantly, such a heated towel rail heats up all year round
If there is no hot water supply in the house, you will have to connect to the heating riser. This requires permission from the Criminal Code and a project. Buy a heated towel rail (preferably a simple design), go to the housing office with its passport (copy), write an application. If permission is given, order the project (you will also need a copy of the passport with connecting dimensions). Then, according to the project, you do it yourself or hire performers (plumbers from the housing office, as an option). Call representatives of the Housing Office for acceptance.
To ensure that the “towel” always warms up without problems, all connections are straight, without arcs or pockets
When determining where to install the heated towel rail, questions may still arise about what height it should be hung. If you have a choice, it is most convenient to place it so that it is at head level and below. This is if you install a U-shaped or snake. If we are talking about “ladders” of great height, the top bar is placed at the level of the heat of the raised hand (approximately 190-200 cm).
When choosing a location for installing a heated towel rail, you must also take into account the distance from the riser. In principle, the closer to the riser, the better - the greater the chance that it will work. But, it can be attributed to a meter or so only if the following conditions are met:
- low hydraulic resistance of the heated towel rail (simple shape and cross-section 1″ or 3/4″),
- sufficient pressure (2 atm or more)
- drain pipes of normal diameter (one step smaller than the riser).
At the same time, be sure to follow other connection rules. Then there will be chances that such a “remote” device will work normally.
What not to do
All the above schemes work stably. As you noticed, all bends go straight, without bends in the form of an arc or rings. This is not accidental - air accumulates in all irregularities, which interferes with, and sometimes completely blocks, circulation.
This scheme doesn't work
The installation of the heated towel rail in the photo is incorrect. At least two mistakes were made:
- the bends are made narrower than the center distance of the heated towel rail;
- They are made with a metal-plastic pipe with loops.
This connection simply cannot work. Metal-plastic pipes are an excellent material, but not for connecting heated towel rails. Their fittings have a very narrow lumen, which has a bad effect on circulation. Plus, air accumulates in the loops, and the flow along the upper loop, even when supplied from above, will not flow - too much hydraulic resistance to the water must be overcome.
Unstable circuits
The following two schemes may work, but not always. At the bottom of the heated towel rail, the water stagnates and, given any difference in height, cannot rise. No one can say specifically when it will work and when it won’t. Depends on the pressure in the riser, the diameter of the pipes and the design of the dryer itself.
Unstable connection schemes
With such a connection, even a working connection may suddenly (usually after stopping) stop working. Everything is simple: the pressure has changed, the pipes are clogged, the water from below is not “pressed”, the heated towel rail does not heat.
Another option for an unstable circuit is with a loop on top. Again, it will work under certain conditions. But sooner or later the highest point will become airy and block the circulation. The problem can be helped by installing an automatic air vent at the highest point, but if the pressure drops, it will not save you.
With loop on top
Not true at all
The photo below shows examples of what not to do. Schemes without a tap on the bypass are inoperative. What this threatens is known. In addition, after several years of use, they will stop functioning altogether. Most likely this will happen after the next shutdown - the system will become clogged with dirt. This is because the entire flow of hot water is directed through the heated towel rail. After repairs, the water carries a huge amount of dirt, which safely settles in the bends (in the lowest areas first). Within a few years everything becomes completely clogged. Fortunately, everything needs to be redone and connected correctly, but only flushing can help the fire.
Very bad idea
It is necessary to wash both the heated towel rail and the connections to it. To do this, remove the dryer and wash it in the bathroom, and wash the outlets one by one by connecting a hose to the free outlets, the other end of which is taken to the sewer. By manipulating the taps, pass a flow of hot water through one outlet, then through the other. After washing everything is put back in place. It may be possible to start the system after this.
Design and specifications
Heated towel rails are made of corrosion-resistant metals or alloys:
- of stainless steel;
- aluminum;
- copper;
- brass
The devices have different shapes - U-, U-, M-, C-shaped, “ladder”, “trapezoid”, angular, stepped, ring-shaped, “snake”. Can be swivel, with an additional shelf. The coating is made of shiny chrome, heat-resistant paints, antique brass or bronze. The variety of shapes and colors allows the design to be used in any bathroom interior.
Most often, when installing a heated towel rail in a bathroom, the most significant factor is the appearance and method of connection. If the dryer plays the role of the main heater, before purchasing you need to calculate the required power based on the norm of 100-140 W per square meter of room area.
Heat transfer at standard operating temperatures in the system depends on the size of the device:
- small ones produce no more than 300 W;
- medium size - up to 900 W;
- large - over 1200 W.
The power of electric heated towel rails is selected similarly to water ones. It is equivalent to energy consumption (consumption) and is indicated in the technical data sheet.
Connection diagrams
We have to look at three scenarios:
- Apartment building with dead-end hot water supply;
- Apartment building with circulating hot water supply;
- Private house or autonomous water heater in an apartment. In this case, we have complete freedom of action: hot water supply systems with heated towel rails can be designed from scratch.
Boiler room with a boiler in a private house
The video in this article will help you learn more about how heated towel rails are installed: a connection diagram, auxiliary fittings and a circuit diagram of the hot water supply will be presented to your attention.
Dead end DHW
The heated towel rail is connected between the riser and the hot water supply. A shut-off valve is installed at the water supply inlet to the dryer. For obvious reasons, the heating of the coil is only possible when water flows through your taps.
Bathroom in Khrushchev: the hot water supply is connected to the riser through a coil
Is it really impossible to realize continuous circulation through the coil - at least by creating a closed circuit and equipping it with a circulation pump?
This is possible, but it makes no sense.
There are two reasons:
- The circulation system must have a heat source to heat the water, compensating for heat loss through the pipes. An obvious candidate for the role of such a source is a hot water supply riser. Only - that's the problem! - it, like the coil itself, cools down in the absence of water supply;
- An inexpensive circulation pump costs about 2,000 rubles and consumes 50-70 watts. An inexpensive electric heated towel rail costs the same and has an energy consumption of 30-80 watts. The principle of Occam's razor, which does not recommend complicating the task unnecessarily, cuts off circulating hot water supply as an unjustifiably complex solution.
The electrical appliance in the photo consumes no more than 80 watts
Circulating hot water supply
Comprehensive instructions for connecting the dryer to the circulating water supply are contained in the already mentioned SP 30.13330.2012. According to the text of the document, heated towel rails must be connected to the DHW supply pipelines (read - placed in the gap of the hot water risers connected to the supply bottling). Connection to circulation risers (return) is permitted provided that shut-off valves and a bypass are installed.
Connecting the coil with bypass and taps
Please note: the author strongly advises that you adhere to this connection diagram even when installing the supply coil. Shut-off valves will make it possible to turn off the dryer in the summer heat, and a bypass will prevent the circulation in the group of risers from stopping when turned off.
Practical implementation of connection
Autonomous hot water system
How to implement hot water supply with a heated towel rail in a system with autonomous hot water preparation when installing it yourself?
The device is installed in the gap of a looped filling or hot water supply line. Circulation in them is ensured by a pump.
Circulation pump for domestic hot water
The connection of the circuit to the heat source is determined not so much by its type as by the presence or absence of an additional outlet for connecting the circulation pipeline.
Here are two examples of connection diagrams.
Circulating hot water in a system with a single-circuit boiler and an indirect heating boiler
The pump causes water to circulate in a closed circuit between the boiler taps. The boiler (in this case, indirect heating) must have three connections: two for connecting the DHW circuit and one for make-up.
Boiler in a system with DHW recirculation
Captain Obviousness suggests: connecting an electric boiler with a circulation pipe is completely identical to that shown in the diagram.
DHW with thermostatic mixer
If the boiler or any other device (gas water heater, double-circuit boiler, flow-through electric pressure heater) does not have a circulation connection, a scheme with a three-way thermostatic mixer is implemented: hot water circulates in a closed circuit and is heated to compensate for heat loss. As water is consumed, the circuit is fed from the cold water system.