What types of screens are there?
All screens are rigid structures with hinged or sliding panels on a frame. In most cases, they are installed on the outside of the bathtub. There is a wide selection of industrial models with different designs and design features. Different materials are used both for the manufacture of the frame and panels.
Differences in materials used
The frames are made of aluminum, steel or plastic. In home-made structures, metal profiles for plasterboard and wooden blocks are used. Plastic frames are less reliable than metal frames. If you do not arrange storage under the bathroom for small items that will be used several times a day, you can choose plastic. The doors in this case only provide access to communications.
Screen made of wooden blocks.
For the manufacture of panels there is a greater choice of materials:
- Plastic screens can have different textures and shades. They are easy to care for: dirt and soap scum can be removed without problems. Installation is simple, the material does not deform.
- Spectacular and unusual models are made from plexiglass. They have a matte or mirror surface, onto which painting or other decor is applied. The material is strong, durable, inert to detergents, and does not wash out.
- MDF panels are inexpensive and come in a variety of colors. Contaminants are easily removed from their surface; special care is not required. They fit organically into the interior.
- For home-made structures, in most cases, moisture-resistant plasterboard is used. It is easy to cut to size and give it the desired shape. Lasts for a long time.
Screens made of metal, acrylic or combined materials are less common.
A common homemade screen option is brickwork under the bathtub. It is covered with tiles, mosaics, and a technological hole is left for access to the siphon.
Brickwork under the bathtub.
Design differences
The frame and panels are the main parts of the product. They are available in 2 versions: solid and with doors that provide access to communications and items stored under the bathroom. Models with a beautiful design organically complement the interior if the design is in the same style or monochromatic.
Existing panel placement options:
- in the form of sliding doors;
- removable or hanging screens;
- blind stationary slabs;
- swing doors;
- with inspection hatches in fixed facades.
Sliding doors slide along tracks to reveal the space underneath the bathtub. The metal frame is more reliable for them. Such screens can be easily installed in small rooms - they are compact and do not take up free space.
Hinged doors are convenient to use, but when they are in the open position, they require additional space. For small rooms this is not the most suitable option. Before purchasing them, they take measurements to find out whether the door can be opened freely. Models are also produced whose doors do not open to the sides, but fold down. They have the same disadvantages.
Removable panels do not have a technical opening for inspecting communications. If necessary, they are dismantled. Used primarily with acrylic bathtubs.
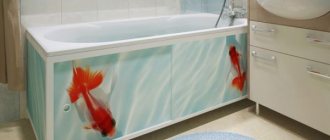
Plastic sliding screen for the bathtub.
Solid screens are the most durable; their solid surface is more attractive than one divided by sections or doors. They provide more possibilities for design, but even plain ones, without decoration, look beautiful. Fixed parts have a longer service life.
A significant disadvantage of this type of screen is that it blocks access to communications. If necessary, the panel is removed to get to them. This takes a lot of time, which in an emergency can lead to flooding of the apartment and neighbors.
A fixed stationary screen with an inspection hole eliminates the need for dismantling. Access to pipes for repair is provided through an inspection door. Its small size does not allow you to arrange shelves under the bathroom for storing small items.
The surface of the screen is made not only solid, but also lattice. In the second case, air exchange under the bathtub improves, and the likelihood of mold and unpleasant odors is practically eliminated. The design of most industrial models includes adjustable legs. A gap is formed between the floor and the lower end of the panel, which allows you to comfortably stand next to the bathtub.
How to choose the right screen
When choosing a screen for your bathtub, you need to pay attention to several aspects. First, you need to consider the area of the room
After all, if a bathtub in a small room has a screen with doors that come off, they will make it difficult to use. In a tiny room, it is best to make sliding panels. You also need to understand that fragile glass and mirror screens are not the best choice for an apartment where small children live
First, you need to consider the area of the room. After all, if a bathtub in a small room has a screen with doors that come off, they will make it difficult to use. In a tiny room, it is best to make sliding panels. You also need to understand that fragile glass and mirror screens are not the best choice for an apartment where small children live.
Before going to the store to buy a finished screen or material for its manufacture, you need to very carefully measure the dimensions of the bath itself: its length, height, width. If a side panel is required, you should also know its expected dimensions.
When purchasing a finished structure, you need to check whether the rollers on the guides are in good condition and whether the screen legs are height adjustable. How are joints made on plastic panels?
All this is important, because a pleasant appearance is what a person strives for
You need to understand that if the bathroom does not have a good hood, then the wooden frame for the screen made of chipboard and MDF will sooner or later deform and collapse from moisture accumulated over years of use. Therefore, you need to take care of the hood in advance or use moisture-resistant materials.
Before installing it yourself, you should think through the design in detail - its functionality and appearance. Only after this should you get to work. In this case, the result will please the owner for many years.
Stages of installing a sliding screen under a bathtub
The installation sequence depends on the type of model purchased. There are no special problems with installation. When purchasing a kit, take into account its size, which should be sufficient to cover the bathtub. Before installing the screen, connect all communications.
If you have been using a bathtub with open sides for a long time, clean the space under it from dust and dirt, make sure there are no leaks, dampness or mold on the walls. Such defects must be eliminated, otherwise they will later turn into a problem.
Required tools and spare parts
In most cases, you can install a factory product using a wrench and a shaped screwdriver, which are sometimes included in the kit. Many designs involve fixing the frame with adjustable legs, without attaching it to the floor, walls or bathtub. In other cases, you will need an impact drill or a hammer drill with a set of drills, a hammer, and dowels with self-tapping screws.
If the panels do not fully correspond to the dimensions of the plumbing fixtures or are made independently, to give them the required dimensions you will need a jigsaw, a file, a knife, sandpaper, a level, a square, a tape measure, and a pencil.
Mounting the screen under the bathtub.
The purchased product includes:
- 2 or 3 panels;
- frame elements: 2 side posts and the same number of guides;
- legs;
- handles with screws for doors.
The presence of all necessary parts is checked according to the technical documentation. When installing, follow the assembly instructions. Each model has small features that should be taken into account.
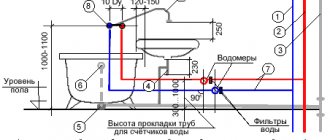
Marking
Before purchasing, you need to take the dimensions of the bathroom to choose a model with suitable parameters.
Measurement of the bath.
Step-by-step instructions will help you complete the markup correctly:
- Apply a level to the sides of the bathtub that touch the walls and draw a line with a pencil. There is no need to press hard - after installing the screen it will be visible.
- They retreat 1 cm inward from both lines. Lines are drawn along the level - guidelines for installation, along which the outer edge of the vertical posts will be located.
- A plumb line is applied to the corner of the bathtub, and a mark is placed on the floor in the place to which it points. A line is drawn from the lines on the wall in the direction of this mark. Correct with a square so that at the point of intersection of 2 lines it turns out to be 90°.
The markings on the walls are for vertical posts. Lines on the tile indicate the location of the outer edge of the guides. The point of their intersection is the place for mounting the corner post. This marking method is used regardless of the model of the protective structure and the thickness of its walls. It is enough to indicate the location of the outer sides of the frame.
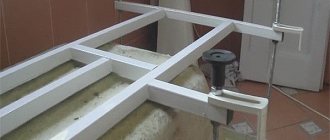
Creating a wireframe
The frame is assembled on the floor or on a flat table. Lay out 2 guides in parallel, with the grooves facing inward. The racks are placed across the top, ensuring the alignment of the mounting holes. Self-tapping screws are screwed into them, but not completely.
Adjusting the legs
The legs are screwed into the plugs of the vertical posts with threaded holes. Their height is adjusted after installing the fence under the bath between the side and the floor. By rotating the legs, the structure is installed by surprise. The length of the legs allows you to adjust the height of the product within a range of 10 cm.
Screen installation
The screen is inserted into the grooves of the assembled frame. If it is not solid, but sliding, check the free movement of its elements along the guides. The screws are tightened to the end, giving the frame rigidity - then the facade will not dangle. Hinged doors are hung on hinges, the ends are closed with plugs. If the bathtub is metal, they are not placed on top of the racks so that the frame also rests against the sides with guides. If provided by the design, shelves and handles are installed on the doors.
The assembled screen is placed under the side and aligned, guided by the marks. Tighten the legs so that the structure fits tightly. It is recommended to lubricate them with sealant to prevent them from slipping on the tiles. The space between the side and the top guide is filled with polyurethane foam. After polymerization, its excess is cut off with a mounting knife.
Screen installation.
To cover the end part of the bathtub, buy a design with a side panel. After installing the front part, the side guides are secured with self-tapping screws in the grooves of the corner post. The rest of the installation points are similar.
It will not be possible to install a screen on an acrylic bathtub in this way: it does not have sufficient rigidity, so the procedure is somewhat different. The base for it is equipped with a special mount. A spring latch is installed on top between the inner surface of the side and the screen. The structure is secured from below with a support with a magnetic latch.
For installation without special clamps, another option is used. Holes are drilled in the side without touching the stiffeners, and the upper guide is attached with self-tapping screws. Before installation, it is recommended to fill the bath with water so that it acquires its characteristic shape under load.
Materials for homemade frames
When selecting material for the construction of a planned structure, you should focus on your own skills, knowledge in the field of construction and capabilities. The load-bearing capacity of the selected option and resistance to the damp environment traditional for bathrooms are also important.
In the construction of homemade frames the following are used:
- Lumber. Basically a wooden block with edge dimensions from 40 to 60 mm. Cutting and joining the timber into a supporting structure is done quickly; fastening and forming nodes does not cause difficulties even for an inexperienced craftsman.
- Profiled pipes. The strength and load-bearing capacity of rolled metal with a square or rectangular cross-section makes it possible to significantly reduce the dimensions of the supporting structure; it is more elegant and “neater” than a wooden one. However, the manufacture of metal structures is available to a contractor with welding skills.
- Metal profile for gypsum fiber board. It is used primarily not for reinforcing frames, but to create a base for a decorative screen. To work with the profile, you need the usual tools available to every owner; experience in such work is not necessary.
Lumber is the least suitable of all the proposed options for working in a bathroom, but assembling a frame from it can be done without problems.
Errors and shortcomings are easier to redo than flaws in metal structures, and they don’t hurt your pocket as much if you need to purchase additional material for rework.
Image gallery
Photo from
Timber support structure
Welded metal structure
Aluminum profile frame
Steel profile construction
It is important to initially remember the characteristic vagaries of wood; before starting work, treat the block with antiseptic impregnation. During assembly, it is advisable to use galvanized hardware and corners if there is no experience in arranging connecting nodes with notches.
Profiled metal products are also not very resistant to moisture. To construct a frame, it is better to buy it galvanized or have it galvanized after purchase.
If a metal structure is installed without cladding with decorative panels, it is better to coat the profiled pipes with powder paint. The result looks decent and protects against rust.
The frame made of a metal profile used for fastening drywall is resistant to moisture and does not require additional treatment with a water-repellent compound
An aluminum profile or its equivalent made of galvanized steel tape is not at all afraid of water. A frame made of this material covered with plasterboard will last for decades.
True, you shouldn’t rely too much on the fact that it will be able to compensate for the swaying of the acrylic bathtub, although it will diligently prevent it, but to the extent possible.
The profile is simple and easy to use; it can be cut and connected without difficulty. Ceramic tiles, mosaics, and plastic panels can be perfectly glued to drywall attached to an aluminum or steel frame. If preference is given to steel products, then for installation in the bathroom you need to buy a galvanized profile.
It happens that two or three materials in combination are used in the construction of the frame. For example, the piping is made of a bar, and the racks are made of a metal pipe. If it is necessary to raise the bathtub above the floor level, brick supports, foam concrete blocks or large timber are placed under the bowl.
If several problems are solved during the construction of a frame, several types of building materials are used. It should be remembered that direct contact of metal, brick, wood should be excluded by laying waterproofing material between them
Making and installing a screen yourself
For a homemade design you will need plastic sheets, MDF or chipboard. Sliding doors can be made from lightweight plastic. It is unlikely that you will be able to buy sheets exactly to size, but they are easily cut. An alternative material is moisture-resistant drywall. It is mainly used to make a stationary basement. Think in advance about the placement of the hatch for access to the drain. It's better to buy it - it's inexpensive. Special screens for tiles are sold, completely invisible after tiling.
If the structure is sliding, the guides and racks are made of metal profiles with 2 tracks. The use of fittings for sliding wardrobes with a roller mechanism also justifies itself: there is no friction between the doors and the profile, the parts last longer. If wooden blocks are used for a blank screen, the material is first sanded, treated with antibacterial and insecticidal compounds, and painted.
When making a blind fence with your own hands, sometimes you forget about the legs and fix the lower profile to the floor. Then it is uncomfortable to use the bathroom - it is impossible to stand close to it. Instead of legs, you can make a cutout or place the screen at an angle, with the lower part tilted inward.
Homemade structures are often made of plasterboard mounted on a galvanized metal profile 75x40 and 60x27 mm. The surface is tiled.
They start with markings: draw lines on the wall, then on the tiles. They retreat 1 cm from the edge of the bathtub, add the thickness of the profile, drywall with tiles, mark.
Screen installation.
Then the profiles are mounted:
- Measure the distance to the side of the bathroom and cut the strip to the required length. Holes with a diameter of 6 mm are drilled into it at both ends.
- Place it on the wall, check it with a level, mark holes for dowels, and drill. Install the stand, hammer in the dowels, and secure it with self-tapping screws. A similar operation is performed on the other wall.
- The guides on the floor are mounted in the same way. Don’t forget about the cutout for the legs: install a profile of 2 segments of equal length. The distance between their ends in the center of the bath is 30 cm; clean tiles without slats are left here.
- Install the upper guide and connect it to the racks.
- An additional horizontal profile is mounted at a height of 20 cm. It rests on intermediate short posts. There are only 4 of them: 2 each for the leg cutout and the viewing window.
Drywall is cut to the dimensions of the frame, not forgetting the holes. It is fixed to the frame with self-tapping screws every 15 cm. Finally, the surface is covered.
Details about installing a screen under a bathtub are shown in the video.
Features for a curved bathtub
Often, screens installed for bowls in the bathroom are rectangular in shape, since standard bathtubs are also rectangular. However, recently the plumbing fixtures on the domestic market are so diverse that a corner bathroom will no longer surprise anyone. For such models, the rectangular option is not suitable. A curved design is required. You can purchase it taking into account the parameters of your corner bowl or create it yourself by following our instructions.
That's why experts recommend choosing plastic. This is a moisture-resistant material that bends easily and holds its shape perfectly. We also note that today plastic is sold in a variety of colors, which makes it possible to give the bathroom a special appeal and charm.
Universal screen for a semicircular bathtub
First you need to fix the plastic guides to the floor so that they perfectly follow the curve of the bathtub. Using “liquid nails”, wooden blocks are fixed to the top of the bowl, which serve to fasten the upper guide made of metal profiles. Then, using a knife, you should cut out the sashes of the current size and shape from sheets of plastic and fix them below and above the starting profiles. The lower joint is masked by using a floor plinth.
If you don’t want to cut out a plastic model yourself, just buy a ready-made structure and fix it under the bowl, as described above. The main thing is to clearly match the curve of the screen to the curve of the bathroom itself.
Popular bath screen models and prices
Screens come in different prices - from cheap plastic to expensive products from large companies. Buyers pay from 500 to 700 rubles for plastic structures.
Edelform
Products from the Swiss design bureau Edelform create a feeling of comfort in the room. Distinctive features of the company's products:
- natural shapes and shades;
- simplicity combined with functionality;
- elegance of smooth lines.
The screens are equipped with inserts for arranging niches, which increases their functionality. The front part is made of waterproof MDF panels. Cost - about 5800 rubles.
Edelform screen for bathtub.
Rocaelegance
The company's models are distinguished by their elegance. High quality workmanship and simple installation - the room is transformed in a few minutes. The set includes 3 legs that increase the stability of the structure. Screen material - VMDF. The doors have beautiful protruding handles. Cost - 4600 rubles.