The bathroom has always been and remains almost the main room in the house. It is the comfort and convenience of taking water procedures in the morning that determines your mood for the whole day, and a pleasant bath in the evening will calm you down and set you up for a pleasant night's rest. Therefore, every owner strives to create maximum convenience in the bathroom. And here you can’t do without a spacious bath bowl. Of course, sometimes you have to do repair work and update the plumbing. The most difficult procedure is replacing the font, especially if you have to do it for the first time. So, installing a steel bath: the nuances of choosing ditches and what you will have to face during installation.
How to install it yourself: basic methods
On your feet
How to assemble?
It is recommended that before starting work, you study the assembly instructions from the manufacturer, which detail all the nuances for a specific model. Typically, a structure with legs is assembled as follows:
We have discussed detailed instructions for installing an acrylic bathtub on legs with all the nuances in this
article .
- On the case turned upside down, you need to find special places reserved for the legs. As a rule, if the bottom has no holes, the mounting areas are marked by the manufacturer with symbols or stickers.
- Using a drill or screwdriver, you need to drill holes for fasteners. It is very important to be extremely careful and control the depth of the drill so as not to break through the bottom. To do this, you should measure the length of the screw in advance and mark this distance on the drill using a piece of electrical tape.
- If drilling holes is not required, you will see special mounting pads for quick installation. You just need to screw the legs there.
- After installing the legs, carefully turn the bathtub over and place it in the designated place. Be sure to cover the bottom of the bathtub with soft materials so as not to damage it during further installation by accidentally falling objects.
The legs must be installed in the places provided for this purpose. Otherwise, the unequal load will cause the bathtub to tip over or become deformed, and drilling in other places may cause cracks and leaks.
Height adjustment
To adjust the height of the legs, you will need a building level and a wrench.
First, level one leg against the wall, then adjust the position of the others according to its height, starting with the second leg against the wall. The legs are adjustable depending on the dimensions of the bathtub, optimally 60 cm from the floor to the edge of the side.
If the wall is already covered with ceramic tiles up to the future level of the bath, then the side of the bath should be adjacent to the lower edge of the lining, so the legs are adjusted accordingly.
If the manufacturer does not provide a difference in height for a more convenient drainage, then it is enough to adjust the pins so that the legs of the drain are 2 cm shorter than the legs of the headboard.
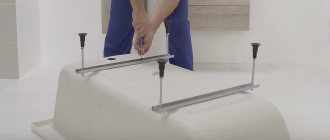
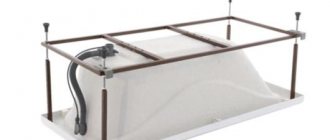
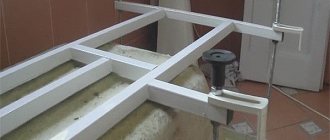
On the frame
Installing a bathtub with a frame is practically no different from the method with legs, only there will be a little more work. Below are the main assembly steps:
Read detailed instructions and tips for installing an acrylic bathtub on a metal frame
here .
- Unpack the frame elements;
- Turn the bathtub over;
- Make markings indicating the places where the elements are attached;
- Drill holes for fasteners in specially marked areas or thickenings of acrylic;
- Screw the mounting brackets to the bottom;
- Attach the legs and other frame elements.
ACRYLIC BATH ASSEMBLY DIAGRAM:
Use frame elements and fasteners for installation only from the manufacturer, their dimensions are accurately calculated. If there is a need for replacement, select exactly the same size as the factory products.
On bricks
Sometimes a bathtub is sold at a low and favorable price, but without a frame. In this case, you can make brick supports. This frame is very strong and durable, but making it is much more difficult than assembling a frame from the manufacturer. How to put it on bricks?
- Mark the bottom edge of the side on the wall;
- Drill several holes for fasteners according to the markings;
- Secure the metal profile;
- Mark the places on the floor where the bricks will be located;
- Carry out brickwork in the marked areas;
- To make a difference in height on one of the masonry, you need to lay a metal plate or a large amount of mortar;
- Wait for the solution to dry completely;
- Place the bathtub on the resulting base;
- Install and seal communications;
- Fill the bath with water and check for correct installation and tight connections.
A detailed step-by-step analysis of the installation and all the details of manufacturing a brick frame:
List of common mistakes
Considering that the bowl is installed for a long period, and sometimes “tightly” sits on the sealant or polyurethane foam, you need to carefully and carefully perform all stages of installation.
Here are the mistakes that residents encounter most often:
- Late installation of drain and overflow. If the bathtub is already fixed in place, the fittings are much more difficult to install, especially given the low seating of the bowl.
- Inaccurate leg height adjustment. It is very difficult to tighten the bolts when the bowl is already glued to the sealant. A special tool and additional effort will be required.
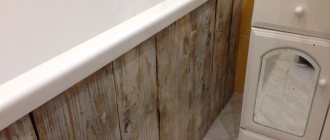
- No gap between the floor and the screen. It is very inconvenient to perform any actions while standing near a bathroom with a blank front wall.
- Loose leg fastenings. Loose nuts can cause the structure to weaken. The bathtub will not fall to the floor, but it may move to the side.
- Installation without taking into account the location of sewer pipes. If the outlet into the pipe is higher than the bottom of the bowl, draining the water will become difficult.
Some shortcomings lead to the fact that repairs have to be done unscheduled, and not only at home, but also at neighbors. Unpleasant moments are associated with inaccurate sealing of the gap between the bathtub and the wall and with poor waterproofing of the floor under the bowl.
Sometimes preliminary sound insulation is not performed. Not all steel bathtubs need it, but if the water jet makes a loud noise, the bottom of the bottom must be covered with polyurethane foam. This can also be done after installation.
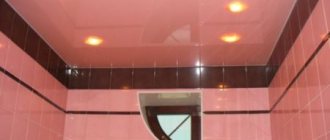
Noise insulation
Overview of the main methods
An acrylic bathtub, unlike a steel bathtub, does not need noise and thermal insulation as much, but if you want to ensure real silence and comfort in your home, then you should think about sound absorption of your bathtub.
Vibroizol
A unique material consisting of rubber and bitumen, with an adhesive composition on one side, invented for soundproofing cars. Excellent soundproofing for a bath.
Foamed polyethylene
The material not only suppresses noise, but also perfectly retains the heat of the water. It comes with a metal or foil layer, which improves its insulating properties.
It will be more convenient to work with a material that has a self-adhesive layer.
Step-by-step instruction:
- Cut a piece of the required size;
- Apply adhesive if the material does not have a self-adhesive function;
- Apply the adhesive layer to the surface and press gently;
- Coat the entire outside of the bowl.
Vibroplast
Polymer, plastic and durable material with a durable aluminum layer, copes well with noise and heat insulation. Eco-friendly, withstands high temperatures, moisture resistant, inexpensive.
- Cut a piece of the required size;
- Warm the material thoroughly with a hairdryer, it will become more elastic;
- Remove the protective film and apply the piece to the surface;
- Warm it up again with a hairdryer, pressing the material tightly;
- In this way, cover the entire surface of the bath with vibroplast.
Polyurethane foam
The method is most popular due to its simplicity and accessibility. This kind of processing is easy to do with your own hands.
For a better result, there are some tricks: it is advisable to use special foam for indoor work , work at high temperatures, warm up and shake the can before work.
- Protect the floor from foam with film or newspapers;
- Seal the technical holes on the inverted bathtub;
- Degrease the surface with an alcohol-containing solution;
- Start processing from the sides of the hull to the bottom;
- Carefully and evenly distribute the foam tightly;
- Work intermittently and let the treated areas harden.
detailed instructions on how to foam a bath in our special article.
If you need something special...
Not all purchases come fully equipped with everything you need. In some cases, there is a desire or need to choose a different font mounting system, without using the provided add-on. On the website akvasan-shop.ru you can select any types of supporting structures of different types. You can find decorative types with designer shapes and colors. A huge selection of installation kits and fasteners will be a pleasant bonus. Preparation and planning With high-quality fastening of the supporting foundations, there is an exact guarantee of successful installation of plumbing equipment. It is difficult to evenly fix an already assembled structure if the floor surface is not prepared. What should be done:
- Dismantle the remains of old plumbing. Replace pipes and drains, check taps.
- Remove construction debris. Sweep, wash the floor.
- When the surface is clean, it is advisable to evaluate the evenness of the tiles. There may be a need to reconstruct the tiles if the masonry is too uneven. Sometimes it is enough to move just a few tiles.
Only after such measures have been taken and all possible defects have been eliminated can one count on simplifying the procedure.
Bottom reinforcement
How to strengthen the bottom of the bathtub so that it does not sag? bricks as additional support . The use of such a base will strengthen the structure, but in case of dismantling difficulties will arise.
The method of arranging the support is called combined, since bricks are used together with the factory base.
- First, install the legs and adjust them in height;
- Measures the distance from the floor to the bathtub and determines the height of the brick support;
- Carry out masonry work;
- Check the length of the legs and the height of the brickwork (they must match exactly to evenly distribute the load on the supports).
- The masonry is covered with a dense layer of polyurethane foam and a bathtub with legs is placed on it;
- The font is filled with water for better “gluing” with the brick.
Fastening methods
Steel bathtub mounted to the wall
It is possible to install a steel bathtub securely and stably. For this purpose the following are used:
- brick base;
- polyurethane foam;
- insert into a niche;
- metal corners;
- frame made of metal profile.
In all cases, except for the construction of a brick base, the bathtub is also installed on complete legs.
How to fix it to the wall yourself so it doesn’t wobble?
The convenience of installing a bathtub to “bare” walls under the top tiled area or to walls entirely finished with ceramic tiles depends on various factors, such as: the dimensions of the bathtub, its shape and the size of the room. Let's look at the main differences in the installation.
Despite the presence or absence of tiles at the installation site, the methods of fastening to the wall are not very different. You can use both fasteners from the kit and wooden blocks and metal profiles.
Installation to tile or under tile, which is better?
When installing a bathtub against a wall, you may encounter three different situations:
- bare plastered walls;
- tiled walls up to the upper planned boundary of the bath;
- fully tiled walls.
Many people wonder: is it possible to first install a bathtub against bare walls, and only then cover it with tiles or lay mosaics? This option has the right to life; first you need to install fasteners on the wall and then “plant” an acrylic bathtub on them. The most important thing with this installation option is to ensure that during further wall cladding you do not damage the coating of the already installed bathtub. Therefore, under no circumstances should you tear off the protective film from the bathtub. It is better to do this after finishing all the work.
Pros:
- ease of bath installation;
- no need to worry about the safety of the tiles.
Minuses:
- With further wall cladding, the surface of the bowl can be damaged.
If you plan to cover the walls after installing the bathtub, be sure to cover it with several layers of mounting film and line the bottom with foam rubber.
This way you will preserve its original appearance. In the second case, you must first:
- place the bathtub against the wall;
- adjust the legs so that along the entire perimeter the distance between the sides of the bathtub and the lower edge of the tile is no more than 5 mm;
- install the mounting plates on the wall so that they tightly press the upper sides;
- check that the bathtub rests on both the legs and the mounting plates;
- using silicone sealant, carefully seal the gap between the tile and the bathtub.
Pros:
- aesthetics;
- maximum sealing of the joint.
Minuses:
- inconvenient installation, it is very difficult to cope with such a task alone;
- the need for accurate calculation and consideration of all sizes.
Third case: how to fix it to the wall if the tiles are already there? This option differs from the first one only in that when installing fasteners to the wall you need to be more careful, since the tiles are a rather fragile material. Below are detailed instructions for using wall mounts. Attention, so that the tile does not crack: first make a hole in the tile using a special drill, and only then insert a drill into the same hole to drill out the concrete.
Pros:
- the safest way for the bathtub surface.
Minuses:
- the tile may be damaged.
It is impossible to answer the question which of the above methods is better. All options have their pros and cons. Of course, it is easier to attach the bathtub to bare walls, but in this case you will have to attach the facing tiles as carefully as possible so as not to damage the acrylic bowl.
How to use wall mounts, step by step instructions?
- Move the height-adjusted bathtub close to the wall;
- Make a mark along the edge of the side;
- Move the body aside;
- When filled with water, the bathtub will sag a little, so the fasteners must be installed just below the marked line;
- Drill holes for plates or hooks in the required places;
- Attach hooks or plates to the marked area;
- Hook the side of the bathtub onto the fasteners;
- Fill the bathtub with water;
- Check that the bathtub sits tightly on the side supports.
For greater reliability, you can coat the side of the bathtub with sealant and thus firmly glue it to the wall.
After attaching the bathtub to the wall, you can safely remove the protective polyethylene, because all the dirtiest work has already been done. How to remove the film? You need to carefully pry it from one of the corners with a fingernail or a sharp object, and then smoothly pull it off the surface - everything is extremely simple.
If necessary, instead of fasteners and frames from the manufacturer, you can use metal profiles or wooden blocks.
A frame is made from suitable sized bars or profiles around the entire perimeter of the bathtub. After adjusting the height, the bathtub is attached to the wall precisely due to the frame.
For step-by-step instructions for attaching a hot tub to a wall with examples in pictures, see our articles: installation on legs, installation on a frame.
Installing legs on a bathtub
Legs come in different designs. The easiest way to install is paired ones: two supports are connected by a metal concave strip that follows the shape of the bowl. They are attached to the inverted bathtub with one screw, and spacers are installed between the legs and the bowl. The kit may include legs on a self-adhesive base, the installation of which is also easy. It is more difficult to fix metal supports, which are tightened in pairs with pins.
The installation procedure is as follows:
- Plugs are attached to those parts that will be adjacent to the bowl.
- Then, a horseshoe-shaped bracket is inserted into the grooves located on the fold of the main part with the hooks facing up. On the reverse side, press the hooks with pliers.
- There are metal loops on the parts, and protrusions on the outside of the bathtub body. The legs are installed so that the protrusion is in the loop.
- Then a pin is inserted into the special holes and secured on both sides with nuts.
All that remains is to screw the metal pin legs with rubber heels into the holes provided for this purpose.
Special models
Corner
Assembly and installation of corner fonts follows the same rules. The only thing is that such products must be placed only on the frame that comes with the kit, this is due to the peculiarities of the shape of each model. As a rule, the manufacturer completes its product with detailed instructions. Therefore, any man should be able to handle the assembly and installation of corner bathtubs.
Hydromassage
But hot tubs are not so easy to assemble. This will require much more time and effort. Indeed, in addition to the direct installation, it is also necessary to connect the pump system and configure everything correctly. But don’t be afraid of this, because we have described all the nuances in detail in this article:
Materials and tools required for installing a steel bathtub
Bathtub Installation Tools
In order for the installation of a metal bathtub with your own hands to be excellent, you must have the following components:
- drill with attachments;
- wrench;
- dry cement and sand;
- plumbing sealant;
- insulating tape;
- polyurethane foam;
- waterproof enamel or paint;
- construction level;
- corrugated pipe;
- tub siphon fitting;
- drain/overflow
Do-it-yourself installation of an iron bathtub begins with checking the condition of the sewerage system. If changes and additions are necessary, you need to improve the operation of the entire structure, otherwise the installation of the steel bathtub will be unsuccessful and everything will have to be redone.
Installation of a steel bathtub on corners, bricks or in a box must be done in such a way that it can be connected to the water supply system and taps without problems. In addition, a siphon, overflow, corrugated pipe for water drainage, and tees must be connected to the communications. Only after this, assemble the harness and treat the joints with sealant.
Do-it-yourself soundproofing of a steel bathtub. Secrets and methods of installation
Advice! The bathtub harness is easy to assemble if you follow the instructions included with the product.
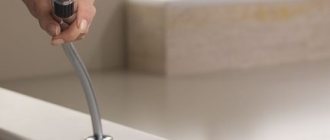
The choice of siphon is another point that must be taken into account before installing an iron bathtub. There are several types of accessories on sale that you can pay attention to:
- Semi-automatic are designs that drain water by turning a special washer. You don't have to fumble around the bottom of the bathtub to find the stopper. One turn of the hinge, the plug rises and drains without unnecessary intervention;
- The conventional plastic design fits all types of bowls and requires minimal installation effort. In addition, such a siphon costs much less than a semi-automatic system.
Important! Some siphons are equipped with metal outlets mounted to the overflow using a bolt. The installation of such a device is simple, as is the installation of an iron bathtub in general, but when choosing this design, pay attention to the manufacturer: metal parts that do not have corrosion treatment will become unusable too quickly!