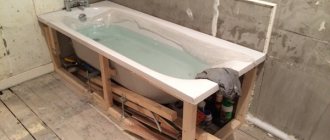
Instructions for installing a toilet, a complete guide to action
Toilet installation instructions
Having decided to install a toilet, you cannot do without a manual, preferably a visual one. Detailed toilet installation instructions will help you complete this procedure.
Before you begin installing a new toilet, you must dismantle the old one.
The rules for dismantling a toilet are simple:
turn off the water; unscrew the cold water supply; unscrew or break off the fixings of the toilet to the floor; tilt the toilet further back so that the remaining water pours out; unfasten the toilet from the socket.
Choosing a new plumbing item is not a problem; with today’s variety of toilets, you can find toilets of any type and price. In the average price range, for example, a good manufacturer is the Spanish company Roca, which produces sanitary ware under the jika and roca brands.
DIY toilet installation
Published: 12 Nov 2011, 22:02
The installation of a toilet needs to be approached responsibly. As a rule, installing a toilet with your own hands takes a little longer than if it was done by specialists. So, the required toilet model has been purchased. Turn off the water and remove the old toilet
A new one will be installed in place of the old toilet, so it is important to make the adjustment correctly, namely, to make sure that the toilet flush is connected to the waste pipe. If there is no connection, you can build up the floor under the toilet, and the problem will be solved
There are several ways to fix the toilet to the floor: fastening the toilet with screws, fastening it to a wooden board previously recessed into the floor, or fastening it using cement-sand filling. After fixing, we connect the place of the toilet bushing with the entrance to the drain pipe. Don’t forget about fixing the cistern; this is no less important work than installing a toilet. A properly installed tank should not leak, so if a defect occurs, it will be immediately detected. At the end, you need to connect the hose to the inlet and check the functionality of the toilet.
Keep your new toilet clean and clogs won't cause you any trouble, but if this happens, you need to know how to unclog the drain. What can you say about installing a toilet? Maybe there are some other nuances that need to be taken into account?
DIY toilet installation.jpg
Precautionary measures
Plumbing ceramics and floor tiles have a common drawback - fragility, and therefore installing a toilet on tiles requires the utmost care from the master. In the absence of experience, there is a risk of not only damaging the material, but also harming yourself, which is much worse. While working, it is very important to remember safety precautions:
- use power tools correctly;
- do not allow glue to get into the eyes and respiratory tract;
- Don't forget about protective gloves.
Features of working with tiles
Installation of plumbing has its own nuances. You need to install the equipment after laying the tiles on the floor, since tiling in an empty room is much easier; you don’t need to waste time and effort on trimming elements. If you install a plumbing fixture before the renovation of the apartment is completed, working with the floor will become inconvenient, and the ceramics may be damaged during the cladding process.
Before starting work, you must make sure that the toilet outlet exactly matches the hole in the drain pipe. If this is not the case, the connection will have to be made using special adapters or corrugated pipe, which will require additional costs. For reliable operation of the device, special attention must be paid to the quality of the joints.
Features of installing a toilet on a heated floor
Typically, experts recommend installing the toilet with bolts. This is quite logical, because given the small area of the pedestal, the task simply leaves no other option. But sometimes doing without bolts is not only possible, but also necessary.
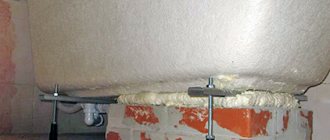
It is necessary to use the installation option without bolts if the bathroom has a heated floor. Without knowing exactly how the heating elements are located, if you drill a hole for the bolts, you can end up with very expensive repairs.
The use of glue for fixation in this case will prevent harm to the heating system.
Before you start fixing the toilet without using bolts, you need to thoroughly clean the bottom plane of the pedestal, as well as the floor. Dust and dirt must be removed from surfaces and degreased. The adhesive solution adheres better to a degreased surface, and the fixation becomes stronger.
The adhesive should be applied exclusively around the perimeter of the lower part of the toilet base. The area of the floor that will be hidden by the plumbing fixture is completely covered with glue.
To avoid wasting adhesive solution, before applying it, you need to draw the boundaries of the toilet bowl on the floor. Having installed the plumbing fixtures with glue, you will need to press them well, and remove excess glue from the floor. After which it will be necessary to install pipes and fittings.
Let's take a closer look at installing a toilet on a heated floor. First of all, you need to install the toilet in the place where you plan to fix it:
- Its boundaries are outlined on the surface of the tile.
- Using a grinder, the enamel is removed from the tiles. You need to remove about two millimeters of the layer. It is necessary to remove the enamel so that the glue will better fix the toilet.
- After preparing the surface, you need to remove dust and degrease it. To do this, it is better to use a special composition for plastic and ceramics. It can be purchased at almost any hardware store. Such degreasers come in different volumes and packaging, but it is best to buy them in spray form. They are convenient to use, and their weathering speed is much higher.
- After this, you need to treat the underside of the toilet. Usually there is no enamel coating on it, but if you get caught by a diligent manufacturer and apply it, you should get rid of it.
- Once the degreaser has worn off, liquid nails should be applied to the floor and underside of the toilet. After which the toilet is put in place and pressed down.
- Excess glue should be removed using a rubber spatula.
This completes the work. All you have to do is wait until the glue hardens. As a rule, complete drying occurs within a day. But this time depends on how thick the layer is. And since the thickness of the adhesive layer is quite large, it is better not to use the device for about a week so that the fixation becomes strong.
Liquid nails should be chosen specifically for use in the bathroom. They are sold under the marking No. 915.
Liquid Nails
Liquid nails are also quite common. This adhesive material will help with the installation of plumbing fixtures on tiles. Installing a toilet with liquid nails has some nuances. In order to install with liquid nails, it is necessary to apply them to both surfaces being joined. Next, you will need to disconnect the toilet from the tile and lay it on its side. You should wait a certain amount of time, after which the final installation of the device is carried out.
Note! As a rule, the waiting time between preliminary and final installation of the device is indicated on the label of the adhesive composition.
To prevent the plumbing fixture from wobbling, it is recommended to apply a seam of liquid nails around the perimeter of the base of the toilet connected to the tile. After this structure hardens, it will be ready for use. The reliability of this method is quite high.
Interesting: We build a toilet in the country house ourselves
What is what
Toilets are divided into two types depending on their design: wall-hung and floor-mounted (also called traditional). The first type is usually installed in sanitary rooms located in public places. The tank of such an element is installed directly into the water pipe itself. Also suitable for rooms with small space. The range of the second type – floor-standing toilets – is quite wide. Such products are made from a variety of materials (such as ceramics, porcelain, steel, cast iron, plastic, earthenware and others), and the choice of their shapes is varied. Ceramic products are considered the most durable and can last up to fifty years. The shape and size of the toilet is influenced by the type of drain, which comes in three types: vertical, horizontal and oblique. The prices of such structures in average stores in our country vary from two to several tens of thousands of rubles. It all depends on the material, design and other individual factors.
Main types of toilets
Overview of options
How to attach a toilet to tiles without bolts
Sometimes you have to attach the toilet to the tiles without the help of bolts, for example, on a warm water floor.
There are two ways of such fastening.
- Strengthening the toilet with cement mortar . First, the toilet is placed in the place where it will be located, then the socket is inserted into the sewer pipe and the toilet bowl is outlined. Then the bowl is removed. The tile glaze needs to be removed for better adhesion to the toilet. Wet the place where the bowl is installed and its base itself, and place the cement mortar on the floor. Place the toilet on the cement and push it slightly into the floor.
- on a warm water floor without drilling using silicone glue, liquid nails or epoxy resin. The underside of the toilet and tiles must be sanded with sandpaper to ensure adhesion of the surfaces (smooth surfaces do not adhere well to each other). Then apply glue to the floor, place the toilet and press.
Connection to sewerage
When connecting the toilet to the sewer, corrugated or eccentric cuffs, plastic bends and drain pipes are used. Corrugated cuffs can be bent at any angle and extended in length.
Corrugated pipes have a rubber membrane inside, through which it is tightly connected to the toilet outlet. The corrugation does not allow unpleasant odors and drainage to pass from the sewer pipes, because it is attached to it using a rim inserted into the sewer riser.
Eccentric cuffs have two outlets with a slight axis offset relative to each other. Before you buy them, you should measure the offset between the axes of the toilet outlet and the sewer pipe in order to select the appropriate eccentric collar model. They can be rotated around their axis.
If you use fan pipes , then you cannot trim or change their geometric shape. Fan pipes are used in case of risk of water seal failure.
If the sewer riser is clogged, then it becomes possible for water to be sucked in from the siphon, as a result of which the water seal disappears and a putrid odor is released from the toilet. In such cases, a drain pipe with a valve is connected to the sewer pipe or the pipe connecting the sewer to the toilet, which, when opened, regulates the drainage of water.
The valve also sucks in air from outside, preventing the water seal from breaking. In cases where a corrugated cuff cannot be used, plastic corners and elbows are used. Their disadvantage is their rigidity, which can lead to leakage due to minor distortions.
Connecting a toilet using a corrugated pipe is a simple process. The corrugated cuff is inserted into the sewer pipe. The joints are lubricated with silicone.
The other side of the corrugation is inserted into the toilet. The inside is lubricated with sealant. To check whether the connection is secure, pour a bucket of water into the toilet or fill the tank full.
If you decide not to use a corrugated cuff when connecting to the sewer, then you need to use a pipe, which is otherwise called an adapter or a drain pipe.
Connection to the adapter is carried out in three different ways, depending on the angle of the toilet.
Connecting a toilet with an oblique outlet is no longer relevant. (installation is done on the floor). Such toilets are installed in cottages and old private houses.
With a vertical outlet, installation is made into the wall at a right angle.
Horizontal outlet means installation into the wall at an angle of 30-40 degrees in the wall or floor.
Connecting a toilet with an oblique outlet to the sewerage system
Toilet connections with an oblique lip
There are three options for connecting a toilet with an oblique projection to a sewer pipe.
- Direct connection to the sewer branch socket. This method is only suitable if the holes match and you do not need to move the toilet to align them. Replacing a toilet requires careful calculation of the socket. It is possible to replace the old toilet with an exactly the same new one. To connect the sewer branch, which has an inserted cuff, with the oblique protrusion of the toilet bowl, you can coat it with soap and push it into the socket. After this, all that remains is to securely fasten the bolts to the toilet.
- If there is still a discrepancy between the bell and the oblique protrusion, but it is insignificant, then it is best to use an eccentric. It will help move the toilet relative to the socket to the left or right by 5 cm.
- Connection to the socket using corrugation. The corrugated cuff allows you to connect the oblique protrusion of the toilet bowl with the sewer branch when it is significantly displaced. Using the corrugation, the toilet bowl can be rotated at right angles to the sewer pipe. The disadvantage of a corrugated outlet is that the toilet bowl is removed from the wall at a considerable distance.
After the toilet is connected to the sewer pipe, a tank is installed to connect it to the water supply. It is advisable to use plastic washers under metal bolts.
Installation of a toilet with a vertical lip
Toilets with vertical outlet came to Russia from Europe. They are characterized by the installation of an outlet siphon and an outlet pipe in the floor. This design is convenient because the toilet can be placed at any angle to the wall. Before installing a toilet with a vertical outlet, it is necessary to install a screw flange on the tiles.
It has a clamp that ensures the connection between the plumbing fixture and the sewer pipe. The flange reliably seals the joints between the sewer system and the toilet. Install a sewer pipe into the hole in the flange.
The toilet is installed on the flange, checking that all the holes for fastenings and joints match, and the structure is slightly rotated, fixing it. An O-ring between the parts helps prevent leakage.
Installing a toilet with horizontal outlet
Plumbing fixtures with horizontal outlet are universal. They can be replaced at any time with a toilet with an oblique outlet. It is placed close to the wall, but not close, so that there is quite a lot of space in front.
The toilet is installed on dowels to the floor and connected to the riser using a sealing collar. Next, the joints are covered with sealant to prevent unpleasant odors and leaks. (Water flows horizontally through the junction of the pipe and the socket.)
Plumbing fixtures with a horizontal outlet are installed in two cases:
- if the apartment has an appropriate sewerage system. In this case, the riser is open and hidden behind a decorative false panel or located inside a specially prepared groove;
- if the layout of the toilet allows you to place the toilet at some distance from the sewer riser.
Important: if you want to hide the sewer, then hide the riser behind a collapsible decorative panel or box to replace, clean or repair communications.
How to install a toilet without bolts
To attach a toilet to the floor without bolts, you need to thoroughly clean both the bottom plane of the pedestal and the floor itself. Cleaning includes degreasing - this will ensure maximum adhesion of the glue to the surface.
As for applying the adhesive composition, it is applied to the pedestal only along the perimeter of the lower plane. The area of the floor that the toilet will cover must be completely covered with glue.
To prevent the glue from protruding beyond the boundaries of the toilet, before applying the glue, you can outline the perimeter of the pedestal on the floor. Having glued the toilet to the chosen place, you need to press it and wipe off excess glue on the floor, as well as connect sewer pipes and fittings.
The adhesive composition provides protection against moisture, and therefore there is no need to treat the junction of the pedestal and the floor with silicone.
How to install a toilet on a tile without drilling: how and how to glue the base
Sometimes it is not recommended to drill into tiles, since various communications may pass under the tiles: a water or electric floor heating system. According to the recommendations of experts, it is best to glue the toilet to the floor surface. In this case it is used:
- epoxy resin;
- liquid Nails;
- special glue.
To improve the adhesion of the bonded surfaces, it is necessary to prepare them, that is, first clean them of contamination with white spirit and treat them with sandpaper.
After installation, the adhesive must be given time to dry. On average, this takes 12 hours (possibly more). This much time is needed to firmly install the toilet in order to further prevent the device from loosening during operation.
How to install a toilet on tiles
As we said earlier, there are two main installation methods used. Let's look at each of them in more detail. Installation on anchor bolts has both its pros and cons. Of course, this method will allow the owner to achieve better stability of the plumbing fixtures, but there is a risk of damaging the tiles. Therefore, basic operations must be done very carefully.
- First of all, you need to install the toilet in the place where it will always be. Then you need to take a pencil and mark the points where special holes should be drilled.
- Once the marking procedure is completed, you can remove the plumbing and take a drill or hammer drill. Install a special drill and make holes in the designated locations. Do not use the impact function under any circumstances, as the tiles may simply crack. It should only be turned on after the holes in the tiles have been drilled.
- Insert the dowels you saved earlier and reinstall the toilet. Screw the bolts into the dowels, first attaching rubber washers to them. Once the plumbing is securely fastened, connect it and check for functionality.
If you don't want to risk the integrity of the tiles, you can use epoxy adhesive. To do this, you need to carry out the following operations:
- Clean the surface as much as possible from any contamination.
- Degrease it with some solvent. To do this, you can use either white spirit, or acetone, or any other similar liquid.
- Roughen the tile or cement base somewhat and re-clean and degrease it.
- Install the plumbing fixtures in the designated location and apply epoxy glue to the contact area. Press the toilet down with something heavy and leave it to dry for 12 hours.
- Connect the toilet and check its functionality.
Once you have completed the installation, there is one last thing left - installing the cistern.
Usually, upon purchase, detailed instructions for its assembly are included, but often they are simply not needed, because the tanks are immediately completed and regulated by the manufacturer. In fact, of all the fasteners, there are only a couple of bolts that secure the tank to the toilet. You just need to remove the cover, install the tank, carefully tighten the bolts and connect the drain. The procedure is quite simple.
If you don't understand anything, watch the video of installing a toilet on tiles with your own hands. In any case, the actual installation takes a minimum of time. You will have to wait much longer for the screed or glue to dry, but even if you entrust the procedure to a professional, it will not dry faster. By doing everything yourself, you will significantly save your family budget, and your family will be proud of your talents!
Some aspects of installing a toilet with your own hands in an apartment
With any chosen method, there are a number of general points that make sense to consider without application to the method of fixing the toilet to the floor.
Joint finishing
First of all, this is to disguise the junction of the toilet and the floor. If the outline of the original hole is significantly larger than the base of the new toilet, you can disguise the joint when installing on cement using mosaic tiles or create a small podium.
Sewer connection
Another important point is installing the corrugation on the toilet.
Depending on the diameter of the toilet outlet and sewer outlet, a product with the appropriate connecting dimensions is selected. The length of the product is also selected.
For simple connections, when the pipe and outlet are approximately at the same level, the flexibility of the corrugation does not matter much, but for complex transitions at a large angle it is better to choose products with maximum flexibility and at the same time a reinforced wall, that is, reinforced.
Important: the corrugation cannot be stretched to its full length, this greatly reduces its ability to resist hydraulic loads. It is better to purchase a product with a small margin of length.
If the distance is short and the toilet is installed on dowels, you can also use one or two adapters of a suitable design.
If the sewer pipe runs behind the toilet (the so-called “lounger”, often found in typical panel houses), you can completely abandon the corrugation and use an adapter paired with a special extension for the lounger.
Instead of an extension with one outlet (essentially a tee), you can use a coupling with two or three outlets. One, with the maximum diameter, is used to connect the toilet, the others - for the washing machine, sink, bidet, and so on.
For models with a vertical outlet, corrugation is not needed; a direct connection between the outlet and the drain pipe is used here.
Installing a toilet cistern
The last significant nuance is the installation of the flush tank on the toilet.
For units where the cistern is attached to the back of the toilet, the attachment is usually done using a bolt or stud connection.
After the toilet is fully assembled and secured, the tank is placed so that the bolts/studs fit into the holes on the back of the body, and the drain hole of the tank is tightly aligned with the drain hole in the toilet seat.
Next, the connections are tightened, and the tightness of the joint between the tank and the main part is checked.
Important: when installing, be sure to use gaskets made of elastic polymer, both at the connection of the tank with the hole in the toilet, and on the fasteners. If gaskets are not included in the package, you will have to make or purchase them yourself. This is also a reason to think about the quality of equipment in general.
For hanging (wall-mounted) tanks, the fastening is different: the product must be fixed to the wall using built-in hinges or brackets, after which the pipe connecting the tank and the toilet is connected.
The last stage of installation is connecting the water supply hose.
Let's get started
Each new toilet, when purchased in official stores and construction markets, must be accompanied by appropriate detailed instructions for its installation. It must be carefully studied and followed with precision for each point. Before you begin installing a new toilet on tiles, you need to buy a part such as flexible corrugation at any plumbing store, and with it individual rubber seals. It will help to extend the toilet to a fairly significant distance in the depth of your bathroom.
Flexible corrugation allows you to control the installation depth of the toilet
At the place where you plan to create the foundation of the product, inside the future outline of its base, make a mark on the tile using a chisel or file. This will help the cement to work properly on all uneven surfaces. Then, in order to begin installing the toilet itself, you need to prepare the cement mortar itself, which will act as glue.
Marking the position of the toilet on a tiled floor
Wet the mark on the tiles and bottom of the toilet. Apply the cement mixture over the entire surface of the bottom of the structure. Immediately after this, carefully place the toilet in the designated place. Leave the structure for 24 hours as the cement needs time to harden. After that, install the tank and connect the water
Pay special attention to the bolts: if they are metal, you should be extremely careful, as there is a risk of damage to the ceramics. In general, the product is ready for use
At this stage, it is recommended to stop for those for whom it would be preferable to install the toilet on a tiled floor without drilling, in order to keep the tilework intact.
Treating the joint with sealant
For everyone else, for greater reliability, we recommend securing the toilet using special fastening bolts
It is very important to remember that tiles for the toilet room must be drilled exclusively with a tile drill. Drills for wood or other materials should not be used, as there is a very high risk of damaging the tiles
The advantage of this method is that this particular installation of a toilet on a tiled floor will be absolutely “painless”, in other words, after some time it can be dismantled, and then easily installed again. For example, if you suddenly decide to carry out a major overhaul of your sanitary unit, at the same time, do not replace the toilet with a new one. The final stage will be the installation of a toilet seat (a seat, which is mainly made of plastic).
Drilling tile floor
Covering the floor surface around the installed toilet
Sometimes circumstances develop such that the toilet was installed before the flooring was completed. For example, there is no money to purchase high-quality tiles, or the desired option has not yet been found in the assortment of stores. But it is impossible to live normally in an apartment without a toilet; it was installed and the finishing was left for the future. Another option is to carry out cosmetic repairs, laying new tiles directly on the old ones (such technologies exist), but it was decided not to change the toilet.
Those owners who plan to take this path should immediately be warned - many difficulties await them. These include difficulties with curvilinear cutting of tiles and problems with fitting fragments. Moreover, you will have to work in very cramped conditions.
Laying beautiful tiles around an installed toilet is by no means an easy task!
One more nuance.
If the new lining is laid on top of the old one, without dismantling it, then the previously standing toilet will be slightly lower relative to the resulting floor surface. It may not seem like much, but it can cause serious inconvenience for some family members, at least at first.
But if the decision to go this route has finally been formed, then look at the example of similar cladding around the toilet.
| Illustration | Brief description of the operation performed |
| One of the obvious solutions is to make cardboard templates, fit them and then transfer the curved markings onto the tiles. But some masters practice making patterns literally on the spot. So, in our example, the master began fitting from the rear right corner of the toilet base. | |
| Dimensions are taken along the maximum length and width of the cut fragment. Intermediate points are measured and plotted. | |
| A curve for cutting tiles is drawn along these points. At the same time, it is taken into account that there should be a seam between the tiles and the toilet seat, approximately the same as planned between the other tiles. | |
| It is fashionable to make curved cuts using a high-quality glass cutter, but this requires considerable experience. Another option is to cut narrow strips using a small grinder with a stone disc, and then break them off with pliers. After this, the edges are smoothed with a rounded file or even just coarse sandpaper. | |
| After cleaning, you can try it on site. If everything is fine, you can move on to the side surface of the toilet seat. The tiles are not being laid yet - until all the cut fragments are fully fitted. | |
| The side fragments are marked in such a way that, on the front side, the seam between the tiles would be exactly in the center of the toilet. Otherwise it won't be very nice. | |
| Cutting is carried out - both straight and curved sections. The technology on curved lines is the same, with fragmentary cutting of narrow strips and subsequent processing of the edges. | |
| The last cut fragment is on the right side of the toilet, with the tile seam extending approximately to the center line of the device. | |
| Having finished with one side, move to the opposite. There are no special features - everything is done in the same sequence. | |
| After all the fragments are cut and adjusted, you can proceed to laying the tiles with glue. Here, one is guided by the usual technological rules for installing tiles, in accordance with the characteristics of the base for installation (on a screed, or on an old ceramic cladding). We won’t go into details here – there are a lot of such instructions on our website. | |
| First of all, the cladding is done around the toilet, from cut fragments. | |
| Well, then - the tiles are installed on the entire remaining uncovered area of the floor, maintaining the specified rows and thickness of the tile joints. This is roughly how it might turn out in the end. |
As you can see, the task of such cladding is very difficult. And perhaps it would still be better, at the slightest opportunity, to go “on the right path”
* * * * * * *
The article, as noted at the very beginning, omitted plumbing aspects - in order to pay maximum attention to the various methods of attaching the toilet to the floor. As some kind of compensation for this “gap”, we suggest watching a video - a master class on installing a toilet on a tiled floor, as they say, from “a” to “z”:
Toilet installation methods
There are at least three options for installing a plumbing fixture on the floor:
- using fasteners supplied as standard;
- fixation with adhesive;
- using cement mortar.
The standard delivery with the toilet comes with fasteners in the form of dowel screws. Installation in this manner is recommended only on a flat surface.
This technique is quite acceptable in terms of its reliability and stability. True, it is not always applicable. This type of mount is most often chosen for small-sized, light-weight devices.
Another installation option is fixation with glue. This method gives good strength. But if you need to carry out urgent dismantling, it won’t be possible to do it quickly and at minimal cost. This mounting option is used if there are no plans to replace the structure in the near future.
In addition, you can install plumbing fixtures using cement mortar. This is a unique alternative to standard screw mounting and adhesive fixation. This method is not much different from installation with glue, because the cement composition also includes an adhesive component. But in terms of the quality of fixation, the cement solution is less reliable than special glue.
In what cases is it recommended to install toilets with glue?
The method, which takes into account the use of adhesive compositions, is gaining more and more popularity among professional craftsmen and self-taught people every year. Most often, this installation option is chosen when a heated floor system is located under the tiles in the toilet room. In this situation, drilling into the cladding may damage it.
Note! This method can also be chosen based on aesthetic considerations. Plumbing fixtures that are not equipped with fasteners look more stylish and impressive in the toilet room.
It is not difficult to carry out such installation correctly, but it should be remembered that installation using an adhesive composition takes quite a lot of time. This is due to the fact that you need to wait until the glue completely hardens. If you ignore this rule, then the connection will become unreliable, and the toilet will wobble or even completely move away from the tile. In order for the adhesive to harden, you must wait 12 to 24 hours.
Painless dismantling
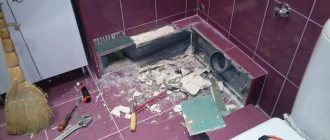
For this procedure we need a simple set of four tools: 1) Crowbar (or nail puller); 2) Hammer; 3) Chisel or chisel; 4) Pliers. Before you begin, wash and disinfect the old toilet. Over the years of service, dirt, germs and limescale could have accumulated here. Prepare a rag and a bucket of water. Wear rubber gloves and, if possible, safety glasses. This will protect you from the unwanted effects of antiseptics, as well as from fragments and ceramic chips. Not everyone can remove a toilet that has served its useful life while keeping it intact. If during installation it was screwed with metal screws into a wooden board, which was subsequently concreted, then you will have to use physical force, practically uprooting it from the sewer pipe. The remaining fragments are removed with a chisel and pliers.
Removing an old toilet can sometimes be a real challenge
If the toilet was installed using plastic screws screwed directly to the floor, then you will have to be very careful and careful, otherwise you can injure yourself or damage the floor. Next, remove the toilet from the sewer pipe tee. You don’t have to put in much effort here. It is also recommended to clean the sewer pipe connection in the area where the toilet will be located. This is usually done using sandpaper or special cards.
Connecting the toilet to the sewer
Necessary tools for fixing the toilet
Good tools are the key to a successful job. They will also be required for reliable and beautiful installation of the toilet.
Despite the minimal amount of work, installation will require a fairly large list of tools and materials:
- drill;
- 8-10 mm drills for concrete and tiles;
- adjustable wrench;
- hammer;
- core;
- rubber spatula;
- silicone sealant in the color of the tile or toilet;
- marker, chalk or pencil;
- dowels 8-10 mm.
You must prepare these tools yourself.
When performing installation work in a house or apartment yourself, you need to have reliable tools that will help you make high-quality repairs.
Fastening hardware is usually included with the plumbing fixtures; you do not need to buy them. You should also make sure that you have water hoses and sewer pipes to connect the toilet to the utilities.
Water floors.
Professional toilet installation with a guarantee.
The home in which we live must be warm, comfortable and cozy. The heating system in most homes is represented by radiators, although today warm water floors are increasingly used to heat rooms.
Hydronic floors are characterized by a system of pipes containing warm water placed between the floor covering and the floor. The water temperature is about forty degrees.
This temperature is quite enough to heat the room.
To create water floors. you will need: a mini electric boiler, a mini floor up to twelve square meters, automation, manifolds and underfloor heating pipes.
It is quite possible to install a water floor yourself. You just need to have some engineering skills.
First of all, you should make a project. If you are not entirely sure of your own competence, consult with specialists, they will help you make a project and choose the right set of pipes for water floors.
However, you can do everything yourself by choosing a set of equipment suitable for self-assembly, which is indicated on them: “For self-assembly.” After this, you can safely begin installing the water floor.
If the floors and the house are wooden, then installation is carried out using a flooring system. Such systems are suitable for all types of buildings and are divided into two types: wooden and polystyrene. Floor systems differ from concrete systems in the absence of a wet process, which makes installation of equipment much faster.
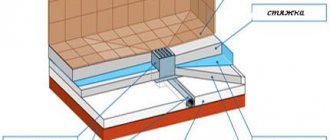
Most often, a concrete scheme is used, that is, the installed pipeline is filled with concrete. This scheme is very convenient because the concrete protects the pipes from damage and holds them firmly. Before installing the pipes, you need to put thermal insulation material on the base of the floor.
After laying the water floor, it is necessary to carry out pressure testing of the system, that is, fill the pipes with water and carry out some kind of tests. If everything is done correctly, the pipes are filled with concrete.
After the concrete has completely hardened, the flooring begins to be laid. In this case, ceramic tiles, linoleum and laminate are most suitable.
Did you like the site? Is the article Do-it-yourself warm water floors of interest? Then subscribe to new ones
Plumbing connection
Having completed the installation, you can begin connecting the toilet to the drain and water supply. A prerequisite here is the complete tightness of all connections, so you need to work carefully, slowly, strictly adhering to the instructions. First, connect to the sewer, then to the water supply.
To the sewer system
It is most convenient to connect the toilet outlet to the drain using a corrugated plastic pipe. The wide end of the pipe is placed over the outlet of the bowl and secured with a plastic nut. The tightness of the connection is ensured by the membrane inside the pipe. The second end, where there is a small rim, is inserted into the drain and twisted.
Preparatory procedures
Of course, in order to properly install plumbing fixtures on tiles, it is necessary to carry out some preparatory procedures. First of all, of course, you will have to dismantle the old toilet, after which you should look at the basis on which it stood. If the taffeta installation method was previously used, then you need to cement the resulting hole. The answer to the question “How long will it take to install a toilet?” depends on the method you are going to use. At the moment there are two main methods:
- on bolts;
- with epoxy glue.
Using the first method, you will have to wait a lot, because if the cement does not dry, the dowels into which the bolts will be screwed will simply come out and will not be able to hold on. In such cases, it is recommended to let the solution dry for at least 5 days.
Instructions for internal fastening
Internal installation involves preparing not only the mounting holes, but also the connection points to the water supply and drain line. The installation process goes like this:
- Mounting brackets are attached to the toilet.
The toilet bracket is secured with a threaded connection - Install the plumbing fixtures and mark the places where the brackets are attached to the floor.
- Place the device aside and drill holes for the mounting elements of the structure.
- The brackets are attached to the floor with a pair of bolts, without fully tightening them in order to leave a small gap for fitting the equipment to the utilities.
- Install sealing elements of engineering systems.
- A sealing strip of plumbing silicone is applied along the contour of the device.
- The toilet is installed on brackets.
The final tightening of the bolts for any method of fastening is carried out after connecting the device to the sewerage system - Using the holes on the sides, the plumbing fixtures are bolted to the internal fasteners.
- As with external installation, excess sealant is removed with a rubber spatula.
- The final tightening of the connections is carried out after the position of the toilet bowl relative to the pipes of the sewer system and water supply has been adjusted.
Installing toilet and cistern lids
The last step is to install the toilet lid, which is usually included in the kit. Some manufacturers leave the choice of cover to the discretion of the buyer. In this case, this part must be purchased separately.
Tighten the mounting bolts from the bottom using a metal nut of larger diameter. Then install the drain barrel cover and secure the drain key.
Do not allow metal parts of fasteners to come into contact with ceramics. Use rubber or plastic gaskets to ensure this requirement is met.
At the last stage, check the operation of the toilet. Inspect all connections for possible leaks.
Installation methods
Before proceeding with installation, be sure to mark the installation location. When marking the holes for attaching the toilet, hold the pencil strictly vertically so that the holes coincide with the mounting holes.
It is better to use a core to mark the holes, which will leave a scratch in the right place. The mounting bolts must be tightened thoroughly, but carefully so as not to split the device and avoid possible tilting.
Vertical mount
Vertical fastening is performed when installing a toilet in a closed or open type.
Side installation
Lateral fastening is carried out in the same way as fastening using dowels, only the connecting parts are located inside the toilet frame. Having made preliminary markings, use connecting parts for side fastening: long screws and corners. The device is fixed through the side holes. Plumbing installed using this method has an aesthetic and attractive appearance.
No bolts or drilling required
Installation of a toilet without bolts is carried out using special glue or liquid nails. Clean the pre-prepared installation site and degrease it with industrial alcohol. Then the joints between the tiles and the toilet frame are treated with sandpaper to provide roughness, which ensures reliable adhesion between the frame of the device and the tiles.
Toilet installation (video)
After preparation for installation is completed, installation of the toilet begins. They start with a corrugated pipe, which is first connected to the sewer hole.
When connecting a corrugated pipe and a sewer, it is not recommended to use glue.
The copper pipe is connected to the water supply system using an adapter. Now you need to secure the toilet to the floor using fasteners, tightening the external bolts. All that remains is to check the exact location of the toilet and tighten the mounting bolts.
Methods for attaching a toilet
When installed in a bathroom, the device is mounted using two methods: closed and open.
The closed type of fastening is carried out using bolts located inside the plumbing structure. The open method involves bolting the base.
Open
Experts consider open mounting to be the most reliable and simplest, since installation is quick and easy. But in terms of aesthetics, this type of fastening the toilet to the tile is inferior to the closed fastening method. In addition, when cleaning, it is necessary to thoroughly wash the frame of the device in the open mounting area to maintain the cleanliness and sanitary condition of the room.
Closed
Having purchased a toilet that is installed in a closed manner, it is necessary to mark the installation site, outlining the outline with a pencil and marking the location for the mounting holes.
Connection to sewerage
There are three types of drain pipe in toilets:
- Toilets with vertical outlet very common in Europe, but they are also common here. The convenience of this model is that it can be installed at any angle to the wall. In this case, before installing the toilet, it is necessary to install a flange with a clamp into which the sewer pipe is mounted. The toilet is installed on the flange until it is completely fixed.
Installation of a toilet with vertical outlet - The most common are toilets with horizontal outlet . This is due to the fact that the toilet has to be placed at a certain angle to the wall. When connecting the sewer system to such models, it is enough to simply connect a special sealing collar or ex class=”aligncenter” width=”650″ height=”397″[/img] Installation of a toilet with a horizontal outlet
- Toilets with oblique release connected to the sewer in the same way as horizontal ones. However, it is necessary that the hole in the sewer pipe is at the correct angle.
Installation of a toilet with corner outlet
Most often I use a corrugated pipe to drain into the sewer. It allows you to adjust the gap between the toilet and the sewer drain. In addition, using a flexible pipe it is easy to change the angle of inclination. There is a special membrane inside the corrugation, which allows you to secure it securely and tightly without gluing the pipe to the toilet outlet. On the other side of the pipe there is a special rim that is inserted into the hole in the sewer pipe and is also attached without glue. It protects against the penetration of odors and moisture.