Repair and decoration
04/20/2018 Anastasia Prozheva
The question of how to raise the bathtub higher is asked by both happy owners of apartments in new buildings and those who are planning to renovate their old apartment. The reasons for raising the bath above a given level may be different:
In order to raise the bath higher, you can use bricks or paving slabs, binding them together with a solution of cement and sand in a ratio of 1:3.
- the initially low factory legs of the bathtub, which makes it uncomfortable to use;
- the slope is too small for water drainage or even a negative angle of this slope (when the sewer pipe is higher than the level of the bath itself), which makes draining water from the bath very slow or completely impossible;
- personal preferences of the owners (very tall height and so on).
Why is it difficult to raise a bathtub above a given level?
The weight of the bath consists of several components:
- the bath itself;
- the water that is poured into it;
- weight of bathing people.
With conservative estimates, the total weight of a filled bathtub with 1-2 bathing people can reach 300-400 kg. The load is distributed over 4 legs, and their total area of contact with the floor barely reaches 10 square meters. cm (30-40 kg per 1 sq. cm).
The pressure of the bathtub legs on the supporting surface (floor, tiles, stands, bricks, etc.) is a very important factor when choosing a method for raising the bathtub.
Another important role is played by the material of the bath itself and its shape. There are several solutions for how to raise a bathtub higher above the floor.
What is the difficulty in solving the problem of raising a bathtub?
The weight of any bath consists of various components:
- The bath itself.
- Water poured into it.
- Weight of a bathing person.
With even the most conservative estimates, the total weight of a full bathtub with 1-2 people in it can exceed 300-400 kg. In this case, the entire load is distributed over only 4 legs, and their total area of contact with the floor is unlikely to exceed 10 square meters. cm, which is 30 -40 kg per 1 sq. see. This circumstance is perhaps the most important when choosing the option of raising the bathtub. The material from which the bathtub is made also plays an important role.
What you need to know to get the job done
A beginner should familiarize himself with these recommendations:
- Always check your work after lifting the bathtub: the font should not be movable and, moreover, should not wobble;
- check the frame or podium again to see how securely the bath “sits” in this frame and what the load is on the legs;
- If the bathtub is raised too high, it can cause inconvenience during operation. For example, if you raised the bathtub by 10 cm or more, then you need to think about an additional step;
- All sharp edges and irregularities must be rounded. If possible, cover the podium with plastic panels or cover it with tiles;
- To avoid falling when using the bathtub, it is necessary for your own safety to think about handrails and install them on both sides.
How to raise a bathtub by lengthening its legs
Most often, standard bathtubs come with legs provided for them, which are attached directly to the plumbing structure itself. At the same time, their length does not always suit users. What can be done if the standard legs for the font are very short? Everything is quite simple: you should purchase new screws that are longer. To do this, you need to assemble one leg at home and go with it to a retail outlet where you can pick up longer screws. After this, instead of the factory studs, screw in the newly purchased ones and install the bathtub in place.
Raising a cast iron bathtub by lengthening the studs on the legs
When purchasing studs, it is necessary to pay attention to their quality, because they are destined to withstand half a ton of weight. This is the simplest method that does not require virtually any knowledge or skills. It allows you to elevate even designer bathtubs without compromising their appearance.
Scheme for attaching legs to an acrylic bathtub
Using hard material stands
As we have already figured out, lengthening the legs to increase the height of the bathtub is not the best way. Its main drawback is the small area of the supports, which leads to increased load on the legs, as well as deformation of the walls and chips on the enamel of the bowl.
To increase the area on which a fairly massive plumbing fixture rests, you can use stands made of brick, foam blocks or paving slabs instead of legs. The advantages of this method are considered:
Important! With heavy bathtubs made from easily deformable acrylic bathtubs and heavy cast iron models, you need to do exactly this - install them on posts. This is one of the best ways to install hot tubs at non-standard heights. When the bowl is raised on bricks, it stands stable, does not wobble, and does not deform under load.
Installing the bathtub on a solid and reliable support
Lengthening the legs of the bathtub, of course, is the easiest way, but it is much safer to build a reliable support under it from some solid materials. For this purpose, the following can be used: wood, brick, paving slabs. It should be remembered that none of these materials can withstand the loads from the legs due to their small area. Therefore, to increase it, it is necessary to place metal plates made of steel under the legs with a thickness of at least 3 mm and an area of 100 cm2.
Bathtub mounted on a solid support
In addition, it should be remembered that the bathroom has a special waterlogged “climate”. Therefore, when choosing wooden stands, they must be properly treated with antiseptic substances and waterproofed. For these purposes, the bars can be painted and coated with water-repellent varnish. These measures will protect the wood from rotting, delamination and the appearance of unwanted “life” on it in the form of mold and mildew. The only advantage of wood in this case is the ease of processing and, as a consequence, the speed of completing the task.
Scheme for installing a bathtub on bricks
When choosing a brick or tile, you need to be guided by the fact that the products must be intact without cracks, chips or other flaws. In general, these materials are much stronger than wood, but only if they are bonded together with mortar. It is also possible to use tile adhesive, but its reliability leaves much to be desired. When installing such a structure, it is necessary to raise the back of the bath approximately 1 cm higher than the front, if the configuration of its bottom does not provide for a slope.
Arranging a drain for a shower stall
When installing a shower stall, special attention should be paid to the construction of the drain. After all, the service life of the cabin and its comfortable operation depend on how correctly it is done. Thus, an incorrectly connected drain can quickly leak or cause unpleasant odors in the bathroom.
Let's take a closer look at the stages of arranging a bathroom drain.
Stage #1. Installation of a shower channel
Installation of channel drainage in the bathroom takes place directly into the floor, fixed on all sides with cement mortar. Before installing the channel, it is necessary to cover the grille with adhesive tape to protect the polished surface from damage.
Stretch film is also suitable for covering the surface of the grille. The main thing is that the protective coating is thin and protects the polished surface from damage.
If the outer surface of the channel is polished, then it is necessary to roughen it with sandpaper so that the cement mortar adheres better. After treatment, it is necessary to treat the surface with a degreasing solution.
The fixation of the channel drain to the floor must be rigid, because the weight of a person’s body will be transferred to the tray
Align the tray strictly horizontally using the side adjusters.
It is necessary to tighten the nuts tightly, because the adjusting mechanism will be filled with cement and it will not be possible to tighten the fastening later
Attach one end of the connecting hose to the channel pipe, and the other to the sewer pipe. Make sure that the hose is inserted all the way and is tightly fixed.
If you suspect the possibility of a water leak, you must first treat the pipe with a thin layer of silicone.
To drain water, it is better to use a plastic pipe rather than a corrugated hose, because fat deposits accumulate in the recesses of the corrugation
The next step is to fill the space on the sides of the channel with cement, taking into account the thickness of the tiles that will lie on top.
Then place a tile on the cement, the top of which should be 1 mm above the level of the channel so that water does not accumulate near the grate. Bathroom tiles must be laid from the drain tray to ensure smooth joints on all sides and no sharp edges.
To allow water to drain, the tiles must be inclined from the sides of the shower area to the drain at the rate of 1-1.5 cm in height per 1 m of floor length.
After laying the tiles, it is necessary to clean the area where they meet the edge of the channel grate and fill them with tile adhesive or sealant. After it has dried, it is necessary to finally clean the space around the edges of the channel drain and remove the protective film from the grate. The drain is ready!
When installing a channel drain, the following nuances must be taken into account:
- The channel capacity should not be less than the water flow in the shower. The classic hydromassage cabin uses 10 liters per minute.
- The distance from the outlet of the drainage tray to the vertical sewer pipe should be minimal.
- If you have doubts about the throughput of the drain system, you can check it. To do this, you need to secure the tray to the floor, connect it to the sewer pipe and apply water pressure to the tray.
- The diameter of the hose coming from the nozzle should not be less than 40 mm, and its slope should be less than 30 mm per 1 m.
- When installing a channel drain in a bathroom door, it is recommended to choose a sectional grille to facilitate access to the siphon.
Following the instructions will allow you to install a channel drain in a shower stall quickly and efficiently. There is no need to be afraid of blockages in the drainage tray built into the floor, because its design allows for cleaning the system from the outside without the need to dismantle the tiles.
Stage #2. Installation of drainage drain
Installation of the shower drain is carried out similarly to the installation diagram for a channel drain described above. Cheap drainage drains are sold without fixing devices, so you should be aware of one nuance when installing them.
If the external drainage device looks like a simple housing with an internal mechanism and a discharge hose, then you must first firmly fix it in the desired position.
To fix the height, you can place a brick, several tiles or other available material under the body.
You cannot fix the drain with polyurethane foam, because subsequently, when you press your foot on the drain grate, it may fall through
With the regulation of horizontal stability the situation is more complicated. If there are no fastening elements, it will be necessary to control the correct location of the drain body after laying the cement screed during the drying process.
The general layout of the shower floor layers is as follows.
The diagram shows a square drainage ladder with fixing elements. Clearing blockages in the drain is done after removing the grate and removing the internal elements.
The drain body is actually a hollow flask with a pipe, so after disassembling it, you can even clean the drain hose using a cable.
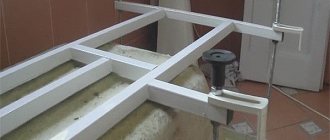
Installing a bathtub on a homemade metal frame
If you have already learned how to use welding equipment well, then you can make a frame from a steel angle and pipes. For this you will need: a welding machine, an angle grinder, angles and pipes. The cross-section of the corners and pipes must be large enough to support the weight of the bath. The design of the bathtub frame itself should ensure maximum stability and strength. The frame is made of such a size that the bathtub rests against it with all its edges, but cannot fall inside. To keep the bathtub more stable on the frame, and to keep the water in it from cooling longer, you can use polyurethane foam to fill the gap between the frame and the bathtub.
Metal frame for a bathtub made of profiled pipe 40x25 mm
Installation of the structure on the podium
How to build a bathtub into a podium? This is a question asked by many owners who are making renovations. This will make the room more functional and comfortable.
The material for the podium can be plasterboard, foam block or brick.
- The first stage of installation will be to install the bathtub on a leveled base and connect it to the drain.
- Next, mark the contours of the future foundation. To do this, apply a plumb line to the edge of the bathtub and mark a point on the floor; later they are connected with a marker.
- The podium wall will be built along a line marked inward from the base line to the thickness of the facing material.
- It is also necessary to provide an opening through which communications will be accessible in the event of an emergency. Such a window can be decorated with facing tiles. It can be easily dismantled if necessary.
- Brick and foam block materials will be reliable in design. But when installing them, difficulties arise due to differences in the size of the bathtub below and above. The elements require sharpening for further installation. Before installing the bathtub into the tiles, the wall must be leveled and plastered.
- It is better to choose moisture-resistant drywall. It will need a rigid frame, otherwise the wall made of it will vibrate. This will not allow the tile to last long. Installing a metal profile fastened with screws or rivets is suitable.
- Also, with a wall made of plasterboard, you can build a frame from corners held together by welding. Any of these options must be secured to the floor or wall.
- Before building the bathtub into the podium, you can pre-provide niches in its lower part for storing small items. This will save space.
- When making a podium of several levels, its steps can be filled with expanded clay or slag concrete or laid out from blocks or bricks.
- The steps will be the width of the tile (22-25 cm).
- The relief profile of the edging will help prevent injuries due to slippery tiles.
Placing the bathtub on a pedestal
Sometimes a bathtub not only has hygienic functions, but is also an object of design and decoration. Typically, such products have original beautiful shapes, curly curves, and, often, very short legs. What needs to be done in this case? It is clear that any of the above methods will simply ruin all the beauty. There is only one way out - if you cannot raise the bathtub, then you should raise the entire floor under it. Of course, raising part of the floor is undoubtedly a more difficult task, but after all the renovation work is completed, the bathroom will acquire a royal appearance. The podium you build can extend from under the bathtub as a straight or shaped step. You can even make several of them in the form of a staircase. This option will allow you to add special sophistication and incredible originality to an ordinary bathroom.
The main thing is that if you live in a multi-story building, then do not forget about the weight of this podium. To this should be added the weight of a bathtub with water and people. The load on the floors should not be too large, especially for old houses with wooden floors. To lighten the weight of the podium, it is worth making it not monolithic, but using frame structures that are finished with the material you like. Note that if the frame is made of wood, it will not support the weight of a full bathtub. Therefore, additional racks must be made inside it, which evenly distribute the weight of the bath over the entire area of the podium.
Sewage problems
Causes of bad odor: 1 problem
The smell in the bathroom from the sewer can appear for several reasons:
- the most common reason why the bathroom smells like sewage may be the lack of a water seal in the siphon;
- and this does not at all indicate that you have a bad drain - the water simply evaporates if the bathroom is not used for a long time - this can happen if the owners are absent for a long period;
- here is the simplest solution to remove the smell - just open the water and let it fill the siphon - the water seal will cut off the “odors”;
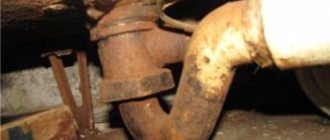
- in old houses that are more than 50 years old, the service life of cast iron pipes has expired, but usually no one replaces them, and leaks form due to corrosion, as in the photo above;
- here the causes of the smell may also be the presence of fungal mold or dampness. That is, a leaky pipe does not have to be a sewer pipe - it can also be a water supply;
- the solution to the question of how to get rid of the smell from a leak lies in dismantling and replacing old pipes with new ones - this is better than a welding patch;
- also the reason why the bathroom or toilet stinks may be the lack of a vent riser, which must go into the attic or onto the roof for ventilation;
- in some cases, residents of upper apartments, when replacing a vent tee, unknowingly remove the vent pipe. As a result, ammonia fumes have nowhere to go, and they penetrate into the room when draining, when the water seal is movable - this is the answer to the question of why there is a smell in the room;
- We continue to consider the topic of what to do if the bathroom smells like sewage and let’s pay attention to another reason - a dirty siphon;
- this problem is especially relevant for the kitchen sink, since greasy dishes are washed there all the time, but for sinks and bathtubs this is also quite relevant, it’s just that the bottle or tube will not clog as often as in the kitchen;
- the solution to the problem here is quite simple - you need to disassemble this siphon with your own hands, wash it in warm water with detergent, and put it back together;
- just be careful when assembling so as not to pinch the gaskets; this is especially true for a bottle siphon.
Hiding the pipes: problem 2
Laying pipes and sewerage - required slopes
Now let's figure out how to hide sewer pipes in a bathroom or toilet if the bathroom is separate. There are three ways here - finishing the walls or with plastic panels, where the sewage system will be under the frame, plasterboard boxes, as in the top photo, or grooves in the wall, which will then be covered with plaster.
Since it is very easy to cover pipes with plasterboard, this method is very attractive for finishers - it is almost dust-free and there is no wet work. But this method has serious disadvantages, especially if the renovation is carried out in a government-owned apartment - the frame finish steals the area of the room - this is at least 4-5 cm on each side.
And if your bathroom only has three squares, then this is an unaffordable luxury, since every centimeter is important - the bathrooms may not even fit.
But how to hide the pipes in the grooves is a matter of saving space, but the work itself is very dusty, and then you will have to plaster the walls. Using a grinder with a diamond blade, two edges of the groove are cut according to the diameter of the pipe being mounted, and then the middle is selected with a hammer drill in rebound mode.
An angle grinder raises dust, so it is advisable for you to use a respirator or a gauze bandage, although there are angle grinders with a vacuum cleaner that are quite expensive.
Any DIY installation requires fixing the pipes, and if it is done hidden, then it is better not to use brackets - it is too inconvenient. For fastening in grooves or simply to the wall, metal strip hangers with perforations are excellent - they press the pipe to the surface as much as possible.
Since it is more profitable for you to install such a pipeline with minimal costs in terms of money and space, simply secure one end of the suspension with a dowel and a screw, and fix the other “tightly” - this way the communication will be held rigidly.
There is a table at the top of the subheading, so if you make the connections yourself, try to follow them - this is very important. There is no 32nd pipe in the table, but it is used for dishwashers and washing machines, where drainage is forced, so a counter slope is even possible there (if technically necessary).
Subtleties of arrangement: problem 3
But what if the drain in the bathroom is below the sewer level and the water remains at the bottom? One way out here is the simplest - to raise this very bathtub so that its siphon is above the outlet level.
To do this, you can place bricks under the legs, and place the container itself without legs on the bricks. Only if you install it without legs, then inflate the bricks with polyurethane foam so that there is no creaking later (for gravity, add water to the bath until the foam dries).
Of course, there is another solution to the problem - connecting a pump to the communication for forced removal. This will certainly be more expensive, but you will immediately solve all the difficulties with the slope, and this is sometimes very important.
I would also like to draw your attention to how to eliminate a leaking sewer pipe. Of course, it is best to change it, but if this is not possible, then for metal you can use cold welding, and for PVC glue MOMENT, which after drying is tightly wrapped with electrical tape.
The process of constructing a podium for a bathtub made of plywood and blocks
In order to build a frame podium you will need the following:
- Saw or jigsaw.
- Hand screwdriver or drill.
- Hammer.
- Plywood and bars.
- Self-tapping screws, corners and other fasteners.
- Building level.
- Polyethylene film.
Work on the construction of the podium will be carried out as follows. If your pedestal is adjacent to the wall and will not be in the middle of the bathroom, you need to use a building level and a regular pencil to mark the top edge for the future pedestal. The main floor under the bathroom is carefully waterproofed with polyethylene or a more suitable insulating material for these purposes. You can additionally use a cork backing.
Then you need to lay plywood on the floor in the place where you want to build the podium, and nail it to the floor with nails or dowels. After this, you need to assemble a strong frame from timber that matches the size and configuration of the future pedestal. The parts are fastened with screws and corners for greater rigidity. For a bathtub equipped with legs, special metal supports are made that increase the area of influence on the podium. The frame is covered with plywood and decorated with any material suitable for the overall style of the bathroom.
Podium made of bars and plywood for a bath
Lengthening the legs
The most common way to install bathtubs is to use supports or simply legs. Using this installation option, you can install models made of cast iron, steel and even acrylic. The legs included in the delivery set usually have a standard height.
If the legs are made in the form of a screw, then they can be adjusted. If the height of the standard legs is not enough or with the help of them you need to give the bath a slope towards the drain for better water drainage, then they can be lengthened.
To do this proceed as follows:
- First, you need to disconnect the drain and overflow from the bathtub and lay it on its side to make it easier to remove the standard legs.
- Then you need to remove the old legs, take one as a sample to the store, and then purchase a metal pin of the same diameter, but longer.
- Then you need to fix the new screws; if necessary, the height of the knife can be adjusted to give a slope in the direction of the drain hole.
- After this, connect the drain and install the bath in its original position.
Important! This method of lengthening the legs has several disadvantages. Firstly, using this method it is impossible to increase the distance between the floor and the side of the font by more than 5-7 cm. Secondly, the load on the legs increases significantly, which is why they can become deformed. Therefore, when purchasing screws to lengthen the legs, you need to pay attention to the material from which they are made and the cross-section diameter.
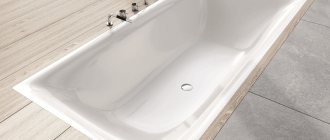
Raising an acrylic bathtub using bricks or lightweight concrete blocks
In private homes, it is possible to construct a podium not only from wooden parts, but also from brick, which is bound with cement mortar. Such a pedestal is very easy to decorate using tiled or mosaic tiles. It is done quite simply. The outline of the future podium is drawn on the floor and bricks or foam blocks are laid on it. Then the entire internal area is filled with the same material. The entire structure is poured with concrete and leveled. After the screed has completely dried, you can cover the podium with tiles. It makes sense to create such a structure during a comprehensive bathroom renovation or during the initial construction.
Beautiful multi-stage podium for a bathtub
Video instruction
Comments: Comments on the post How to lift a bathtub with your own hands. Methods for raising a cast iron bathtub are disabled
Every happy owner of his own home in a new building has a question - how to independently raise a cast-iron bathtub. This question is also asked by those people who have decided to do a major renovation in the bathroom. Read more about how to raise a bathtub, reasons and methods.
No matter how happy you are that you got a new apartment or were finally able to gather your strength and start a major renovation in the bathroom, the question remains open of how to raise a cast-iron bathtub higher.
Some nuances when lifting the bathtub
As mentioned above, bathtubs are different, therefore, depending on the material from which they are made, a slightly different approach is required in implementing the idea of raising them to a higher level.
Cast iron bathtubs are, for obvious reasons, one of the heaviest products. Probably only stone baths made from natural rock can compete with them. It is precisely because of their very high weight that cast iron bathtubs need to be treated with special care.
As for bathtubs made of acrylic components, they can be raised above the floor only with the help of some corners, which are simply mounted into the wall. You can raise a steel bath above the standard level using a cement screed. Moreover, such a screed is made only where the bath itself will be located. In this case, it is necessary to make the correct slope for water drainage. To do this, you can place any square pipe or an ordinary channel under the rear supports of the plumbing product. In addition, you can use wide round washers and threaded studs a meter long. In this case, it will be enough to drill holes in the brick support all the way to the floor. The hairpin is cut into four equal parts. They are inserted into the prepared holes and filled with mortar. After it dries, the bathtub is placed with its legs on these studs. This design ensures high reliability and immobility of the plumbing fixture.
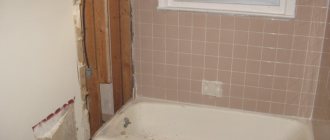
When installing a bathtub on brickwork, it is important to know that when raising the bathtub higher above the floor level, it is very important to ensure that it is unshakably stable. Under no circumstances should it wobble or wobble. The leg mounts themselves must be very reliable. When raising the bathtub to a very high height (more than 10 cm), you should take several steps, and in no case just one. A podium that is covered with tiles when wet can be very slippery, which can lead to injury if it falls. To prevent such troubles, it is enough to come up with and install some reliable handrail near the bathtub, which you can grab onto in a critical situation. You can also use porcelain tiles instead of tiles, which are safer because they are not so slippery.
We really believe that this article has helped you gain the necessary knowledge on how to raise a bathtub higher above the floor. It doesn’t matter at all which option you choose, the main thing is to remember that you need to strictly follow the instructions and use only high-quality and convenient materials in your work. This will allow you to avoid various “unforeseen events”, and lifts, frames or fastenings made by yourself can be used without fear for many years.
Why raise the bathtub?
The reasons for raising the bathtub above floor level can be very different. So, first of all, it is very important to consider the slope of the bathtub for good drainage. Sometimes there are cases when the level of the sewer pipe is higher than the level of the bathtub, because of this, draining the water may be completely impossible, or very slow.
Raising the bathtub will help solve this problem. Thanks to the fact that you raise the level of your plumbing product, water will never stagnate either in the bathtub itself or in the corrugated pipe.
Another reason for raising the level of the bathtub is the growth of all household members. It is very inconvenient for tall people to bend low, etc. Therefore, to achieve maximum comfort for all owners of the apartment, the bathtub can be slightly raised above the floor.
Raising a clawfoot bathtub