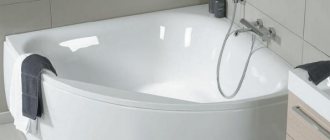
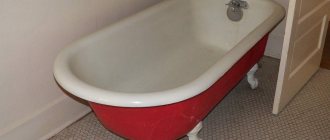
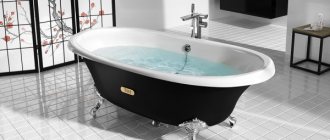
The advantage of acrylic bathtubs is their lightness, but this point is also their disadvantage, since a rather fragile and thin structure may not withstand and burst upon impact or be damaged by the fall of a heavy object.
Agree, I wouldn’t want to spoil the new plumbing during installation. In general, installing an acrylic bathtub yourself is not a difficult task. The main thing is to understand the principle of operation and adhere to the technology.
Below are various methods of installing a bathtub, describing the procedure for connecting the siphon and sewerage supply. All instructions are accompanied by visual photographs and video materials.
Prerequisites for the construction of the frame
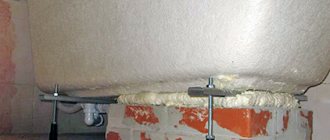
Steel frame for bathtub
A bathtub frame is especially necessary when choosing a bowl with an unusual configuration. Multi-sided, round, oval models are difficult to secure. The wide sides of the product are fixed to a special frame, this ensures a stable position.
The frame is mounted to the walls or made in the form of a separate platform. Use a ready-made design or make it yourself. To install a heavy cast iron model, the support is made of bricks.
The frame for a steel bathtub makes it stronger and more reliable. Such products are thin-walled, the thickness of the sides is half that of cast iron models. The base is made of wooden beams, plywood or metal profiles. This robust structure consists of vertical and horizontal supports.
Installation of the frame provides:
- even distribution of bowl weight;
- preventing deformation of the walls of the font;
- preservation of enamel on the surface.
Acrylic products are more elegant and require reliable support that will protect them from load and deformation. The material is much inferior in strength to metal and cast iron. The bottom of the structure bends easily.
A frame for an acrylic bathtub is simply necessary, especially for thin products. The more elegant the model, the stronger the support should be. If the bathtub has an unusual configuration, a special platform is required for support.
Advantages and disadvantages of acrylic bathtubs
The advantages of acrylic bathtubs include the following aspects:
- the polymer material is repairable if damaged, and in the event of a breakdown of the bathtub or irreversible damage to the enamel, a new acrylic liner can be inserted;
- acrylic is flexible when molded and is easy to paint, so bathtubs made from it can be of various shapes, sizes and colors;
- due to the low thermal conductivity of polymer materials, the water in the bath cools slowly, and the acrylic bowl itself is not cold to the touch;
- the cost of an acrylic bowl is lower than a metal one;
- The density of acrylic is several times lower than that of cast iron or steel, which allows reducing the weight of the structure to 15-20 kg.
The light weight of acrylic allows you to install the structure yourself and independently mount a supporting frame of sufficient strength. If the shape of the bathtub differs from the standard, the base may require additional fastening.
Along with their advantages, acrylic bowls also have several significant disadvantages:
- due to the plasticity of the material, the bottom may bend slightly under the weight of a person;
- the surface of the polymer is sensitive to mechanical and chemical influences: it cannot be cleaned with hard brushes, abrasives and aggressive chemicals;
- the thin acrylic structure can be pierced by a sharp or heavy object, so during construction work, if possible, the bathtub should be removed from the bathroom;
- acrylic polymer is more sensitive to high temperatures than metal: if the water in the bath is warmer than +60°C, the surface may begin to deform.
Materials for homemade frames
Wood frame
The stable frame for the bathtub is made by hand. This will save money and create a more reliable design. The material chosen is durable and affordable.
The most common types:
- Wooden beams are low cost, durable, and easy to process. Disadvantage: rotting due to moisture. To protect the surface, it is treated with a special moisture-resistant compound. Oak, cedar, alder, and larch are used.
- Galvanized profile, used for plasterboard construction. Does not withstand heavy loads, plays the role of decoration. The weight of the product falls on the legs and wooden beams.
- Iron profile pipe holds a font made of any material. Even a non-standard cast iron product. To make such a frame you will need special equipment and welding skills.
- The brick reliably strengthens the product and is used as a stand for cast iron bathtubs. To carry out masonry, you must have certain skills in construction.
The appropriate material is chosen depending on the type of product, wall thickness, and personal preferences.
Features of the material
When making a frame for a bathtub with your own hands, it is recommended to choose the strongest and most wear-resistant pipes, corners, and profiles. It can be made by anyone who knows how to use a drill, a mini-welding machine and a grinder.
To successfully cope with the task, you can find simple diagrams online, as well as photos of the bathroom frame. The main thing is to carefully follow the step-by-step instructions.
Construction methods
There are different frames for installing a bathtub:
- In the form of a stand on legs made of metal profile. Rectangular pipes are used. The structure consists of several elements that support the bowl. The set includes legs that can be used to adjust the height. Only the bottom of the bathtub is installed on the support.
- Flat frame with legs - this option is more complex and durable. The bottom rests on a profile stand, the base corresponds to the bottom of the bowl. Transverse ribs add stability. Vertical elements support the sides. Used for bathtubs of complex shapes and corner models.
- A fully welded frame is the most durable. It is a three-dimensional design that holds the bowl securely. It has several support points, distributes the load from the bottom and sides of the product. The stiffening ribs are located in the areas of the main load.
When choosing the type of support, consider:
- bath dimensions;
- configuration;
- wall thickness.
The thinner the structure, the stronger the support should be.
For a standard rectangular model, a regular frame will do. The supports differ in the thickness of the metal and the manufacturer. If the bathtub has a complex shape with hydromassage, a reinforced frame will be required. High-quality supports are made of thick, durable metal with an anti-corrosion coating.
Frame shapes
As noted above, three types of materials are used to produce the support structure. These include:
- wooden beam;
- metallic profile;
- profile pipe.
In turn, all frames are divided into several types, each of which is designed for a specific shape of the bathtub bowl. These include:
- standard base. It is used for models that have a rectangular shape;
- round. These designs are considered popular. They allow you to save enough free space. This frame is made of wooden boards, the thickness of which varies from 5 to 6.5 cm;
- corner. They help secure the corner designs of bathtub bowls. These structures are made from profile pipes. Its diameter should reach 5 cm. The main elements of the material are installed in one of the corners of the room.
Assembling the finished support
All-welded construction
Plumbing stores sell factory frames designed for each model.
Ready-made supports are distinguished:
- prefabricated;
- whole-welded.
How to assemble a finished frame for an acrylic bathtub is described in detail in the instructions. The kit includes the necessary fasteners.
To assemble a standard design:
- They disassemble all the elements and check their presence.
- Prepare tools: drill, screwdriver, screwdriver.
- The bathtub is turned upside down and the frame is put on top.
- Before screwing in the fasteners, mark and make holes to prevent the material from cracking.
- The bowl is inserted into the base and leveled using a building level.
- The bathtub is fixed in the frame.
After this, a siphon and mixer are installed, and the product is connected to the sewer.
If the design is not satisfactory, it is made with your own hands from wood, galvanized profile, or iron pipe.
Final work
The process of installing the bathtub is completed by assembling the siphon and connecting the drain to the sewer. After this, the joints of the bathtub with the walls are sealed and a screen is installed.
Siphon installation
Assembling the siphon from the technical side is not difficult. But the slightest mistake in the connection diagram of the parts of the device can lead to either a leak or the appearance of unpleasant odors from the collector - this element of the acrylic bathtub acts as a barrier between the bathtub bowl and the sewer.
In this regard, we will consider in more detail the process of installing a siphon and connecting it to the sewer. But first, let's pay attention to a few nuances.
- The factory kit cannot contain unnecessary parts. If something remains, the siphon is disassembled and reassembled, but more responsibly.
- There is only one O-ring per connection. An attempt to improve sealing by increasing the number of seals gives the opposite result.
- All trim nuts must be tightened by hand. This way you can feel the clamping force better. You can tighten it with a wrench, breaking the thread.
- All cone gaskets are placed with the wide side facing the nut.
- Recently, a water seal with three holes has become increasingly common on sale: 2 on top and one on the side, through which settled dirt is removed. The side one is suppressed with a special nut.
To make the assembly instructions more clear, we present a drawing of the siphon in a disassembled state with a digital designation of each part.
Siphon in disassembled condition. 1 - plug; 2 — protective grille; 2с - protective gasket; 3 - flat gasket; 4 — outlet pipe; 5 - connecting screw; 6 - threaded hole for the screw - located in the middle of the pipe (in the photo the arrow is drawn a little differently); 7 — water seal (can be different in design); 8 - plastic coupling nut; 9 — conical rubber seal; 10 — adapter; 11 - flat gasket; 13 - outlet for overflow; 14 - corrugated hose; 15 — gasket; 16 - coupling nut; 17 — overflow pipe; 18 — gasket; 19 — overflow protective grille; 20 — fixing screw.
Assembly is carried out in the following sequence:
- the siphon is unpacked;
- the quality of threads and gaskets is checked - chips and burrs are unacceptable;
- the parts are laid out in the order in which the assembly will be carried out;
- a plug (1) is attached to the overflow protective grille (19) by a chain;
- a flat gasket (2c) and a protective grill (2) are placed sequentially into the drain hole at the bottom of the bath;
- on the reverse side, a flat gasket (3) and a drain pipe (4) are pressed against the drain hole with force. You need to make an effort to ensure that the rubber gasket finds its position;
- From the top of the bathtub, a connecting screw (5) is screwed into the threaded hole (6) of the outlet pipe (4) using a wide slotted screwdriver;
- A plastic coupling nut (8) is placed on the pipe (4) from below. A cone seal (9) is installed under it;
- the pipe is inserted into the hole in the water seal (7) and the nut is tightened;
- according to the same scheme, an adapter (10) is attached to the water seal;
- a smaller corrugated tube (14) is attached to the overflow pipe (17) using a plastic nut (16) and a flat gasket (15);
- The overflow pipe (17) and the rubber gasket (18) are pressed firmly against the overflow hole from the outside. A protective grille (19) is attached to the inside. Everything is secured with a tightening screw (20);
- The corrugated overflow hose is connected to the outlet of the drain pipe.
The siphon is assembled.
Assembled siphon.
Connection to sewerage
The last stage of assembling the siphon is connecting the bathtub to the sewer. To do this, take a larger corrugated hose with connecting tubes of different sizes.
Connecting the corrugated pipe to the water seal.
The smaller diameter corrugated tube is connected to the adapter (10) using a nut (8) and a conical gasket (11). After this, the second end of the corrugated pipe is connected to the sewer pipe. The entry point is carefully sealed with sealant. The connection principle is clearly visible in the photo.
Connecting the siphon to the sewer.
The most common mistakes when assembling a siphon are:
- connecting the drain pipe to the side hole of the water seal, as a result of which sewer odors easily penetrate into the apartment;
The thicker corrugation (2) is mistakenly connected to the wrong hole in the water seal.
- the location of the bathtub drain hole below the sewer pipe receiver.
The drain hole must be higher than the sewer inlet.
Sealing joints
During water procedures, drops of water fall on the walls of the bathtub. Under the influence of gravity, they flow behind the bowl, causing rapid growth of mold there. This can be avoided in one way: to seal the junction of the edges of the font with the wall. This operation can be done in several ways:
- silicone sealant is the most common method of sealing joints. Works great on metal and cast iron bathtubs. It didn't work out with acrylic. The reason is that the walls of the bathtub, and with them the sides, “play” under the influence of loads (water and a person washing), i.e. slightly deformed. This is enough for a thin layer of silicone sealant to begin to let water through.
- silicone tape. Sold in roll form, which is enough to seal the joints of standard-sized bowls. It has shelves 2 and 3 cm wide. Advantages over sealant:
- quick and easy to stick - the work can be done by a housewife;
- easily removed for replacement;
- lower price.
Sealing joints with sealant.
Some experts suggest filling the bathtub with water before applying sealant to compensate for subsidence of the side. It is believed that polymerization of silicone will occur at maximum load on the walls of the font, after which deformation changes will not affect the sealing seam. It helps, but not much. All the same, after 3-4 years the sealant needs to be changed: mold develops under it and behind it;
Gluing silicone tape.
The disadvantage is the same - it needs to be changed often, because... Silicone glue does not have enough elasticity to withstand the deformation of the sides of the bowl. As a result, water gets under the tape, causing mold growth;
This is what the wall looks like under the silicone tape after 4-5 years.
- plastic plinth (corner). When installing, its leg is inserted into the gap between the bowl and the wall. Thanks to the soft rubber applied to the edges, the plinth fits tightly to the tiles and acrylic, preventing water from passing through. Movements of the side under loads do not affect the joint density. Difficulties arise only when passing corners. Many home craftsmen do not know how to cut the connecting joint at the baseboard, especially if the corner of the wall is obtuse or sharp. You can see how to perform this operation correctly here.
The junction of the bathtub with the wall is sealed with a plinth.
Screen installation
The space under the bathroom is covered with special screens. You can make them yourself or buy them ready-made. The material can be brick, foam blocks and gypsum plasterboard, followed by gluing tiles on them (used by home craftsmen) or plastic, acrylic, MDF, glass - a factory-made version of protection. There are also many installation methods. All this is described in detail in the work “How to install a screen on an acrylic bathtub?”
Homemade screen made of blocks.
In conclusion, we note that none of the instructions for installing an acrylic bathtub contain any difficult-to-follow items. All work can be done independently, significantly saving the family budget.
Preparatory stage
The frame for an oval bathtub is made by attaching it to the wall on both sides. First, calculate the height of the platform. To do this, measure the distance from the lower edges of the side to the floor.
It is necessary to calculate the load on the structure. The weight of the product filled with water and the weight of the person are taken into account. The choice of material, the number of stiffeners, and wall thickness depend on this. Next, you need to do the following:
- Boards for the base are laid around the perimeter and screwed to the floor.
- Install the racks, attach them to the base and to the wall.
- Another board is placed on top of the racks.
- Lay a sheet of chipboard or plywood and screw it around the perimeter to the frame.
- A hole is cut in it for the bathtub.
- A template is used to mark the hole.
- Cut it out using an electric jigsaw or a hand saw.
Plywood is used with increased water resistance, 15 mm thick.
The racks are nailed to the bars, and not to the base, this will simplify installation. For convenience, metal corners are used.
Preparatory work
Installation of an acrylic bathtub begins with preparatory work, which is carried out in the following sequence:
- all unnecessary objects and things are removed from the premises - if they do not interfere, then there is a risk of severe contamination;
- the water supply is shut off by emergency taps (if necessary, they can be temporarily turned on);
- the screen is removed from the bathtub (you can see how to do this in the article “How to install a screen on an acrylic bathtub?”);
- the siphon is disconnected;
- use a hammer and chisel to knock down a corner of strips of ceramic tiles along the sides of the bowl;
- use a knife (trowel) to remove the sealant;
- the old bowl is dismantled. To do this you need to do the following:
- unscrew the screws at the corners of the font if a frame structure for installing the bowl is used;
- swing and then remove from the pedestal;
- knock down the tiles and then the plaster from the wall in the area of the built-in side of the bathtub.
- the font is removed from the premises;
- the siphon is disconnected from the sewer riser;
- the sewer hole is closed with a stopper or a rag so that an unpleasant odor does not spread throughout the apartment;
- the area under the old bathtub is cleared of debris;
- if a corner version of the bowl is purchased, the angle in the wall is leveled to 90o. The technology is outlined here. If this requirement is ignored, the fastening strips will quickly damage the acrylic;
- waterproofing work is being carried out (instructions are given in the material “How and how to waterproof a bathroom floor?”);
- the floor is leveled with cement-sand mortar or ceramic floor tiles - differences in height should not exceed 1 cm;
- the joints of walls and floor tiles are sealed with sealant;
- The sides of the bowl are protected from damage during transfer from room to room with masking tape.
Profile construction device
Profile frame
A profile frame for a bathtub is the most popular option.
For production use:
- square pipes;
- U-shaped section;
- corner.
Algorithm of actions:
- Measurements are taken.
- The design is designed to ensure proper weight distribution over the entire frame area.
- Cut the profiles to the required length and fasten them together.
- The pipes are laid on the floor and welded or bolted.
- The frame frame is welded to the corners of the floor base.
- A platform made of bricks, boards, and sand is installed under the bathtub.
- Rubber is used for shock absorption so that the product does not wobble.
- The gaps between the bathtub and the floor are filled with polyurethane foam.
The edges of the metal parts are sharp and can damage the bowl. The profiles are in contact with the bathtub with the back side. Drywall and tiles are laid in the same plane.
Do-it-yourself technologies for installing an acrylic bathtub
When deciding how to properly install an acrylic bathtub with your own hands, they use modern technologies used when carrying out work by repair and construction firms and organizations. For self-installation, no specialized construction tools are required, except for a hammer drill, which is used to drill and install grooves, and any homeowner will have screwdrivers, a hammer and a hacksaw. For proper installation, a building level is required; for certain work, a grinder with a disc for concrete and metal, and a screwdriver, if available, will not hurt.
Assembling a timber base with your own hands
Ready-made frames are not always suitable for installation. A DIY wooden bathtub stand is more durable. This is the simplest and cheapest option. You will need a beam with a cross section of 40 x 40 mm and a sheet of plasterboard.
Prepare a set of tools:
- drill;
- hammer;
- wood drill;
- hacksaw;
- screwdriver
The wood is treated with a special impregnation that protects it from moisture.
Procedure:
- They take measurements and cut parts. The upper and lower parts follow the shape of the bathtub.
- To begin with, lay out the support perimeter. This is a flat frame with stiffening ribs.
- The prepared parts are screwed to the floor with dowels.
- The corner posts are secured carefully; the main load falls on them.
- The stand is nailed to the wall along the entire perimeter.
- The upper support panel completely repeats the assembly of the lower one.
- The profiles are secured using self-tapping screws.
- Additional load-bearing walls strengthen the structure. They are installed every 0.5 m, along the longest side.
- One stand is placed on each side in the center.
After this, communications are connected, the frame is covered with plasterboard or a plastic screen. Decorate with ceramic tiles or panels.
Required Tools
At the first stage of installing the structure, you should prepare all the necessary fixtures and tools, namely:
- a hammer drill with a drill of the required cross-section and length - for making holes in the wall;
- screwdriver - for tightening fasteners when assembling the structure; in addition, it can be used to drill holes in the bathtub itself, if necessary;
- an open-end wrench of the appropriate size - to adjust the height of the legs of the bathroom frame;
- construction corner - inspect corners;
- roulette;
- building level - to level the structure horizontally;
- pencil or construction marker - for marking.
It is also worth taking care of additional consumables in advance: sealing tape or a plumbing corner - to seal the joints between the wall and the bathroom. But you can also use simple silicone sealant if the walls in the room are perfectly smooth.
Installation on bricks
Bath on bricks
This is a reliable way to install a bathtub. The brick base does not deform or deteriorate from moisture. This stand differs from a wooden and metal frame. Installation features:
- Two brick supports are placed at a distance of 50–60 cm from each other.
- The width of the structure should not be larger than the bathtub.
- The stand follows the shape of the bowl.
- The part on the drain side is 1.5–2 cm lower to ensure water drainage.
The bowl is placed on the finished supports and firmly fixed to the wall. The gap between the brickwork and the bottom is filled with tile adhesive or polyurethane foam.
Methods for exterior finishing of an acrylic bathtub
If you purchased an acrylic bathtub without a decorative screen, then you can make this part yourself.
Image gallery
Photo from
Brick walls to stabilize the position
The standard way to close a bathtub is a decorative screen
External brick wall with tile trim
Front panel for decorating an acrylic bathtub
When performing finishing work, you must follow some rules:
- use only moisture-resistant materials that are resistant to temperature changes and are not susceptible to the formation of mold and mildew;
- provide quick and easy access to communications located under the structure.
If the bathtub is installed on bricks, you can also lay out a half-brick thick brick wall on the front part, and then line it with ceramic tiles or mosaics. The top row of bricks is made 2-3 cm below the side of the bathtub, and then blown with foam to seal.
It is also necessary to leave a technological hole, and then use canopies to make a door.
When building a brick wall, you cannot use it as a support for a bathtub. Be sure to leave at least 2 cm of empty space between the side and the top of the brickwork
Finishing an acrylic bathtub with plastic, MDF or moisture-resistant plasterboard is very popular. An original solution is to create a mirror screen. Plastic panels allow you to quickly and inexpensively finish the finishing of the bathtub. In addition, if the panel becomes unusable, it can be very easily replaced.
As for drywall, after installation, it can be finished with different materials: tiles, waterproof wallpaper, covered with film or applied with decorative plaster.
In both cases, it is first necessary to make a frame from a metal profile or wooden beam. In this case, the metal must be treated with an anti-corrosion compound, and the wood must be treated with a moisture-resistant primer.
Panels made of plastic or MDF can be laid on a wooden frame, as well as plasterboard can be attached and then covered with various finishing materials.
To make a wooden frame, install boards around the entire perimeter of the bath that will serve as a base and screw them to the floor with self-tapping screws. Make vertical posts in the corners, attach the top horizontal board to them using metal corners and install additional vertical posts in increments of 50-60 cm.
Interesting options for creating a screen for a bathtub are proposed in this article.
Bath installation
When the frame is completely ready, install the bowl on it:
- A cement pad is poured onto which the bottom rests.
- Carefully lower the bathtub into the hole on the frame.
- Then connect the water supply and sewerage.
The sides of the frame are covered with panels made of thick plywood, chipboard or flat slate. The shields are secured using screws with anti-corrosion coating. Tiles are glued onto the resulting walls. The gaps between the tiles, floor and frame are sealed with sealant.
For convenience, doors are made to provide access to the pipes in case of leaks and blockages. Detergents are stored under the bathroom.
The service life of the product depends entirely on the reliability of the installation. The frame for the bathtub must be solid and very durable. It is up to the buyer to choose a ready-made design or make it yourself. You can call a specialist and entrust the installation to an experienced specialist.
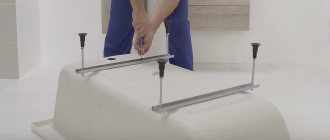
The procedure for installing an acrylic bathtub on legs
Assembling an acrylic bathtub with legs is much easier and faster - the design is elementary. The kit includes two strips, four legs with pins, fastening of an acrylic bathtub to the wall, a number of nuts and self-tapping screws.
Marking and assembling the frame
In an acrylic bathtub with legs, the frame consists of two slats that are attached to the bottom. These slats come with adjustable legs. The task is to screw the planks evenly, install the legs and level the entire structure. Not too difficult.
Complete set of acrylic bathtub with legs
Find the middle of the mounting strips and the bottom of the bathtub and make marks. Having aligned the middle marks, two mounting strips lay the uninverted bathtub, stepping back a little from the edge of the reinforcing plate (3-4 cm), we install the strips. Use a pencil or marker to mark the installation locations of the fasteners (there are holes in the strips).
We place the mounting strips
Using the marked marks, drill holes to a depth of about 1 cm (you can glue colored tape to the drill to make it easier to control the depth). The diameter of the drill is selected 1-2 mm less than the diameter of the screws (indicated in the instructions or can be measured). Having installed the strips and aligned the holes, we fasten them with self-tapping screws (included in the kit).
Installing an acrylic bathtub on legs with your own hands: screwing the strips
Putting the legs on
The next step is installing the legs. They are assembled in exactly the same way as in the previous version: one lock nut is screwed on, the rod is inserted into the hole on the mounted bar, and secured with another nut. An additional nut is needed on the legs on the screen mounting side (pictured).
Putting the legs on
Next, we turn the bathtub over, set it in a horizontal plane, twisting the legs. We control the situation using the building level. Then you need to install a fastening on the walls, with the help of which the sides are fixed to the walls.
Place the bathtub, set according to its level and height, in place and mark where the sides end. We take the fastening plate, apply it to the mark so that its upper edge is 3-4 mm lower, and mark the hole for the fastener. The number of fasteners varies - one or two dowels, as well as the number of fixing plates on the wall (one or two on the wall, depending on the dimensions). We drill holes, insert plastic plugs from dowels, install clamps, and screw them on.
Installing an acrylic bathtub to the wall
Now you can install the acrylic bathtub - lift it so that the sides are higher than the plates installed on the wall. We lower it, pressing the sides against the wall, they cling to the fixing plates. The installation of the acrylic bathtub with legs is complete. Next, connect the drain and you can use it.
Installation of acrylic bathtub with legs is completed
Assembling such an acrylic bathtub takes a little time. But the design turns out to be very flimsy. Not every adult feels confident. The bottom sags, the legs slide on the tiles. Enjoyment is below average.
There is also a combined installation option. This is when they put the bricks on legs and is shown in the next video. After assembly, two bricks are laid on the mortar, a significant layer of mortar is laid on top (it must be kneaded to be low-plastic, adding a minimum of water). When you put the bathtub in place, part of the solution is squeezed out, it is carefully picked up, and the edges of the remaining part are corrected. The bath is loaded (can be filled with water) and left for several days to allow the solution to set.
Bath screens
Using screens, communications are hidden; it is possible to make shelves for storing various household items. In addition, they significantly improve the interior of the room. The screen can be brick with further cladding with ceramic tiles, MDF, plastic panels, plasterboard, OSB or in the form of an ordinary curtain made of thick fabric. We'll tell you how to do each option in turn.
Tiled bath screen
The photo shows a sliding screen for a bathtub with adjustable legs
Functional bath screen
The structures must provide convenient access to the siphon for periodic routine cleaning of the system. It is advisable to have an opening for the feet only if the bathroom is used for washing. As an option - a country house for temporary residence. It is unprofitable and dangerous to install an expensive washing machine in it; summer residents, out of old habit, use the bathtub to wash clothes.
What types of frames are there for installing screens?
Any type of screen, except brick, is mounted on a frame. They are made from metal profiles (the best option), wooden slats or square pipes. The latter option is very expensive and labor-intensive, and has no operational advantages. Why do you need a frame that can withstand a load of hundreds of kilograms, if it actually does not exceed a few? We believe that there is no point in considering it. The manufacture of the structure must be approached very carefully; in any case, a crooked structure will have to be redone.
How to make a frame from metal profiles?
Step 1 : Count the number of profiles.
They need three vertical baths in height, two horizontal in length and two horizontal in the width of the bath. To strengthen the structure, use jumpers; you need to make a separate small frame for the door. Three jumpers in length are enough; in width you can do without them. Knowing the dimensions of your bathtub, it is easy to find out the total amount of material. Immediately buy self-tapping screws for attaching profiles.
Step 2. Make markings.
This is a very important stage, don’t rush, check the measurements several times. To increase accuracy, use a plumb line; the level does not indicate vertical planes accurately.
How to make markup?
- Apply the plumb line to the wall and corner of the bathtub, wait until it calms down. Make a mark of the upper and lower position of the thread, draw a line between the marks. Using the same algorithm, draw a vertical line at all free corners of the bathtub; there can be two or three of them depending on the size of the bathtub and the room. This way the junction of the screen with the walls is indicated.
- At a distance of about 3-4 centimeters, draw parallel lines next to them outside the perimeter of the bath. The specific distance depends on the frame material and finishing materials: plasterboard, OSB, MDF or glue and ceramic tiles.
- Draw the same parallel lines on the bathroom floor. Check all dimensions again to avoid mistakes.
Further work depends on the material used to make the frame. The best option is a metal profile, but you can also work with wooden slats.
Metal profile frame
Step 1. Cut the metal profile to size, we have already described how to determine them above. Don’t work on jumpers yet; make blanks only around the perimeter of the frame.
Step 2. Lay the long profile on the floor, one side should be exactly adjacent to the marked line. Carefully use a marker to mark the locations for drilling holes for the dowels. It's not good to work with a pencil, use a marker.
Laying metal profiles
Step 3. Remove the profile, drill holes with a drill, put the profile in place and fix it. Do not immediately tighten the dowels; the strips have perforated holes, with the help of which the element can be slightly moved in different directions and achieved an exact position.
Step 4 . Now fix the planks to the walls. The algorithm of actions is the same. If you plan to use a heavy OSB board for cladding, then the vertical and horizontal profiles at the corners are connected to each other with hardware.
Step 5. Fasten the profiles along the length and width close to the top side of the bathroom, you should have a strong frame. If necessary, make additional jumpers to strengthen the structure. They can have a vertical or horizontal position.
Profile racks
Step 6. Decide on the size of the door for the siphon inspection, make a small frame for it in the right place. Constantly check the position of all frame elements with a level. The door dimensions are at least 30 cm around the perimeter, otherwise it is inconvenient to clean the siphon.
The frame is ready, check its stability, apply multidirectional efforts from all sides. The structure is wobbly - add jumpers in problem areas, achieve high stability.
Screen covered with plasterboard
Bath after tiling
Frame made of wooden blocks
In terms of its performance, it is in no way inferior to metal profiles. Do not be afraid that rot will appear on the tree. If there are any concerns, soak it with antiseptics.
For the frame you can use slats of various sizes. When choosing, take into account the load of the finishing sheathing. A universal option can be considered to be the dimensions of the slats five by five centimeters. Make markings on the floor and wall as always. One feature - take into account the width of the slats; they should fit under the side shelves of the bathtub and not interfere with the finishing. To fix the frame, use metal corners and dowels; the width of the corners is slightly less than the width of the slats. This will make it possible to adjust the position of the frame without fear. In addition, possible errors when drilling holes for dowels can be easily corrected.
Step 1 . Place a long block on the floor and estimate the position of the corners. Make marks for drilling holes for dowels.
Practical advice. In order to completely eliminate the possibility of the corner going beyond the line, it is better to move it slightly inward. It’s not scary that it will be screwed to the block off-center, but nothing will interfere with the finishing.
Step 2. Drill holes, secure the corners with dowels and the block to them with self-tapping screws. Adjust its position. Install the short block in the same way.
Step 3. Measure the height of the vertical elements. Make a gap of approximately 1 cm to the bottom of the sides of the bathtub. Using corners, fasten the segments into a single structure with the bottom one.
Installing racks under the bathtub
Step 4. Prepare two more long and two short ones for fixing in the upper part of the frame. Why two and not one? We recommend installing the first one at a distance of approximately 10 cm from the side; these bars are needed to control the size and verticality of the frame. On an already stable structure, it is recommended to fix one more one close to the side. It’s much easier to do this, and the frame is more accurate. In addition, the strength of the structure increases.
Step 5. Make a frame for the door in the right places; if heavy materials will be used, then install several jumpers. To increase strength, you can fix several spacers in the corners.
The frame is ready, you can begin the finishing cladding, fastening is carried out with wood screws.
Brick screens
In terms of time, they do not take much time, and in terms of strength, reliability and durability they are much superior to the previously described options. Prepare materials and tools. You can use bricks or concrete blocks. The quantity is calculated in this way.
- Calculate the side and end area of the space near the bathtub that you are going to cover.
- Divide the resulting amount by the area of one brick or block. Round the quantity to a whole number. For reserve, you can take one block or two bricks.
One bath will require two buckets of sand and a third of a bucket of cement. In the future, the surface needs to be finished with ceramic tiles; we will give a step-by-step design in the next section.
Step 1. Place the first row of bricks on the edge, constantly checking its position with a level. You need to know that masonry on an edge has its own characteristics; if they are not followed, the wall may “float”. First feature. The solution should be slightly thicker than when laying flat. To increase the adhesion of the mortar to the side edge of the brick, it should be moistened with a spray bottle. Do not overdo it. The optimal degree of wetting will be determined practically. Second feature. After three rows you need to give the solution time to harden a little. Take a break for two or three hours.
The bricks are laid in a checkerboard pattern, the joints of the lower row are covered with whole bricks of the upper one.
Step 2. Continue working until the entire space is covered. It will be difficult to push the mortar into the gap between the masonry and the sides. It is advisable to make such an emphasis, it significantly increases the strength of the bathtub installation. Use any small means at hand for these purposes; such work cannot be done with a trowel.
Masonry brick screen
Important. Don't forget to leave a hole for siphon inspection. Check the structure, remove any remaining mortar that has emerged. Give it time to harden at least 24 hours.
Ceramic tile finishing
If the wall already has tiles, then the work becomes somewhat more complicated. The fact is that you need to take measures to match the seam between the tiles on the wall and the screen. There are situations when it is impossible to lay a whole tile, you have to cut it into pieces. If you have no practical experience in cutting tiles, use plastic inserts. They can even out jambs up to a centimeter, but the appearance, of course, will suffer a little. Real professionals do not use inserts for joints; their cuts fit tightly to surfaces without gaps.
Step 1. Count the number of tiles, the method is the same as for bricks. And you can buy one or two tiles as a spare; you won’t need any more, the surface area to be finished is very small. You need to buy about 10 kg of glue.
Step 2. Start laying tiles from the bottom row. Check the position with a level or a level lath, and check several tiles at the same time. They must lie strictly in the same plane.
Applying adhesive to tiles
Step 3. The tile is placed on an uneven surface; it is impossible to use a comb. Apply the glue with a spatula along the edges and in the center of the tile, about one centimeter thick. Next, the tile must be pressed and moved left and right until the position is leveled. The final adjustment is made with a level. Don't forget to use crosses. Some beginners install crosses flat on the four corners of the joint. This should not be done for several reasons. Firstly, it is much more difficult to level the tile; the cross will constantly move the nearby one. Secondly, there will be problems with removing the cross; you will have to pick out each one with a knife.
Gluing tiles
Step 4. No experience - use plastic elements in corners and joints, they make the work much easier.
Step 5 . After about two hours, you can start grouting the joints. The color of the material should be in harmony with the tiles and the overall design of the room. Excess grout is removed with a damp cloth or sponge. Do not wait until it is completely dry; dry material is difficult to clean.
Finishing with OSB boards or plasterboard
The boards must be moisture resistant. We recommend using more durable OSB boards; plasterboard boards are easier to work with, but in terms of load resistance they are far from ideal. Under force they begin to sag and the ceramic tiles fall off.
Finishing with slabs is much simpler than laying ceramic tiles. How is it done?
Step 1. Take the frame dimensions and mark the slab. As a rule, the length of the bathtub exceeds the length of the slab; it will have to be joined. This possibility must be foreseen during the manufacture of the frame and a vertical stand must be installed at the joining point.
Cut off all the blanks. Drywall is easily cut with a mounting knife; for OSB you will need a hand-held electric saw or jigsaw.
Step 2 . Fix the elements one by one with self-tapping screws, and work carefully with the drywall. When the self-tapping screws are tightened with great force, their heads fall inside the plaster, and new ones have to be screwed in.
Fastening drywall
Step 3. Screw small hinges where the door is installed. Check the functionality of the door.
Covering the frame with plasterboard
Inspection hatch door installed
Step 4. Proceed to finishing the surfaces. You can use ceramic tiles - it takes a long time and is expensive. There is a simpler option - cover the surfaces with self-adhesive decorative film; today there is a huge selection on sale - cheap and beautiful. In addition, you can easily change the pattern or repair the coating in case of mechanical damage. But the film also has a drawback - the surface must be perfectly flat.
Practical advice. Do not try to immediately glue the film without air pockets, it is almost impossible to do. Removing air is simple - pierce the pocket in several places with a needle and remove the air by smoothing the pocket.
Plastic lining
The option is not the best. It is recommended to use if the bathroom walls are lined with clapboard. The installation process is standard. The problem arises with the technological hole and the door. Practitioners recommend making them from OSB from plasterboard and not wasting time on lining.
DIY bath screen made of PVC panels
How to make sliding doors
A very simple and functional screen option. For manufacturing you will need two guides and an MDF board. The disadvantage of this material is that there is a possibility of spontaneous deformation. You can get rid of it only by making a separate small frame for the doors. It is advisable to use thin wooden slats; MDF is glued to them with special glue.
Step 1. Make a frame from a metal profile; we have described the algorithm for making such structures. Check the position of all elements.
Important. For a sliding screen, it is especially important to maintain the parameters; the racks must be strictly vertical.
Step 2. Attach the guides to the frame. They can be aluminum or plastic.
Plastic guides
Top guide
Step 3. Measure the exact distance between the guides; the spread in parallelism cannot exceed 1–2 mm. Otherwise, the doors will jam when opening/closing.
Step 4. Cut out the doors of the required size from the MDF board. For overlap, 2–3 cm is enough. You can cut the slab with an electric jigsaw or a hacksaw. Work carefully, place emphasis on the bottom - this will reduce the hairiness of the cut.
Step 5: Bevel the cut. Use sandpaper or a cylindrical sander. Install handles.
Plastic homemade screen doors
Step 6 . Install the doors into the guides. To do this, they need to be inserted into the lower guide, slightly bent and inserted into the upper guide. The thickness of MDF is approximately 5 mm.
Sliding screen
A guide profile is fixed to the floor. The cutout in the door is made to lead out the hoses from the washing machine.
The front surface can be finished in any way, taking into account the interior of the bathroom.
Below is how to make a screen for a bathtub with your own hands.
Durable fabric curtain
The simplest, cheapest and fastest option. The curtains can move along a wire or a thin tube. Material: durable fabric. You can use roller shutter fabric, it does not fade throughout the entire period of use, keeps its shape and is not afraid of moisture.
DIY bath curtain
Bath curtain