To prevent the penetration of unpleasant odors from the sewer, all plumbing fixtures connected to it must be equipped with a special device - a siphon. This device plays an important role in the system and performs two functions: a water seal provides odor protection and prevents debris from entering the pipeline.
Bathroom or kitchen sinks can be assembled with or without a siphon. If you purchased the second option, you will have to install it yourself. Installing the siphon on the sink takes 20-25 minutes, and this does not require any additional tools, just a screwdriver. This article talks about how to choose, assemble and install a siphon on a sink.
Purpose of the siphon
Whether you live in a private house or in an apartment, if your home has a sink, washbasin, bathtub or shower, then there are siphons there. You can do without this plumbing device only in the case of an outdoor washbasin.
Siphon
A siphon is a curved section of pipe through which waste water is drained from a sink/bathtub/shower tray into the sewer system. Connecting a sink to a sewer is impossible without this plumbing fixture. After all, it is what retains unpleasant odors coming from the sewer pipe and prevents the growth of bacteria thanks to the water seal that it forms.
It is also necessary to connect a siphon to the sewer to catch coarse debris that, for whatever reason, ends up in the drain. It is important to immediately note that the plumbing device in question is not capable of fully protecting the sewer system from clogging. It is necessary to periodically use additional chemicals intended for drain cleaning.
Instructions for action
Old siphon
- Before replacing the siphon under the sink, you need to get rid of the old siphon and dismantle it. You need to do this work over a bucket and first prepare a good piece of rag, so that you can then securely close the hole in the pipe. You should not lose sight of the coupling - if it is no longer elastic enough, then it is better to replace it with a new one.
- When the old siphon is dismantled, everything is cleaned of dirt and the ideal place is prepared, you can proceed to the procedure for installing the device. The siphon should be pressed tightly and securely against the sink drain. A tight fit of the gasket must be ensured around the entire perimeter of the pipe area.
- Next, you need to securely fasten the gasket and screw. All this is inserted into a special drain hole. You can thread the screw and then tighten it all the way. After this, work is carried out on the drain socket of the siphon, into which a corrugated pipe with a gasket should be inserted. Everything is tightened using a wing nut.
- Replacing a siphon under a sink requires a competent approach to such work. In this regard, it is better to provide additional reliability and install a special seal in the form of rubber, and the socket of a corrugated pipe can already be inserted into it.
- At this stage of plumbing work, you can check the device for leaks. In this case, you just need to turn on the water, and if it does not leak anywhere, then we can assume that the installation procedure of the device is coming to an end.
Siphon replacement
In order for the device to hold for a long time and reliably, you need to carefully lubricate the gaskets and threads with sealant and, for greater reliability, use plastic electrical tape. This is a prerequisite; this is the only way to prevent the appearance of any cracks and the possibility of any types of leaks.
Types of siphons
Before we begin to analyze the question of how to properly connect a siphon to a sink or other plumbing fixture, let’s look at what types of siphons exist. After all, having decided to purchase this product, you will first of all think about its variety, which is necessary specifically in your case. For greater clarity, consider the following images.
Types of siphons
As can be seen from the above pictures, the most functional and easy to install today is the bottle siphon. We will stop there.
Basic equipment of a bottle siphon
To answer the question of how to install a bottle siphon on a sink, you must first consider what parts it consists of. The main components of a bottle siphon for a sink or bath are:
- protective grille;
- set of rubber gaskets;
- conical rubber cuffs;
- inlet or outlet pipe;
- connecting screw;
- coupling nut;
- bottom;
- connecting nut for sewer pipe;
- drain pipe.
Basic equipment
Various modifications of bottle siphons
Depending on your device model, it may have additional parts such as:
- several inlet pipes;
- overflow pipe;
- auto drain valve.
If you will have a washing machine next to the sink on which you are installing the siphon, you should consider purchasing a model with a special additional inlet pipe. It is much easier and more convenient to connect household appliances to the sewer through a siphon, rather than directly.
The overflow pipe is installed on a sink, the design of which initially includes an overflow hole. To avoid flooding in the kitchen, manufacturers of bathroom and kitchen sinks have recently begun to equip them with an overflow hole, and manufacturers of siphons have begun to equip their products with an overflow pipe.
Siphon with overflow
Auto-draining is a very convenient feature of modern models. When there is a need to fill the sink with water, just simply press to close the valve on the drain. Then, when you no longer need the water in the sink, the valve opens and the drainage continues as usual.
Auto drain
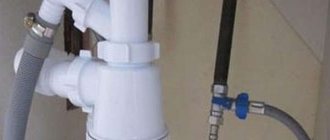
The image below shows one of the modifications of the bottle siphon. In general, they all have a similar device, but which modification of the siphon for the bathroom sink to choose is up to you to decide based on your specific conditions.
Siphon with stopper
There are also models of siphons for double sinks. The convenience of this model is that you do not have to install the sink siphon twice. And this will significantly save your time and effort. But not only. The model with two inlet pipes is more compact, which is important for productive use of the space under the sink. By installing 2 separate siphons on a double-bowl sink, you create a web of pipes and hoses under the sink. This will not only prevent you from placing a trash can there, for example, but will also make the sewer unit difficult to maintain.
Siphon for double sink
How to choose a drain device?
The product has a simple design and is easy to disassemble to check for defects. It should be free of defects on the surface and in the threaded connections. The gaskets are elastic and lubricated with silicone sealant.
USEFUL INFORMATION: How to properly connect a gas stove
Price
The price may vary significantly. A simple plastic siphon of any modification can be bought for 100–300 rubles. For a product with chrome plating or with additional outlets you will have to pay from 400 to 1000 rubles. The price of brass devices starts from 1000 rubles. and can reach 15 thousand rubles. The most expensive are chrome-plated bottle-type siphons made of brass or steel.
Dimensions and choice of device type
Siphons come in standard sizes and are generally compatible with any sink. The cross-section of the outlets depends on the volume of water drained. When purchasing, do not forget to check the completeness and compliance with the diameter of the old drainage device.
Tips for choosing a siphon type:
- A product with a collapsible flask is recommended for the kitchen: it is easy to clean from food debris. A bottle siphon with a corrugated drain, as in the photo, is easier to install than others.
- It is more difficult to select a pipe drain, since it has a rigid structure: its pipes must be precisely aligned with the holes of the sink and sewer bed.
- If there are problems with free space or inconvenient placement of pipes, a corrugated siphon will save the situation.
- For a kitchen sink, it is better to choose a drain with smooth walls, since the corrugations quickly become clogged with dirt.
- If there is absolutely no space under the sink, you should choose a special flat siphon.
To install the drain device, you need to purchase odorless silicone sealant. Acidic compounds will not work.
Summarize
Assembling a siphon for a sink, washbasin, shower cabin or bathtub does not take much time and does not require special skills. However, there are a number of nuances that you should be aware of and take into account so that you do not have to do double work by redoing something. You need to take everything into account so that you don’t soon need to replace a completely new device with a more functional model, because you forgot to take into account that you will place a washing machine nearby and it will also need to be connected to the sewer through a siphon.
If you are new to plumbing and are installing a siphon for the first time, the manufacturer’s instructions for the product may be incomprehensible in some ways. Having only a schematic description of the assembly and installation sequence of the device, it does not contain important information and tips that will help you avoid mistakes and protect your kitchen from sewer leaks.
Preparatory process
To choose a suitable and high-quality siphon, you need to know what it looks like and what it should consist of. The correct equipment and quality of the product will help you quickly and reliably replace the siphon yourself in a minimum amount of time and there is absolutely no need to call a plumber here. So, before starting the installation process, the siphon should be disassembled into parts, checked for defects, the absence of any debris, and for the strength of the thread. All rubber gaskets and threads must also be lubricated with special silicone grease. This is necessary to eliminate the possibility of leakage. To avoid confusion, you need to lay out the siphon very carefully, preferably in the same order in which it was assembled.
To work you will need the following tools:
- screwdriver;
- transition cuff;
- flashlight;
- plastic electrical tape.
All this can be purchased at a regular hardware store. It is also worth taking care of choosing a high-quality lubricant - sealant, which will be needed during the work process.