Plasterboard sheets, hemmed to a metal frame, have become one of the most popular ceiling finishes in modern housing, due to many advantages. This is a simple and relatively inexpensive way to make a surface perfectly smooth with minimal effort. But often craftsmen with little experience in this field do such cladding in the bathroom, and are disappointed with the result: the ceiling quickly becomes unusable, deformed, and the repair needs to be redone. In this article we will tell you whether it is worth installing a gypsum board ceiling in the bathroom.
Primary requirements
The ceiling structure in the bathroom must meet a number of basic requirements, presented:
- high resistance to high moisture;
- long service life;
- availability of regular coating maintenance;
- harmonious combination with lighting and details of the entire interior;
- thermodynamic stability;
- environmental cleanliness;
- fire safety;
- ease of self-installation;
- maintainability;
- compatibility of finishing with structural elements.
An important indicator is the correct choice of drywall and frame elements, which will allow you to independently create a durable and easy-to-use ceiling structure.
The high hygroscopicity of plasterboard somewhat complicates its use in rooms with high humidity, including bathrooms, so it is recommended to use cement putty and plaster based on high-quality Portland cement as finishing materials.
Types of plasterboard partitions for the bathroom
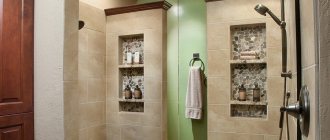
In the bathroom, you can install partition structures made of plasterboard of various types, depending on the functional and aesthetic wishes of the owner. The most popular are:
- solid false walls for the entire height of the room with door or arched openings;
- structures of smaller height, made in the form of a ledge or shelf;
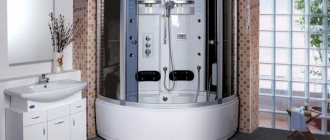
- analogues of shower stalls or screens for bathtubs and toilets;
- enclosing bulkheads made of multi-level blocks;
- niches for washing machines;
- walls of complex configuration for the bathroom interior;
- elements with niches, windows, glass block inserts;
- protective screens for communications.
Whatever option is chosen for DIY construction, the main thing is that it pleases the owner and is installed technologically correctly.
Plasterboard partitions are easy to construct, versatile and suitable for any type of finishing. The functional qualities and affordable cost of materials make such structures increasingly popular for construction not only in bathrooms, but anywhere in the living space.
Hood
The presence of a properly organized hood is a prerequisite for using a plasterboard ceiling in the bathroom.
The installed exhaust fan must have a capacity of at least 25 m3/hour. With a combined bathroom, such indicators necessarily increase to 50 m3/hour.
It should be noted that standard fans with a diameter of 10 cm are characterized by a productivity in the range of 90-110 m2/hour, so choosing a decent model of such a device can be quite problematic.
Turning on the fan cannot depend on the lighting in the room, and the operation of such a device must be as silent as possible, which is ensured by special bushings and special sliding bearings. In order to effectively ventilate the entire space above the ceiling structure, it is advisable to install a fan in the ventilation duct, and a regular decorative ventilation grille directly in the ceiling.
It is advisable to connect the exhaust fan not using a switch, but using a standard dimmer, which allows you to conveniently regulate the speed of the installed ventilation impeller.
Combined bathroom
In many standard apartments, the bathtub is combined with a toilet. Let's leave aside the question of whether this is convenient. Our task is to understand how to decorate such a room using gypsum boards.
Typically, combined bathrooms are not large in size (there are exceptions, but we will talk about them below). Therefore, we recommend giving preference to light colors.
Do you have a tall but not too spacious bathroom? Try installing a white two-level ceiling with hidden lighting. On the one hand, such a solution will balance the room - sometimes with such a configuration there is a not very comfortable feeling of being in a well. On the other hand, light colors will make the room visually wider.
In addition, such lighting creates a volumetric effect and looks interesting - one of the few decorations that are suitable for such small-sized bathrooms.
By the way, it is not necessary to choose an LED strip with white light. Unusual bright edging is a common and stylish technique. True, you will have to carefully select the shade so that it harmonizes with other colored elements.
Is the bathroom spacious enough? Then experiment with the original form of a multi-level plasterboard structure with an insert of translucent stretch fabric. Volumetric elements and spotlights look extremely interesting. The main thing is a sense of proportion. When designing the layout, take into account all the dimensions so as not to overload the ceiling - otherwise you will get the opposite result from what was intended.
Nuance: Drywall will help you zone the combined bathroom. Use ceiling-floor structures for this. Of course, for tiny rooms of 2 by 3 meters this is not an option - even a very thin partition will make it difficult to move. But for more spacious ones, this is a fairly reasonable and functional solution.
Frame
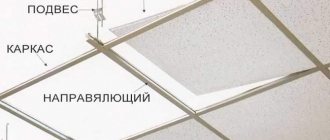
It is recommended to make a frame metal base for installing plasterboard sheets from a galvanized profile. In accordance with the marked perimeter of the bathroom, a guide profile is installed, to secure which dowels are installed every half meter.
Metal profile frame
Focusing on the drawn transverse lines, with a distance of half a meter, the suspensions are attached to the ceiling base. The load-bearing ceiling profile is installed on the hangers and secured with self-tapping screws, and then the transverse elements in the guide profile fixed on the walls.
Only after the entire frame base for attaching the plasterboard ceiling has been completely assembled, is it possible to begin the process of insulation, soundproofing, and laying all communications.
Materials and tools
To create partitions from gypsum plasterboard in bathrooms, you will need the sheets of plasterboard themselves, guides and rack profiles for the metal frame, fastening building materials - corners, self-tapping screws, as well as damper and reinforcing tapes, putty mixture and antiseptic primer.
You will also need to assemble a set of tools. It includes:
- electric drill and electric screwdriver;
- bubble level and plumb line;
- scissors for cutting metal or cutting machine;
- hammer for driving in dowel nails;
- drywall cutter;
- roulette.
If you plan to install a bulkhead with a door, you will need beams to strengthen the opening. But you can strengthen it by doubling the profiles in the shape of a kind of “box”.
Properly selected fasteners have a direct impact on the strength of the partition. The guides are fixed to the walls and ceiling with screws and dowels. The frame parts are fastened using metal screws with a press washer. The base is covered with plasterboard using screws with a countersunk head that is recessed and does not protrude on the plane of the sheet.
Wiring
The power distribution for all lighting and ventilation equipment must begin after assembling the frame base. At the first stage of electrical work, it is necessary to determine a detailed schematic plan of electrical wiring, which marks the exact location of all points and nodes, including sockets, switches, ceiling lights, blocks and junction boxes. The finished diagram is transferred to the surface in the bathroom.
Installation of wiring under a plasterboard ceiling
The wiring must be laid inside a special corrugated PVC pipe, which will completely eliminate damage to the insulating layer of the wires under the influence of sharp edges of metal profiles.
Block 1
Additional protection against moisture
If you still have any doubts about the advisability of using drywall in the bathroom, the modern building materials market has taken care to completely dispel them.
Before installation, the sheets are additionally coated with a special “moisture barrier” primer, which has the following properties:
- Protects surfaces from moisture, penetrating deeply and sealing capillaries.
- Forming a flexible dense film, it does not allow steam and water to pass through.
- Suitable for surfaces made of any materials inside and outside buildings. These are gypsum sheets, concrete, brick, plywood, wood. Also chipboard, metal surfaces free of rust, any type of plaster.
- Any decorative materials, putty, paint, glue, wallpaper, etc. can be applied over the primer.
Advice!
The “moisture barrier” is applied to the loose surface in two layers. Add 1/5 part of water to the primer for the first layer.
Apply the second layer after the first has completely dried. When preparing the surface, follow the instructions.
Plasterboard ceiling with built-in lights
Binder
Self-filing of the frame is one of the most important stages of construction and finishing work, which includes the installation of plasterboard sheets on the ceiling, represented by moisture-resistant gypsum fiber boards.
Before you begin installing them, you need to treat the back side of the sheets with a cement-based waterproofing compound.
To make holes for built-in lighting fixtures and ventilation, a 10-12 mm drill and an electric jigsaw are used, and it is recommended to cut the plasterboard sheet itself with a sharp construction knife. The building material is attracted to the frame base with self-tapping screws, which are fixed at a distance of 15-20 cm from each other. You must retreat about one and a half centimeters from the edge of the sheet.
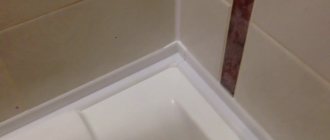
During the filing process, gaps of no more than 10 mm wide are left between the plasterboard slabs and around the perimeter of the entire bathroom. Subsequently, a waterproofing mixture is pressed into such gaps, which will serve as high-quality protection for the ends of the plasterboard sheets from increased moisture.
It is important to remember that in the process of filing drywall, the head of fasteners in the form of self-tapping screws must be immersed in the finishing sheet by approximately 1 mm, and all the resulting recesses will subsequently be puttied.
Installation stages
When the preparation is completed, you can begin the main work - installing a plasterboard ceiling .
- Determining the ceiling level, marking the area. On the ceiling, be sure to mark the places for attaching the main profile suspensions and the areas where the built-in lamps will be located.
- Installation of the main profile around the perimeter of the ceiling. To do this, be sure to use a level.
- Strengthening drywall. After preparing the frame, you can proceed to the main stage. First you need to cut the drywall to the required size. Using a screwdriver, secure the material to the frame. At the same stage, you need to make holes from the lamps with a drill and bring out the wires.
- At the last stage of installation, you need to treat the screws and seams with putty, then sand them. If desired, you can apply a layer of acrylic primer, this will increase the level of protection of the material from moisture.
Production of two-level plasterboard ceilings. Read about it here. And here is an article about repairing plasterboard ceilings.
See our website. And you will learn a lot more informative, useful information.
Puttying
Treatment of ceilings based on plasterboard sheets in rooms with high humidity, including the bathroom, is most often carried out with a cement composition. You cannot use standard gypsum putties for this purpose, which can crack due to changes in humidity.
Universal mixtures are represented by plastic polymer putties, the consumption of which is significantly lower than other compositions, and the main disadvantage is the rather high cost.
Experts recommend using gypsum finishing or universal putty for puttying the ceiling, for example ABS Saten and Eurogips Saten, which have a good consistency and are very easy to apply. Such compositions need to be mixed in small quantities as they are used.
Before puttingtying the entire surface, self-adhesive serpyanka is glued along all the seams, and then tightly filled with putty, which minimizes the risk of cracking.
Selecting gypsum board sheets for the bathroom
Standard ceiling plasterboard with a sheet thickness of 9.5 mm is not suitable - it is a hygroscopic material that will quickly become unusable. It is more practical to use hyper-strong green gypsum board with a thickness of 12.5 mm. The slats withstand moisture, withstand flooding from neighbors above, and do not swell or deform. Thanks to special factory processing, mold, mildew and moss do not take root on gypsum boards.
Finishing
After applying two layers of putty, the entire surface is thoroughly sanded, after which it is primed for painting or any other finishing method. The most popular option today is finishing the ceiling surface in the bathroom with special glass wallpaper.
This finishing material serves as a very effective protection of the structure from high humidity. The surface is covered with moisture-resistant wallpaper using special glue. At the final stage, all lamps and fans are installed, as well as their correct connection to the electrical network.
Modern glass wallpaper can have a smooth structure or have some kind of pattern on which a layer of waterproof paint can be applied.
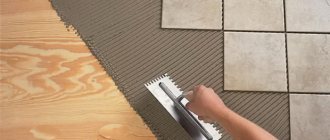
Installation of drywall using adhesive method
Adhesive installation allows drywall to take up almost the same amount of space as plaster.
This method is suitable for correcting not very large surface differences - up to 4 centimeters.
At the most protruding point no more than 15 millimeters will be added.
What to glue drywall to
The adhesive composition is selected depending on the type of base and its condition. All types are listed in the following table:
| Adhesive composition, photo: | Description: |
Professional gypsum-based adhesive | The formula of such adhesives is designed so that adhesion to cardboard and mineral surfaces is maximum. The composition is ineffective than the same gypsum plaster, but there are advantages. The price of one bag of such a mixture is about 300 rubles, so it makes no sense to refuse a specialized composition. The Perlfix adhesive from the Knauf company, shown in the photo on the left, contains synthetic fibers that reinforce it when it hardens. Setting time is 30 minutes. Full strength is achieved only after 7 days, but finishing can be done even the next day after installation. |
Gypsum-based putty and plaster | If glue is not found, or putty has already been purchased, then you can use it for installation. The quality of fixation will be slightly worse. It is not allowed to lay the composition in too thick layers. It is better to use plaster compositions with a coarser grind. |
Polyurethane glue | Polyurethane-based adhesives hold drywall tightly. These compositions are suitable for surfaces with the smallest differences. With their help, you can quickly and efficiently level the ceiling, since the setting time is short. |
Polyurethane foam | The base of the foam is polyurethane foam. The work is done in exactly the same way as with polyurethane glue. Professional compounds with low secondary expansion are purchased. They have more composition at the output, are used economically, but they require a special gun. Read on our website : fastening gypsum boards to polyurethane foam. |
Liquid Nails | An ambiguous option for our case. On the one hand, these compounds hold up very well, but on the other hand, they can be used on flat surfaces, and the material consumption is too high. Liquid nails can be used when gluing drywall to drywall when you want to create a decorative edge. |
Cement based tile adhesive | If the main base is cement, then tile adhesive can also be used for the job. The disadvantage of the solution is that it takes a long time to set and dry, however, the final strength will be good. |
Of all the above, he advises giving preference to a special gypsum-based glue.
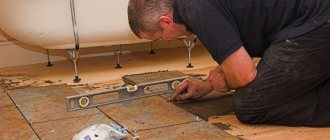
The process of installing drywall in the bathroom with glue
This work will be somewhat wet and dirty, but to a lesser extent than plastering. It begins with preparing the base, which must be strong, clean and with high adhesion.
For this:
- Remove all traces of finishing from the surface.
- They knock down all the plaster that does not hold firmly.
- Next, clean the surface with brushes, even better if you do this with a vacuum cleaner, so as not to leave dust that will interfere with normal adhesion.
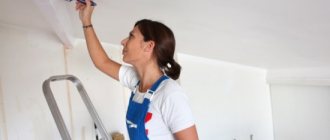
- Then the surfaces are impregnated with a primer composition with antiseptic additives. It is recommended to use a sprayer for work. If it is not there, then take a brush or roller.
Priming the wall in the bathroom
To obtain the highest quality result, you should use concrete contact as a primer.
It will create a rough surface with high adhesion. It should also be applied to glossy surfaces to which the glue does not adhere well.
After the composition has dried, you can begin installing drywall.
If the wall was initially flat, then the glue is applied in a small even layer, the sheet is applied to the surface and pressed evenly over the entire area.
If leveling is needed, the layers are enlarged and the sheets are aligned. There are two ways to do this.
1 way to apply glue to uneven walls
Glue is applied to the plasterboard sheet in large beads. It is necessary to carefully coat the edges and spread the composition evenly in the center of the sheet.
Applying glue to drywall
Then the whole thing is lifted and applied to the wall. A long building level is taken and applied to the sheet.
When deviating from the plane, the drywall is pressed down with the same level until it reaches the desired position.
The disadvantage of this solution is that in this manner it is easy to make errors in measurements, and the result will not be even.
2 way to apply glue to uneven walls
The second option will help achieve high accuracy in alignment.
Before installing the sheet, beacons must be installed. These can be classic beacons for plaster or any other stops that, when installing drywall, will prevent it from being pushed in more than it should be.
You can use simple dowel screws, glued pieces of drywall, and so on.
Beacons must be placed so that all sheets receive support at the edges. Next, glue is applied and the sheets are fastened.
Video: adhesive installation of drywall in the bathroom
Photo
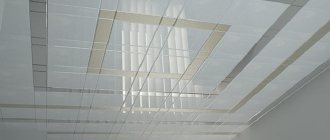
Multi-level plasterboard ceiling design
Finished ceiling
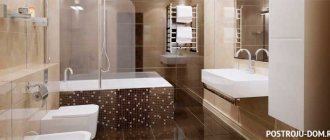
Bathroom interior with plasterboard ceiling
Device
As a rule, a bathroom or a combined toilet is a small space. The ceiling height in a typical apartment building bathroom is lower than in living rooms due to the sanitary cabin - a monolithic concrete structure that prevents apartments from flooding each other.
The sun cubicle limits the already small height of the bathroom
That is why the assembly of complex multi-level structures from gypsum plasterboard in these premises is extremely rarely practiced. Therefore, our choice is a simple single-level ceiling.
Single-level gypsum board ceiling
The ceiling sheathing can be assembled from a galvanized steel profile or from a slightly cheaper bar with a cross-section of 30 to 50 mm. The author strongly recommends that you go with the first option.
What is this instruction about:
- After flooding or at high humidity levels, the block may rot;
- When humidity and temperature changes, wood warps. Deformation of the frame will lead to cracks in the ceiling;
Warping of the wooden sheathing will cause cracks to appear.
- Finally, wood serves as tasty food for insects.
Reviews
Many craftsmen lay several layers of moisture-resistant putty on the ceiling of plasterboard sheets in the bathroom, which allows them to achieve an ideal plane.
However, it must be remembered that each applied putty layer must be primed, which will prevent the putty from peeling off and further falling off.
As operating practice shows, the main advantages of installing plasterboard ceilings in the bathroom are the ability to quite easily hide even pronounced unevenness on the surface, as well as install additional lighting fixtures.
Among other things, there are almost no difficulties when installing it yourself.
Block 2
Cons of a plasterboard ceiling in the bathroom
Of course, there are also disadvantages:
- Suspended ceilings reduce the height of the room. Minimum for the thickness of the profile used when installing the frame.
- Drywall, even if it is moisture resistant, is not intended for constant contact with water. The ceiling structure requires careful finishing after installation to prevent moisture from penetrating under its surface. This can lead to the formation of mold or mildew under its surface, which will inevitably lead to rapid dismantling and repair. Therefore, it is necessary to putty and seal the seams very carefully.
USEFUL INFORMATION: How to hem a ceiling with plasterboard with your own hands (video instructions)