Painting the ceiling in the bathroom is the most budget-friendly of all finishing options. We have already described the process of installing slatted structures and the issue of the cost of suspended ceilings, but in this article we will return to perhaps the most traditional method. Let's consider whether it is even possible to paint ceilings in damp rooms, what paint is best to use, and describe the DIY painting process with photos and video instructions.
Why paint the ceiling in the bathroom?
Suspended structures “eat up” the free space of the room, so they are simply not suitable for low rooms. In addition, the installation of some types of bathroom ceilings is difficult to carry out on your own without the involvement of professionals, and working with paint is familiar to almost everyone.
Read more about installing other types of ceiling coverings in the articles “Installation of a slatted ceiling: step-by-step instructions”, “Choosing a ceiling for a bathroom”.
Pros and cons of painted ceilings
Painted ceilings are very popular in many countries around the world, due to their attractive appearance, ease of work and a number of other factors.
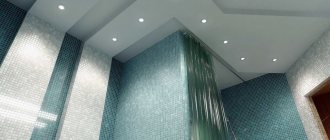
Even ceilings that are multi-level or suspended are painted. Bathroom ceilings are painted very often, and a wide variety of ceiling paints are used, taking into account their technical characteristics.
Painted ceilings have their advantages and disadvantages. If we talk about the advantages, the following points can be highlighted:
- the ability to carry out work on your own;
- ease of care of the coating;
- duration of use of the ceiling covering, subject to proper painting;
- resistance of water-based paint to wear and moisture, as well as its safety for human health;
- relatively low cost of work;
- the presence of an aesthetic and attractive appearance of the ceiling covering.
Among the disadvantages of painted ceilings, a number of parameters can be noted:
- the appearance of stains after painting the ceiling;
- heterogeneity of the coating.
Such unpleasant moments can arise due to the fact that the technology for applying paint to the ceiling surface is violated. Therefore, it is quite difficult for beginners to paint the ceiling in compliance with all technological features. If the ceiling surface to be painted has significant defects, it is often impossible to eliminate them with paint. In such cases, it is best to use other methods of finishing the ceiling surface.
What kind of paint will be needed?
The choice of paint for the bathroom must be approached carefully; the composition must include substances that repel moisture. Oil paint will not work here because it has low vapor permeability, which will promote the growth of fungus under the paint layer. To paint the ceiling, it is better to stick to water-based paints - water-dispersion . Water-based compositions are easy to apply, but can be washed off with water.
Water-based paints are well suited for wet areas.
- Acrylic paints are water-dispersion compositions that cover small cracks and depressions well. Acrylic paints come in a wide range of colors. Paints for wet rooms must contain special anti-mold components. Acrylic paints may have a slight odor.
- Latex paints are similar to acrylic paints, but are more flexible.
- Silicone paints form a film on the surface that prevents mechanical damage to the coating.
In addition to paint, for finishing painting you will need a deep penetration primer, plaster mixture and putty. The putty must be waterproof so that moisture does not accumulate under it.
Modern Bathroom Paints
All existing paints and varnishes can be divided into several groups, which differ in properties and chemical composition. Let's take a closer look at each variety.
Alkyd
These quick-drying paints replaced oil paints, which are now almost never used. Enamels of this type perfectly resist moisture, withstand temperature changes and maintain brightness even with intense exposure to sunlight. Can be applied to concrete, plaster and many other materials. Painted surfaces dry quickly and do not fade for a long time.
Alkyd paints come in a wide range of colors; they come in glossy, matte, and semi-matte. The latter create a ceiling covering that resembles plastic. Another advantage is good adhesion to the surface being painted.
But the material also has disadvantages that limit its use in the bathroom. The main one is poor breathability. Alkyd enamels do not breathe because they form a waterphobic continuous film. But microdrops still collect on the surface, so very quickly the finish begins to bubble and peel off, mold and mildew appear. Another disadvantage is the strong smell, so painting is only possible with good ventilation.
Based on PVA
This group also includes water-based paints labeled “Vinyl”. One of the advantages is the low degree of fire hazard. They are best used in dry rooms - the living room and bedroom, since they are washed off with constant exposure to water. But there is no particular need to thoroughly clean the ceiling in the bathroom as, for example, in the kitchen. Therefore, water-based emulsions can be used in this room; occasional drops falling on the ceiling will not cause harm to the coating.
PVA-based paints are poorly tinted - only light colors are available, but they dry quickly. The finished coating fades in the sun and is easily damaged by mechanical stress, but lends itself well to additional processing and allows you to obtain a textured painted surface.
This is one of the most affordable products. But the finish will have to be updated every 2-3 years.
Acrylic
Paints of this type form a durable matte film. These coatings can be used to paint any surface except varnish. They dry quickly, do not fade in the sun, are moisture resistant and are not afraid of temperature fluctuations. The painted surface can not only be wiped, but even washed. Acrylic is absolutely not afraid of moisture. But washing is allowed no earlier than a month after application, when the paintwork is completely dry. The use of abrasives and chemicals is also prohibited.
Acrylic paints do not crack, are highly resistant to abrasion and are environmentally friendly. Paintwork materials do not emit harmful substances either during application or during operation. Another advantage is economical consumption, since they have high hiding power. Water-based acrylic coatings lend themselves well to tinting.
The only drawback is the high price, but it will pay for itself thanks to its durability and long service life.
Latex
These are water-based emulsions with a latex pigment binder and, in fact, belong to acrylic paints, but with a denser and more elastic structure, so they can be washed more often. After drying, a smooth, durable film is formed that is absolutely not afraid of moisture. Therefore, latex paints are often used in the bathroom. In terms of environmental indicators, it is not inferior to acrylic compositions. Paintwork materials are also valued for their abrasion resistance, as well as for their ability to hide cracks up to 1 mm thick when applied twice.
The paint dries quickly, adheres well to any surface, resists mold, and breathes. The disadvantage of paintwork materials is low resistance to fading. The cost is average.
Silicone
These paints are made from silicone and acrylic polymers and offer the benefits of all of the above. They do not fade even when exposed to direct sunlight and hide cracks up to 2 mm wide. Another plus is the ability to allow air to pass through, that is, the walls “breathe.” The paintwork material is resistant to cracking, alkalis and high temperatures. But these paints cannot be used on wood or metal. Prices are in the average range.
Silicate
This type of coatings is made on the basis of glass. The material dries quickly, is highly durable, vapor permeable and fireproof. The disadvantage of silicate paints is their poor color palette. Most often they are used for facade work.
Tools
- A roller with a long handle is needed to apply the base coat of paint. Bathrooms don't often have high ceilings, so if you have a long enough handle, you won't need a ladder. The pile on the rollers should be of medium length. Use a small roller to work from a scaffold or ladder.
- A paint brush will be needed to paint certain areas on the ceiling where it is not very convenient to work with a roller.
- It is inconvenient to take the paint straight from the can, as small debris may get into it. To prevent this from happening, the composition is cast into a special tray . There should be a place to remove excess from the roller.
One container is used for paint; the relief surface is needed to remove excess from the roller.
- Clean rags are used to remove drops and sagging from the ceiling surface.
- A spatula is required to apply putty.
It is recommended to use glasses while working to prevent paint from the ceiling from getting into your eyes. Any headgear is used to protect hair.
Why coloring?
This type of finishing has undoubted advantages in application:
- The price for its implementation is affordable to almost everyone. This is quite an important point in many cases.
- Painting takes much less time than other types of finishing.
- This type of room decoration can be done with your own hands.
- The choice of finishing materials on the construction market is very wide.
Most often, uneven ceiling finishes become an obstacle to painting. If there are serious damages or changes, this method can become very expensive and unprofitable in terms of the time that will have to be spent on it. In addition, such finishing will undoubtedly last much less than other types of ceiling decoration.
If you have decided to choose this particular method of decorating a bathroom, then the next question will arise about choosing the necessary materials.
Preparatory work
Painting should begin with preparing the base. If preparation is poor, the painted layer may fall off in the future. The scope of work depends on the condition of the ceiling, but in general the general procedure will not change.
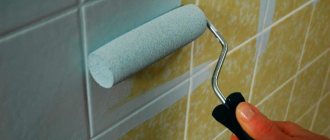
- Cleaning the base involves removing the old coating. If painting is being done for the first time, then you just need to remove dirt, dust and cobwebs. If there is whitewash on the ceiling, it must be washed off.
Removing old whitewash with a sponge.
Whitewashing in damp rooms is a common mistake in renovations. When in contact with moisture, lime crystallizes, resulting in reduced adhesion to the surface. The whitewash layer falls off along with the topcoat.
- The whitewash is washed off with warm water using an old rag, sponge or washcloth.
- Further work order may differ depending on the condition of the ceiling. Cracks and holes can be repaired using putty. The surface is primed with a deep penetration compound. Depending on the manufacturer's recommendations, the primer is applied twice, but be sure to wait until the first layer dries.
Puttying the ceiling
- If the ceiling is uneven, then a layer of plaster is applied to it. If the layer thickness is more than 1 cm, a TsPVS mesh is fixed. The plastered surface is re-primed and puttied several times with a break for drying.
If the renovation of the bathroom is not the first time, then the procedures for leveling the ceiling can be skipped.
- Special heat-insulating linings must be installed on the heating pipes; they will protect the plaster from cracking.
Nuances and recommendations
When choosing paint, you should pay attention to products with a biocidal effect, which are designed specifically for bathrooms and kitchens. There is no need to skimp on materials: the coating will be more uniform if you paint in 2-4 layers, with each subsequent one applied after the previous one has dried.
Mold and mildew often form in the bathroom due to high humidity; they make themselves felt by dark spots and efflorescence. If the fungus penetrates deeply, before painting the damaged ceiling in the bathroom, the plaster is removed not only in the area itself, but also at a distance of a meter from the stain.
Simply painting over such places will not work, since the microorganism can penetrate into the thickness of the ceiling. You can only get rid of it chemically, using drugs with a fungicidal effect - for example, Alpa Fongifluid, Xiolat, Teflex, Atlas Mykos, Spektrum, Filasmuffy. The liquid penetrates deep into the wall and kills the fungus.
Folk remedies are also used:
- Chlorine bleach type "White" (not suitable for wooden surfaces). Apply using a sponge or spray. Bleach is harmful to health and therefore requires careful handling and ventilation of the room.
- Borax. A solution is prepared from 2.5 liters of water and 200 g of substance.
- Vinegar. This acid also destroys the fungus.
- Hydrogen peroxide 3%. The product is sprayed onto the ceiling, left for 10 minutes and washed off.
- Baking soda. Used as a solution of ¼ tbsp. l sodium bicarbonate per 200 ml of water.
- Tea tree oil. 1 tsp. ether is added to 200 ml of water.
Apply the product to the ceiling using a sprayer or sponge. But to avoid fungus, it is better to use factory products.
Another problem is smudges and rusty spots on the ceiling. There are two solutions. The first is painting with dark colors. The second is to buy paints and varnishes against smudges and stains, for example, Snezhka, which is first used to prime the ceiling and then applied as a topcoat.
If you choose the right paint, you can forget about repairs for the next 5 years. Then the ceiling in the bathroom will always be clean and tidy.
Painting instructions
- Work should begin with painting joints, junctions with walls and pipes. All this work is done with a paint brush. You need to dip the tool in paint up to half its length. The brush must be squeezed out so that there are no smudges.
Painting corners and junctions.
- When the paint has been applied in all the “difficult” places, you can start working with a roller. The roller is dipped into paint and then pressed onto the grooved surface of the tray.
- The paint is applied in strips, creating an overlap of 5 - 8 cm. The first layer should dry well.
The room temperature must comply with the manufacturer's recommendations; also make sure that there is no damp draft in the bathroom.
- The second layer is applied perpendicular to the first.
Which paint to choose
Silicone-based compounds are recognized as the best for wet areas. They meet all operating requirements, are durable, environmentally friendly and affordable. Therefore, when painting the ceiling in the bathroom, we recommend choosing silicone paints. This is the best option for value for money.
Silicone paints come in matte and glossy textures. The first ones create the effect of a whitewashed ceiling. The latter reflect sunlight and visually add height. But that's not the whole difference between them.
Not only aesthetics are important, but also performance properties. Glossy coatings are more durable, resistant to dirt and washing. Moreover, the more expressive the shine, the more reliable the coating.
Matte paints do not tolerate wet cleaning well. Due to their porosity, they are difficult to keep absolutely clean. Frequent wet cleaning provokes the formation of shiny spots. But this drawback does not apply to high-tech coatings. However, matte paints have the advantage of hiding imperfections, while varnish highlights imperfections well. In addition, stains are more noticeable on the gloss.
There are also paints with an “eggshell” effect that have an almost imperceptible shine. They are more wear-resistant than their matte counterparts and tolerate wet cleaning well.