Probably everyone can install an Armstrong suspended ceiling, since it all happens in the form of a designer assembly. We will talk to you about how to do this correctly in this material.
Nowadays it is very popular to install suspended ceilings in rooms, especially if these are office premises. However, as the development trend of the suspended ceiling market shows, many people install such structures in their apartments, since this is the easiest and cheapest way to make ceilings not only beautiful, but also with the addition of many design effects to create a completely unique interior in your room . Armstrong-type ceilings can serve a different role, not only aesthetic, but more on that below.
Advantages and disadvantages
Suspended ceilings are easy to install and look great in any room. They can improve heat and sound insulation. You can install all the lamps exactly in those places where you like it most. In the space between the ceiling and the armstrong, various communications can be carried out. The repair is simple and does not require special tools or skills.
Helpful information:
- Frame bathhouse: pros and cons, construction nuances
- Interior plastic doors: pros and cons
- Stretch ceiling in the bathroom - pros and cons
- Parquet board: tips for choosing, pros and cons
- Pros and cons of sand-lime brick
- Paintable wallpaper - pros and cons
However, there are also some disadvantages that, I believe, are not significant. A suspended ceiling cannot protect against leaks from above. If there are fiber boards in the structure, they will deteriorate when moisture gets on them, but they can be easily replaced.
These are straight ceilings only. They can also be installed diagonally, but this must be done by a specialist, which will cost much more than doing everything yourself. Armstrong is best done in apartments with high ceilings, because the entire structure will lower the level by 20 centimeters. If you want to make suspended ceilings in an apartment with a low level, then it is better to install suspended ceilings; they practically do not take up space and are not expensive.
Armstrong ceilings are most often installed in offices, restaurants, and can also often be found in entertainment centers.
What are the specifics?
Well, first of all, the bathroom is usually spatially limited. If the house is not built according to a special project, and the apartment is just a “Khrushchev” building, you can’t count on more than a few square meters. That is, in the bathroom it is often simply impossible to turn around.
Secondly, communication networks are densely laid out in the bathroom like nowhere else. The web of pipes for hot and cold water supply, central heating system and sewage system does not make the task of optimally arranging plumbing fixtures (at least a sink, bathtub or shower stall) and a washing machine any easier, but rather the opposite.
Thirdly, even if you have a luxurious bathroom with enough space for everything, this room is still a room with high relative humidity. Well-designed ventilation will partially solve the problem, but for those who like to relax at the end of a hard day in a hot bath, moisture problems will still remain.
And, fourthly, if in your bathroom you have a bathtub and not a shower stall, then, perhaps, this is the room in which you will most often see the ceiling in all its details.
Installation of suspended ceilings
Mounting the Armstrong ceiling is not complicated, and everything can be understood from the picture. During installation, hangers, load-bearing profiles, transverse profiles, profiles located around the perimeter, fastening units and a ceiling slab are used. Ceiling tiles can come in different sizes. The most common slabs are 600x600 in size, since with this size the suspended ceiling is the most durable. All other sizes of ceiling slabs are practically out of use.
Armstrong plates can be made from different materials. They can be soft - organic or mineral, hard - glass or metal. They can also be mirrored or with different patterns.
It is better not to use a rigid slab when installing suspended ceilings, since it will cost much more and all profiles must also be special - reinforced. Mineral slabs contain mineral wool, which is harmful and is almost never used. Organic boards are the most common because they are made of paper and are completely harmless. They cut perfectly with a regular knife and are easy to work with.
Profiles for Armstrong ceilings can be made of both metal and metal-plastic. They must have holes for hanging. They are connected to each other using spring locks or bendable antennae. Each profile, if necessary, must be cut on the side that will be exactly opposite to the lock. And they need to be cut strictly to size.
The pendants are made in the form of metal rods, which are connected to each other by a curved leaf spring with many holes. By compressing the spring, you can easily set the required level of suspension and by releasing the spring, this level is firmly fixed.
Fastening units are ordinary dowels, which are made in the form of self-tapping screws or metal collets. Metal collets must be installed in those places where you will have lamps and other structures that will weigh down the ceiling.
The Armstrong suspended ceiling mount is completely removable. The rod can simply be screwed into the fastening unit and the profile is hung on the hook below. By squeezing or unclenching the “butterfly”, the profile height is adjusted and leveled. If you need access to the inter-ceiling space, you can carefully lift several slabs and move them a little to the side. It is imperative that your hands be one hundred percent clean, otherwise dirty fingerprints will remain on the front side of the stove.
Classification by design
Ceilings made of different materials have common features, similar principles of assembly, determined by the geometry of the cladding.
Rack and pinion
The lining is carried out in long narrow parts, joined along the long side. Before the invention of perforated stringers, the dominant idea was borrowed from carpentry: the tenon (protrusion) of one element was inserted into the groove of the second. Thus, the following are united: wooden, plastic, MDF - lining; tongue and groove board; MDF panels.
Wood
A suspended wooden ceiling in a home bathroom is a logical choice for a wooden cottage, an interior in an ecological style. Moisture-resistant species are preferred: larch, teak, Canadian cedar. Affordable pine is half the price of linden, three times cheaper than larch, and requires an impeccable paint coating.
The durability of the finish is determined by:
- Protective measures: moisture-repellent, antiseptic impregnation; varnishing, painting.
- Effective ventilation of the ceiling.
The sheathing bars are treated in the same way, otherwise the planks will move. Primary impregnation with fire retardant compounds is required.
Lining is easier to lay than tongue-and-groove boards; the latter is superior in aesthetics. The boards, placed together at random intervals, form a harmonious panel that attracts with its natural pattern and richness of shades.
Clamping the boards with clamps.
Plastic
PVC withstands moisture perfectly: it does not rot, does not decompose, does not warp. Easily cleaned with a damp sponge. It is best suited for DIY repairs and does not burden the budget. The range of colors, patterns, imitations of natural textures does not limit the imagination.
Let's mention the disadvantages:
- Cheap thin-walled products are easy to damage.
- PVC fades over time from exposure to light.
- Substances released during a fire are extremely dangerous.
Often installed on a wooden frame that needs moisture protection. A galvanized plasterboard profile successfully replaces timber, and straight hangers allow you to vary the height.
Installation on a galvanized frame.
The specific gravity is less than wood; due to its flexibility, the pitch of the batten cross members is 0.5 - 0.7 m. Seamless samples are pressed against the shelf with self-tapping screws, the lining can be fixed with clamps with a low tongue (1 - 2 mm).
A neat, seamless set appears to be a continuous finish; the large width (250 versus 100 mm of lining) speeds up installation. New perspectives for PVC are opened by a model with basic steel stringers: the panel shelves are snapped into stamped guide locks. Decorative inserts cover the gaps between the slats.
Seamless
To avoid the appearance of condensation, drips, and fungus, consider and implement natural or forced ventilation of the ceiling and the entire bathroom.
MDF
The original purpose of medium-hard fiberboards (MDF) is to replace expensive solid wood parts. Plates with double-sided lamination are suitable for the bathroom.
The suitability of MDF for a shower must be confirmed by the manufacturer! It is recommended to additionally coat the short ends with sealant.
The MDF frame is similar to that described. The plates are connected using the tongue-and-groove method, secured with clamps to the beam or clips to the mounting rail. Stapling is not recommended: the clamping of the staples weakens and water penetrates through the damaged melamine film.
The load-bearing capacity of the plates is small, so heavy lamps and steel air ducts are supported on the frame and anchored to the ceiling.
Aluminum
Winged metal rushes upward. Indeed, a slatted aluminum false ceiling, assembled on traverses suspended by means of adjustable rods, is in perfect harmony with a high bathroom.
Premium class
Photos of typical bathroom ceilings
Until the work is completed.
The wrong side of beauty
Lightweight, rigid, durable, moisture resistant - just some of the advantages. A system with an elastic lock best reveals the capabilities of a slatted ceiling:
- Simplifies the installation of panels.
- Guarantees reliable fixation.
- The design of the inserts ensures air exchange between the ceiling volumes.
- Lamps can be built in without any problems.
- Allows quick disassembly for repairs of utility networks and flooding.
- The unified slats standard allows you to change the design without redoing the base.
There are also spots in the sun:
- Anti-corrosion coatings of aluminum are suitable for operating conditions in a humid environment, but are sensitive to mechanical stress and abrasive.
- A low bathroom will not allow the use of adjustable pulls.
- The kit will not be cheap.
Illustration of the principle from CESAL
You cannot cut the plates with a grinder: flying particles will cut the surface. Scratches become hotbeds of metal corrosion.
Video:
Cassette (tile)
The essence of the concept is the creation of cladding from individual tiles. It is convenient to veneer; various combinations are allowed. The maximum aesthetic effect is achieved in spacious bathrooms of luxury housing. The intended composition does not always fit into the bathroom of a panel high-rise building.
There are samples that require labor-intensive methods of fixation: glue, screws. The cassette versions are much more rational:
- Contains all necessary constructs.
- They are simply assembled (by a specialist).
- Modules are installed without fasteners.
- Dismantling is provided for audits, emergency situations, and design renovation.
- Single replacements of accidentally damaged modules are possible.
The term “Armstrong-type ceilings” has become a common name for cassette systems from various manufacturers, in addition to Armstrong Ceiling Solution, so the products differ in their nuances.
The following types of cassette ceilings are produced:
- closed;
- open.
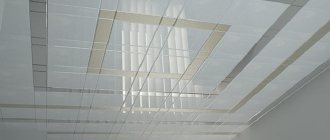
The basic basis of the first ones: longitudinal guides on suspensions; a corner framing the perimeter of the room. The cassettes are inserted into the slotted grooves of the guides until the lock clicks into place. A variety exclusively for metal modules.
Closed modification "CESAL"
The second ones have a honeycomb structure of T-shaped profiles: transverse crossbars are added to form cells. The modules are stacked on the shelves of the guides. The binding remains visible from below.
Open modification "CESAL"
They produce aluminum, galvanized with powder coating, glass, acrylic, polyvinyl chloride, MDF, mineral fiber boards. Running dimensions: 595×595, 595×295, 395×395, 295×295 mm.
Criteria for components:
- Moisture resistance: should not absorb water, rust, or change dimensions.
- Durability of the outer decorative layer.
- Hygiene.
- Fire safety: non-flammable or self-extinguishing.
- Injury safety: no sharp fragments from accidental impacts.
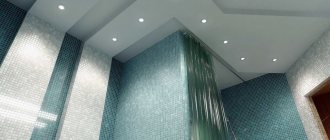
It is popular to decorate the central dominant with mirrors, glass, decorated with ornaments, graphics, and internal uniform lighting.
Closed combined system combines several standard sizes
Mirror design
Ornament, graphics, interior lighting
Polished mirror aluminum enhances the space. The framing is arranged in a single color.
The external contour of two-tier projects is often formed with plasterboard, the latter allows you to obtain curved configurations that are not possible with cassettes.
Combined ceiling
Hygienic mineral blocks
Sophistication of veneer
Let's mention important nuances:
- The false ceiling “eats” at least 25 cm.
- The strength of a row of tiles is low.
- Frame installation is difficult for a non-professional.
- Water does not linger when poured.
- The cost depends on the type of cladding, comparable to the price of high-quality wooden cladding.
Practical tips:
Armstrong
The company is famous for its ceiling cassettes based on solid mineral fiber. Series: “Newton”, “Ceramaguard” are functionally suitable for the bathroom. The first uses calcium silicate hydrate, the second uses ceramic additives.
Harmlessness and chemical resistance are confirmed by use in swimming pools. Ceramaguard, in addition, provides decent sound insulation. The discreet appearance is designed for public buildings.
Tools and equipment
Nowadays many accessories are produced that are designed specifically for suspended ceilings. These are spotlights, ceiling lamps or raster lamps, ventilation grilles, special units for air conditioning. For spotlights, all holes can be cut with a regular knife. If you need shaped holes, then this will not be a problem for you either. When using hard slabs, you will already need a special tool, depending on the material: a glass cutter or a grinder.
"Soviet" ceiling
The usual interfloor ceilings of Soviet-era bathrooms were bleached or painted with nitro-painted reinforced concrete slabs. Constant changes in temperature and humidity provoked the appearance of dark spots, local peeling of whitewash or paint, and in particularly wet places, fungus and mold appeared that were not aesthetically pleasing or healthy. Finishing the ceiling with finishing materials available at that time (wallpaper or ceramic tiles) was also not possible due to constant excess moisture.
The situation has changed radically with the advent of new building materials on the market: moisture-resistant plasterboard and various designs of suspended ceilings.
Armstrong ceiling calculation
Before purchasing all materials for installation, you need to calculate everything so as not to spend extra money and so that you do not have a lot of extra material left. The ceiling is calculated along the perimeter of the walls and the resulting results can be rounded within an addition of 3 meters. Please note that wall profiles can be bent into corners by making a cut.
Experts do not recommend cutting slabs up to 300 millimeters, as additional cells may appear that will require additional material consumption. If you want to give the suspended ceiling a more austere look, then you usually trim the slabs from the center to the walls, while gradually reducing their width. Please also take into account that all additional equipment in the form of lamps and ventilation grilles are not considered an additional load for the ceiling.
Armstrong ceiling installation
According to simple installation rules, all suspension for supporting profiles must be done at a distance of 1.2 meters. Along the perimeter of the walls, the hanging units must be placed at a distance of no more than 45 cm from the wall. But this almost never works out, and therefore all the nodes are placed along the wall in a checkerboard pattern.
Any additional load on the ceiling in the form of an air conditioner must be strengthened with the help of additional hangers, which are located strictly diagonally from the main one. Sometimes the hooks do not allow various devices to be placed in the cells; in these cases, additional hangers are shifted a little to the side. There is no need to make precise markings for fastening units, as this is not necessary. Even the slightest tilt of the suspension can be compensated by adjusting its height.
Embedded elements
The structure of the frame of the Armstrong suspension system is such that it is possible to install not only ceiling tiles in it. Various equipment for the system are made in a square shape, with dimensions of 600x600 mm.
The most popular of the elements built into the ceiling are lamps. Raster panels are framed panels, inside of which there are several lamps. Ceiling lamp variations are also produced. They have a more standard look. This model consists of a panel with a socket, and the lampshade protects it.
Installing a lamp in an Armstrong ceiling
For a suspended kitchen ceiling, a built-in ventilation panel will be relevant. The advantage of its placement will be the fact that all communications and the drainage system can be hidden behind the panels. There are also air conditioning units for ceiling systems. In addition to the equipment variations presented above, there are many others.
Ceiling ventilation panel Armstrong
All built-in elements place additional load on the Armstrong suspended ceiling. For this reason, it is not recommended to install them on wooden walls to which the frame is secured with nails. For greater stability of the suspension system with equipment, additional fastenings are used. A pendant is placed on the remaining metal profiles, which is then attached to prepared units on the ceiling.
Frame for suspended ceiling
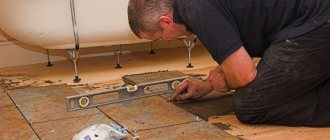
The first step when assembling the frame is to lay the wall profile around the perimeter of the room. When installing, use a laser or bubble level of at least one meter. Make marks around the perimeter and compare the distance to the floor to determine horizontalness.
We secure the wall profile around the perimeter using self-tapping screws. If you do not plan to install many additional devices in the ceiling, then this mount is quite sufficient, since the entire load will be supported by the load-bearing profile and it is not recommended to mess around here. When installing ceilings of this type, you can simultaneously achieve excellent sound insulation.
After the necessary holes have been drilled in the ceiling, proceed to cutting the required number of supporting profiles. They must be connected on the floor into long strips of the required length and installed in the wall profile. Afterwards they are moved apart to the required width and hangers are installed. Then, using tightly stretched cords, they are leveled according to the level of sagging.
Next, you need to mount the longitudinal and transverse ligament. This is done using a parallel or cross circuit. Cross circuits are more labor-intensive and are made in those places where it is necessary to strengthen the frame or lay various communications.
Preparation for installation of raster ceilings
Before installation in the room, they mark the ceiling, mark the horizon line - the level at which the ceiling is installed, it does not always run parallel to the floor or ceiling, after that they install metal profiles on hangers, an angular profile along the marked line and lay decorative panels. Armstrong ceiling is a suspension system (attached to the base) and decorative panels (mineral wool panels) installed in the cells of the frame system. A comprehensive ceiling system is a set that includes a thermal and sound insulation board, materials necessary to solve a specific architectural and construction problem, structural elements, technical solutions and recommendations for construction work.
For more information, see the specialized article on markings when installing Armstrong ceilings
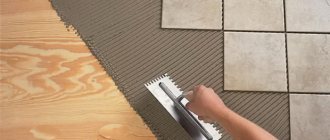
Laying Armstrong slabs
Once the entire profile structure is ready, you can begin assembling the ceiling. We lift the slabs and, one by one, carefully, without additional physical effort, place them in the cells. If the slab does not fit into the cell well, do not put pressure on it from above, otherwise it will break. It is necessary to carefully correct it from below.
First, install the necessary equipment on the ceiling and connect the communications. Connect the wiring to the lamps, and only then lay the panels. We lay the last slab as follows: hold it face down on our palms, carefully place it into the opening and smoothly lower it. It happens that the slab lies askew, then in this case we correct the lower corner with our finger and that’s it - your Armstrong suspended ceiling is ready!
How to install the structure
Installation of the Armstrong suspended ceiling, according to the installation instructions, is divided into three stages:
- preparatory;
- installation;
- finishing.
Marking and preparation for installation
Preparation
Installation of the Armstrong ceiling begins with measurements. Instructions for installing a suspended ceiling Armstrong recommends:
- If the floor is flat, then measure the height of the room in the corners. The smallest height indicator will become the main one. If the floor is uneven, it is recommended to use a building level when working;
- in the selected corner, measure 15 cm from above (if the installation of the Armstrong suspended ceiling is accompanied by additional laying of communications above it, for example, ventilation, then the distance should be increased);
- Apply level marks in other corners of the room. It is recommended to use a laser level, which allows you to make the most accurate markings in order to correctly install Armstrong suspended ceilings with your own hands.
Mark the level on all walls
Having decided on the height, you need to determine where the Armstrong ceiling hangers will be mounted.
To do this you need:
- calculate the center of the room. The easiest way is to stretch 2 diagonals from the corners, and the intersection point will be the center.
We find the center of the room and make subsequent markings
- A line is drawn across the room through the resulting point. It should form a right angle with the wall;
- 1.2 m is measured from this line on both sides and a mark is placed, then the distance is measured again and so on until the end of the wall. The load-bearing profile of Armstrong suspended ceilings will be fixed to these marks.
Profile installation diagram based on measurements
The step-by-step description of marking work before installing the structure seems very long, but in fact, marking is done quite quickly. If you neglect to accurately carry out this stage, the installed Armstrong system may be unevenly fixed, distortions will occur, and the installation of suspended ceilings will be of poor quality.
Installation stage
It is very important that the Armstrong ceiling installation diagram be fully followed. Step-by-step implementation of all points of the instructions guarantees that you can install the Armstrong ceiling with your own hands with high quality.
Complete diagram of the frame assembly for Armstrong panels
You need to do the following:
- mount the spokes for fastening. To do this, holes are drilled according to the measurements applied to the wall and spring-loaded spokes are attached to them with self-tapping screws or dowels. To simplify the work, it is recommended to fasten the knitting needles with hooks in one direction. Attach the supporting metal profile to the hooks;
- assemble the frame. To assemble the ceiling, Armstrong himself provided special markings on the supporting and transverse profiles. Installation recommendations recommend fixing 5-6 main elements to the wall, mounting crossbars on them, and only then attaching the remaining main beams. This method of assembling Armstrong suspended ceilings will save time and promptly identify distortions that have arisen due to errors when applying marks. If the misalignment is slight, it can be adjusted using spring-loaded fastening spokes. The last metal profile is always fixed close to the wall, regardless of the distance to the previous beam;
- After all the elements are installed, you need to snap the locks into the grooves. This is the simplest stage - if the base is mounted correctly, the locks will snap into place without difficulty;
- Now you can install the corners. They are necessary to ensure that the tiled square is placed evenly.
If you plan to install lamps, then the base for their installation must be reinforced with additional crossbars and a plumb line. The more massive the lamp floor lamp, the greater the strength enhancement should be.
But it is not recommended to hang massive chandeliers, although the Armstrong ceiling installation technology provides for this type of lighting. A heavy chandelier can only be suitable for an individual project; standard materials of Armstrong slabs will not fit well with a massive lamp.
Finishing
How to install decorative tiles? Perhaps this is the easiest step in the instructions on how to make an Armstrong ceiling yourself.
To do this you need:
- wear clean gloves. Most tile materials are very easily soiled and stains from sweat and grease easily remain on them;
- a square of tiles is taken and inserted diagonally into the finished metal cell;
- in the pre-ceiling space, the tiles are turned horizontally and lowered face down;
- these actions are repeated the required number of times.
Panel installation
That's all, now you can admire the work done. But in order for the finishing to be flawless, the craftsmen recommend:
- carry out work when the humidity in the room is no more than 70%;
- carefully monitor the coincidence of the pattern. If a relief option or a convex pattern is selected, then the match should be 100%. If an error occurs, you should immediately correct the error by simply slightly lifting and rotating the tiled square;
- if the tile does not fit in a corner or near a wall, then you can give it the required size using a regular sharp knife (scissors are not recommended - they can crush the cut of the slab).
For those who have at least once installed an Armstrong ceiling, the technology for installing the structure seems extremely simple. It does not require special tools or equipment. Installation work, if all steps of the instructions are followed, can be handled by two novice craftsmen.
The only thing that prevents Armstrong products from gaining popularity is that the installation reduces the height of the room, and this is unacceptable for many apartments.