Suspended ceilings made of aluminum panels will decorate any room where you want to create a modern interior. They will reliably disguise flaws in the base ceiling base and will combine effectively with lighting fixtures. The design is suitable for a bathroom, kitchen and even a bedroom, if you choose the right texture and design of the panels.
Let's start with calculations
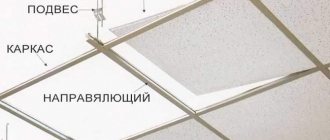
Installing a slatted ceiling, just like renovating a bathroom, is not as difficult as it might seem at first glance. First you need to understand what parts and components it consists of. Typically the kit includes:
- Universal hangers.
- Corner wall guide profile.
- Stringer or load-bearing type profile.
- Decorative inter-slat insert.
- Aluminum ceiling rail.
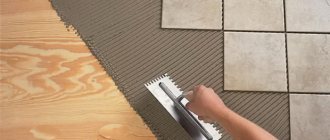
The slatted ceiling design in the bathroom is installed only after the tile laying has been completed, both on the floor and on the ceiling.
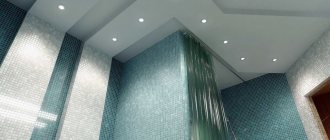
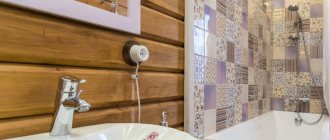
The length of the structure usually does not exceed 4000 millimeters, and the width is in the range of 100-150 mm. 16 and 4 millimeters, respectively, equal the length and width of the insert that performs a decorative function. The ceiling will look more beautiful if you use the original material with a mirror surface.
visually enlarge the room using a ceiling with a mirror surface
It is necessary to measure the area of the ceiling itself as accurately as possible with your own hands in order to make the calculation correctly. We use a regular tape measure or ruler with a length of up to one meter.
Even if we don’t have these tools at hand, a regular sewing tape will do just fine. When measuring using it, small errors appear, but they will not be critical. The ceiling area is easily calculated by multiplying the width by the length. But the number of inserts and slats can be calculated in another, simpler way.
Reasons for the popularity of slatted ceilings in the bathroom
A slatted ceiling in a bathroom made of aluminum panels combines the advantages of wooden and plastic materials: durable, safe, resistant to moisture, easy to clean and install.
For a bathroom, this is one of the best ways to finish the ceiling for the following reasons:
- Anti-corrosion resistance and moisture resistance (aluminum does not rust, which immediately puts it in first place among the materials used for finishing ceilings in rooms with high humidity. In the bathroom this figure reaches 90%);
- Hygiene. Mold does not form on the surface of the slats, the slats do not emit an unpleasant odor or harmful substances. These panels are easy to care for. With a little time and detergent, the aluminum ceiling will again delight you with its original shine;
- Dust-repellent properties. Special impregnations that cover the slats during manufacturing do not allow dust particles to settle on the surface of the material;
- Price. For a bathroom, a slatted ceiling will be inexpensive, since the room is not large;
- Decorative aluminum ceilings will suit different areas of the interior;
- Operational life. The specific climatic conditions of the bathroom shorten the service life of finishing materials. The slats are not afraid of temperature changes and constant exposure to high humidity, so this ceiling will last at least 15 years;
- Versatility. Aluminum panels can be installed not only in the bathroom, but also in the kitchen, hallway and even living spaces;
- Fire resistance. Aluminum does not burn and does not melt under the influence of fire.
Which solution should I use?
We add the width of the insert and the width of the slats together. Divide the length by the resulting number. The result obtained from previous actions is again divided by two. This is how we get the number of slats and inserts that we will need in the future. For example, we are given:
- 0.016 meters – width of the inter-batten insert
- 0.1 meter ceiling rail width
- 3 meters – total length of the bathroom
First we add 0.016 and 0.1. The result is 0.116 m. Divide three by 0.116 - we get 25.8 or 26. Usually the result is rounded up.
There is a separate interval at which stringers or profiles with a load-bearing function are installed.
- The distance between adjacent profiles must be at least 1200 mm. A lower value is allowed
- At least 400 millimeters must be retreated from the parallel wall.
If the length of the wall corner profile is calculated, then add 3 percent to the resulting figure. Errors in calculations and costs for pruning will then not be scary.
Types and advantages of rack and pinion systems
A slatted ceiling is a structure that includes a suspended frame system and cladding panels. The material for the manufacture of finishing panels is most often plastic, galvanized steel or aluminum.
Diagram: rack and pinion system design
Rack structures made of polyvinyl chloride are lightweight, but have low strength. Zinc ceiling slats are more susceptible to corrosion. And therefore it is not advisable to install them in bathrooms and kitchens, where the humidity often exceeds the threshold of 70%.
Aluminum panels can be considered the “golden mean”, successfully combining the positive properties of plastic and galvanized analogues. The soft material is not afraid of water and is not subject to corrosion. Such a ceiling will also save you from unnecessary costs in case of flooding by neighbors.
There are two options for installing slatted shelves:
- Closed type - involves installing a metal frame and mounting the panels themselves on it. An inter-batten insert is placed in the gap between adjacent panels, which adds decorativeness to the structure.
Scheme: installation of a closed slatted ceiling
- Open type - does not provide for filling the inter-rack space. They form a complete and smooth surface.
Open type systems have good ventilation, which prevents water condensation from settling on the slatted surface. But regardless of the installation method, the arrangement of a slatted ceiling eliminates the need for the construction of powerful frame systems.
Scheme: open type installation
As for the aesthetic aspect, thanks to the variety of textures and wide color palette, using slatted structures you can successfully realize the most daring ideas. Design ideas can be gleaned from photos on thematic forums on the Internet.
An impressive design can be created using shaped slatted panels. Arched elements help shape curves, making a smooth transition between two rooms with different ceiling heights.
Let's start marking
- Along the perimeter of the bathroom it is necessary to mark off a horizontal surface using paint thread, as well as a water level or a laser plane builder.
- Next, set the lowest point of overlap, take special measurements and use a regular tape measure. You can’t install slatted ceilings with your own hands without this.
- We need to find the so-called L value. To calculate it, we need to subtract the overall height of the lighting element from the distance to the lowest point of overlap. The horizontal line marked on the walls must be moved upward exactly by the amount L. It is this point that will become the front plane of the slatted ceiling in the future.
Nuances of choice
When purchasing a set of rack system for decorating the ceiling in the bathroom, you need to pay attention to the following details:
- equipment – availability and width of the “layout”;
Complete set without narrow strips. - rail size – width 5 – 15 cm;
- color – white, plain, multi-colored;
- texture – imitation of wood, stone;
Covering the planks with imitation wood. - coating – gloss, matte, photo printing.
Panels, layout and stringers must be from the same manufacturer. The end profile is interchangeable and only affects the complexity of assembly and the decorative value of the coating.
Since the installation is carried out by a home craftsman with his own hands without the involvement of specialists, it is necessary to purchase the required number of hangers, lighting fixtures and “combs” (stringers). To do this, you need to read the step-by-step instructions below.
We install guides for the ceiling structure
- Installation of the guide angle can begin immediately after the horizontal plane has been cut out. This is not a load-bearing structure; it is needed only so that the owner can hide with his own hands the places where the ceiling slats are adjacent to the wall. But it is at the initial stages that it is already possible to install this element in the bathroom.
- It is better to cut the corner from the very beginning so that it can maintain the desired length. To do this, all necessary cuts are made in advance. You also need to make special holes for the dowel. This is done with a metal drill, and a step of 50-70 centimeters must be observed. They work with a wider edge. Then the same holes for the dowel are transferred to the wall.
Drilling holes on the body of the corner using a hammer drill directly on the wall is not the best solution in such a situation. Otherwise, the structure begins to quickly deform.
We install guides for the slatted ceiling
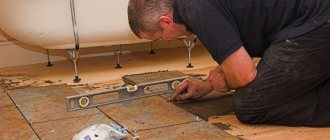
Correct installation
Using dowels, we fix the guide profile to the wall. In order for the U-shaped profile to fit tightly to the wall, it is necessary to drill holes for dowels exactly from the outside of the profile.
Once you have secured the profile, you need to install the hangers according to the markings. The best option would be adjustable hangers, which will give you the opportunity to more accurately align and level the entire surface of the slatted ceiling. The edge points should be placed at a distance of no more than 40 centimeters from the wall, but one step of the distance between each other can be increased to 1.5 meters.
Next, we mount stringers on the hangers - these are tires with grooves into which the slatted ceiling panels will be inserted. The distance between the stringer and the U-shaped profile should be approximately one centimeter to compensate for possible deformations.
We install stringers
- Profiles with a load-bearing function of this type can be fixed to the ceiling. Or use special universal type hangers. They operate on what is called a “butterfly”, a type of adjustable clamp. Finally, you can do everything using long screws through the dowel. In general, it is the latter option that can be called the most preferable, although such an opportunity does not always arise. With this installation, it will be possible to adjust the ceiling plane later.
- The interval between pendants must be at least 1200 millimeters. The first part should be at some distance from the wall, at least 400 mm.
- Comb profiles are also installed in increments of no more than 1.2 meters. The same step of 0.4 meters from the wall remains for such parts, if they are extreme
- Stringers should be 10-15 centimeters shorter than the width of the room. It is worth remembering this when cutting them.
Required materials and tools
In addition to the panels you will need to purchase:
- guides (metal strips with a special profile);
- traverses (elements to which the slats will be attached);
- suspensions for traverses (2 – 3 for each traverse);
- dowels and screws.
The total length of the traverses is determined based on the fact that they will be installed in increments of 1 - 1.2 m.
All materials, as always, should be purchased with some reserve: it will be needed if some elements are accidentally damaged during installation, as well as in case of replacing damaged elements in the future.
You also need to make sure you have the following tools:
- level: it is better to take not a bubble level, but a water level (two glass tubes connected by a long rubber one);
- marking tool: marker, cord;
- perforator;
- screwdriver or screwdriver;
- construction knife (if PVC panels are used);
- metal scissors;
- roulette.
At the beginning of installation, wires must be installed in the under-ceiling space to power the lamps. They must be laid in pipes or corrugated hoses made of metal or self-extinguishing plastic (requirement of the PUE).
Let's move on to the aluminum slats themselves
- It all starts with cutting the slats; without this, installing a ceiling in the bathroom cannot be carried out. The length required for the structure is one centimeter shorter than the span between the walls.
- To do this, use a regular grinder or metal scissors. The main thing is not to scratch the front part of the product and to ensure its safety.
- The penultimate and second planks are installed first. This is due to the fact that walls rarely boast ideal geometry, especially in our country. And, especially if we are talking about buildings from the times of the Soviet Union. Products that are adjacent to the guide angle will have to be trimmed.
- There is nothing complicated in the installation process itself. On stringer locks, the rails simply snap into place without the need for additional fasteners.
- First, the first two slats must fall into place. After this, the support profiles are taken and then raised to the working height. The facing elements should touch the corner, but barely.
- The plane on the hangers can also be adjusted during further installation. Then you can achieve an almost ideal result.
The ceiling surface can be adjusted until the inserts are installed. In any case, if the combs themselves were installed on long screws, and not on hangers. It is enough to unscrew or screw in the parts as needed.
The outermost slats are installed last. The main thing is not to forget to trim these structures first so that they retain the desired parameters. We can say that this is the final stage of renovation if the ceiling in the bathroom is of the open type. The film is removed and the product is used as usual. For “open” ceilings, a mandatory step is to install special interpanel inserts yourself. And only after this the repair can be considered complete.
We mount the slats on the guides
It is better not to remove the protective coating immediately, but to wait until all aluminum structures are installed.
Selection of aluminum panels
First of all, you need to decide what the ceiling will be like.
Aluminum slats are available in quite a variety of designs:
- Color. Available in a wide range - from regular matte white to golden.
- Form.
- Size.
- Presence of perforation. Provides ventilation of the space between the slats and the floor slab.
There are three types of slats based on their shape:
- classic rectangular shape without roundings (they are called “German”);
- with rounded corners (Italian "");
- with a special shape (“designer”): usually somewhat more difficult to install.
The length of the slats (the standard range is 2.5, 3, 4 and 6 m) must be selected taking into account the size of the bathroom so that there is as little scrap as possible.
Aluminum slatted suspended ceilings
The width of the panels is divided into:
- wide (25 - 30 cm): do not have visually demarcating elements, so the ceiling surface looks solid;
- narrow (85, 100, 150 mm): have clearly defined edges, so that the boundaries of each rail are clearly visible after installation.
In addition, various inserts can be installed between narrow slats, which make the design of the structure more impressive.
If aluminum slats seem too expensive, you can purchase more affordable steel or PVC panels.
Which ceiling option is better to choose?
Cost and appearance should be the main consideration for those choosing between aluminum and plastic products. Both options can last for many years with proper care, and their characteristics are almost the same.
Choosing between aluminum and plastic slatted ceilings
Slatted ceilings are most often installed in the bathroom, since they are perfectly protected from moisture, even in large quantities. In addition, such structures are unfamiliar with the problems of fungus and mold. There is another type of product - suspended slatted ceilings. They consist of several elements, including: a decorative insert and an adjustable suspension, a steel corner and traverse, and an aluminum rail.
The slatted ceiling is resistant to mold and mildew, and is also protected from moisture.
As for plastic structures, they are also impervious to moisture and microorganisms. In addition, when installing them, you can count on sufficient ventilation, since the slats do not fit tightly together. The structure can easily be placed along the length and width of the room, regardless of the specific dimensions. It will then be possible to place lamps at any point in the structure without any problems.
Slatted ceilings are usually supplied with all the necessary elements, so installation can begin almost immediately. For example, a universal support rail is almost always included. It has special grooves for attaching slats. In addition, it itself is made of high quality galvanized steel. To attach the elements, simply click everything into place.
Correct marking is half the success
- It is most convenient to make markings when the walls are tiled. In this case, even tile seams will serve as a guide. Equal distances are measured from the uppermost seam and the perimeter is marked out; this will be the plane of the suspended ceiling. Moreover, even when the seams have some differences, it is better to fasten the frame along them. If the plane of the ceiling does not coincide with the seams on the tiles, then the end result will not please you with its appearance.
- When you have a laser level at hand, marking the perimeter is not difficult. Otherwise, you'll have to resort to the good old building level. Using this simple tool, a straight line is consistently drawn. This method is only suitable for rooms with a small area. With a perimeter of more than 20 m, errors will be inevitable. It is also worth considering that size matters in this case: the longer the instrument, the higher the measurement accuracy. The angle of the ceiling and wall should not serve as a guide.
- On the ceiling, slatted panels are usually installed across the room, parallel to the wall with the front door. The profile guides (also called comb, tire or stringer) should accordingly run perpendicular to the slats: from the entrance to the opposite wall. The outer guides are attached from the walls at 20-25 cm. The rest are in increments of 50-60 cm. The hangers on which the guides are attached are driven into the ceiling in increments of 40-50 cm.
Before you begin installing the ceiling, you need to mark everything correctly
How is a plastic slatted ceiling installed?
As in the case of an aluminum slatted ceiling, here it is necessary to initially mark it as accurately as possible. For example, it is calculated in advance how much the ceiling surface will be lowered. You also need to decide what type of design will be used. The ceiling is installed only after finishing work inside the room has been completed.
The boundary of the end profile fastening is indicated by a solid line along the entire perimeter. If the markings are incorrect, then the ceiling plane is unlikely to look beautiful. The lowest level in the room is determined from the very beginning. It is important to take into account the availability of communications if it is really important in a particular case. The marked points are connected using a special straight rod.
A certain number of holes need to be made along the perimeter line; a regular hammer drill is used for this. The distance between the holes is generally 50 centimeters. The profile is subsequently attached to these holes. Usually the tires are the same length, but you can still use scissors to achieve the desired width.
At the next stage, the baseboard is attached to the wall. It is necessary to cut the material at an angle to hide any possible irregularities. There are special places inside the plinth parts where other elements are fastened.
The tires should be located at some distance from the wall, at least 30 centimeters. Many problems will arise if these requirements are not met. Such structural parts should not lie on the profile, but help increase the strength of the fastening. After this, the panels are cut and installed. The main thing is not to make the canvas longer than necessary.
The installation of elements begins after the preparatory work has been done. All elements are introduced gradually into the grooves of the end profile, as carefully as possible. When the next panel comes, be sure to fasten the intermediate profile.
DIY aluminum ceiling installation
Design features
The design of slatted ceilings consists of:
- traverses (supporting rails) to which the panels are attached;
- decorative plinth – mounted around the perimeter and hides the gaps between the walls and ceiling formed after installation;
- suspensions in the form of steel wire attached to the base ceiling base;
- lighting devices. It is better to purchase them in advance, because before mounting in the panels you will have to cut holes for the lamps.
Material calculation
If the color of the decorative ceiling has been chosen, all that remains is to count the number of materials:
- To determine the length of the corner profile, the perimeter of the room is measured. The resulting value is divided by the standard length of the bar (3 m);
- the length of the support rails is determined after the markings are applied to the ceiling. Measure the length of parallel lines from wall to wall, which are drawn in increments of 1 m, and add up the values. Divide the figure by 3 m;
- To calculate the number of slats, divide the ceiling area by the area of one panel.
Frame installation
Installation of a slatted ceiling begins with preparing the room: furniture is taken out, old finishing is removed, cracks and crevices are sealed with putty, and the ceiling surface is primed. Then begin assembling the frame base:
- Mark the level of the new ceiling with a marker in the corner of the room. The distance between the profile and the rough surface must be at least 5 cm. If you plan to mask utility lines with a structure or build massive lighting fixtures into a slatted ceiling, increase the distance;
- The mark is transferred to other corners of the room using a laser level. All points are connected by an even horizontal line that will outline the perimeter of the room;
- The lengths of the walls are measured along the line, and the corner profile is cut into pieces of the required size using metal scissors. The standard length of the slats is 3 meters;
- the profiles are attached to the wall surface with screws and dowels so that the lower part of the plank coincides with the line. Before installing the profile, recesses are drilled in the walls through holes made in the flanges of the planks. If the profile is solid, holes for fasteners are also drilled in it in increments of 50 cm;
- on the internal corners the profiles are attached end-to-end, on the external ones they are cut at an angle of 45°;
- Before installing the suspensions on the ceiling surface, mark the attachment points for the support rails. For the first line, they retreat from the wall by 40 cm, the step between the remaining stringers is 1 m. The suspensions are attached to the ceiling in such a way that they are located in the places of the holes on the traverses;
- The suspension rods are secured to the ceiling with anchor bolts, having previously drilled holes in the slabs. Adjust the evenness of the structure by setting the suspensions at the same level;
- stringers are the basis for the design of a suspended ceiling made of aluminum panels, so the tires are installed at the same level as the corner profile and perpendicular to the decorative panels every meter. The tires are attached to the hangers with self-tapping screws through special holes located on the stringers. The smoother the base, the smoother the ceiling will be;
- if the length of the tire is shorter than the distance from wall to wall, the stringer is extended. Then the suspension is attached to the edge of the next traverse, and the second one is joined to the first one, screwed with self-tapping screws. But there should be a distance of 0.5 cm from the wall to the edge of the tire so that the planks fit into the corner profile more easily.
How to install an aluminum slatted ceiling - step-by-step instructions.
How to attach slats
Remove the protective film from the slats, cut the panels into pieces of the required length so that the slats are 0.8 mm shorter than the distance between the walls. You should not cut all the panels at once, since there are no rooms with ideal geometry. Therefore, measurements will have to be taken as work progresses.
To cut slats, use metal scissors or a grinder with a diamond blade. When working with scissors, make a line on the back side of the panel with a sharp object and bend the part along this line. The rail will break, but the edge will not be even, so it is better to cut with scissors or a grinder.
Attach the ceiling panels starting from the wall opposite the entrance to the room. First, one end of the panel is inserted into the corner profile, then it is unfolded and the other end is installed. To prevent the grooves on the support rails from clinging, the rail is pulled down. Once the panel is in place, a characteristic click will be heard. This means that the tenons on the panel fit into the groove of the guide and snap tightly into place.
The same applies to other slats. The last panel is cut to width, the whole part is inserted into the groove of the previous one, and the cut part is inserted into the corner profile.
Some tips:
- It is almost impossible to achieve the tightest possible attachment to the end profile. You can only minimize both the deficiency itself and its consequences.
- Attention must be paid to the panel that is attached last. This is what needs to be cut off most often. But it’s better to cut off the penultimate one and leave this one alone. A slight bend will appear, but it will not be visible throughout the entire plane. But the fit and connection will become tighter.
- The profile is inserted between the last two slats. It will serve as an additional seal if the panels themselves are not enough. The assembly is considered complete after the last profile is in place.
This material is suitable for upgrading the ceilings of a small bathroom, as it is easy to install, inexpensive and unpretentious in operation.
Installation of perimeter guides
The work begins with attaching guides to the walls, which will simultaneously serve as a decorative frame for the ceiling canvas. All of them should be located:
- strictly horizontal;
- at a distance of approximately 10 cm from the floor slab.
The second point is of a recommendatory nature: 10 cm is the optimal value, which will not greatly reduce the height of the room and at the same time will allow you to easily place all the electrical equipment and lamps.
If necessary, it can be adjusted in any direction.
How to achieve a strictly horizontal position of the guides? It makes no sense to set equal distances from the main ceiling - there is no guarantee that the slab itself lies strictly in a horizontal plane. You can “dance” from the floor, as it is always level.
But the most reliable way is to make marks using a water level. The use of this tool eliminates any error that would occur when marking distances with a tape measure or using a bubble-type laser level.
We connect the marks made with straight lines, cut off using a stretched cord, after which we screw the guides along them with dowels (the wide side). The fastener installation step is 40 cm.
Slat ceiling installation diagram
If the guides are attached over tile cladding, it is highly desirable to avoid the mounting holes from getting into the seams between the tiles. If you still have to deal with this, the hole must be drilled with a special drill for ceramics and without the perforation mode.
If the metal strip needs to be trimmed, this can be done using metal scissors.
In the corners, the guides are inserted into one another.
Among suspended ceiling systems, the slatted ceiling in the bathroom is chosen due to the relative ease of installation and the aesthetic appearance of the structure.
You can read about how to properly whitewash a bathroom ceiling here.
Drywall is a material from which you can create an interesting decorative ceiling in the bathroom. You can read further about the features of plasterboard ceilings.
Installation of lamps
The lamps are fixed in the holes made for them, after which the lamps are screwed into them.
Light sources can be positioned in different ways:
- along the walls around the entire perimeter;
- along only long walls;
- across the entire surface of the ceiling in a checkerboard pattern;
- asymmetrically with concentration over work areas.
If PVC panels are used, the lamps should not emit too much heat.
Ceilings made of plastic panels have excellent moisture resistance, which is why they are widely used in finishing bathtubs. Read how to make a ceiling from plastic panels on our website.
Tips for installing a suspended ceiling in a bathroom can be found here.
In a damp room, for safety reasons, it is recommended to install a low-voltage lighting system, which requires a voltage of 12 or 24 V. In addition, it is more economical. Some halogen lamps, as well as new generation lamps - LEDs, are designed for this power supply. The latter are characterized by particularly low energy consumption and a significant resource.