Not so long ago, almost the only material for finishing a bathroom was ceramic tiles. The construction industry does not stand still; new materials are constantly emerging. Many people use siding in the bathroom to decorate walls and ceilings, this is explained by its practicality, durability and low price.
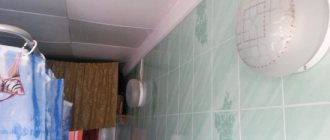
Bathroom finished with siding.
Performance properties of siding
Modern PVC panels (also called siding or lining) help create a different style in any room, but are most often used to decorate the bathroom. High moisture resistance, correct geometric shape, simple and reliable connection make it possible to finish a bathroom with siding without extra time and special skills.
There are several types of such material:
- Rack and pinion. Most often they are used to decorate the ceiling, but the slats are also suitable for cladding walls. The width of the slats is 100-125 mm, and the length is 3 m. The slats are connected to each other using a locking connection, which can be wide or narrow. Plain colors or colors imitating wood or other materials are common.
- Standard. In this case, the width of the panels is 250-370 mm, and the length is 2.6-3 m. Tongue-and-tongue locking connections allow for quick and reliable installation. The coating can be plain, imitate other materials, or have a pattern or photo printed on it.
- Sheet. The width of the lamella is 203 mm, and the length is 4.05 m. Finishing with such sheets is done end-to-end, then the seams are filled with sealant in the color of the material. They are most often mounted on a flat surface using glue, but they can also be installed on the sheathing.
Depending on the connection method, the panels are:
- Seamless. Most often they are used to decorate the ceiling. The tight fit of the panels to each other ensures minimal seams.
- With chamfer. Their difference is that there is a chamfer at the junction. They are used for finishing walls and ceilings.
- With decorative surface. Externally, such panels resemble natural lining, but cost more than previous options.
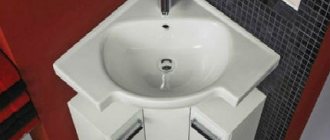
Finishing the bathroom with white siding.
Decorative characteristics of siding
Decorative varieties of siding panels
Manufacturers release rich collections of plastic with all sorts of colors onto the global construction market. Do not hesitate, you will definitely find the color or shade that will look harmonious in your bathroom.
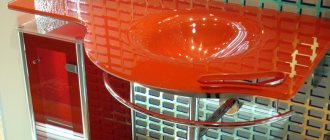
Bathroom design with siding is not only popular, but also beautiful in appearance. The decorative characteristics of this finishing material are at an excellent level. Siding walls in the bathroom will turn a small, simple room into a stylish and original room in a short time. Modern consumers especially love the finishing of bathrooms with siding, which imitates natural wood. Color variations in marble shades are also popular. In any case, the siding should meet your tastes and individual preferences.
Advantages and disadvantages of cladding
Siding for bathroom interior decoration is made of polyvinyl chloride, which provides it with high resistance to high humidity.
In addition, this finishing material has the following advantages:
- low cost (anyone can buy it);
- a large selection of colors (this allows you to choose the material to suit any interior);
- long service life (mold and mildew do not form on it);
- high heat and sound insulation characteristics (when installing the frame, it is possible to lay an additional layer of insulation and further increase these indicators);
- environmental friendliness (the materials and technologies used in production make such material completely safe for humans);
- simplicity and speed of installation (this does not require special tools or special skills - even a beginner can cope with the work);
- ease of use and maintenance (just wipe the panels with a sponge dipped in soapy water).
Like any building material, siding also has some disadvantages:
- fire hazard (although the panels do not support open fire, they emit toxic smoke when burning);
- deformation (at sub-zero temperatures);
- reducing the space of the room (when installed on a frame);
- relatively low strength.
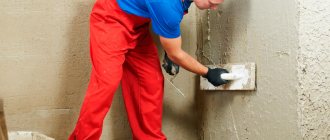
Bathroom finishing.
Finishing the bathroom with siding
As you know, bathtub siding is special; special coziness and comfort should reign here so that everyone can enjoy it as they should. Therefore, if you decide to use a material such as siding to decorate the interior of this room, then know that you are doing the right thing in any case.
Before starting work, you should watch the video in this article and photos, select the desired pattern and material, and make the correct calculations.
Attention: Never take the material end to end. You will always have waste and it is about 10 percent.
After all, as you know, siding is particularly successful due to its unique characteristics and advantages, which means you will definitely appreciate it.
Advantages
Bathroom siding has a number of advantages:
- First of all, this concerns resistance to constant exposure to water vapor and moisture. So, we can safely say that siding for interior decoration of a bathroom is one of the best cladding options, keep this in mind.
- The material is highly durable, moreover, it has good resistance to various mechanical influences, this is especially important for rooms such as a bathroom, toilet (see How to cover a toilet with siding correctly) or a shower room.
- Siding is also considered to be a material that is practical and hygienic, which is important for the bathroom. You yourself have already understood that it is durable, which means that in any case, when choosing it, you will definitely appreciate all these advantages.
Attention! I would like to note that traditional ceramic tiles have the same characteristics, but the siding is much cheaper, which means that now you need to understand that this is indeed an excellent option for the bathroom.
Decorative qualities
Today you can find plastic panels on the market; they are made in various colors and textures, which allows everyone to purchase the version of this material that they need. Moreover, it is precisely these products that are distinguished by the fact that they are able to satisfy truly any tastes and wishes, and this is so important.
Facing materials of this type are distinguished by high decorative qualities, which means that using materials in the bathroom, you can turn a dull and gray room into something original and aesthetically pleasing.
Ease and simplicity of installation
When installing the material, you will not encounter problems, which means you can easily and simply carry out repair and finishing work, getting only pleasure from it, which is, of course, nice.
- You will be pleasantly surprised that it is really not difficult to carry out such work yourself, which means that you will definitely succeed.
- All you need to do is to study the implementation of this work step by step, then you can understand that this is indeed the case, there is nothing complicated in it.
Attention: When installing plastic panels, you must install them on the sheathing, because this is an important condition; there is a simpler option - gluing the material to load-bearing surfaces. You must make the right choice so that everything is done well.
- Siding differs from ceramic tiles in that it is inferior to it in terms of mechanical strength, simplicity and speed in terms of installation, which means that in any case, when purchasing this material, you will appreciate it properly.
Wide range of possibilities in interior design
Siding is a universal material, so it is used to decorate any room indoors:
- Bathroom. Due to its availability and ease of installation, siding has replaced such a popular finishing material as ceramic tiles. A bathroom decorated with it not only looks beautiful, but is also inexpensive. In this case, all the work can be done independently. The result is a practical coating that does not accumulate dust and dirt.
- Balcony or loggia. Here, this material not only gives the room an attractive appearance and practicality, but also improves the heat and sound insulation characteristics of the surfaces on which it is installed.
- Corridor. Siding is used to cover the walls completely or half their height. Finishing the corridor with such material makes it presentable and practical. In addition, it makes cleaning easier because... There is always more dirt and dust in the hallway than in other rooms of the house.
- Ceiling. This material can be used in any room. In addition to high aesthetic qualities, siding allows you to hide existing communications (electrical wiring, pipes, etc.).
Plastic panels for finishing
Ceramic tiles also have the same characteristics and practical indicators that are observed in this material. On the other hand, in terms of strength, vinyl siding is inferior to ceramics.
Although, of course, the process of installing plastic panels takes less time and the process is much simpler than when carrying out finishing work using ceramic tiles. A novice craftsman can also do this kind of work, since no special knowledge and experience in carrying out finishing work is required.
Installing the panels will not take much time, since this process is quite simple and finishing work on the bathroom and toilet will not take more than three days.
The decorative qualities of plastic panels are also quite high, since modern manufacturers offer a variety of colors, textures and all kinds of shades for decorating different rooms.
Particularly popular these days are models whose colors imitate natural materials, such as marble and various types of wood.
Bathroom installation options
Before finishing a bathroom with siding, you need to calculate the required material. To do this, multiply the width by the length and determine the surface area on which the work will be performed, adding a 10% margin.
If the repair is carried out without removing the plumbing, then cover the bathtub, washbasin, pipes, etc. with film. When installing the panels, the wooden frame, as well as the surface of the walls and ceiling, must be treated with antifungal agents. Old finishing material is removed from the walls. If the siding is installed on a frame, then there is no need to prepare them additionally.
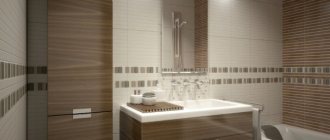
The following techniques will help to visually increase the area of a small bathroom and make its design beautiful and unusual:
- The main surface of the walls is finished with light-colored plastic, and darker colors are used in the corners.
- They focus on one of the walls - for this purpose it is decorated in a brighter color.
- Dark-colored panels are installed in places where mirrors and other accessories are installed.
- Light-colored siding is used to decorate a small bathroom.
Using an adhesive composition
If the walls in the bathroom are almost flat, then it is easier to install the siding using glue. The surface is first cleaned of dust, then sanded to ensure good adhesion of the materials, and primed. This solution allows for quick installation and does not take up free space, making it suitable for small spaces.
Frame method
If there are irregularities on the walls, it is better to choose installation on a frame. Although installing the sheathing requires additional time, effort and money, it does not require leveling the walls, which compensates for these inconveniences. Installation is carried out on both wooden and metal sheathing.
The disadvantage of this method is that the size of the room is slightly reduced, but if the bathroom has sufficient area, then it can be ignored.
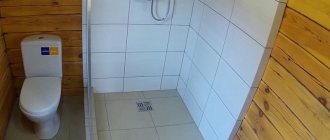
Finishing the walls and floors in the bathroom with PVC tiles
Laying PVC tiles on the floor in the bathroom
As an inexpensive alternative to tiles, you can use PVC tiles. This material can be used to create wall and floor coverings.
In the latter case, you should choose stronger and thicker tiles, since the floor covering is subject to heavy loads.
PVC tiles are attached with glue. Installation usually begins from the center of the floor or wall.
First, four tiles are glued, with their corners meeting at the center of the wall, and then they continue laying to the sides.
During work, you should constantly check the direction of laying using a level.
Conclusions:
Plastic is an inexpensive and practical finishing material for the bathroom. If you want to learn how to work with panels or tiles, you should clearly see how to decorate a bathroom - videos on this topic can be found on thematic resources.
Selection of plastic panels
An important stage of the work is the purchase of materials.
To purchase high-quality panels, you need to pay attention to the following points:
- The more stiffening ribs there are in the siding, the stronger and more reliable it is.
- You cannot buy material if the locks or lintels on it are deformed.
- The coloring should be evenly applied to the entire surface, the design should be clear and unblurred.
- The image when joining the panels should turn out beautiful, undisplaced.
- There should be no bubbles, cracks or other defects over the entire surface of the plastic.
- Locks must provide a reliable and durable connection (gaps are not allowed).
- The dimensions of the panels must strictly correspond to the parameters declared by the manufacturer, otherwise there will be problems during their installation.
Be sure to request a quality certificate to ensure that the siding you purchase is intended for interior use and is safe for humans.
Plastic panels for the bathroom.
What is siding?
This foreign word refers to finishing made from simple plastic panels. Siding is a non-flammable material that is based on PVC and is widely used for cladding various surfaces. It first appeared two centuries ago, in North America, when boards nailed at an angle began to be used as external protection for a house from various weather influences. Then variations of design appeared, intended for a variety of purposes: vinyl siding, metal, cement and plinth panels. Over time, this type of finishing has moved inside the house and is now widely used as surface cladding in rooms with high humidity, especially in bathrooms. At the moment, the quality of siding is in many ways not inferior to tiles, and in some ways even superior to it.
Siding does not spoil the interior of the bathroom at all, but only decorates it!
Instructions for tiling a bathroom
Installation of PVC panels is not difficult, so you can do this work yourself. If you decide to cover the entire room with siding, you should first install it on the ceiling, and then move on to finishing the walls.
Installing siding with glue
It is necessary to prepare the following materials and tools:
- antiseptic primer;
- roller and tray;
- glue;
- hacksaw and construction knife;
- tape measure and pencil;
- building level.
After cleaning the walls from the old coating, they must be properly leveled, wait until the putty dries, and cover them with a primer. On the ceiling, siding is most often mounted on a frame to hide the communications there (cable, pipes, etc.).
Work on gluing the panels begins with the installation of starting profiles (do this in the corners of the bathroom). The verticality of their installation is controlled using a level or plumb line. You can do the work without starting rails, then the joints should be closed using decorative corners.
They mark and trim the panels, which are mounted vertically, so they are cut to height.
One of the finishing options.
Further work is performed in this order:
- evenly coat the first panel with glue;
- insert it into the starting element and press it against the wall over the entire surface;
- smear the next panel with glue, insert its groove into the tenon of the previous one and press it against the wall;
- the last element is cut to width from the groove side and, slightly bent, inserted into the opposite starting profile;
- The joints with the bathroom are taped with a special tape or a border is installed, and a plinth is installed.
It is necessary to remove the protective film from the panels only after installation is complete, otherwise they may be damaged.
Frame installation
This method allows you to hide all the irregularities on the wall and does not require additional preparation.
You will need the following materials and tools:
- metal profiles, brackets, etc.;
- wooden blocks (they must fit into the metal profile);
- primer;
- metal scissors;
- hacksaw;
- tape measure and pencil;
- screwdriver
Creating a frame is similar to what is prepared for drywall (only the profile is installed horizontally), and consists of the following steps:
- Guide profiles are installed in the corners.
- Places for mounting horizontal elements are marked on the walls and brackets are attached.
- The profile is inserted into the guide elements and fixed using brackets.
- In places where shelves or other furniture are installed, the profiles are reinforced with wooden blocks.
- Mark the panels and cut them to size.
- The profiles are mounted in the same way as in the previous case, only instead of glue to the frame they are fixed with self-tapping screws.
The popularity of siding when covering bathroom walls is explained by the fact that its installation is much easier and faster than ceramic tiles. If everything is done correctly, the result is a smooth, beautiful and practical surface.
Frame mounting
The second common option for installing siding panels is to mount them on the sheathing. That is, the frame is first mounted on the main surface, and then the panels are mounted on it. This method is often used for the bathroom, especially if the walls are uneven. Making a screed is quite an expensive undertaking, and the more uneven the surface, the more building material is needed for leveling.
Installation of PVC wall panels on a frame
And the lathing allows you to avoid leveling the walls and save a lot of money. Unlike installing drywall, siding can be attached to any wall, since it is lightweight and does not require additional reinforcement. The frame can be of two types - wooden or made of metal profile. There are also special plastic profiles for sale for installing lining.
If you decide to make the sheathing from wood, you must first treat it with antiseptics so that it does not mold or rot in conditions of high humidity. Wood is a natural material, so it is susceptible to mold and mildew.
Frame preparation
The frame is used only in case of uneven surfaces. Before installing the sheathing, the walls are treated with impregnations or other antiseptic compounds.
The frame is mounted perpendicular to the laying of the panels. That is, if the siding is laid vertically, then the profiles are laid horizontally and vice versa. Corners are installed along all openings in the room, into which the grille is then mounted.
Preparing for work
Before you begin installing a siding ceiling with your own hands, the room must be cleared of all furniture, lighting fixtures and curtain rods must be dismantled.
Old facing material is removed from the ceiling surface. If there are areas on the ceiling that are affected by mold, mildew or rust, they can be removed using special means.
Then all cracks and cracks are filled with cement mortar. There is no need to carefully level the surface - the panels will hide all flaws and irregularities. The prepared surface is treated with acrylic primer.
Suspended ceilings made of siding are installed on a frame, so the next step is drawing up a plan and marking.
Planning and marking
To quickly and correctly assemble the frame and mount the panels for installing the siding ceiling in the bathroom, you need to draw a diagram.
- Measure the length of all walls, the size of the corners, and enter all the data on the plan.
- Measure the distance between the ceiling and the level at which the siding is planned to be placed.
- Draw your plan, taking into account the pitch of the ceiling profile (80 cm) and the step of fastening the guides (30 cm).
Using a level, the lowest corner of the ceiling will be taken as the starting point. Retreat at least 5 cm from the main ceiling and place a mark on the wall. A horizontal line is drawn from this point along the entire perimeter of the room - the basis of the future frame. The distance may be more than 5 cm, especially if insulation or installation of spotlights is planned.
How to make a ceiling from siding
Many people wonder how to make a ceiling from siding? Well, this is quite relevant in the modern world of advanced building materials. Let's try to lift the veil of this technological process.
Anyone who is interested in covering the ceiling with their own hands using siding should know the procedure for installing the ceiling, which consists of the following operations:
The beginning of the finishing work consists of preparing the frame on which the siding will be attached. The location of this frame relative to the base ceiling should be at a distance. This distance is selected depending on the type of lighting devices you choose, located on the ceiling, and other factors. It should be mentioned here that the minimum distance from the base ceiling to the cladding should be no less than 6 cm.
Having determined this indicator, you should use a tape measure and a marker to apply the corresponding mark on the walls. And taking this mark as a basis, using a building level, you need to apply markings along the entire perimeter of the room, which indicate the places where the wooden blocks under the sheathing will be attached.
If the walls of the building are made of concrete, you will have to make holes in them using a hammer drill, into which dowel nails will be inserted to secure the wooden blocks.
The next stage is attaching the starting profile to the beams using self-tapping screws or small nails. If you do not want to use this type of fastener, you can use a construction stapler, which uses special staples for fastening.
The starting profile should be secured as accurately as possible, since otherwise the siding joints may be unreliable and the false ceiling will look unsightly.
If the ceiling being installed has modern lamps, then power supply must be supplied at the points where they will be installed. In the ceiling siding panels themselves, you will need to drill holes that match the size of the recessed lights.
Before you begin covering the ceiling with siding, you need to accurately measure the siding panel and cut off exactly as much as required. And only then can the ends of the panel be inserted into the starting profiles. Each subsequent sheet of ceiling siding is installed in the same way.
It should be remembered that the last panel must be adjusted just enough to completely cover the missing ceiling space.