Leaking water from the tank into the toilet can become a big problem because the flow of cold water increases greatly. This also leads to the appearance of limescale in the drain bowl. The drain tank has a simple design and repairing it will not be difficult, even for inexperienced users. Most of the materials installed inside are made of plastic, which greatly reduces their service life and leads to constant breakdowns. But how to fix a toilet in a short time if water is leaking?
Water flows in the toilet after filling the tank
The design of toilet flush tanks is based on the principle of filling the vessel with tap water until the water supply valve is activated, which blocks its flow into the tank.
One of the safety devices in this system is the overflow mechanism: when the tank is filled, if the shut-off valve does not operate and water continues to flow into the cavity, the excess volume of water flows by gravity into the toilet. The situation when, for some reason, the inlet valve does not close is not the most critical, unless you take into account that even with the toilet not working, water consumption increases to an average of 100 liters per day.
The reasons for water overflow can be:
Incorrect adjustment of the float mechanism of the flush tank
Overflow due to improper adjustment of the float mechanism is the most common problem in flush tanks. The float chamber, pushed by the volume of water through a metal rod or plastic guide, presses on the valve and thus stops the flow of liquid into the tank. If the metal guide is bent or the adjustment screw on the plastic guide is loosened, the float chamber moves and the supply valve simply does not shut off the supply.
The method to solve the problem is simple: remove the tank lid and adjust the position of the float relative to the upper water level. For most toilets, the float is adjusted so that the water level does not reach the overflow neck by 1-1.5 cm.
Float chamber malfunction
If the float is damaged, the supply valve simply does not close. A float filled with water does not float up and thus the supply valve is simply constantly in the open position.
The simplest repair method is to replace the float or drain the water from it and seal the leak.
Water supply valve diaphragm malfunction
For diaphragm water supply valves, the supply is closed by pressing the plastic rod onto the rubber membrane, while the supply hole on the reverse side is tightly blocked by the rubber. Over time, a groove forms on the rubber at the inlet hole, through which water first begins to simply seep through, and after a while it simply flows unhindered into the tank. The repair method is membrane replacement.
Drain mechanism malfunction
This problem begins to manifest itself gradually when the tank itself, after a certain time, begins to fill with water. In this case, it is necessary to disassemble the drain mechanism, clean it of deposits and change the rubber seals.
Poor water quality
The reason for the tank overflowing is often associated with poor-quality tap water - a large amount of iron oxide, lime or mechanical inclusions form a coating on the walls and mechanisms, which over time acts on the rubber seals as an abrasive, literally eating the surface. In this case, it is necessary to install a filter system and replace rubber gaskets, membranes and seals.
Malfunctions
Typically, all possible malfunctions with the toilet have the following symptoms:
- water constantly flows into the bowl;
- liquid continuously flows from the plumbing system into the tank;
- the toilet itself is leaking;
- flush button is broken;
- You need to press the button multiple times for the drain to occur or for the liquid to stop flowing into the tank.
To eliminate a breakdown, it is very important to determine its cause.
First option
An overfilled tank is a likely reason why water is constantly flowing. All “extra” water goes into the bowl through the overflow.
Let us highlight several reasons for this problem:
- valve crack (found only in plastic products);
- problems with the pin holding the float lever;
- low gasket pressure;
- its wear and tear.
By understanding the reasons, you can roughly figure out how to act.
How to solve:
- Remove the cover.
- Raise the float a little. The leak should stop. If this happens, you will only need to bend the lever slightly to ensure that the water supply is shut off.
- If that doesn't help, you'll have to inspect the valve. Instead of a broken pin, you can use a piece of copper wire. If the hole in which it is attached has become large, the entire valve will need to be replaced. To do this, you should take a sample of the old one with you to the store in order to find exactly the same one.
- If the gasket is worn out, you will still need to replace the entire valve, since they are not sold separately.
Second option
Let's consider the option in which water flows, and its level in the tank is less than overflow. A common cause is a broken bolt holding the toilet and shelf together. This problem was especially acute in older models that had a pair of steel bolts. Naturally, under the influence of water they quickly became unusable. In this case, they need to be replaced. Moreover, it is advisable to choose products from corrosion-resistant materials.
You can solve the problem by disassembling and reassembling the tank:
- turn off the cold water supply;
- remove the tank cover;
- we empty it;
- disconnect the flexible hose;
- unscrew the bolts securing the shelf to the toilet: if that doesn’t work, you can use a hacksaw;
- tilt the tank back to remove the shelf from the cuff;
- drain the remaining liquid and place the tank on a level surface.
After replacing the bolts with new ones, you should reassemble everything
At the same time, it is important to replace the rubber elements so as not to return to repairs in the near future
When tightening the bolts, you need to act carefully so as not to overdo it. The toilet material breaks quite easily.
Third option
What to do if the bolts are intact, there is a lot of space before the overflow, and the liquid is flowing. When there is water in the tank, it does not flow into the bowl while the rubber bulb is holding it. By pressing the button, the bulb rises and the liquid flows out. Over time, the material from which it is made loses its qualities, which means that there is every chance that the pear will begin to leak water.
It is necessary to change the pear. It is fixed to the rod using a thread. You can unscrew it by turning it counterclockwise. You need to go to the store with a sample of the old product to find an identical one.
A temporary solution may be to place some kind of weight on the rod to press down on the rubber, preventing the liquid from constantly leaking out.
Water flows into the toilet after flushing
The problem associated with water leakage after flushing occurs both in old-style systems with cast-iron wall-mounted tanks and in new “compact” systems. The reason for this phenomenon is the improper operation of the flushing mechanism.
When you press a key or button, water is discharged and the drain hole opens as wide as possible. At this time, the locking and adjusting mechanisms are in a suspended state - when the button is pressed, the valve or weight with the gasket cannot lower, but as soon as the button is released, the mechanism returns to the lowest position and closes the drain neck.
A sudden release of the button causes the locking mechanism to move along the guides under the influence of the water flow. At the same time, the deterioration of plastic parts becomes more and more visible, this leads to distortions and “freezing” of the mechanism itself. The result of such a defect is the following: the drain neck is skewed and incompletely closed; the water entering the tank is simply immediately drained into the toilet.
The method of troubleshooting is to completely replace the drain mechanism and then adjust its operation:
One of the additional causes of the problem may be increased water hardness and the natural aging processes of plastic.
Frequent problems due to which water constantly leaks from the drain tank
Faults that cause water to leak:
- Water flows non-stop from the water supply pipe.
- Water flows in a small stream into the drain bowl.
- Draining from the tank occurs only after much torment with a lever or button.
- The lever or button does not respond at all.
- Leaks and puddles form near the toilet.
- The tank is filling with an unusual loud noise.
How to change the cartridge in the mixer?
Which bathtub is better - acrylic or cast iron?How to clear a clog in the sink?
The tank is leaking where the bolts are attached
Installation of compact type toilets is carried out using a bolted connection between the tank and the toilet. In this case, the most common bolts are made of metal with a zinc coating to protect against corrosion. Rubber gaskets and universal silicone sealant are used as sealing. In more expensive models, the bolts may be made of brass or bronze, but in most cases it is galvanized metal, which is still susceptible to corrosion.
Leakage at bolted joints begins with a small amount of water seeping in, and gradually the leakage will increase. The following can be suggested as preventive measures:
- Shut off the water supply.
- Drain the water from the tank.
- Carefully loosen the thread.
- Remove the bolts.
- Remove rubber gaskets.
- Clean the surface of the rubber gaskets from silicone and dry them.
- Clean the ceramic surfaces where the bolts are installed.
- Apply a layer of silicone sealant and install rubber seals.
- Again treat the seat of the bolted connection with silicone, install the bolts, add 2-3 metal washers from below and tighten the connection with a nut.
If the leak cannot be stopped, the entire fastening system must be replaced, from bolts to rubber seals. In this case, there is no point in trivializing; everything needs to be changed.
Installing fittings
A new mechanism for the flush tank is selected in advance. This takes into account:
- height and volume of the tank;
- location of the water supply hole;
- location of the hole for the button or lever.
Fitting kit for installation Source moskva.meduzza.ru
Place the housing of the drain mechanism into a clean tank lying on a flat surface, having first unscrewed the lower mounting nut from it and installed an elastic sealing ring on the pipe. A plastic nut is screwed onto the thread of the stand from the outside of the tank. Screw it in with your fingers until it stops, then tighten it slightly with a wrench. Do not overtighten the fasteners - the plastic may burst.
A new sealing ring is placed on the toilet bowl shelf - it should be located around the drain hole. The surface of the shelf is first cleaned of dirt and wiped dry.
New bolts with elastic gaskets are inserted into the mounting holes inside the container to ensure the tightness of the connections. The drain tank is placed in place without leveling yet. It is necessary to insert the bolts into the mounting holes of the toilet shelf and screw the nuts on them.
The next step is to level the tank and tighten the nuts with a wrench. It is important to tighten the fasteners gradually and alternately, sometimes right, sometimes left, to avoid skewing the tank.
Installing and fixing the tank Source fb.ru
Next, install the side or bottom supply valve of the drain tank, having first put the o-ring on the pipe. The mechanism is also secured with a nut located on the outside of the tank. A flexible water supply line is connected to the inlet valve; the threaded connection is sealed with fum tape.
Before connecting the flexible line, it is advisable to briefly open the water supply to remove rust particles and other debris from the pipe that got there during dismantling.
After connecting the flexible line, turn on the water to check the tightness of all connections. If necessary, fasteners are tightened with a wrench. Then they check the operation of the mechanisms and adjust the fittings so that the system functions properly.
Before installing the cover, the mechanisms are checked and adjusted Source calgary.isgreen.ca
At the final stage, the lid is installed and the button is put in place - just screw the ring around it with your fingers. After final testing, the tank is completely ready for use.
Leak between the toilet and the cistern mounting
At the junction of the toilet tank itself, a leak can be the result of several defects:
- incorrect installation of the tank on the toilet;
- failure of the rubber seal;
- defect of the tank and (or) toilet.
A leak at the installation site due to a violation of the installation technology may occur due to:
- improper installation of the rubber gasket;
- the fit between the tank and the toilet is not tight enough;
- aging rubber seal.
Installation of compact type toilets with a flush cistern attached to the toilet is done by installing a rubber gasket between the toilet and the cistern. The gasket is pressed tightly with bolts. A distortion made during installation will certainly lead to a violation of the tightness of the gasket and the beginning of water leakage when the tank is full.
In models where there is a ceramic cistern pipe that fits into the toilet opening, leakage due to a leaky gasket is unlikely. Most likely, the appearance of water here is due to a crack in the body of the pipe or tank. For some time, you can seal the crack with silicone or silicate (office) glue. But this is only a temporary measure for 2-3 months; in the future, the operation will have to be repeated more and more often. Therefore, it is recommended to immediately start looking for a new tank or completely replace the entire set.
Main causes of leakage
Since all the holes in the tank are equipped with seals, the first “suspicion” falls on them.
Seals are present on the fastening of the container to the toilet (in the “compact” system) and on the flush mechanism. If the tightness of the fastening holes is broken, water penetrates in a very thin stream, drops, and this happens constantly. Replacing the fasteners or, in some cases, the presence of other operating defects - the entire tank.
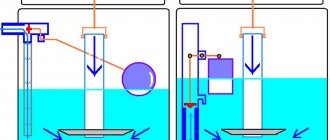
If the toilet tank is leaking water into the toilet, this may be due to a faulty flush mechanism or a broken seal. In the first case, after flushing, the water stops flowing until the tank is full, after which it continues to flow into the toilet. The flow is less strong than at the time of flushing, but quite active. In the second, water seeps in constantly, the activity depends on how badly the seal is damaged.
The diagram shown in the illustration above shows a modern toilet cistern controlled by a push-button flush mechanism. A special membrane is used as a drain valve. This part cannot be repaired; disassembling the siphon with membrane is not recommended. The easiest way to solve the problem is to completely replace the siphon with one of the appropriate size.
Repairing a toilet cistern with a constant leak due to a gasket that has lost elasticity or integrity involves replacing the gasket. But, depending on the model, it may be necessary to completely change the “filling” of the container, since the parts are offered in a non-separable version.
Additional leak options
The question of how to fix a leak in a toilet may concern a leak in the water hose that connects the tank to cold water. There are two main types of problems here: a violation of the integrity of the hose (the internal rubber part in a metal braid) and the nut securing the hose to the container. The hose bursts at the point of greatest bend, after prolonged use, at elevated temperatures and low external humidity in the toilet. The nut may be initially of poor quality, the thread may break during installation, or there may be a crack in the metal. The hose and nut must only be replaced.
The tank leaks from the sides or from the bottom to the floor
Quite often, a tank leak is confused with the presence of condensation on its surface. Filling a container with cold water in a room at normal room temperature automatically causes dew drops to appear on the outer walls. It’s another matter when marks characteristic of a constant flow are visible on the sides. Rusty or calcareous marks left after water flow indicate a defect in the internal mechanism or cracks in the ceramic bowl itself.
Problems associated with the presence of traces of leaks can be classified as follows:
- presence of traces of water jets from technological holes;
- traces starting below the holes, appearing in places of microcracks;
- presence of traces at the bottom of the tank.
In the first case, when water simply overflows through the technological holes, the cause of the defect may be a malfunction of the overflow mechanism or the absence of a special hose attached to the filler pipe.
If the mechanism malfunctions, water overflows and finds a place to exit through the mounting holes. Solving the problem is quite simple - adjust the mechanism, check the drain neck and install plugs on the unused hole for connecting the hose.
A fallen tube on the inlet pipe of the valve is not a critical malfunction; simply, under the pressure of water, a large amount of splashes with an unpredictable trajectory is formed in a confined space, as a result of which a certain amount of water simply splashes out. Flaw correction method:
- Shut off the water supply.
- Remove the cover.
- Place the fallen pipe onto the pipe and secure it with a clamp.
If the ceramic or plastic bowl of the tank is mechanically damaged, a leak may occur on the walls at the fracture site. It is useless to repair visible cracks that threaten the integrity of the structure; the constant process of filling and draining water systematically affects the walls and breaks the seam, no matter how strong it may be. In this case, you just need to replace the tank.
If no visible cracks are visible, but water seepage still occurs, it is recommended:
- Shut off the water supply.
- Drain the water from the tank.
- Mark places where water leaks.
- Dry the tank outside and inside.
- Using silicone sealant or silicate glue, treat microcracks inside and outside the walls.
- After finishing the treatment, fill the tank with water.
Filling microcracks with sealing compounds will ensure sealing of the walls for a fairly long period, but this is provided that the walls are not subject to mechanical stress that can turn microcracks into real faults.
Tanks with bottom hose connections most often leak at the hose connection. The defect can be eliminated by tightening the hose nut on the fitting or removing the hose and reinstalling it using fum tape or tow.
Signs of water leakage
The following phenomena indicate that the toilet is leaking in the cistern area:
- the constant sound of falling drops or a stream;
- lime deposits or rust stains on the back wall;
- wet inner surface of the lower bowl, even if the plumbing has not been used for a long time;
- the appearance of condensation on the supply hoses and the outer sides of the earthenware appliance;
- weak and too long drainage of water instead of a volley drain.
The first sign of a problem may be unsuccessful flushing.
If the water pressure is too low to allow waste to pass through the water seal, the shut-off valve will not close the hole in the tank reliably enough.
Leaking toilet cistern with button
Models equipped with a button, in addition to all the listed diseases, may have another problem unique to them - the development of the mechanism and the weakening of the release spring.
The appearance of this defect is associated with the mechanism of operation of the drainage system - when you press the button, the drainage process begins, the button is restored to its original position after the mechanism has completely drained the water and released the spring.
Solving the leakage problem in this case is quite simple:
- Shut off the water supply.
- Remove the cover.
- Adjust the mechanism and slightly stretch the spring.
- After this, check the functionality of the mechanism and, if necessary, make adjustments again.
We adjust the water level
Manufacturers of drain fittings supply devices that are, by default, configured for the maximum volume of water in the container. Often this level is excessive. The filling capacity of the tank can be reduced by adjusting the mechanism.
If water is supplied from the side using a float valve, it is enough to change the position of the float. To do this, change the bend of the lever. The adjustment principle is simple, but to achieve the desired result you have to bend the lever several times, using trial and error. If the float is held on a rigid metal rod, it will require serious physical effort to bend the lever even slightly. In newer models, the lever is made of plastic - to adjust the level of water intake, the float is moved along the rod.
What should I do to prevent the tank from leaking?
There are few recommendations in this case. First of all, you need to install the toilet correctly and be sure to secure it with mounting screws. A skewed toilet or a toilet with play will itself cause leaks in connections and gaskets.
The second point is related to the need to use modern means of cleaning the tank. Chemical agents allow you to remove lime and rust deposits, which means the mechanism will work longer.
The third thing worth remembering is the need to promptly replace them at the first signs of destruction of rubber gaskets.
A leaking toilet tank is a common problem that has many causes. Finding out why the breakdown occurred and then trying to fix it is the correct sequence of actions.
Preventive measures
To prevent a situation where a toilet tank leaks with or without a button, you should regularly carry out certain preventive procedures, as well as follow the operating rules.
Prevention may include the following:
- minimize the likelihood of mechanical deformation of the toilet;
- minimize sudden temperature changes;
- clean the toilet bowl and cistern every six months;
- regularly check the condition of plumbing components, fittings and other parts so that they cannot leak;
- avoid condensation.
Thus, if the plumbing is leaking, you can simply carry out the repair yourself, without turning to a master plumber. First of all, you need to determine what is the reason that the tank is leaking.
It is important to remember that timely preventive procedures will increase the service life of plumbing and sewerage systems in general. If a malfunction is detected, it is recommended to fix minor problems first and then proceed to major damage.
Preparation for repair
Before starting work, you need to prepare tools and purchase new parts that require replacement.
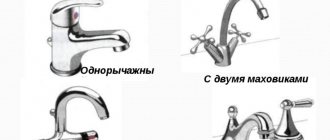
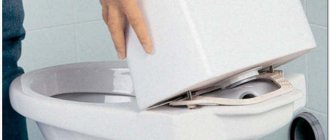
The next stage of preparation is removing the tank cap. There are two popular design options:
- with one button;
- with two buttons.
The dismantling process is different in each option. To open the lid, equipped with one button, you need to turn the ring counterclockwise. It is better to use a screwdriver for this. After removing the ring, you need to move the cover to the side and remove the clothespin. As a result, you can completely remove the cover and begin repairs.
Opening a design with two buttons occurs differently. First you need to press one button and find the hole located on the side of the second button. Use a screwdriver to carefully remove the second button. After this, begin to unscrew the slotted screw. The process then continues as in the first case.
Required Tools
Some parts of the drain mechanism are quite fragile, so you should carefully carry out all dismantling work, without using excessive force.
To replace the internal fittings of the drain tank, you will need the following tools:
- pliers;
- adjustable wrench or wrench.
Damage not related to fittings
It is important to know how to repair the cistern or the toilet itself if cracks appear in the body. Leaking water can cause a flood, so if a problem is discovered, you should act immediately. Ceramic glue will help seal the crack, but the plumbing will have to be replaced in the near future.
A leak may also occur if:
- The nuts on the bolts that secure the tank to the toilet have come loose. The fasteners must be carefully tightened with a wrench. If the seals need to be replaced, the tank will have to be removed and reinstalled.
- The connecting cuff between the tank and the toilet shelf is deformed or damaged . It must be replaced, but as a temporary measure, the resulting gaps can be sealed with silicone sealant.
Video description
This video clearly shows how to set up the filling mechanism.
Let's look at how to adjust a flush tank with a button and a lower inlet valve. First of all, you will need to turn off the water supply, drain the contents of the container, remove the button and remove the tank lid. An adjusting screw is provided on the float mechanism. It is twisted to lower the float down and reduce the filling of the tank. Having set the screw to the optimal position, you can close the lid, install the button and turn on the water supply.