(1 votes, average: 4,00 out of 5)
You are the happy owner of a shower cabin. But do you want to save money on installation or do you think “I’m not a man, I can’t do it myself?” In principle, you can assemble a shower stall yourself. In order to install a shower cabin with your own hands, you need to know the structure of the shower cabin.
A shower cabin consists of a shower tray, shower walls, a top cover (if it is a closed shower cabin) and, in fact, a shower panel - a shower head and additional nozzles (if the cabin is multifunctional).
Shower cabin.
Shower cabins are:
- open;
- closed.
An open shower cabin consists of a shower tray, a shower head and doors. The side walls are tiled bathroom walls.
Such shower cabins are installed in the corner of the bathroom, which is why they are called shower corners.
Shower corner
Choosing a design to manufacture on your own
If you decide to make the cabin yourself, in this case you will have to give up the majority of the parts that have mobility. They are difficult to make on your own.
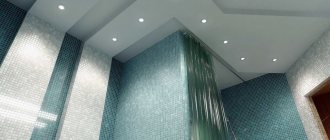
It is better to make a stationary shower room on your own - an area separated by partitions where the shower is installed.
To make work easier, the cabin is installed in the corner of the room, which allows you to save free space.
In order to construct the structure, you will need to make a fence and install a door. For work, it is better to use waterproof plasterboard.
A shower cabin made independently using high-quality materials will last a long time, unlike products made from plastic.
However, there is also a disadvantage of a homemade cabin, which is its simplicity. Unfortunately, it is very difficult to perform many of the functions of modern factory cabins, and also to dismantle a homemade device.
Shower without cabin: design features
A shower without a shower stall is a very popular solution among modern designers. On the one hand, it is very beautiful, fashionable and modern, the bathroom seems more spacious and free, nothing restricts movement during water procedures. But there is another side to the coin. In practice, such a solution is not always profitable and convenient. Water will splash all over the bathroom. It’s good if the dimensions allow you to install an open shower away from communications, a washing machine, and shelves with cosmetics and towels. Otherwise, things will not have time to dry. As an option, you can protect the shower with tempered glass, but then it will become like the same shower stall, which it was decided to abandon in favor of space and a wet floor.
Advice. In a bathroom with an open shower, it is recommended to install heated floors.
Functionality and dimensions
Before you start making a cabin, you need to decide what functions it will perform.
An important point is to determine its size. In a homemade cabin, you can not only take a shower, but also use its tray for soaking large, dense items.
Note!
Do-it-yourself vegetable garden: new interesting garden crafts for the street at your summer cottage (photo/video review)
DIY ceiling installation: step-by-step description of how to make a ceiling. Review of modern structures and ideas for their design (105 photos)
Do-it-yourself garage doors - a detailed description of the construction of various types of garage doors (120 photos)
Before studying information on how to make a shower cabin at home with your own hands, you need to carefully measure the free area, determine the location for fixing the shower and faucet, and also secure the door correctly.
A cabin made by yourself may differ from standard sizes. It all depends on the wishes of the home owner. One way or another, there is no need to make a shower smaller than 100 x 100 cm.
The height of the structure can be similar to the height of the room. In this case, a ventilation system will be needed.
With or without pallet
An additional point that should be emphasized is the presence or absence of a pallet. The pallet acts as the floor surface in the cabin.
Naturally, a floor is necessary in the shower, but it can be replaced with a steel bathtub, which can be purchased separately.
Note!
Insulate the foundation with your own hands - a step-by-step description of the use of the best materials and technologies (90 photos)
Laying laminate flooring with your own hands: a detailed description of how to lay laminate flooring. Laminate calculation, step-by-step description and installation secrets (105 photos and videos)
Do-it-yourself chimney - a detailed description of how and what to build an effective chimney from (110 photos)
The use of a pallet makes work much easier in terms of repair and maintenance of the washing area. However, when making a shower without a tray with your own hands, you don’t have to limit its shape and size.
It is easy to make a tile cabin with a drain in the floor surface. In this case, the shower will be installed at the same level with the general floor surface. This option will be relevant in the current interior.
But, you should understand that difficulties may arise during drain repair work.
Open shower location options
Open showers are usually built in a corner, less often along one wall. The most successful option in practical terms: arranging a shower in a niche or erecting a screen that would allow the open “cabin” to be enclosed with walls on three sides.
Despite the fact that the shower itself is located without a cabin, it would be a very good idea to fence it off with something
A shower without a cubicle can be installed on the wall opposite the entrance in long, narrow bathrooms. One of the latest design installations is to install a shower in the center of the room. To do this, erect a narrow wall on which a mixer and a watering can are mounted, or a tropical shower is installed directly from the ceiling. The latter option is only suitable for very spacious rooms.
Finally, the shower can be a room within a room. The bathroom is divided into two parts, one of which will be a kind of shower room. The floor in this area is usually made lower. A stationary or decorative partition is erected between the bathtub and the shower room, which rises from floor to ceiling, but does not reach the outer walls to the width of a convenient passage. There are many photos of open showers published on the Internet, which you can take as a basis or bring your own bold ideas to life.
Advice. A shower without a cabin is usually equipped without a tray. There is no point in installing a tray in an open shower, from which the water will flow far beyond the “acrylic bath” under your feet.
Stages of making a homemade cabin
Having assessed all the points regarding how to make a shower room with your own hands in an apartment, you can get to work.
It is best to build the cabin on a pallet with a plasterboard partition and stick tiles on the walls.
Note!
Do-it-yourself dressing room: arrangement ideas, drawings, diagrams, projects and dressing room design options (125 photos)
Installing a window sill with your own hands - detailed instructions and step-by-step video description of how to install a window sill (85 photos)
Do-it-yourself brick stove - secrets of simple and practical masonry, construction schemes and a review of the best stoves (95 photos + video)
It is recommended to make the door a swing type from plexiglass. This easy option requires a preliminary sketch of a drawing with all the necessary dimensions. A simple sketch will make the job much easier and prevent mistakes.
Providing power to the shower cabin
Connecting to the power grid is an important and responsible stage, since it is associated with the safety of people’s lives. All rules for working with electricity must be followed.
- The cabin is connected with a copper cable with three cores, with a cross-section of at least 2 mm2.
- This is a cable laid from the central panel only to power the shower structure.
- If the model is powerful and consumes 5 kW/h of electrical energy, then a separate 25 A circuit breaker is installed on the panel.
To carry out work with connecting electricity, it is better to invite an electrician.
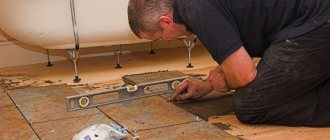
Making a pallet
Work should begin from the bottom of the cabin - the pallet. If you use a ready-made base, this will reduce installation complexity and time.
When making a pallet yourself, you must take care in advance to protect the room from moisture. To do this you will need to use roll waterproofing.
It all depends on what material the floor is made of. The treated surface should not allow moisture to pass through. The same applies to the bottom of the walls.
Next, the concrete is poured. In this case, the surface should be inclined in the direction of the drain by 2–3 cm per meter. Before pouring begins, drainage pipes are laid and a drain ladder is fixed.
Checking the correct installation
The work of installing and connecting the model is behind us. Before launching, a control check of connections is carried out for leaks, and fastenings are checked for strength. To make sure that the pallet is installed correctly, it is recommended to stomp on it. From such actions, the lower part of the structure should not wobble or creak.
When the inspection is completed, the water supply taps are opened. The liquid continues to flow for 15 minutes, and the joints are inspected for leaks. Even a small appearance of water on the floor should alert you. The leakage problem is dealt with even before the full launch.
If you carry out all the steps sequentially, the installation of plumbing will not take a long period of time, without spending a lot of money.
Drainage installation
How to make a drainage system in a shower stall with your own hands? This job has high demands. The pipe connections must be strong, and it is better to drain the water with a small number of bends.
Thanks to the ready-made pallet, you can easily reach the drain and carry out repair work in case of an emergency. Even so, it is important to install a system with a small number of joints.
Connection to the water supply system
Simply assembling a shower stall is not enough. An important step will be connecting to the water supply:
- connection begins with the selection of materials (hoses, metal-plastic pipes, fittings, taps);
- the water supply in the bathroom stops;
- the cabin taps through which liquid will be supplied are connected;
- pipes are run from the taps to the structure;
- the common water supply riser opens;
- Connections are checked for leaks.
For proper operation of the hydromassage, it is recommended to install coarse water filters at the inlet of the water supply system. Purified water will not clog the nozzles with debris and will extend the life of the hydromassage.
In apartments with low water supply pressure, an additional pump and liquid reservoir are installed. This will ensure correct operation of the hydromassage.
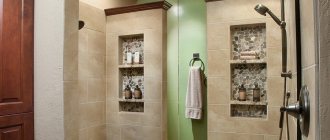
Wall decoration
For ease of installation, the booth is placed in the corner of the room. The surface of the walls in the shower room must be protected from moisture and tiled.
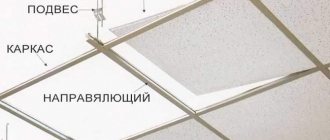
The role of the front wall will be played by the door, so you will need to make a single partition. You can do it as follows: build a blank wall reaching the height of the booth.
Initially, a frame structure is made from profile metal. A waterproof sheet is used for its lining. Afterwards the surface must be covered with putty. The completed wall should be tiled.
Drainage: choosing a drain and determining the installation method
The main and most difficult task is to waterproof and ensure good water drainage when the floor itself is a tray.
Attention! In apartment buildings, such showers are rarely installed. To install the ladder you have to raise the floor very much.
A drain for a shower without a cabin is a complex plumbing device that is recessed into the floor; only the decorative drain grate is visible from the outside. Depending on the method of connection to the sewer system, there are:
- Horizontal (with lateral supply);
- Vertical (characterized by high throughput, used in private houses and cottages, where installation with an outlet under the floor is possible);
- Wall-mounted (mounted into the wall surface, thereby ensuring a large outflow of water).
The throughput of the ladder must correspond to the pressure or minimum reading of 1.5 l/sec. Determine the location of the drain: in the center, on the edge, in the corner, on the wall. The average height of the ladder is 15 cm.
Water supply
For a beautiful shower, it is better to hide the pipes in the wall. In the niche where the pipeline is laid, insulation should be laid to preserve heat. To prevent the formation of condensation, it is better to use plastic pipes.
Door installation
The final stage is installing the door. It is better to purchase a ready-made door, or make it yourself from sheet polycarbonate.
The door leaf is fixed on special hinges with fixation. You can get complete information by watching a video on how to make a shower with your own hands.
So, before taking on such work, you should assess your strengths as much as possible. Any of the oversights or shortcomings can lead to improper installation of plumbing and the manufacture of the shower cabin as a whole. As a result, comfort will be replaced by a lot of troubles.
In general, about the design of a shower stall
The cabin is a stationary or mobile structure, equipped with protective elements that prevent water from spilling in the bathroom. The equipment is connected to centralized water supply lines, the water temperature is adjusted using a manual or automatic mixer.
The base of the cabin has a rectangular or oval configuration; there are designs of complex geometric shapes.
Essential elements
The main parts of the structure include:
- Pallet made of natural or synthetic materials. The unit can be made of brick, followed by lining with tiles or other finishing material that can withstand exposure to water.
- Safety fence. The elements move along guides, and a magnetic lock is provided. Budget designs use soft curtains suspended on a synthetic rope.
- A mixer that supplies water at the required temperature. The liquid is sprayed through nozzles installed on the central panel; a standard watering can with a flexible hose is provided. There is an additional distribution tap that allows you to select operating modes and adjust the water pressure. Standard cabins have up to 6 operating algorithms.
- A drain hose connecting the hole in the pan with the pipe of the central sewer system.
Additional components
Additional equipment items include:
- Cabin cover, in which an additional tropical rain shower is installed and ventilation ducts are provided.
- Built-in radio or music player with a control panel located on the central panel.
- A telephony unit that allows you to receive or make calls while using the shower cabin. It connects to the telephone network by cable or wireless technology.
- LED lighting, which requires connecting the equipment to an alternating current network (the cabin uses a voltage reduced to 12 V).
- A pump designed to operate a hydraulic massage system. The pump is equipped with a distribution block that provides liquid supply in accordance with the selected program. Such equipment complicates the design of the shower cabin and is rarely used.
DIY shower photo
Please repost
0