If when decorating living rooms there are no questions with the choice of skirting boards (they are matched to the ceiling or floor), then when decorating a bath, everything is different. This is a room with high humidity and special hygiene requirements. In addition, in most cases the bathroom is tiled, which creates certain difficulties in selecting and installing the edging around the bathtub.
You will learn from this article which skirting board to choose for a given room, and how to install it correctly and reliably.
Reasons for the appearance of gaps and their size
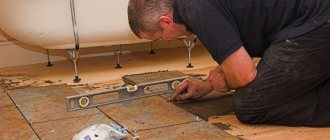
When the walls in the bathroom are uneven or the shape of the room has incorrect geometry, it happens that the bathtub does not match the size of the room. Even a slight tilt of the wall partition causes an opening to appear. Not only walls, uneven floors, mistakes or mistakes when laying tiles - because of all this, a gap can appear between the wall and the bathroom.
As a rule, the uneven surface is leveled, and then the opening is sealed. If the cause of the gap is an uneven floor or improper installation of the bathtub, then its height is adjusted using the legs, then the gap is eliminated. A serious violation occurs when the bathtub is replaced or installed on already laid tiles. This can also cause a hole to appear.
Let's see how big the gaps can be and how to close them.
| Up to 1 cm | Any method is suitable for grouting, but it is better not to use grout, as cracks may appear. The best option is a silicone-based sealant, applied with a gun and leveled. |
| From 1 to 3 cm | A common size of openings, its repair is relatively simple, just stick on a curb or plastic corner. |
| From 3 to 5 cm | For this size, a combined method using a plinth or corner is suitable. |
| From 5 cm and more | In this case, it is necessary to make a PVC shelf under the bathroom, which will block the visible space. |
When insulating gaps between the bathtub and the wall, it is important to read the instructions for use of the material. This guarantees the quality of work, the strength of the joint, and will prevent the appearance of cracks. To avoid openings when you are renovating a bathroom, follow some rules: first, finish the floor, install the container according to all the rules, then install the finishing tiles, starting from the bathtub and moving towards the ceiling.
Work should be carried out carefully and carefully
Features of installing bath skirting boards
Installation of the baseboard is carried out using a special sealant
The choice of sealant here needs to be given special attention. The fact is that if you take regular silicone, its service life may not be long enough
Now manufacturers have begun to produce formulations that, in order to save money, contain cheap and unreliable components. With regular contact with water, they are gradually washed out of the material and form pores in it, which contribute to the formation of fungus.
At the moment, the optimal sealant for a bathtub is a sealant based on MS Polymer.
The baseboard is attached to both the wall and the bathtub so that water does not have the opportunity to penetrate under it. However, if the bathtub is not fixed firmly enough and moves a little each time during use, then the baseboard is glued only to the wall. This ensures the integrity of the connection between the curb and the wall. If the baseboard glued to the tile is pressed well against the bathtub, then practically no water will leak under it, even when there is no sealant there. And a good connection to the wall is guaranteed to eliminate cases where the bathtub leaks between the walls.
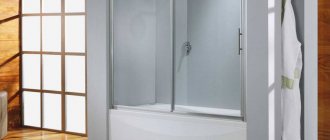
Borders come in various shapes and some models allow you to not only close the outer corner from water, but also fill the gap between the bathtub and the wall.
With its help, you can achieve additional fixation of the bathtub in its place. The bottom strip, previously treated with sealant on both sides, of the baseboard is inserted between the bathtub and the wall. This solution adds stability to the structure and serves as a kind of fixation, which is very convenient if the bathtub is located a short distance from the wall.
What happens if you don't seal the joint?
The bathroom is a special room, a special microclimate. High levels of humidity, increased evaporation, stuffiness, poor-quality repairs and waterproofing carried out with errors - all these are the reasons for the appearance of not only cracks and leaks, but also fungus, mold, harmful microorganisms, and a disgusting odor.
Do not delay in eliminating these phenomena, otherwise all this will lead to the destruction of the walls and have a detrimental effect on the well-being of the residents. If it happens that a gap appears near metal structures, they will rust. The main thing is to prevent serious leaks, otherwise you will not avoid problems with your neighbors.
If the joints are not sealed, fungus and an unpleasant odor may appear in the bathroom.
Self-adhesive border tape
This tape is sold in roll form and is positioned as a material for easy and quick DIY repairs. On the reverse side there are two adhesive strips covered with a protective film. Before gluing, this film is removed, and then one adhesive strip is aligned with the side of the bathtub and the other with the wall.
The process is indeed very simple and fast, but the result will be very short-lived. The tape does not adhere to wall unevenness and tile seams, which means it does not provide sufficient protection from moisture. The adhesive layer quickly breaks down and the tape comes off. The appearance of such material deteriorates even faster - it becomes gray, becomes moldy and cannot be washed.
Matching the sealing material to the style of the bathroom
Do not think that to eliminate the gap between the wall and the bathtub, you can take any material and cover the gap. Don’t do everything hastily, everything should be combined: high-quality material + ease of use + harmony with the interior. For styles such as hi-tech or minimalism, the latest, frequently used materials are suitable; a plastic border will look good.
If the renovation is done in an eco-style or an ordinary classic, you cannot do without stone or ceramics. A marble edge will suit the classic design. This element will add elegance and splendor. Eco-style is simpler, so limit yourself to regular white ceramics or simple grout. Those who are limited in finances can use plastic skirting boards and border tape.
The material for sealing joints must be chosen so that it does not differ in color and style of the room
Sealing a seam in a bathroom
When making repairs, you should not ignore such a stage of work as sealing the seam - this will save you from many problems and troubles. A product such as a sealant involves sealing gaps whose width is less than two centimeters. Sealants are divided into several types.
- Acrylic is an environmentally friendly, reliable product; it is easy to apply plaster or paint on it. Stronger than silicone, but inferior in flexibility. Doesn't lose its qualities for a long time. Use waterproof acrylic sealant.
- Silicone - ideally fills cracks evenly, very flexible in properties, protects against bacteria, moisture resistant, prevents destruction of the base. Use neutral (sanitary) silicone sealant, never acidic. The best option is Sikasil-C. It contains 100% silicone, without acetic acid and chemical additives.
- Polyurethane - it combines the properties of acrylic and silicone, guarantees high sealing, and has a long service life. A super universal product - SikaFlex®-11FC+, is used to seal various gaps - in concrete, between tiles, wall ceilings and bathtubs made of steel, cast iron, acrylic. Possesses flexibility and elasticity.
Sealing is a must. If this is not done, fungus may develop in the bathroom.
Advantages and disadvantages
Laying the silicone corner
Each flexible bathroom border that is on the market today, depending on the material of manufacture, has its own characteristics, but they all have common positive qualities, such as:
- moisture resistance;
- resistance to mechanical damage;
- resistance to temperature changes;
- low cost;
- elasticity;
- ease of use.
Next, we will consider the features of each type of material that you need to know and take into account when choosing and purchasing a border.
The silicone corner for the bathroom differs from its analogues in its very high flexibility and can be installed in places with frequent bends. This material is not afraid of deformation and can be used over a wide temperature range. A product made from this material is also called a rubber corner, since it is very similar in its physical qualities. However, this type of borders has shown poor tolerance to the effects of modern detergents, most of which have aggressive chemical compositions. Also, the rubber joint seal does not withstand the effects of cleaning agents containing abrasive materials.
For your information. When purchasing modern bathroom borders made of silicone, pay special attention to the shelf life of the product. Most of these models have a sticky surface on the inside for ease of installation, but the shelf life of the adhesive composition is usually no more than two years from the date of manufacture. If you buy an expired product, the tightness of the joint in this case is not guaranteed.
Corner made of durable acrylic with a latch
Acrylic bathtub borders are very popular, despite their higher cost compared to silicone counterparts. Products made from this material have various decorative options and a large palette of colors, which allows you to choose an acrylic corner for any style or color scheme of the room. Despite the wide range of options and high strength of the material, this type of borders still gives way to conventional plastic products. This is because acrylic borders are considered conditionally flexible and are not suitable for edging complex shapes, since they can burst if they bend too much.
Important. Acrylic products do not tolerate thermal expansion well and experts do not recommend using it to seal joints on steel or cast iron bathtubs due to the difference in expansion of materials when heating and cooling. It is also recommended to mount such a border using liquid glue with a silicone base, which remains elastic when hardened.
PVC corner cover
PVC borders for bathrooms rightfully occupy a leading place because they have good elasticity, low cost and a large set of decorative variations for any type of interior. These models have different designs that can be used in almost all cases. This corner can be made as a self-adhesive finishing border for the bathroom, which is laid on the finished lining, or as an internal option, which is mounted under the tiles at the initial stage of lining.
How to remove sealant from a bathtub? Cleaning and Removal Methods
Important. One of the disadvantages of this material is its short service life, on average 2-4 years, subject to high-quality installation. Also, white plastic begins to turn yellow over time, which slightly spoils the overall appearance of the room.
Sealing the joints between the bathtub and the tiles with mortar
This is an outdated method of sealing the joints between the wall and the plumbing. It's important to keep a few things in mind here. First of all, all the cracks are carefully cleaned. If the gap is of a decent size, it is clogged with a rag soaked in cement-concrete mortar. Then fill it with a solution of medium consistency and level it. Allow it to dry completely, then decorate it with a decorative border, you can simply paint it or stick on a plinth or tape.
Before sealing, the cracks should be thoroughly cleaned
Sealing the joint between the bathtub and the wall using polyurethane foam
A simple method is sealing with foam. The best choice is one-component polyurethane foam, which has excellent moisture resistance. The work requires great care, since it is very difficult to clean the product from surfaces and hands. Before applying foam, the gap is thoroughly cleaned, then degreased and dried. Afterwards, foam is poured into the gap and allowed to dry completely - about 40-45 minutes. The excess is cut off with a paint knife and then decorated. It is important to remember one property of polyurethane foam - when it dries, it increases significantly in volume.
When choosing foam you need to pay attention to moisture resistance
Sealing a seam in a bathroom with tape
If the opening is small, do not use any solutions or mixtures, but use tape as the easiest way to seal the cracks. This plastic is very strong and thin, with a highly adhesive layer on one side. The material is flexible and elastic, which allows you to seal corners with high quality. Ideal for tiled surfaces.
The gap is first cleaned, degreased, allowed to dry, then the protective paper is peeled off from the tape, and the adhesive layer is heated using a hair dryer. Next, the border is applied and immediately leveled, glued along the seam, pressed and smoothed onto the base. Using this method, you do all the work quickly, easily, and you don’t even need decorative finishing.
If the opening is small, you can use curb tape
Sealing in wooden bath rooms
For high-quality sealing with a wooden wall, you will need a product based on silicone and acrylic latexes. When using such a sealant, vapor permeability, resistance to moisture and elevated temperatures will be guaranteed. First of all, the surface must be cleaned, degreased, and foam insulation must be placed on the inside of the gap (to reduce the amount of material consumed). To make the seam even, limit its borders with masking tape and form a seam. Apply trim as desired.
Silicone or acrylic latex is suitable for sealing wood.
Sealing with silicone mastics (sealants)
The use of this method of sealing seams can be recommended in cases where the width of the gap between the wall and the side of the bathtub does not exceed 1.5 cm.
Recommendations for choosing material
- To seal seams in the bathroom, you need to purchase silicone or silicone-acrylic moisture-resistant sealant.
- The sealant is most often packaged in tubes, so to use the material you will need to use a mounting gun. If such a tool is not available, you can purchase sealant in a tube, however, in this case, the sealing will be of less quality.
Advice! If it is necessary to seal the seams around the perimeter of an acrylic bathtub, then you should choose a sealant that is approved for use with polymer surfaces.
How does the work happen?
- The surfaces need to be cleaned very well.
- The joint between the side and the wall is wiped with solvent or alcohol to degrease the surface. Allow the surface to dry thoroughly.
Advice! It is extremely important that during sealing work the air and surfaces being treated in the room are as dry as possible. Therefore, it is advisable not to use the bathroom for a couple of days before the sealing process begins.
- The sealant is applied to the joint in an even line without breaks or thickening. Since this is quite difficult to do when using sealant in tubes, preference should be given to using a mounting gun.
Advice! The expense of purchasing a mounting gun will not be unnecessary; this tool will come in handy on the farm many times. And it doesn't cost too much.
- In order to regulate the width of the seams formed, you need to correctly cut off the spout of the tube with sealant. The sharper the angle of the cut, the thinner the line.
- Now you need to smooth the layer of sealant. The easiest way to do this is with your finger. To prevent the composition from sticking to your hands, you should wet your finger in a soapy solution.
Joint when installing a bathtub after wall cladding
Probably the most difficult thing is to renovate a bathroom due to the occurrence of various unforeseen situations when installing a bathtub. Some install it before tiling, some after. Entrust the installation of the container to specialists. But its dimensions do not always fit perfectly into the size of the room; therefore, gaps of various sizes are formed.
If you had to install the bathtub after ceramic lining, try to move it closer to the wall and carefully align it. If the gap in width is more than 10 mm, seal it with moisture-resistant concrete, then decorate it with a plastic or ceramic side. The main thing is not to rush, it all depends on what the bathtub is made of. If it is cast iron, then auxiliary fixation is not required here. If it’s made from a different material, then you can’t do without this stage of work.
If the gap is small, use a ceramic bead
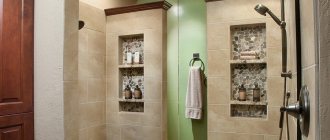
Installation of ceramic border
Despite the fact that many are intimidated by the complexity of tiling work, if you wish, you can still do without the help of professionals and carry out the installation yourself. Having studied the information on how to make a ceramic border in the bathroom and started installing it along the sides of a cast iron or acrylic container, you will understand that there is nothing complicated in this matter.
What will you need for installation?
Preparing the surface for laying a ceramic border on laid tiles is no different from the actions when installing borders made of other materials. The corner on top of the cladding is installed on “liquid nails”; the process itself is very similar to the installation of a plastic product.
To hide the ugly end of the corner, special plugs are used. They create the impression of a smooth transition from the side of the bathtub to the curb
Before starting work, calculate and purchase the material. Since when cutting tiles it can split, you need to take a little more than necessary. In addition to straight sections, you will also need corners and plugs.
The corner elements of the ceramic border can be in the shape of a triangle or a regular element with a cut corner at 45°
To carry out installation, you need to prepare waterproof tile adhesive, sealant, and grout. The tools you will need are a special gun for applying foam, an emery block, a spatula, and a grinder.
Step-by-step description of work
The ceramic border can be laid during wall cladding - or in other words, “under the tiles”. In this case, the next row of tiles can be laid after laying the corner, or the top row can be laid out first, and then, under it, a border can be installed.
The sealing work is carried out in the following order:
- Prepare tile adhesive. Proportions and cooking technology may differ for each brand, so you must follow the instructions.
- Installation starts from the corner and special corner elements are used for this. Apply enough glue to the back side of the ceramic blank with a spatula so that it fills the space under the border and protrudes slightly upward. Excess glue is removed a little later with a spatula.
- Rectangular elements are pressed evenly onto the surfaces; if it is necessary to “drown” one side a little more, tap it with a rubber mallet.
- The next tile is laid in the same way. If you need to insert a smaller element, it is cut off using available tools. This can be a tile cutter, a grinder with a diamond blade, or a regular glass cutter (they cut the glaze with it, and the tile breaks off evenly at the point of the cut). The cut site is polished with a whetstone.
- According to technology, the next day it is recommended to moisten the not yet completely hardened border so that the glue hardens correctly.
- After finishing the cladding, before the glue dries, wipe the tiles with a damp cloth.
- When the glue under the curb has set, waterproof grout or silicone sealant is applied to the seams. After this, the border is wiped again.
To protect the bathtub from accidental falls of heavy elements, it is covered with cardboard boxes (preferably over the entire surface). You can secure them with tape.
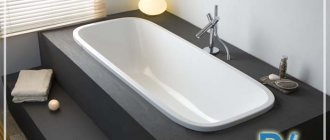
Joint with acrylic bath tiles
As a rule, acrylic bathtubs weigh little, so when you use it, it can move and the seal of the gap can break. Making a recess in the wall to mount an acrylic bathtub does not make sense, since its back walls are flat. To ensure that the seam is sealed efficiently, thoroughly secure the bathtub in place - fix it to the floor using silicone sealant. Then the joint is sealed with sealant and finishing.
To ensure a good sealing of the bathtub, secure the bathtub
Sealing wide joints
The appearance of gaps can occur for various reasons. If its value is from 1 to 5 cm, then polyurethane foam is used for initial sealing. The joint is cleaned, primed, and foam rubber corresponding to the dimensions is placed in the recess to a depth of 4-5 cm. The main thing is that the foam does not fall. If the gap is of equal width, then using transparent silicone sealant, preferably “For aquariums”, fix a plastic baseboard directly onto the foam, matching the interior of the room, and remove excess sealant. We wait a day for the silicone to completely harden. If the gap line is uneven, cover the polyurethane foam with a sealant that matches the color scheme of the finish and level it using a damp brush or narrow spatula.
Large joints can be sealed with foam and sealant.
Sealing by installing plastic borders
Plastic corners or baseboards for the bathroom are long profile strips (standard length 2.5 meters). These planks are made from PVC, a material that is excellent for finishing bathrooms and other rooms with a damp environment.
Advice! PVC borders are one of the most practical options for sealing seams between the bathtub and the wall, since they look quite attractive, but at the same time have a low cost.
In addition to the baseboards themselves, manufacturers offer shaped parts - plugs, corners. They are made in the same decorative design as the baseboards, so the finish will look complete and harmonious.
Advice! Plastic is a fairly flexible material, but for special cases (for example, to seal a round bathtub), you can purchase super-flexible skirting boards. Such products are somewhat more expensive than standard ones, but they allow you to seal any curved joints.
How is the work done?
The plastic corner can be installed before finishing the walls, that is, “under the tiles,” or after the renovation is completed, by gluing the material on top of the tiles or other finishing material. The last option is used more often, since it is easier to implement. Work algorithm:
- The surface is prepared in the usual way, that is, cleaned and wiped to degrease with alcohol.
- Before installing the baseboard, it is recommended to seal the gap with silicone sealant as described above.
- The skirting boards are cut into pieces corresponding to the dimensions of the sides of the bathtub. In the corners, the cut is made at an angle of 45 degrees.
- A thin layer of glue is applied to the corner, then applied to the installation site and pressed well to fix it.
Methods for decoratively masking the joint between the bathtub and the wall
How to seal the joint between the bathtub and the wall so that it is of high quality, beautiful, and matches the cladding of the room? You can decorate the joint with a plastic plinth. It doesn’t matter what the bathtub is made of; it fits perfectly with different ones. To ensure that it is securely fixed, a transparent sealant should be applied to the gap. It doesn’t matter whether it has an adhesive base or not, do not neglect the auxiliary fastening.
To beautifully seal joints, you can use sides
The most win-win way is to use a border made of ceramic tiles. Now there are borders with a pattern on sale. This is labor-intensive work; it is important to maintain the angle of inclination. Another convenient option is self-adhesive tape. It’s quite suitable as a decorative finish, but you shouldn’t count on high-quality insulation from this tape. It can be fixed with sealant or foam. So choose the best option for you, taking into account all the possibilities, including financial ones.
What to seal after installing the bathtub
If you choose the option of installing a bathtub after finishing the cladding, the formation of a gap is inevitable. Let's look at the most practical and commonly used methods to seal the joint between the bathtub and the wall.
Sealant
The optimal material for sealing small-width seams is silicone or acrylic sealant. For these purposes, it is better to purchase sanitary material, since it resists the appearance of fungal spores on its surface longer.
If the joint is 1–5 mm deep, then simply silicone it, and remove excess material and smooth it with a spatula or a finger wrapped in polyethylene.
Advice! To make the seam smooth and neat, apply masking tape along the edge of the bathtub and tiles, and remove it after filling the seam.
If the seam is deep and has a width of more than 5 mm, then to properly seal it, first lay a sealing cord of suitable diameter made of foamed polyethylene. A thin layer of silicone is then applied over the cord. This technology allows you to reliably seal the junction, while the sealant will not peel off, as when applying a thick layer.
Cord for pre-filling deep seams.
Note! Despite the presence of antibacterial additives in the sanitary sealant, black spots still form on the surface over time. Therefore, silicone must be renewed every 1–2 years.
Plastic corner or baseboard
The use of a decorative PVC element allows you to close gaps up to 3 cm wide. Depending on the preferences of the owner and the overall interior, the element used can take the form of a simple corner, plinth or decorative border.
Note! The plinth performs decorative functions and covers the seam, which must first be sealed to prevent moisture from seeping through.
Regardless of the shape, installation is carried out in the following order:
- The edge of the bathtub and the bottom of the tile are wiped with a solvent to remove dirt and degrease.
- The plinth is cut into the required lengths, taking into account the installation of additional elements: corners and plugs.
- Silicone is applied to the back of the plastic element, which acts as glue. It is better not to use liquid nails, since when replacing the decor, the hardened glue will have to be removed mechanically, which can damage the enamel.
- The decorative element is installed in place and pressed, the protruding sealant is removed.
Advice! It is advisable to load the baseboard with something while the silicone dries. Ceramic tiles placed on edge are suitable.
The advantage of this method is the ability to close a wider seam, but the disadvantage is the same as with sealant - the formation of mold under the baseboard.
Elastic decorative tape
Another option to close the gap between the edge of the bathtub and the tile is to use an elastic tape with an adhesive backing. The tape has good flexibility and fits tightly to the surface. The procedure for gluing the tape is as follows:
- The tiles and the side of the bathtub are washed with detergents and allowed time to dry.
- After drying, it is recommended to degrease the surface.
- Next, the protective layer is removed from the edge of the tape, after which it is applied to the seam and smoothed with your fingers.
Advice! For better adhesion, it is recommended to slightly warm up the adhesive base after removing the protective film. An ordinary household hair dryer is suitable for this purpose.
The tape is available in various widths, so you can choose products to mask a gap of up to 3 cm.
The advantage of the tape is quick installation without tools, but the disadvantage is its fragility, since the adhesive base is not comparable to the sealant.
Ceramic border
Using a ceramic border to decorate unsightly bathtub junctions is considered the most durable method. Some tile manufacturers also produce borders, which allows you to purchase material from one batch and series.
In addition to the border itself, the kit includes decorative ceramic corners with cuts that are mounted in the corners.
The technology for installing ceramic borders is as follows:
- The edge of the tile and the side of the bathtub along the perimeter of the seam are degreased.
- Silicone or liquid nails are applied to the back of the elements (only for cast iron bathtubs).
- The curb is laid on the junction and pressed, the protruding sealant is removed.
Installation of the border begins from the corner that is most noticeable at the entrance to the bathroom; along the edges of the bathtub, the elements are trimmed with a grinder, and the edges are closed with decorative caps.
After the glue has hardened, the seams between the border are filled with elastic grout, matched to the color of the one used to fill the seams when laying the tiles. This allows you to create a neat and complete ensemble in the bathroom. But there are the same problems as with plastic baseboards - mold on the silicone grout. You definitely can’t use regular grout with acrylic and steel bathtubs, but with cast iron it’s a lottery; cracks can form at any time.
Sometimes, instead of a ceramic border, narrow decorative strips are used, which are produced by the manufacturer for some series of tiles. The dies are glued at an angle to the bathtub using tile adhesive, laid on the joint in a thick layer (suitable only for cast iron bathtubs). This method also has the right to be used, because with proper selection of decor you can get an original and budget solution to the problem.
To summarize, we can say that all methods used after laying tiles have the same weak point - silicone sealant/grout.