In this article, we are going to look at typical problems that may arise when using a shower - shower stall, faucet, hose and watering can. Of course, in each case we will try to find ways to eliminate the problem. So let's get started.
No matter how reliable your plumbing is, sometimes it needs repairs.
Types of bathroom faucets
As a rule, models of three categories are used in bathrooms:
- traditional two-valve taps;
- common single-lever devices;
- innovative sensor faucets.
For many decades, homes have been equipped with two-handle faucets . Such devices are equipped with two handwheel handles, one of which is intended for hot water, and the second for cold water.
As a locking mechanism, older models used a system of a seat and a valve on a stem equipped with a rubber gasket. When the valve was tightened, the valve closed off the seat, which provided a path for the water to flow.
The stem with the valve had to be screwed in, then unscrewed - this was time-consuming and inconvenient. Instead, they now use a metal valve axle box or a device made of a pair of ceramic disks.
Although two-valve models with a ceramic block are more expensive than devices with rubber gaskets, they have a number of important advantages. They are easier to operate, more durable and reliable
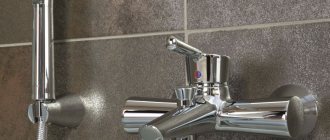
Single-lever options have now become very popular. Lever or joystick mixers have one shut-off and control mechanism that controls mixing, supply, and pressure of hot/cold water.
Based on the locking unit, the range of such mixers can be divided into two categories:
- with ball block;
- with disk cartridge.
The second option looks preferable due to its lower cost and maintainability. Its locking mechanism, similar to valve devices, includes two ceramic discs with holes for mixing and shutting off water flows. If it fails, replacing the cartridge is quite simple.
Single-lever ball faucets are more expensive, and they cannot be repaired due to the difficulty of finding the locking mechanism. Plumbing stores rarely offer it.
If the ball mixer fails, you will most likely have to throw it away and buy a new one instead. Our recommended article will introduce you to the selection criteria.
But ball valves, installed on hot water and cold water pipes in front of plumbing to shut off the flow in case of repairs, have almost completely replaced obsolete valves.
It is almost impossible to distinguish a ball mixer from a cartridge mixer by appearance. In order not to make a mistake when purchasing, it is important to pay attention to the internal structure of the model indicated in the technical data sheet, or ask the seller
The control element of a touch-sensitive faucet for a kitchen or bath with shower is a photocell, which turns on a stream of water when you bring your hands to the tap and turns it off when you remove them. Repairing such plumbing requires experience and knowledge not only in the field of plumbing.
An exception to the rule is a clogged aerator, which manifests itself in a weakening of water flow. This problem, which we will discuss in detail below, can be easily fixed by yourself.
Repair of old style cranes
In old-style faucets, the flow of cold and hot water is regulated by two separate taps. Most often, leaks occur due to wear of the rubber seals, or due to a malfunction of the half-turn valve axle boxes.
To replace worn parts in an old-style faucet, you must:
- Close the cold hot and water valves at the pipes entering the apartment, open the mixer and release the remaining water, relieving the residual pressure.
- Remove the decorative caps from the faucet handles, unscrew the bolts holding the handles, and remove the handles.
- Using an adjustable wrench, unscrew the valve axle by rotating it counterclockwise.
To repair a leaking faucet, it is necessary to replace the rubber seal of the axlebox faucet. Most often, the seal is attached to the valve axle with a screw; to replace it, you need to unscrew it with a screwdriver.
If a hum was heard from the open faucet, or the valve opened with force, then the faucet axle box is faulty and needs to be completely replaced.
Reassembling the mixer is done in the reverse order.
Do not use excessive force when tightening to avoid stripping the threads.
Typical causes of malfunctions
Failures of plumbing fixtures are largely associated with low quality products. You should not save money when purchasing by purchasing cheap faucets from little-known manufacturers. As a rule, when assembling them, low-quality components and consumables are used, which quickly fail.
It may be advisable to abandon the usual sealing options in favor of new analogues: instead of rubber gaskets, it is better to use modern analogues made of paronite or silicone. Their service life is much longer, and they are less deformed over time.
Installing a filtration system on water pipes will not only allow you to use high-quality water, but can also increase the service life of plumbing products
A common cause of malfunctions of mixing devices is also water flowing in pipes. Foreign inclusions and a high content of mineral particles lead to the formation of deposits, clogged filters, and cracking of seals.
Prevention of leaks - installation of main filters
As we have already written, one of the main reasons for faucet malfunctions is low-quality tap water. Due to deterioration of communications, rust particles and grains of sand enter the water, and turbidity appears. All this accelerates the wear of the moving parts of the mixer, and may even jam them.
To purify water and extend the life of faucets and household appliances (washing machines and dishwashers), main water purification filters are used.
Filters are installed immediately after valves and meters at the inlet of pipes and filter all water entering the apartment. In addition to cleaning from suspended particles, the main filter can soften water and remove excess iron from it.
Filter designs differ for hot and cold water. Pay attention to the markings when purchasing and installing them. Also, when choosing a filter, pay attention to whether you will install it on a horizontal or vertical pipe section - not all models can work in both positions.
Types of breakdowns and methods for fixing them
We list the most common problems with sanitary water faucets with detailed instructions on how to fix the problem.
Failure No. 1 – low water pressure
Using water that comes out of a tap in a thin stream instead of a rapid stream is inconvenient and not very pleasant. If the neighbors on the landing have the same pressure, the reason is most likely that the aerator is clogged.
This element is often included in the design of modern faucets. The mixer aerator saturates the water with air bubbles, reducing its consumption and reducing splashing. Fixing a clogged aerator will not take much time or effort.
If the metal aerator is covered with rust, it is better to replace it with a new one, especially since the cost of this part is not too high
To do this, you will need to grab the aerator with pliers and unscrew it. Remove the mesh filter from the device, then rinse the parts thoroughly, clearing them of small debris and deposits. After cleaning, the device is assembled and inserted back into the tap.
Failure No. 2 – valve leakage
A common cause of water constantly dripping from a faucet is a worn gasket. This minor part plays a dominant role in old-style valve mixers, where it ensures the tight fit of the shut-off valve to the seat - the hole intended for water flow.
This type of problem can be easily corrected. You just need to stock up on a new high-quality gasket, as well as wrenches and lever wrenches.
You need to proceed according to the following instructions:
- Securely shut off the water supply system.
- Using a wrench, carefully release the bolt securing the wing.
- Move the adjustable wrench counterclockwise to unscrew the leaking housing.
- Remove the worn gasket and insert a new one in its place.
- Take the sealant - FUM tape, and wind it clockwise under the stop edge.
- Reinstall the housing and tighten the bolt, after which you can turn on the water.
If, even after replacing the gasket, the faucet continues to flow, you need to pay attention to the “saddle”. With long-term and frequent use of the mixer, this part begins to deform, become covered with scratches, cracks, which can lead to leakage.
Detailed diagram showing the structure of a traditional valve mixer with two taps, identifying all components and consumables
To solve the problem, you need to identify the damaged area, and then use a cutter to turn the found area with a little effort. This way you can level the plane of the “saddle”, thanks to which the mixer will easily fall into place and the leak will stop.
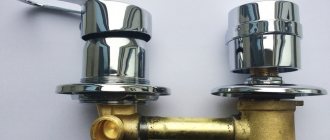
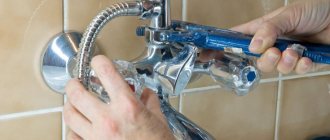
Failure No. 3 – the locking mechanism is faulty
A leak from under the lever is usually associated with a breakdown of the locking mechanism, which must be replaced with a similar element.
The following signs will help you verify this:
- it is difficult to operate the lever due to unexpected resistance;
- the supply of cold/hot water stops;
- the flowing stream spontaneously changes temperature;
- it is impossible to close or open the valve all the way.
To replace the cartridge you need to use the following instructions:
- Remove the plug from the housing.
- Use a Phillips screwdriver to loosen the mounting screw.
- Remove the lever, and then remove the decorative nozzle.
- Using an adjustable wrench, unscrew the nut that secures the position of the cartridge in the housing.
- Remove the faulty unit.
- Place a new element in its place.
The final stage is to assemble the device in the reverse order and install it in its original place. Then the mixing fittings are reconnected to the water supply lines, after which the water is turned on and the work done is checked.
When replacing the cartridge, pay attention to the tabs that are on this part. They must coincide with the recesses located inside the housing. If this condition is not met, the mixer will leak
Please note that cartridges vary significantly in size and configuration. In order not to make a mistake when buying a new part, it is better to come to the store taking the old unit.
Breakdown No. 4 – problem with the ball mixer
If the ball joint is leaking, which may be caused by a worn gasket, you can try to repair it. To repair a ball mixer, you must first turn off the valves on the water supply system. After this, you need to unscrew the bolt on which the mixer is mounted and remove the device lever.
Next, you will need to unscrew the threaded connection and dismantle the faucet dome. After this, you need to find the sealing gasket and clean it of dirt. If there are any defects on it, this part must be replaced. It is also better to inspect the ball for damage. If they are found, you will have to change the tap.
The mixer lever must be removed carefully and accurately. It is necessary to perform loosening movements until the resistance weakens. After this, you need to pull the lever up and pull it out
You should also consider the sleeve in which the ball is installed. If necessary, worn out seals around the moving parts of the device should be replaced. After this, you can assemble the reinforcement by performing the operations described above in reverse order, and the parts should be sealed with a special compound or FUM tape.
Failure No. 5 – the housing gasket is worn out
One of the most common failures of lever faucets in the bathroom is caused by the fact that the spout is constantly in motion. Because of this, the rubber gasket located in the groove quickly wears out. To change it, you need to separate the gander from the body by unscrewing the fixing nut.
The damaged gasket is removed from the spout groove, after which a new part is installed there, and the gib is mounted in the body. The thread of the fastening nut is wrapped in 2-3 layers of FUM tape, after which the part that secures the spout is screwed in.
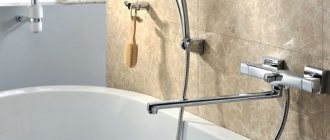
Breakdown No. 6 – repair of the faucet-shower switch
Problems with the shower switch are also common sources of leaks. This is mainly caused by a damaged gasket that is placed between the housing and the switch.
For repairs, you will need to disassemble the mixer, which is done as follows:
- the switch button is removed from the rod, which is held in a stationary position;
- you get the valve and stem;
- the oil seal is removed from the housing;
- a similar new part is installed in the intended place;
Next, you need to perform the manipulations in reverse order so that the shower switch is completely assembled. After this, you can turn on the water and check the quality of work.
The cause of malfunctions of spool switches is often a broken nut that holds this part. To cope with the situation, you should dismantle the tap, remembering to turn off the water. Remove the shower hose and switch handle.
Modern faucets may have a built-in or specially installed switch. The latter has a collapsible design, which greatly facilitates repairs. If the built-in unit breaks down, in most cases you have to replace the entire accessory
Unscrew the nuts that secure the spool and switch. Replace the broken part with a new one. Clean the threads, as well as the internal cavity of the nut, with sandpaper. After lubricating all parts with grease or a similar compound, install the mixer in its original place, and then turn on the water.
If the button that turns off the shower does not return to its place, then the spring has failed. To correct the situation, you need to disassemble the switch, as described above, and replace the broken element.
When water flows simultaneously from the shower and from the tap, without the ability to switch, the reason is a faulty oil seal, which is located on the switch rod.
In this case, the following operations are required:
- purchase a new oil seal, turn off the water;
- remove the button and remove the rod;
- remove the old one and insert a new oil seal;
- assemble the switch.
After repairing the mixer, you can turn on the water to check the correctness of the work.
Failure No. 7 – leaking shower hose
Sometimes water leaks at the connection between the faucet/hose or the hose/shower head. In such a situation, the gaskets will need to be replaced. After turning off the water, the hose clamping nut is unscrewed with pliers, and then the old gasket is removed.
Instead, a new part is inserted, and it is better to give preference to a more reliable paronite or silicone product.
The design of the shower head and shower hose does not imply the possibility of disassembling them. If these elements malfunction, it is impractical to carry out repairs, so it is better to replace them with new products
To seal, 2-3 layers of FUM tape are wound onto the thread, after which the clamping nut is tightened. Finally, the water is turned on and the operation is checked.
Failure No. 8 – other faults
We list a number of other faucet breakdowns that users may encounter:
- A continuous stream of water may be caused by a broken cartridge or a blockage that has formed between it and the gasket. In this case, you need to disassemble the tap, clean all the parts, and if necessary, change the valve.
- A dry rubber gasket can cause water to refuse to flow when the valve is open. To verify this, just tap the open device with some hard object.
- When the rod thread is torn off, the valve begins to rotate. To solve this problem, you can try wrapping the thread with thread, but only replacing the part will provide significant help.
- A damaged rubber gasket can cause constant noise in the faucet. To fix the problem, it is recommended to change the gasket or cut off the worn edge.
As we can see, many faucet malfunctions can be easily corrected with your own hands using simple tools.
Before starting all work, it is important to carefully read and, if possible, watch the instructions, and perform all actions clearly and carefully.
How to repair a single lever faucet if leaks are detected
Typically, a leak of this kind occurs as a result of a cartridge failure. This element has the form of a compound cylinder, with three holes located at the bottom. One of them is designed to flow out cold water, the second - hot water, and through the third, mixed warm water flows.
Natural current is not physically different from ordinary electricity. It also does not physically come to the person who signs up for it. To be able to detect and replace faulty lamps, lighting must be turned on at regular intervals throughout the day, over a large area.
Of course, we also depend on your report of defective and non-firing lamps, the online form can be found in the "Online Services" section. Information about water quality and water hardness can be found on our home page under the heading “Water”. Chemically, water consists of one oxygen and two hydrogen atoms. Natural water always contains minerals and salts, which it absorbs as it flows over rocks, gravel and soil. Water hardness is a measure of the amount of dissolved, naturally absorbed calcium carbonate - more commonly known as limestone and magnesium - in the water.
Replacing the cartridge in the mixer
Depending on the mechanism used to mix cold water with hot water, cartridges are divided into two types: ceramic and ball. At the top of the cartridge there is a rod with the lever of the mixer itself attached to it. This is where the leak occurs.
B. Water enters the gaps between the conical surfaces of the switch
In Switzerland, for the most part, the limestone content determines the hardness of the water, so the more lime the water contains, the harder it is. This does not affect the quality of the water, it even helps the water taste better. Problems can occur with chalk water, but in domestic installations.
Prevention of leaks - installation of main filters
Lime appears as water beads on fittings, is harmful to the heating rods of washing machines and coffee machines and can lead to significant investment when whole pipes calcify. This can be said with a clear conscience, since drinking water is strictly monitored and controlled in Switzerland and must meet high quality requirements. In terms of price, mineral water still has a clearer view of empty water: the latter is about a thousand times cheaper.
What are the signs to determine when it’s time to replace the faucet cartridge?
The main ones are:
- no supply of cold or hot water;
- the water spontaneously becomes either hot or cold, without using a lever;
- the tap does not close completely or does not function normally;
- when switching the lever, you need to make quite a significant effort;
- presence of leakage from under the lever.
Conclusions and useful video on the topic
The presented video describes how to repair the most common failures of a shower mixer:
The reasons for failure of shower faucets can be very diverse. In some cases, they are easy to fix yourself using common tools. In other situations, you have to resort to the help of plumbers.
Unfortunately, sometimes the faucet cannot be repaired and has to be replaced. To prevent this from happening, it is important to take preventive measures, and when purchasing plumbing fixtures, choose modern models from well-known companies.
Tell us about how you repaired a faucet with a shower hose with your own hands. Share technological nuances you know that will be useful to site visitors. Please leave comments in the block below, post photos and ask questions about the topic of the article.
Eliminating leaks in faucets with two valves
This malfunction usually occurs:
Replacement procedure:
- Turn off the cold water tap on the riser
; remove the plug from the valve; Unscrew the screw securing the valve. This must be done without undue haste, as the screws in that place often turn sour and the thread can inadvertently be damaged. - Unscrew the valve axle
with a suitable wrench; if necessary, replace the old O-ring with a new one. - Replace the old crane axle with a new one
. - Reinstall the valve
.
Leaking from under the shower hose or nut
In these cases, the procedure is similar to that described above:
Breakage of the switch from the shower to the faucet-axle box
If suddenly water begins to flow out of the shower head and faucet at the same time, then there is a high probability that the bathroom faucet needs to be repaired; the switch is apparently broken.
Procedure during repair:
- Manually unscrew the switch button.
- Using a wrench, unscrew the switch housing.
- Carefully remove the rod, inspect the gaskets and, if necessary, replace them.
The most common reasons for faucet failure
When using a tap to supply water, various problems sometimes occur:
- a valve that is not tightly closed (water leaks or constantly drips);
- the stream of water is very weak , despite the fact that the valves are completely turned off;
- after opening the tap there is a loud hum ;
- breakdown of the switch from the shower to the tap (water flows from the shower and tap at the same time).
Among the many reasons for the occurrence of such and similar problems, two of the most common can be identified, namely:
- cloudy, rusty, “hard” water with solid impurities in the system;
- design defects (poor workmanship or the material itself).
In most cases, repairing a bathroom faucet with your own hands is not difficult.
However, do not forget about the simplest precautions:
- Before you start repairing a bathroom faucet with a shower with your own hands, you must turn off the water at the inlet of the corresponding pipes into the room.
- Having closed the valves, turn off the mixer taps and make sure that water does not flow from them - they may also be faulty at the inlet.
- Be careful when working with a hot water tap - there is a risk of scalding.
- When tightening, do not use force - you may break the thread.
Is water leaking from the water heater valve?
A safety valve is a small part with one function: preventing the tank from bursting. During the heating process, hot water from the water heater expands. If after this the volume of water exceeds the capacity of the tank, an accident will occur. This is why a water heater check valve exists: it is activated when a certain critically high pressure is reached, draining excess water.
If debris is clogged in the check valve, the water heater will not supply water. You will need to drain all the water from the tank, disassemble and loosen the rod.
Difficulties in choosing a new cartridge
As mentioned earlier, when choosing plumbing fixtures, it is important to pay attention to its quality. Try to choose cartridges from well-known companies and avoid falling for clever counterfeits sold under the guise of products from well-known brands.
Unless you're installing your entire plumbing system from scratch, you generally don't have much choice. The fact is that no matter what model of mixer you choose, there are only two types of cartridges - ceramic and ball.
The advantage of using ball cartridges is the ability to disassemble the bathroom faucet with shower and repair it, if necessary.
A ceramic cartridge, unlike a ball cartridge, is non-separable. It only changes entirely.
Repair of other minor problems
In addition to water leaks, faucets are also susceptible to other breakdowns. For example, the water pressure from them may decrease . Most often, such a breakdown is associated with contamination of the aerator.
To clean the aerator you need to:
- Remove the aerator from the tap by turning it clockwise by hand. If your hand slips, wrap the aerator in a cloth and try again. If you use a tool, use rubber pads to avoid damaging the chrome surface.
- Remove the aerator screens. To do this, gently press on them from the outside.
- Rinse the aerator mesh under running water. Large particles of contaminant can be removed with a pin or thin awl.
- Assemble the aerator and install it on the faucet without tightening it too much.
Another common problem is water leakage at the junction of the gander and the mixer body . To eliminate it, you need to tighten the loose nut securing the gander using an adjustable wrench. If the leak remains, you need to remove the gib and replace the rubber seal at the joint. When tightening the gooseneck nut, you must use rubber pads under the adjustable wrench to avoid scratching the surface of the nut.
When disassembling the mixer, it may turn out that some parts are “stuck” to each other and do not turn. Try lubricating them with special WD-40 fluid. It will dissolve rust, displace moisture, and allow you to disassemble the mixer without damaging it.
If you have not found a solution to the problem with a broken faucet in the bathroom, read our article about faucet repair.