Every self-respecting home owner should be able to do absolutely everything, from driving nails to full-scale repairs. But experience comes with time, which means it’s never too late to learn.
It happens that the faucet in the bathroom or kitchen starts to leak, and you can hear this mainly at night, when you lie down, fall asleep and hear the water dripping monotonously. This is an alarming signal, and if the leak is not eliminated immediately, an emergency may occur later.
And eliminating such a situation is much more expensive than changing the gasket or valve axle box in a timely manner. In general, today we’ll look into the question of how you can get rid of a leaking faucet.
THE FAUCET IS LEAKING IN THE KITCHEN - HOW TO FIX IT YOURSELF
To repair a kitchen faucet you will need:
- knife with a sharp end;
- hex and adjustable wrench;
- screwdrivers;
- a new cartridge, valve axle, rubber gasket, etc. - depends on which part you will change;
- WD40 is a technical aerosol that is useful if parts are “stuck” to each other. However, you can get by with the traditional tapping of a hammer on a screwdriver, but there is a high risk of damaging the mixer.
Regardless of which faucet you have installed, before starting repairs, you must turn off the water supply to the system and drain its remaining water into a sink or a separate container. To do this, just open the tap. Then you can begin to repair it, taking into account the design features.
To repair a single-lever faucet, you will need a hex wrench.
REPAIR OF SINGLE LEVER KITCHEN MIXER
The main principles of repair are sequence of actions and accuracy.
- Using a thin screwdriver or knife, pry and remove the decorative plug on the faucet body.
- In the resulting hole you will see a screw connecting the lever and the adjusting rod. Unscrew it using a hex wrench.
- Remove the lever from the body and unscrew the decorative casing. This can even be done by hand if the parts are not stuck to each other.
Removing the decorative casing
- There will be a locking (clamping) nut underneath it. Gently unscrew it with an adjustable wrench or by tapping it with a hammer on a screwdriver.
- If you disassemble the ball mixer, you will see a sealing collar under the nut. Inspect it for dirt, deformation and tears. Pull out the ball. Inspect its surface - it should be smooth and clean. It is necessary to remove the seals and support springs - their poor condition can cause the tap to leak.
- If you are disassembling a faucet with a cartridge, remove it and thoroughly inspect it.
- Replace the failed part.
- Reassemble the faucet in reverse order.
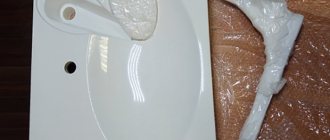
Installing a new cartridge
To extend the service life of the product and ensure smooth running of its rubbing parts, you can use a special silicone lubricant.
Removing the mixer handwheel
REPAIR OF TWO-VALVE MIXER
What to do if your two-valve faucet is dripping in your kitchen? Almost everything is the same.
- On the valve flywheel, pry up and remove the decorative plug.
- Using a screwdriver, unscrew the screw that secures the flywheel.
- Remove the flywheel. There will be a crane box in front of you.
- Unscrew it counterclockwise and inspect it.
Removing the crane axle box
- If it is a worm-type axlebox and its gasket is damaged, replace it separately - buy it in a store (costs pennies) or cut it yourself from rubber of a suitable thickness. The axle box with ceramic discs is replaced entirely.
- Reassemble the faucet in reverse order.
General scheme of mixer repair work
Everything is as simple as possible and slightly reminiscent of a construction set. But a leaking faucet is not the only problem you may encounter while using it in the kitchen.
Step-by-step instructions for replacing the gander
The replacement procedure is similar to the repair sequence:
- Remove the old gib by unscrewing the clamping nut.
- Prepare the new spout by lubricating the rubber seals with silicone grease.
- Install the new gooseneck and carefully tighten the clamping nut.
Before buying, it is better to take out the old one and take it with you to the store for a sample.
How to repair a single lever faucet if leaks are detected
Typically, a leak of this kind occurs as a result of a cartridge failure. This element has the form of a compound cylinder, with three holes located at the bottom. One of them is designed to flow out cold water, the second - hot water, and through the third, mixed warm water flows.
Replacing the cartridge in the mixer
Depending on the mechanism used to mix cold water with hot water, cartridges are divided into two types: ceramic and ball. At the top of the cartridge there is a rod with the lever of the mixer itself attached to it. This is where the leak occurs.
What are the signs to determine when it’s time to replace the faucet cartridge?
The main ones are:
- no supply of cold or hot water;
- the water spontaneously becomes either hot or cold, without using a lever;
- the tap does not close completely or does not function normally;
- when switching the lever, you need to make quite a significant effort;
- presence of leakage from under the lever.
Repair of single-lever mixers ↑
Instead of double-valve faucets, single-lever faucets are increasingly being used in kitchens and bathrooms. In them, both water pressure and temperature are regulated using one lever: temperature right - left, pressure up - down.
Cartridges used in faucets are more durable than gaskets
Such faucets use disk or ball cartridges, which are much more durable than gaskets, but also more expensive. It is not difficult to notice that the cartridge needs to be replaced - water begins to ooze and flow in the “wrong” places. Externally, different models have quite a lot in common, but the internal structure of the “balls” and “discs” is different, so it will not be possible to replace one cartridge with another. When purchasing, you need to know exactly which cartridge you need. At first, it is better to entrust the replacement to a specialist, watch the technician at work, and then you can try and deal with the breakdown yourself.
Let's figure out how to fix a ball valve. Its repair cannot be called a simple procedure. We will propose a certain sequence that should be followed when eliminating a leaking faucet:
- first you need to turn off the water supply and drain the remaining water from the system;
- then unscrew the screw that holds the mixer lever;
- slightly loosening, pull the lever part up and remove;
- the opened threaded connection is unscrewed clockwise;
- the faucet dome is removed and the plastic part underneath is removed;
- if plaque is found on the gasket, carefully remove it, and if the seal itself wears out, gently replace it;
- carefully inspect the ball, removing it from its mounting location; if there are obvious defects, then replacement will also be required;
- the seals that secure the ball are also dismantled and inspected; if necessary, replace with new ones;
- After all the “therapeutic” procedures, the tap is assembled and checked for leaks.
After the screw is unscrewed, the lever part, slightly loosening, is lifted up and removed
Preventive actions
Experienced plumbers recommend getting rid of problems with taps even at the stage of their use, for this you need to:
- Install filters. Modern water in urban systems “kills” any tap within six months.
- Do not unscrew the mixer unless necessary. Any intervention shortens the life of the seals.
- Close the tap tightly. Due to incomplete closure, the seals also wear out.
- Do not delay repairs if necessary. Most problems are much easier to fix in the early stages.
Thus, all malfunctions of the faucet in the bathroom can be prevented by an ordinary person.
Be careful when working and listen to our advice on prevention
Aerator contamination
On many faucet models, an aerator is built into the end of the spout, which, by breaking up the water flow, creates a volumetric jet, saving its consumption. Sometimes it happens that the gander leaks because of it.
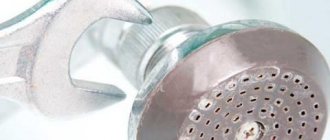
The occurrence of leaks is often due to the structural features of aerators. The smallest particles of contaminants collect on its meshes and impede the movement of water. As a result, the pressure inside the gander increases and leaks appear. You can fix the problem by cleaning the aerator or replacing it.
Brass aerators are highly resistant to mechanical damage. In the future, when cleaning such models, the risk of damaging them with an adjustable wrench is minimal.
Shower switch repair
There are several types of shower switches, let's look at some of them.
Spool
The leak in such switches comes from under the handle that opens and closes the water supply.
Causes of malfunction:
- Are the rubber rings on the rotary rod working or not,
- the gasket on the axle box is worn out,
- The axle box is twisted.
After correcting or replacing parts, the switch must be assembled and tested. Don't forget about lubrication of the switching mechanism.
Button
To disassemble this mechanism, you need to turn off the tap, remove the cap, unscrew the screw and pull out the button with the spring.
Reasons for failure:
- the spring has sagged and does not hold,
- Valve rings are worn.
If the spring has sagged, you should replace it with a new one or make it yourself. To do this, it is stretched and heated red-hot, after which it is dipped in cold water. After cooling, you need to heat it again for uniform hardening. You can also make a wire spring using the same method.
If the valve rings become brittle, they should be replaced. After replacement, the entire mechanism must be lubricated with Vaseline or another lubricant.
Suberic
The main problem is that the plug does not fit well to the body and leaks. It could also be:
- poor rubbing,
- mechanism erosion,
- presence of solid particles in the housing.
In order to fix such a switch, you need to unscrew the screw, remove the handle, unscrew the nut and remove the locking ring. After a thorough inspection, the parts should be lubricated with Vaseline and assembled into place.
Causes of faucet breakdowns
To begin repairing a faucet, you need to know the common problems and malfunctions of faucets that may arise during operation.
The second reason may be that old materials are used in production, for example, if you use rubber for a gasket, then such a gasket will last less time than a silicone one. An important point is that the silicone gasket is less deformed and does not collapse due to drying out.
The most common reason in our time is hard and dirty water that flows through pipes. This water forms deposits in faucets and contributes to the destruction of seals and other parts of the device. This reason also contributes to the corrosion of metals.
These were the reasons for faucet breakdowns, and now we need to look at specific faults that may occur.
Required tools and materials
To change spare parts yourself, you need to have a small set of tools that can be found in every home:
- Screwdriver Set;
- adjustable wrench;
- pliers;
- fum tape, silicone grease.
If you are unable to understand the intricacies of breakdowns or lack patience and desire, it is recommended to invite a specialist technician. He will be able to repair and replace all necessary parts quickly and efficiently.
Preventing a problem is better than repairing it. There is no need to subject the faucet to mechanical stress. Do not lean on the gander and do not hang anything on it. Use the shift lever carefully, avoiding sharp turns. Turn on and off without force. Taking good care of the tap will significantly extend the life of the device.
Two-valve
The breakdowns of two-valve mixers are usually the same as those of single-lever devices. Usually, troubleshooting problems does not require the intervention of a specialist, because everything can be quickly fixed on your own. The most common breakdowns are usually the following problems:
- wear of seals;
- wear of rubber flywheel gaskets;
- leaking from under the valve;
- leakage from under the spout union nut.
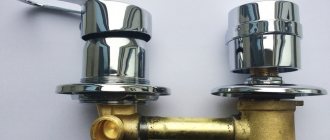
Diagram of a two-valve mixer
The old oil seal is replaced according to the following scheme:
- first you need to seal the oil seal, if this does not help, then it will need to be completely replaced;
- to replace this sealing element, unscrew the union nut and remove the oil seal bushing;
- then the old oil seal is removed;
- it is necessary to perform a high-quality seal; for this, the valve stem is wound;
- the oil seal is installed;
- After this, you need to put the bushing in place and tighten the union nut.
How to replace the old rubber gasket:
- first you need to turn off the water and remove the casing attached to the bolt and held on by the thread;
- use a wrench to remove the neck;
- At the bottom of the neck there is an old rubber gasket, which is replaced with a new element;
- After this, the mixer is assembled in the reverse order.
Disassembling a two-valve mixer
A leak from under the valve can occur due to a pin flying out of the rod. This problem can occur because the pin was not installed tightly to begin with, or because the sealing tape wrapped around it has become worn and worn out. In this case, the water is shut off, the flywheel is removed from the valve head and the fallen rod is removed. Next, the sealing tape is wound and the pin is installed in place.
Water leakage from under the spout union nut may occur due to wear of the rubber gasket. In this case, you need to remove the spout union nut, remove the old gasket and replace it with a new one. Cut a new mono gasket yourself from rubber material.
If a leak appears from the tap, it needs to be disassembled and inspected. A dripping faucet is the first sign that the device of this element needs repair. You should not start this process, otherwise you will have to completely change the mixer. Therefore, if your faucet is leaking, immediately begin troubleshooting the problem.
Cracks on the body
A faucet in a bathroom or sink may leak because a crack has suddenly appeared in the body of the device. Its formation can be caused by disturbances in the structure of the material resulting from excessive stress or the accidental fall of a heavy object. The housing or handle may crack due to wear and tear due to constant friction during shifting.
After making sure that there is a clearly visible crack from which water is dripping, a person must decide to repair or completely replace the faucet element.
Note! Repairs are permissible only if there is nothing to replace the part with at the moment. It should be understood that the measure considered is temporary.
The most common methods for partially restoring a damaged part or faucet part are:
- the use of special sealant or glue,
- using the cold welding method.
The owner must be prepared for the fact that the faucet will lose its attractive appearance after repair, and also come to terms with the fact that the material used during restoration may dry out and become unusable.
Lever cranes: repair
Newfangled lever models, which allow you to control the water temperature using a single lever, are considered more reliable, although they also fail. How to fix a faucet - so that it doesn't drip - of this type? The most common cause of a leaking lever faucet is that it is clogged. In this case, you need to do the following:
- remove the decorative plug, thanks to which the water is supplied;
- unscrew the screw, and with it remove the handle that is attached with it;
- remove the lower nut located under the handle and replace the cartridge with a new one.
The crane is assembled in the reverse order. You can learn how to fix a video when water is dripping from a tap by watching a thematic video.
Another common problem is the flow of water being weak. Cleaning the aerator will help correct this defect. It is located on the faucet spout. You can even unscrew the aerator with your bare hands, without resorting to pliers.
Often the reason why a faucet leaks is because the rubber gasket wears out. The latter has contact with water, experiences pressure, and can dry out, which has a bad effect on its service life. Sometimes a gasket lasts up to 7 years, but this happens rarely. The problem is accompanied by an unpleasant hum coming from the bathroom. In this case, you should disassemble the mixer and replace the gasket.
These are the recommendations on how to fix it if the faucet is running in the kitchen. In addition, problems often arise not with the faucet itself, but with the push-button switch that transfers water to the shower. If it does not work, the spring is broken, then it can be easily replaced. If there is a leak, it is necessary to replace the old gaskets with new ones.
Cranes of this design are considered simpler and more convenient in terms of repair. How to fix when water flows from a valve type tap? In this case, a worn gasket is most often to blame. To do this, unscrew the valve, turning it counterclockwise, and remove the part that has become unusable. The gasket, which should replace the predecessor, can be made from rubber yourself. An alternative to making it at home is to purchase a new part.
Is your kitchen faucet leaking? Perhaps the reason lies in the wear of the oil seal. In this case, water comes through when the tap is in the open position. The algorithm for how to fix a leaking faucet in the kitchen is simple in this case: unscrew the seal nut, remove the defective liner and replace it with a new one. The latter can be made from sealing tape. If the work is done correctly, the question of how to fix a dripping faucet in the kitchen will cease to be relevant.
There are times when a newly installed gasket lasts for several days, and then problems with water begin again. This indicates that irregularities in the form of cracks have formed on the saddle. You can get rid of them using a special cutter on the body, which replaces the worm valve.
An alternative to the capricious “worm” can be a mixer with ceramic discs. What to do when a ceramic faucet leaks? Its owners usually do not have such questions for several years during operation. If problems do appear, they can be easily eliminated by tightening the lock nut, which is located on the body. The recommendations are similar if you want to know how to fix a plastic tap.
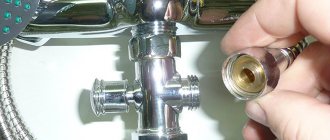
Sometimes it is necessary to change the O-ring. It is its wear and tear that causes the faucet in the kitchen to leak in the area where the faucet and shower hose are attached. The replacement is carried out as follows: unscrew the shower hose using a wrench (this must be done as carefully as possible) and remove the old seal.
You can learn more about how to fix a leaking kitchen faucet in the video.
How to choose a new gander to replace the old one
If you decide to replace the gander completely, then to buy a new one you will have to measure the diameter of the part that connects to the body and the size of the clamping nut. The easiest way is to remove the old gander and go to the store with it. What to pay attention to:
- gander material: brass, stainless steel or silumin alloy. It is recommended to purchase spouts made of stainless steel or brass;
- tube length - you can choose a gander that is longer or shorter than the old one;
- purpose of the spout - there are ganders for drinking and industrial water.
Sometimes in the bathroom it’s enough to replace the plumbing with new ones and repairs won’t even be needed
How to fix a leaking faucet
What to do if the tap leaks in the closed position? If a two-valve mixer is leaking. This type of faucet has been used in apartments for many decades. It's just that nowadays it has become more modern. But the principle of the device is the same, and the malfunctions are exactly the same. A two-valve mixer is designed in such a way that one valve responds to the supply of cold water, and the other to hot water. This type of mixer uses a worm gear. And the most common malfunction in a two-valve mixer is when water drips from the tap, that is, the tap leaks.
In this case, the gasket in the tap fails. You can replace it yourself. The required product can be purchased at any specialized store or market. Many men know how to fix a faucet. After all, not everyone wants to call a repairman for such a minor breakdown. Replacement sequence:
- First you need to turn off the hot and cold water.
- Unscrew the fixing wing and bolt.
- The valve body must be turned counterclockwise using an adjustable wrench.
- Replace the old rubber gasket with a new one.
- Then you should take any seal that is available and wind it clockwise under the thrust flange onto the thread.
- Then tighten the housing. The valve is fixed with a screw, i.e., assembly is performed in the reverse order.
But it happens that a new gasket is installed, the faucet in the bathroom functions normally for some time, but after a while it is discovered that the faucet is leaking again.
In this case, the reason must be sought in the so-called valve seat. After prolonged use, it may crack, become jagged, and become worn away. Then you should go over the problem area with a cutter and level it. And the faucet will stop leaking.
In modern cranes, instead of a worm gear, a crane axle box containing ceramic discs is often used. In this case, if the tap is leaking, you need to tighten the lock nut, which is found in some models, more tightly.
If the leak cannot be eliminated, the valve axle box should be replaced.
How to fix a faucet with a cartridge
Inside the faucet with the cartridge there are plates with slots. The lower one is securely fixed, and the upper one remains movable and connects to the rod. Turning the lever causes the rod to move and the movable plate to move, allowing water to flow.
If problems arise in the functioning of a faucet with this design, a new cartridge must be installed. In most situations, water begins to leak from under the handle, and trying to repair the structure is impractical. When installing the component, first turn off the water and then remove the handle. To do this, remove the plug hiding the screw, lift the handle up and remove the pressure ring. After replacing the cartridge, the structure is assembled in the reverse order.
Consequences of leaks
Often people simply turn a blind eye to the dripping faucet in the bathroom for years without taking any action. In fact, “chronic” leaks usually lead to much bigger problems. Therefore, a leaking shower mixer or faucet can lead to an emergency and extensive leakage. The most negative consequences of plumbing leaks in the bathroom are:
- Increased humidity inside the bathroom. The bathroom is already characterized by high humidity, which negatively affects the finishing materials and furniture inside the room, and a dripping faucet further increases the amount of moisture in the air.
- Annoying sounds. When a faucet or mixer leaks, the sound of falling drops is heard throughout the apartment, especially if the sink or bathtub is made of thin-walled metal. Historians claim that during the Middle Ages they even tortured people with such sounds, so it is not surprising that this situation irritates household members.
- Increased water consumption. Almost every apartment is now equipped with meters installed on water supply pipes, so when a faucet, faucet or shower in the bathroom leaks, water consumption, and therefore utility bills, increases significantly.
- Danger of flooding on lower floors. If you do not figure out in time why the faucet is leaking and do not eliminate the cause of the breakdown, the situation may worsen and result in a large leak that will ruin the renovation not only in your bathroom, but also in the apartment of your neighbors below.
Who is to blame, or why is the faucet leaking?
If a faucet is leaking, the causes can be identified by looking at the location of the leak.
The main “culprits” of the leak:
- Damage to the rubber gasket.
Repeatedly turning the water on and off leads to natural wear and tear on the moving parts of the faucet, including rubber seals - cracks appear, change sizes, flatten and curl. When a closed tap leaks, the reason is the gasket, which will have to be replaced.
- Seal wear. The sealing gland tends to wear out quickly. It is very easy to identify this reason - in the closed position no faults with the mixer are visible, but as soon as the tap opens, water begins to leak from under the valves.
- Poor quality installation.
Errors made during assembly and installation of the mixer sooner or later lead to leakage. Thus, excessive force when tightening the nut damages the sealing gasket and accelerates its wear. A loose connection or defect in the flexible hoses leads to water simply flowing under the tap. - The ball cartridge is dirty.
The design of the ball mixer cannot be called successful - inside the body there are tightly fitting parts that react very “painfully” to mechanical impurities of tap water. To eliminate a leak in the ball valve, it must be completely disassembled and cleaned. - Mixer wear
. As a rule, all taps have their own service life, so over time the threads, jib filter or locking mechanism may wear out. In this case, neither replacing the sealing and rotating elements, nor tightening the nuts will help - the mixer will still have to be completely replaced.
Repair of two-valve tap
How to repair a two-valve faucet? The specifics of the repair work depend on the cause of the leak.
Gasket problem
How to determine that it is the gasket that needs replacing? Try turning the faucet tightly. If even then it continues to leak, the problem is probably with the gasket. To replace it, follow these steps:
- Remove the valve body. To do this, scroll it counterclockwise;
- We take out the old gasket;
- By analogy with the old gasket we make a new one. For this we need rubber or thick leather;
- A new gasket is inserted into the structure;
- A seal is screwed onto the thrust edge;
- The valve body is screwed back on and then tightened with a wrench.
Replacing the old gasket in the valve with a new one
. Important. No need to do the installation yourself
They can be found in any store of the relevant type. A homemade product is usually used when the leak is severe and there is no time to visit the store.
The problem is in the sealing insert of the oil seal
How can you determine that a leak is caused by a worn out sealing insert? In this case, the leak is observed near the valve stem. Water starts flowing when the tap is opened. To eliminate the problem, it is recommended to carry out the following work:
- Unscrew the oil seal nut. For this we need a screwdriver;
- We make a new liner from fluoroplastic sealing tape;
- We remove the old liner. Screw a new one onto the valve stem;
- The nut is tightened.
Replacing the sealing insert on the oil seal
Important. After finishing work, try turning the valve
It should turn smoothly. Also check that the leak has been fixed. Only in this case can we assume that everything was done correctly.
Read how to change the faucet in a separate article.
Shower hose ring seal problem
If the O-ring is worn out, there is usually a leak in the area between the hose and the mixer. To fix the problem you will need to do the following:
Carefully, so as not to damage the thread, unscrew the hose. To do this you will need an adjustable wrench; The old seal is removed; The ring lining is installed; The hose is screwed in.
Hose and faucet connection
After the work is completed, you should turn on the water and check if the leak has been fixed. If a small leak remains, you should think about replacing the locking elements (faucets). You can purchase new locking elements at any plumbing store.
Leak at the connection point of the shower hose and shower head
Even during the operation of the mixer, leaks often form at the connection points of the flexible hose to the mixer and shower head. Gaskets are installed in these places, which become deformed and fall in over time. If a leak occurs, disconnect the hose and replace the gaskets.
The hose is connected to the mixer using a hex nut. You need to unscrew it and change the gasket.
To replace the gasket where the shower hose connects to the faucet, you will need a wrench.
The connection between the hose and the shower head is made using a conical relief nut, which can be unscrewed without a tool and even a girl can do it. There is a gasket on the pressure hose that needs to be replaced with a new one.
Note! The hex and flare nuts for connecting the shower hose are very thin, so you should not use much force when tightening them, as they may burst.
Causes of leakage
Leaking is the most well-known problematic situation that occurs with plumbing.
And it doesn’t matter whether it is in the kitchen or bathroom. Faucet leaks can occur for many reasons.
Table No. 1. Causes of leaking faucets.
Cause Solution Poor quality faucet Often, wanting to save some money, people prefer lower-cost faucets. But you should understand that cheap taps can leak water. It is unlikely that you will be able to avoid this problem if you have already purchased such a faucet. Therefore, when purchasing, always choose only tools from trusted manufacturers whose products you are confident in the quality of. It also happens that you buy a product from a well-known brand at a low cost. Here you need to be able to distinguish a fake from an original, because a common model is unlikely to be sold for pennies. Incorrect installation of the faucet This is the second most common reason. Most often it occurs in people who, without experience, install the mixer themselves. Also included here are cases of incorrect assembly of the faucet. With such errors, often even the most expensive faucets lose all their advantages, begin to drip, rust, and creak. To solve the problem, you need to trust the installation of faucets to people who have extensive experience in this and cannot make mistakes, even holding holding a mixer with unfamiliar designs or fastening systems, etc.
If you leave this work in the hands of a master, be sure to check the qualifications, otherwise you risk wasting time and money. Incorrect use of the mixer Although the mixer provides the ability to twist and move in the other direction, or rotate the screws, you still need to work with it with extreme caution. Problems in this direction can arise if you apply a lot of force during installation of the mixer, or turn the tap itself in the wrong direction angle, lifted up or pressed down, screws were unscrewed further than required. All this spoils the product and in the future can lead not only to leakage of the faucet, but also to a final breakdown. In this case, there is only one solution - buy another faucet and handle it with care. Wear of parts Few people think that the crane is literally “outdating” its usefulness.
Constantly turning the lever on and off and moving parts wears out the materials over time. This happens especially often with rubber gaskets. It is not difficult to solve this when some materials have been damaged. Here it will be enough to replace them. This can be prevented by carrying out preventative maintenance on the cranes. Equipment expiration Although this happens less often, even this reason can lead to a water leak. As a result, you will also have to buy a new faucet, which can last for several years if used properly.
Plumber set
What to look for when choosing
Since the gander is an integral and far from the most important part of the mixer, the faucet itself is chosen first, paying attention to the following factors:
- The material used to make the vast majority of faucets is brass; copper is sometimes found; the cheapest models are made from stainless steel, but they are visually different from the two previous ones with chrome plating due to their less intense metallic luster. To find out exactly what a chrome-plated faucet is made of. Look at the inner surface of the non-chrome-plated fastening union nuts or gib, in which the aerator is first unscrewed. Compared to copper ones, preference should be given to more durable brass faucets.
- If you plan to use separate faucets for the bathtub and washbasin, it is better to purchase a model with a fixed gooseneck to fill the bowl - this will prevent leaks due to abrasion of the gasket at the point where the tube is attached to the faucet body.
- It is clear that if you have a washbasin in a bathroom without a mixer, choose a model with a long swivel spout. Before purchasing, you should determine the middle distance from the center of the bathtub on the wall to the sink drain hole and select the length of the gander accordingly. If the distance from the bathtub to the sink is too large and it was not possible to find a mixer with suitable parameters, the faucet body is shifted from the bowl towards the sink so that its aerator is located above the drain hole of the washbasin.
Faucets made of different materials
- When purchasing, you can unscrew the aerator in the spout and look at the thickness of its walls, comparing it with other models - the larger the cross-sectional area of the tube, the more reliable the selected faucet is in operation.
- The diameter of the spout does not matter much and can only be important if the user has a rare habit of filling the bath faster. Typically, the circumference or perimeter dimensions of all jibs are standard and correspond to the internal channels of faucets from specific manufacturers. Expensive models of wall-mounted mixers from German manufacturers (Hansgrohe, Grohe) of the avantgarde, hi-tech styles have the highest passage channels of the ganders.
- When choosing a suitable spout from any manufacturer, you should keep in mind that the vast majority of expensive or cheap models are made of brass with a chrome finish. In not a single budget Russian or Chinese gander will the chrome coating peel off from the brass, and the metal will not rust over decades of use. Therefore, there is no point in overpaying for a product from a more well-known brand if a similar cheap one is practically not inferior to it in terms of technical characteristics.
Structural design of bath and washbasin faucets