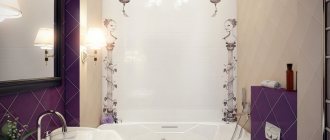
The bathroom is one of the most important rooms in every home. There you can relax after a hard day at work and take a shower. When arranging premises according to fashion trends, it is now worth considering a cabin without a pallet. There are a huge number of advantages in such designs, but they still remain something unidentified.
Today, more and more people are abandoning bathtubs and at the same time equipping them with showers of this type. These models help to bring unsurpassed style and minimalism to any room design. The cabins are made without a ceiling or tray, and the walls are installed on ceramic tiles. But you still need to look at the general information, as well as all the advantages and disadvantages of such options.
Shower without a tray - a rational solution ↑
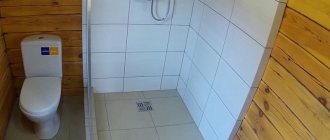
The bathroom usually does not have a large area, especially in older houses. Therefore, every square meter here is worth its weight in gold. A factory tray usually takes up a lot of space in the shower. At the same time, it does not provide much useful space, and therefore many refuse this attribute, preferring a shower without a tray.
The absence of a bulky element contributes to a more interesting organization of the interior space. In addition, such a shower creates additional convenience for people with weak physical abilities, since in this case there is no need to step over the high side.
From an economic point of view, a shower without a tray also has its advantages. This attribute (pallet), made of high-quality material, costs a lot of money. In addition, it requires constant care, which requires additional costs. Therefore, its absence saves money in the family budget.
Shower without tray - the optimal solution for saving space and money
Design and functions of a shower drain
The simplest shower drain in a bathroom under tiles is a device made, as a rule, of metal, plastic or metal-plastic. This device ensures effective collection and drainage of water from the shower floor. The shower drain has a simple design and low cost, is easy to use and install, and is trouble-free during operation.
The design of the ladder for draining water in showers consists of the following elements:
- a funnel with a flange for receiving water from the shower, in the lower part of which there is an outlet pipe for discharging liquid into the sewer. A waterproofing membrane is attached using a flange;
- decorative removable grille for catching objects, decorations that accidentally fell on the floor, large debris;
- a siphon for creating a water seal inside the drain drain to prevent unpleasant odors from the sewer from entering the bathroom.
Thus, in addition to collecting and draining water, shower drains perform a number of other useful functions:
- retention of debris that can enter sewer pipes and cause them to clog;
- preventing the penetration of stench into the bathroom, thanks to a dry seal or water seal;
- providing easy access to the drain for cleaning it in case of a blockage.
Shower drains with a dry seal or water seal save space in a small bathroom, eliminating the need to install a bathtub or a bulky shower cabin with a high tray, which also results in significant savings on the family budget. But before you buy a drain for a shower floor, carefully understand its types, because we are choosing a device designed for a long service life.
Features of shower room design ↑
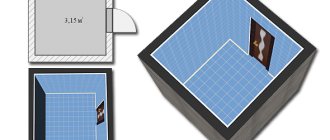
Behind the external simplicity of a shower without a tray lies a complex system. To comply with all the points (drain in the bathroom floor, waterproofing, correct slope), a headroom of at least 150 mm is required. And this despite the fact that the floor level should be lower than in other rooms. It is advisable to provide for this criterion during the design of the house, otherwise you will have to raise the floor and make a side around the perimeter of the shower.
Floor arrangement ↑
Under a neat layer of ceramic tiles lies a real “pie”, each level of which performs an important function.
The bottom layer is a concrete base, which acts as a support for the entire structure. Next, insulation made of dense polystyrene foam or expanded polystyrene is placed. Then there are two layers of screed, between which there is waterproofing.
Important! Waterproofing plays a decisive role when installing a shower without a tray. For apartments in multi-storey buildings, it is of particular importance, as it prevents flooding of neighbors below.
Floor installation in the shower room
The drain ladder is installed on a concrete base in a designated place, and the drainage pipe is connected to the general sewer system. If the drain is installed in the center of the shower, then there should be a slope of 3% on all sides. When the drain in a shower without a tray is located in the corner of the room, a slope of 2% is maintained.
Areas of special attention ↑
In addition to the floor, there are other surfaces in the shower that need good waterproofing. The so-called wet zones include:
- seams between the wall and the floor;
- bottom of the wall;
- area on the wall that is exposed to water when showering;
- pipes that collect condensate, and the places where they are inserted into the base.
These surfaces are considered an area of special attention, therefore they are carefully treated with waterproofing material.
Wet and humid areas in the shower
Cons of a shower without a tray
When it comes to the negative characteristics of such structures as shower stalls without a tray, they include the following:
- Before installation, you need to carefully consider all preparatory processes . First of all, you need to immediately remember about the drain with a slight slope. If this is not done, the liquid will begin to stagnate. For arrangement, you will need to vary the level of flooring. In apartment buildings this can sometimes be very difficult to do.
- It is precisely because of the first drawback that the use of shower cabins is limited . It is almost impossible to do this in an apartment.
- Serious costs for the preparatory processes , because there will be a small redevelopment in the bathroom.
- Such a cabin usually has the simplest functionality . There will be no additional features in regular models. That is why if you want to add something, it will further increase the cost.
- If the pipe is clogged, water can stagnate in the cabin and spill throughout the room.
- You need to be careful about sealing , because when water spills, you can often flood your neighbors.
Waterproofing the shower floor: basic methods ↑
There are several ways to moisture-proof a floor, each of which is effective in its own way. However, in order to get the desired result, it is necessary to maintain the correct technology and be able to work with the material.
Roll insulation ↑
Waterproofing a shower floor without a tray can be done using rolled self-adhesive or fused insulation materials. In this case, preparation of the base is of great importance. If there are uneven surfaces, the surface is leveled with a cement screed. The hardened base is treated with bitumen mastic, on which the material is rolled out.
The strips are laid with an overlap of 100 mm and an overlap of about 150 mm on the walls. If built-up waterproofing is used, then all joints are soldered using a construction hair dryer. The edges of the self-adhesive waterproofing are pre-lubricated with special glue and pressed tightly.
To reliably protect the floor, it is recommended to lay at least two layers of moisture insulation. In this case, the stripes of the next layer are located perpendicular to the stripes of the previous level.
Moisture insulation of bathroom floors using fused rolled material
Bitumen-polymer insulation ↑
The next way to waterproof a shower without a tray is to use bitumen-polymer mastic, which is sometimes called “liquid rubber.” The main advantage of this method is the ease of application of the material and the absence of complex preparation.
The surface must be cleaned and primed before applying mastic. “Liquid rubber” is applied with a brush, the layer thickness is maintained within 2-4 mm. All joints around pipes and drains, as well as the seam between the floor and the wall, are especially carefully processed. After polymerization of the mastic, a reliable waterproofing layer is formed.
Floor treatment with bitumen-polymer mastic
Polymer cement insulation ↑
Polymer-cement compositions have good adhesion and high elasticity, so they are excellent for moisture-proofing floors. Such mixtures consist of cement, quartz (white) sand and polymer additives, which, after filling all cracks and depressions, crystallize, forming reliable protection against leaks.
The pre-prepared mixture is applied to a slightly moistened surface with a hard brush or spatula. Particular attention is paid to wet areas. After the first layer has dried, it is moistened and a second layer is applied, while leveling the surface with a spatula. As a rule, two layers are enough to completely protect the surface from moisture, but if necessary, a third layer can be applied.
For your information. Unlike other methods of waterproofing a shower floor without a tray, the polymer-cement composition does not require the use of additional cement screed. After it has dried, you can begin installing the tiles.
Application of a polymer-cement composition to the surface
Penetrating insulation ↑
The mixture of penetrating waterproofing material consists of special cement, quartz sand and chemically active components. Penetrating into the structure of concrete and filling its pores, the active elements react with cement, forming a structure of high-density crystals. Thus, the waterproof layer is formed not on the surface, but inside the concrete base.
Since the penetration reaction occurs only in the presence of water, before applying the composition the surface is well moistened until completely saturated with moisture. The technology of floor moisture insulation itself is similar to the method of applying bitumen mastic and polymer-cement insulation: the material is applied to the base with a brush, and all wet areas are carefully treated.
In the case of penetrating waterproofing, the concrete itself acts as a waterproof layer.
Moisture protection of walls ↑
When it comes to waterproofing a shower without a tray, protecting the walls from moisture also plays an important role. To implement it, the following steps are performed:
- The wall is cleaned of smudges, old paint and other contaminants.
- Surface defects (cracks, potholes, etc.) are sealed with an insulating compound, after which the entire wet area is treated with waterproofing material.
- In areas that will be most exposed to moisture, you can apply two layers of moisture protection.
It is not necessary to use the same type of waterproofing for walls and floors. For example, you can lay roll insulation on the floor, and use polymer-cement material for the walls.
Advice. Since the bathroom is a place with high humidity, it must be equipped with good ventilation. To ensure reliable removal of moisture, a fan is installed in the exhaust hole, the power of which is selected in accordance with the area of the room.
Waterproofing bathroom walls
Arranging a shower without a tray is not as simple a process as it might initially seem. Surface treatment must be thorough, because any missed area, even minimal, can lead to dire consequences in the future. Therefore, it is better to entrust this work to specialists who have good experience in waterproofing various rooms and objects.