Despite all its apparent strength, the shower cabin can break simply because the installation and operating instructions were not followed. Of course, the nuances of proper use of the cabin are specified in the document that you receive upon purchase. However, it would be nice to know what the operating instructions for the shower cabin are long before purchasing it.
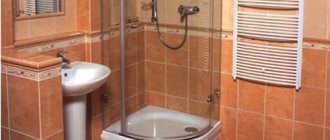
What is attractive about the design of a shower without a tray?
Models without a tank have the following advantages:
- the cabins have a compact design, which significantly saves space and makes it possible to install a shower even in very small rooms;
- a tiled shower without a tray in an apartment is easy to use. It has a minimal risk of injury: the absence of high sides is suitable for bathing small children, the elderly and people with disabilities;
- ease of care: cleaning the coating does not require the use of special detergents;
- the ability to independently create an original bathroom interior;
- economical and long service life.
The disadvantages of the structures include the need to raise the floor (or deepen it).
How to check the quality of parts?
Before installing the cabin in the bathroom, you need to make sure the quality of the components. To do this, the product is pre-assembled in a spacious room and without the use of sealant . Cabins with a ceramic tray are installed using a jigsaw.
Pallet: ceramic, steel or cast iron, acrylic (the latter is at the peak of popularity).
- Thin sanitary ware has a high chance of cracking or breaking - look at the thickness .
- Steel trays are supplied on adjustable legs, with a bottom treated with polyurethane foam and rubber gaskets underneath (so that the water jets do not create a rumble when they meet the surface). If there is no such protection, using the shower will be inconvenient.
- Acrylic needs additional support in the form of a support system , a metal frame or fiberglass bottom reinforcement. Check for the presence of parts that provide rigidity to the structure.
Scratches and chips on the frame, and even more so broken parts, are unacceptable . Test small parts for geometric consistency.
The glass is in packaging, but in the box it is not visible whether it remained intact after transportation. , tempered glass with a thickness of at least 6 mm is used for booths , which is enough to withstand many mechanical impacts. But to check, shake the box - if there is no characteristic noise of broken glass, then everything is fine.
Features of a shower without a tray
The key difference between designs of this type is the absence of a reservoir bowl with sides.
One of the main features is the high requirements for the evenness of the cladding surface. At the slightest change in altitude, water will accumulate in the bathing area, which can lead to leakage or the appearance of an unpleasant odor.
Schemes for arranging showers without a tray
How to make a shower without a tile tray? The cabin can be “hidden” into an existing niche in the room. If it is not provided for by the floor plan, it is constructed by installing partitions or partitions.
A convenient and rational location option is to install taps, a watering can and a drainage system in the corner of the bathroom.
The compactness of the design makes it possible to locate the shower along the walls of the room.
The swimming area can be protected from splashing water with doors, walls and ceiling made of glass or plastic.
When installing a cabin enclosure that completely encloses it on all sides, it is necessary to install an additional ventilation system.
How to remove water from a shower floor without a tray?
The element responsible for draining water from the shower floor is the drain.
Depending on the material used, drainage systems can be:
- plastic - most often used when installing showers, due to the simplicity and convenience of the installation process. The material is lightweight, does not corrode and can withstand significant loads. The disadvantage is low resistance to high-temperature wastewater;
- made of stainless steel - suitable for use in premises with high sanitary and hygienic requirements (catering establishments, including schools and preschools, swimming pools);
- cast iron - installed in the premises of industrial enterprises. Such systems are durable, have good throughput and can withstand a wide range of temperatures. Due to the significant weight of the products, installation is associated with high labor costs.
Depending on the location and type of reception, the ladders can be:
- point - water is drained along an inclined plane into a funnel connected to a sewer pipe. The drainage system is installed in the center of the shower, in the wall area or in the corner;
- linear - a long gutter with a rigid grid, located near the wall of the cabin, and connected through a pipe to the sewer drain. This type of drain has a high receiving capacity, so it is most often used in large showers;
- wall-mounted - point or linear type, additionally equipped with a water receiver built into the wall.
Drains with a wet seal are similar to the siphon design - an S-shaped channel is built between the funnel and the drain fitting.
Dry gate drains:
- membrane - the system opens when water pressure is applied to the membrane, after the liquid leaves, the spring returns the valve to its original position;
- float - when the drains pass, the shutter is located at the top, after the end of swimming it lowers to the bottom, blocking the passage.
Difficulties in installing tiled showers without a tray:
- the shower structure must be located above the plane of the existing sewer pipes, which requires re-equipping the entire sewage system or raising the floor level to the height required for installation;
- For the normal functioning of a cabin without a tray, it is important to be careful during operation and regularly clean the walls of the drain hole from dust particles and other deposits. In the absence of proper care, the patency of the canals may deteriorate.
It is not advisable to install a shower in a newly built house, if the building shrinks, the drain walled under the cladding and the waterproofing may become deformed and become unusable.
Cabin materials
Enclosing doors are most often made of thick glass (regular or organic), cast polycarbonate, or plastic. The material is wear-resistant and easy to clean; it can be used to create zoning for the bathroom by fencing off a corner or wall area.
The most practical use would be to use frosted, tinted or textured glass: the residue of soapy water and salt will be barely noticeable.
For small bathrooms or combined bathrooms, a shower cabin made of tiles without a tray and without hard barriers is relevant: to protect against water getting on the floor, you can use elastic sliding curtains made of PVC or silicone. Such products last a long time, have a low price, which allows them to be replaced if necessary.
It is advisable to use mosaic tiles to decorate the floor area of the cabin: this will minimize slipping during water procedures. Also suitable are ceramic products of a regular format with a textured front surface and a base made of polished wood (walnut, oak) coated with moisture-resistant varnish.
The principle of operation of the shower cabin
The shower cabin is connected to the cold and hot water supply lines. The liquid is supplied under pressure through pipelines to a mixer installed on the central panel. The user selects the desired temperature using a lever or individual valves.
There are designs with an automatic thermostat that maintains the desired water temperature.
The liquid is supplied through internal wiring to the nozzles or watering cans. The operating mode is selected using buttons or individual valves. The length of the shower head hoses and the configuration of the sprayer depend on the personal preferences of the owner or the initial configuration of the set. For example, the standard supply includes hoses with a length of 1600 mm, but there are products ranging in size from 1250 to 2000 mm. The watering can is equipped with a lid with round holes that form a directed flow of water.
Several types of massage nozzles can be installed in the cabin:
- supplying water under pressure (hydraulic massage);
- directing the flow of liquid saturated with air bubbles (air massage);
- operating in combined mode (support both hydraulic and air massage).
Sprayers are installed in vertical rows, providing water supply over the entire height. The pressure force depends on the installation point of the nozzle. Maximum pressure is provided at the level of the person’s legs; the upper sprayers direct water to the neck with reduced pressure. The liquid flows into a pan equipped with a drain, which takes it to the sewer.
Assembly in parts
Brief assembly algorithm:
- Unpack the equipment and study the instructions to understand what the shower cabin consists of.
- Determine the installation location of the product. At the installation point, provision is made for water supply pipes and a drain hole.
- Turn the acrylic tray upside down, and then mount the metal frame with legs.
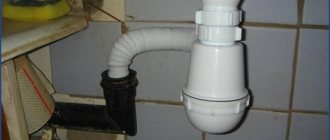
- Connect a siphon to the drain hole.
- Install the base in the corner of the room, lay the drain hose to the sewer lines (do not connect the hoses), and then adjust the position of the structure according to the level. To adjust, use screw elements in the supports, which should be rotated with a wrench.
- Remove the layer of protective film glued inside the pallet.
- Unpack the elements of the decorative apron, which is attached with screws or glue to the pallet flange.
- Mount the guide profile for the vertical walls, which is fixed on the outer part of the side of the base.
- Install plastic walls and central panel. Cover the connection lines with a layer of water-resistant acrylic sealant.
- Install fixed glass panels that are sealed with rubber bands and sealant.
- Install the upper part of the frame, and then attach guides for moving the sashes.
- Secure the sliding doors and adjust the position of the elements relative to each other. When closing the doors, there should be no gaps through which water enters the bathroom. Magnetic latches are provided on the mating surfaces of the doors.
- Assemble a roof panel that can accommodate fans and additional watering cans.
- Install the top element on the side walls and the front part, cover the joint line with a layer of sealant, and then connect the parts with screws.
- Connect the connecting hoses for water supply to the nozzles or shower heads in accordance with the cabin manufacturer's instructions.
About connecting to water supply
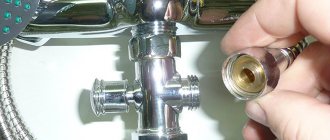
When connecting to water supply lines, you must:
- Shut off the water supply using the valves, and then release the pressure through the mixer taps.
- If switching the cabin is intended instead of a mixer, then you should carefully unscrew the union nuts and remove the equipment.
- Connect flexible reinforced hoses equipped with rubber seals.
- Tighten the fastening nuts. There is no need to install additional insulation on the threads.
- Unscrew the valves and make sure the circuit is tight.
If the cabin is placed at a distance from the hot and cold water supply risers, then it will be necessary to equip the water supply with plastic pipes. The elements are laid in a niche cut out in the thickness of the wall, which is then covered with cement and covered with a layer of finishing material. If a shower room is installed in an already renovated room, then the pipes are installed in an open way.
It is possible to use decorative plastic boxes that improve the visual perception of external wiring.
Electrical connection if necessary
Some cab models include equipment that runs on electrical power (for example, a radio, fans or lighting system). For switching, you need a socket equipped with a separate automatic fuse and an RCD unit. The power point is located in an area protected from splashing water and steam. It is recommended to use devices with a sealed lid. The socket is connected to the distribution box using a VVG cable with a grounding conductor laid inside the walls of the premises.
The power supply with a transformer and rectifier is plugged into the socket, which is connected to the distribution panel inside the shower cabin with a separate cable.
The reduced voltage eliminates the risk of electric shock to humans. If the cabin uses a hydraulic unit with an electric drive designed for a voltage of 220 V, then the equipment is grounded and placed in a sealed compartment that is not flooded with water.
After completing the switching of the water supply and power lines, the cabin must be moved towards the walls, and then checked for correct position. If the structure is skewed, additional adjustment should be made by rotating the screws on the legs. Then the joints between the plastic cases and the walls are sealed. The insulating material prevents the formation of odor-causing mold in hidden cavities. After the sealant has hardened, a test run of the equipment is carried out.
Bathing area dimensions
To determine the optimal dimensions of a future tile shower without a tray in an apartment, be guided by the following selection criteria:
- bathroom size. For comfortable swimming in a small room, a 100x100 cm cabin is suitable. If the room is large, choose the design dimensions at your discretion;
- ceiling height. The peculiarity of the building's floors may require raising the floor level in the room by at least 10 cm, so in a low bathroom it will look unaesthetic;
- if the shape of the room is non-standard or irregular, it is advisable to make a shower room with asymmetrical walls, which will also help visually correct the geometry of the room;
- Features of those living in the house: large, overweight people will find it uncomfortable to bathe in a small shower.
The minimum size of the walls of the shower area is 70x70 cm.
Closed and open types
When choosing a location for your cabin, consider whether you prefer a closed or open model. If you want to place it in a corner, then opt for the open option. However, in this case, make sure that the walls are completely covered with tiles, which will protect them from contact with water. If open-type models consist only of a tray, a shower head and doors, then closed-type shower cabins, or as they are called, monoblock cabins, are also equipped with side walls, a roof and a shower panel. Closed models maintain the required temperature very well.
Shower cabins are also built-in. This model is installed in a recess in the wall, since it only has internal panels. This type of shower stall is closed with a sliding, transparent door.
Making a booth from scratch, step-by-step instructions
Preparation of necessary materials and tools
- ruler, tape measure, pencil;
- laser level, marking cord;
- cement-sand mortar, expanded clay, mixing container;
- waterproofing (liquid compounds and rolled materials);
- sheet extruded polystyrene foam (at least 5 cm thick);
- tile adhesive, grout;
- drainage system (ladder), pipes;
- facing material.
Marking and preparing the base
Before installing a shower, consider the option of installing a drain: raising the level of the entire bathroom floor or only in the bathing area (in this case, the cabin will have a small step):
- clean the surface of debris and dirt, if necessary, dismantle the old cladding;
- Using a tape measure, determine the future location of the drain. If the ladder is installed in the center, the floor must be sloped on all sides along the perimeter of the cabin; if the drain is near the wall, the plane should have a greater height on the opposite side;
- make a zero level mark on the wall;
- adjust the laser level so that the beam is located in the center of the sewer pipe opening;
- position the ladder so that the inlet pipe is higher than the beam, taking into account the height and thickness of the upper platform of the glass;
- on the wall (1 cm above the beam) mark the level of the drain hole with a pencil;
- to indicate the slope of the surface, make marks on the walls 2-3 cm above the beam, move them along the entire perimeter;
- Use a marking cord to mark lines along the marks.
Waterproofing the installation area
Before installing the drain and pouring the screed, cover the base of the shower with mastic or bitumen. Apply the compositions in 2-3 layers to the entire floor and wall area (to a height of 20-25 cm).
A second insulation layer must be made on top of the dried rough screed: lay sheets of fiberglass or roofing felt in several layers, placing the edges over the walls. Fold at the corners and secure with glue.
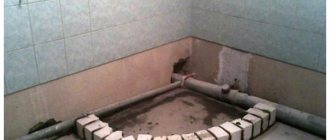
Pipe installation and foundation construction
- install the drain elements, check the quality of the assembly by pouring water. To avoid clogging with debris, cover the grill with tape;
- make formwork from moisture-resistant plasterboard or oriented strand board;
- fix the structure on the ceiling;
- install the drainage system on the base, aligning the position of the outlet pipe with the sewer pipe and maintaining a slope towards it (by 1-2 ⁰);
- Fill the remaining floor areas after installing the ladder with expanded polystyrene;
- prepare the cement-sand mortar for work, pour the screed, its drying time will be at least 2-3 days.
Another option for carrying out the work is possible: install the drainage system in a specially designed formwork, fill the remaining area with a solution of cement, sand and expanded clay, taken in a ratio of 1: 1: 2 (add water in a minimum amount). On the hardened screed, make a layer of waterproofing and lay polystyrene foam.
If it is impossible to adjust the position of the ladder, heat the plastic pipes with a hair dryer, then slowly and smoothly give them the desired direction and hold it there until the material cools.
Leveling the surface
The stage of forming the surface of the shower floor consists of laying a finishing concrete screed up to 4 cm thick.
During the pouring process, check the horizontal plane using the marks on the walls and compliance with the required slope: use a trowel to draw lines from each corner of the drain to the corners of the shower area, removing the thickness of the mortar in the required areas. You can use a rule or a rod for this purpose. Correct minor unevenness with a float.
After the screed has dried, dismantle the formwork.
Frame assembly and ceramic tile cladding
In the case of arranging a shower with a frame made of enclosing walls:
- mark the places where the parts are attached to the walls;
- secure the profiles and guides;
- install partitions with seals;
- secure the door frame and install fittings depending on the type of opening mechanism.
If cinder block, brick, plasterboard partitions or walls are used as a protective barrier, decorate the surface with ceramic tiles after tiling the floor: the bottom row of vertically located elements will “cover” the horizontal coating.
Install using a notched trowel and tile adhesive that has high adhesion and resistance to moisture.
Treat seams and joints with moisture-resistant silicone sealant.
Laying finishing tiles
Lay the ceramic cladding starting from the ladder and moving towards the perimeter. The tiles in areas along the walls must be trimmed and the corners joined.
To install the coating yourself, use a waterproof tile solution.
How to turn it on
Separately, you will need to pay attention to some options and modes of the most expensive equipment, including a steam generator, hydromassage and aromatherapy. Basic rules of touch control:
Basic rules of touch control:
- activation of any function is accompanied by a green indication;
- when the function is disabled, the button turns red;
- To turn on the system, just press the touch zone for a few seconds.
It is strictly forbidden to expose the touch screen directly to water, due to the risk of triggering the system for enabling individual functions or modes.
Careless or improper handling of any shower stall functions very often becomes the main reason for their premature failure
How to turn on the watering can
If a single-lever mixer is used in the shower stall, then water is supplied by moving its handle to the “pull” position. Turning clockwise provides hot water, and in the opposite direction - cold, which allows you to set the optimal temperature.
Shower head
The deviator, which is a water flow distributor, helps to choose the optimal shower mode for the cabin. The mixer handle is responsible for increasing the pressure of the water flow. You can reduce the pressure if you lower this handle down, and raising it to the top position increases the flow of water.
It should be noted that narrow shower heads are less convenient to use, and water flows from too wide devices for a very long time after the tap is closed or switched to the “Hand Shower” mode.
How to turn on the overhead shower
A rain shower or overhead shower resembles a traditional watering can in appearance, but the main difference is its larger dimensions and higher location. Enabling the function allows you to create the impression of real rain, which is due to a special system responsible for the supply and distribution of water through a special ceiling grille.
Rain shower
In addition, as a result of mixing water with air, you can feel the fall of “real” raindrops, and the built-in LEDs make taking such water procedures especially pleasant. The Tropical Rain function is activated on the touch panel by pressing the button with a special symbol.
How to turn on the hydromassage
The hydromassage function is quite useful, but cannot completely replace traditional massage.
After turning on the system, you must press the “Nozzles” button, which will activate the upper elements, and pressing again will ensure the operation of the middle nozzles. When the button is pressed for the third and fourth time, the lower nozzles and all elements are activated respectively at the same time.
Grouting and cleaning
1-2 days after finishing the cladding work, grout the joints. To ensure sealing of gaps between tiles, use mixtures that have fungicidal and moisture-resistant properties.
After 5-6 hours, depending on the type of composition, clean the surface of the tiles from excess fugue with a damp sponge or soft cloth, remove the tape from the drain grate.
Installation of cabin doors
You can install two types of doors in the shower:
- sliding or folding - opening along the cabin wall using a roller mechanism. The installation of the canvases is carried out on horizontal guides attached to the base and vertical profile;
- hinged (single- or double-leaf) - mounted on hinges that are fixed to the wall or metal frame. The canvas is equipped with a seal to ensure tightness and silent movement.
For small bathrooms, it is advisable to use sliding doors, which significantly saves space.
Installing a heated floor over the entire area of the bathroom or only in the bathing area will help make water procedures as comfortable as possible. When choosing the design of a shower corner without a tray with tiles, focus on the size of the bathroom, the quality and pressure of the water - the choice of materials used and the functionality of the shower will depend on this.
Mixer design
A wall-mounted mixer with a hygienic shower or its simple type can have a different design.
Lever
Such devices are currently the most popular. It is possible to regulate the water supply, its pressure and temperature using one lever.
The distributor in such a device is a plate- or ball-type cartridge. Such units are very reliable and durable.
Valve
This is a classic type of mixer. In it, the supply of cold and warm water is regulated using two valves with valve axle boxes; the handles (thumbs) rotate around their axis.
The main drawback of the design is the need to use rubber or silicone gaskets for its components. They are short-lived and systematically fail.
Thermostatic
Such mixers are equipped with a thermostat that controls and maintains the temperature of the liquid. The device has two regulators - for the degree and pressure of water heating.
This type of wall-mounted hygienic shower mixer has the following advantages.
- It has a water saving mode option.
- By setting its temperature absolutely correctly, you will also reduce the cost of heating the liquid.
- A thermostatic device will protect you from ice water or a stream of boiling water.
- The device responds to pressure fluctuations in the system. It eliminates this problem by working in simple mode.
Let us immediately emphasize that the price of a mixer, based on its advanced functionality, is significantly higher than simple analogues.
Shower made of tiles without a tray in an apartment
Each tile shower without a tray photo can differ in color, contrasting and visually separating the bathing area from the rest of the area, or be made in one shade to create the effect of space integrity.
For loft-style rooms, it is important to use stone (decorative brick) as a facing material for partitions, floors and walls made of glass, enclosed in dark-colored frames.
For eco-style bathrooms, the walls and flooring can be made of wood or ceramics that imitate this material. The finishing touch will be a home-made or purchased wooden footrest.
A shower corner without a tray with high-tech tiles is equipped with lighting and massage nozzles. The floor (walls) are decorated with black tiles, or doors made of tinted glass are installed, combined with chrome fittings. The outline of the cabin should be of a strict shape, with a minimum number of niches and shelves inside.
You can create a shower room in a minimalist style if you make walls, partitions and doors from transparent plastic or glass - this will visually make the space light and filled with air.
General assembly rules
First, they always install the pallet, then the walls, hang the curtains or doors and finish with the installation of the roof. Let's move on to the instructions on how to properly assemble and install the shower cabin structure yourself.
Pallet
Acrylic
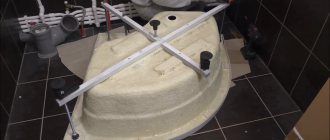
We begin the assembly and installation of the shower tray by screwing the legs, siphon and fixing the drain onto the tray turned upside down.
Acrylic models need a frame. Its beams are usually arranged crosswise , but can also be parallel. Studs are installed in the holes of these strips, secured with nuts on the top side and a thrust bearing on the bottom.
Using a level and an adjustable wrench, we adjust the height - the surface must be level to ensure normal drainage and to avoid the accumulation of water on the sides of the pan. A correctly installed structure does not bend or make cracking noises.
Ceramic
Ceramic options do not have space under the tray - they are supplied as a single block . The space for draining and laying pipes is cut out in the floor itself. Installation occurs according to the following algorithm:
- The pallet is “tried on” to the area where the booth will be located . A marker outlines the perimeter and makes a mark at the drainage site. It is important that the drain hole is located as close to the drain pipe as possible to ensure rapid drainage of water.
- A hole is cut in the floor at the location of the siphon .
- A furrow is cut for pipes and communications.
- The area under the booth is impregnated with a thin layer of PVA glue , slightly diluted with water. After complete drying, it is covered with another thin layer of adhesive.
- A siphon is connected to the drain, a tray is placed on the solution, maintaining the same horizontal level in all corners.
- At the end, a strip of silicone sealant must be applied at the joints with the floor and walls.
In parallel with the installation of the siphon, the water supply is connected - at this stage tees for cold and hot water will be useful . All joints are sealed with fum tape or sealants. Potential problems with leaks are eliminated by checking the seal (pour a bucket of water into the pan several times).
Walls
First, the rear part is installed - the one where electrical appliances, communications, etc. are located. It is located next to the side panel, attached to it and to the pallet with self-tapping screws. Next, a metal arch is mounted to the pallet with bolted connections. It is very important that the holes on the frame exactly match the mounting holes on the pallet itself.
The joints with walls and brackets must be treated with sealant so that during operation water does not leak outside the shower stall.
Curtains
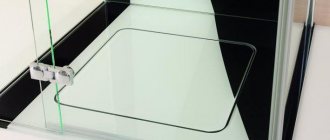
Sealant is applied to the grooves of the strips for fastening the glass, then the glass is carefully set there. For the reliability of the structure, self-tapping screws are used. They are finally fixed only after the arrangement of all parts has been completely settled .
A strip of rubber seal is cut and squeezed into the gap formed between the groove of the panel and the glass. Mounts with a roller mechanism are inserted. The rollers can be adjusted so that the sashes are in contact as closely as possible. Stoppers are placed at the ends.
Turning on ventilation
Any shower stall, regardless of the set of functions, is a closed space, so humidity levels in such plumbing fixtures increase quite quickly. The lack of effective ventilation significantly increases the risk of mold and mildew formation, so a forced air blowing system is very important.
Set for shower cabin AM 11 remote control, speaker, fan, lamp, power supply
Among other things, the presence of forced removal of moist air masses allows you to avoid fogging of the mirrors. Activating the “Fan” button starts the system, and when pressed again, the ventilation device is turned off. Also, many models have an ozonation option. The function not only prevents the formation of mold, but also gives freshness and also cleanses the air of any unpleasant odors.
Enabling the Turkish Bath mode
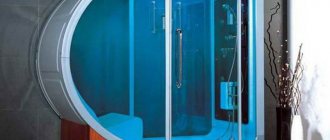
The presence of an electric steam generator in the shower stall ensures the operation of such a plumbing device in the “Turkish Bath” mode. During the process of heating and evaporation of water, the interior space of the shower cabin or hydrobox is saturated with steam.
In this mode, the humidity inside the cabin reaches 100%, and the temperature is about 50-65°C.
Shower cabin with Turkish bath
Enabling and disabling such a useful and pleasant function is done from the control panel. After filling the steam generator with water, pressing the “Steam” button activates the steam supply. If there is no water inside the steam generator, the indicator on the button flashes red.
Shower in the room's recess
A shower of this type does not need a tray , because... water flows into the drain due to the slope of the floor. An alternative option is a drainage system. Convenient in cases where even the smallest pallet is too high for some family members (for example, for the disabled and the elderly).
A special feature of the installation is the installation of a water collection system (stairway or channel). The pipe and siphon are placed inside the screed. According to the rules, the sewerage system is located with a slope towards the riser.
Waterproofing of walls and floors near the shower stall in this case should be of particularly high quality and use antifungal agents . A special cuff is laid on the floor, which surrounds the drainage ladder. The cuff covers the main waterproofing layer to eliminate the possibility of leaks.
The sound of water transmitted to the rooms on the lower floor can be muffled by soundproofing . Some drainage drains are initially designed to absorb unnecessary sounds.
Learn how to properly build a shower stall in an open-air summer cottage from this material.
Recommendations for the installation and installation of a garden shower made of polycarbonate can be found here.
Easy and convenient to use
The shower cabin is a comfortable and convenient device. Everything about its use is intuitive and easy to construct. Each function is divided and labeled , making it easier to use. It does not take up much space , and this helps to place equipment or furniture in the bathroom.
Shower stalls are a space for taking a shower, enclosed on all sides. The flooring under the shower is made airtight and lined with floor tiles. The surface for the shower device must be flat, without slopes or curbs.