Installing a boiler allows you to use warm water when the hot water supply is cut off. The device helps save money on utility bills. There are several installation locations for the device. You can place the water heater in the bathroom: this installation option is considered more convenient.
Installing a water heater in the bathroom is easy.
We place the water heater in the bathroom
Gone are the days when a huge boiler storage tank hung over the bathroom. Modern water heaters can even be installed under the sink. When installing a water heater in the bathroom, they determine whether it is a separate or combined bathroom.
With a separate bathroom, two options are acceptable:
- above the bathroom closer to the entrance;
- above or below the washbasin (if the dimensions of the device allow).
With a combined bathroom (which also contains a bathtub), typical of Khrushchev-era apartment buildings, gostinikas, and one-room apartments, there is plenty of room for your imagination to run wild. The following methods are acceptable:
- on the wall behind the toilet;
- above the tank;
- in boxes for risers;
- under the sink (a compact boiler of only the instantaneous type is suitable);
- on the upper mezzanine (not a very good option).
Important!
When connecting in rooms with high humidity, the electrical wiring is enclosed in a corrugated plastic hose, and the housing itself is grounded (in accordance with PUE standards).
If possible, provide a separate power line on the panel for a water heater with a circuit breaker.
Operating principle of electric flow heaters
The device increases the temperature of the liquid passing through it using a heating element - a tubular electric heater (TEN) or an open spiral.
The first type is more common, because the part is easier to replace in case of failure. An open spiral is used in compact devices.
The heater is turned on when water is supplied through the inlet. When the flow stops, the device shuts down.
The presence of liquid supply is monitored by a sensor, which sends a corresponding signal to the heating element or coil.
The required temperature of the element is reached in a few seconds, after which the device simply maintains it. Hot water from the tank is supplied to the user through the outlet.
What are the benefits of using instantaneous water heaters for showers?
Among the advantages of instantaneous electric water heaters for showers are the following:
- Speed of work. You don't have to wait long to get hot water: heating takes a few seconds after the first switch on, then the temperature is maintained constantly.
- Economical. The device uses exactly as much liquid as needed. In storage devices, water is supplied to the tank, so the volume may be too large or insufficient. However, if used regularly, the flow device will consume a lot of electricity.
- Compactness. The faucet attachment for heating water takes up little space. It can be installed even in a relatively small bathroom or cubicle.
What are the disadvantages
Before purchasing a device, you should consider several nuances:
| High power | Most models require a separate power line to operate. Theoretically, you can connect the device to the electric stove cable, but you will have to use them separately, otherwise an overload will occur. |
| Danger | If you need to provide water to the entire house, you will have to install several devices, or one, but powerful one (more than 25 kW). This level potentially creates a threat to life, since the chance of failure is higher. |
| Fast cooling | In a flow device, the liquid will be hot as long as there is electricity. In the storage device, the water in the tank remains warm for an hour after being turned off. The problem can be eliminated by erecting additional structures, but in most cases this is impractical. |
| Lack of scale protection | If the water is hard, the flow model will sooner or later fail. Despite constant circulation, salts will gradually be deposited. Even a filter will not correct the situation, although it will extend the service life. |
How to hide a water heater in the bathroom?
Modern water heaters are attractive in appearance, unlike old boilers. There is no need to hide them specifically, only if there is such an opportunity. A small boiler (up to 30 l) will fit under the sink (washstand). Storage water heaters are hidden in niches, wall cabinets, behind blinds, inside plasterboard boxes.
Complete turnkey apartment renovation
- Everything is included The cost of repairs includes everything: work, materials, documents.
- Without your participation After agreeing on the project, we only bother the owners when the repairs are completed.
- The price is known in advance. The cost of repairs is fixed in the contract.
- Fixed repair period Turnkey apartment renovation in 3.5 months. The term is fixed in the contract.
Read more about Done
What if there is no space in the bathroom?
There may not always be room for a water heater in the bathroom. Are there rooms in the apartment where this unit can be installed? Yes, there is, let's look at it in order.
Source: sense-life.com
Kitchen
Although there appears to be plenty of space, most of it is taken up by functional kitchen elements. In addition, there is a gas pipeline riser. Connecting a boiler may raise questions among the engineers of the servicing gas supplier.
For apartments of the so-called Stalinist type, a niche was provided for the refrigerator. Its approximate dimensions are 750 mm x 750 mm with a depth of 250 mm. This is enough to accommodate a productive boiler with a capacity of 50 liters. Under the kitchen window of the Khrushchev house there is a niche where a compact boiler will fit (if the heating radiator is removed).
More options:
- mezzanine above the entrance to the kitchen;
- locker;
- flow-through under the sink;
- inside the box as part of a kitchen set.
Do not forget that the water heater must be as close as possible to the water supply system, otherwise a trail of cables and pipes will stretch behind it, which is difficult to hide. You will have to make false panels, reducing the usable kitchen area.
Pantry
For new buildings, a dressing room is provided in the hallway. It is a separate room with an interior door. A water heater will fit there, at the same time solving the problem of aesthetics, since it will be hidden from view.
Do you need repairs?
We have already renovated more than 500 apartments, we will be happy to help you too
Find out the cost of repairs
What about the toilet?
This is the most inconvenient, although easily accessible, room for hanging a boiler. Important communications are concentrated here: cold and hot water supply risers, a water meter, shut-off valves, and sometimes filters. The box is intended exclusively for soundproofing risers. In a typical apartment, the boiler will hardly fit inside the box behind the toilet.
The location depends on whether it is a combined or separate bathroom. If it is separate, then the usual position of the boiler is above the toilet cistern. There are no more options due to limited space. At the same time, it is also impossible to hide the boiler, with the exception of metal or plastic blinds.
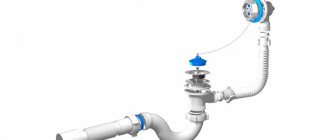
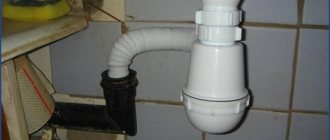
Non-pressure water heater for an apartment. Bathroom. Above the sink.
© home-comfort.ru / Electrolux Smartfix 2.0 TS
Example:
This Electrolux Smartfix instantaneous water heater is connected to the water supply (cold water).
Its advantages:
- ultra-compact to fit into a small apartment
- has overheating protection
- productivity 2-4 liters per minute
The kit includes a shower head or faucet, or both a faucet and a shower head. You can choose what suits you best for your home.
Hard to reach places
The options for installing a boiler in the corridor or hallway cannot be called successful. It also has its own functional areas that cannot be changed. For example, an area for taking off and putting on outerwear, storing things, and hangers.
We can recommend these places:
- a niche for a pantry is the most successful option for a corridor;
- mezzanine;
- inside the wardrobe.
There is also such an option as a floor cabinet. This is a handcrafted storage unit to hide your water heater. Can be placed in the hallway, kitchen, bathroom (if there is enough space).
Some tips on where to place a water heater during a complex renovation
If the water heater is installed as part of a comprehensive renovation, like other equipment, it is important that it be included in the project. The project is drawn up in advance by the architect, taking into account all the features of the apartment. Of course, repairs are best done on contractual terms with a contractor company.
With a comprehensive repair, the customer receives the following benefits associated with determining the location and installation under the boiler:
- The water heater is mounted on a load-bearing or strong wall (brick, concrete). Hanging on drywall and similar walls is prohibited;
- a water supply scheme is being thought out so that it is convenient and closer to the pipes;
- The location of sockets and electrical wiring under the water heater is safe for users. A separate copper cable will be laid and connected to an additional machine. This is an additional safety measure against power surges when turned on. The wire must be grounded;
- during installation, space was left for checking (removing) the heating element;
- access to the sewerage system is provided for draining water from the overpressure valve;
- when installed next to an existing water supply system, the housing will not block valves, meters, or shut-off valves. In addition, there will be free access to the boiler itself.
The device body can be aesthetically hidden (at the customer’s request).
Step-by-step instructions for installing a boiler
It’s better to work together; if this is not possible, then call an assistant, at least just to hang the water heater.
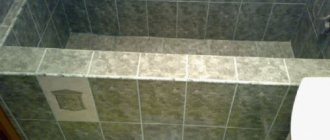
Step 1. Decide on the installation location of the storage boiler, draw up a diagram of the pipeline layout. You will need to supply cold water and drain hot water.
A water heater will be installed here. The dimensions of the room correspond to the dimensions of the boiler
We recommend connecting using the simplest and most reliable scheme. At the cold water inlet there is a shut-off valve, followed by a safety valve assembled with a return line. There is no need for a valve at the hot water outlet; for repairs, it is enough to close one. If you wish, you can install valves at every turn and on every pipe, but the result of such work will only be negative. In addition to the fact that you will have to buy unnecessary elements, installation time will increase and the number of places for possible leaks will increase. Practice shows that all other shut-off valves are never used; only one input valve is always closed.
Important. Try to install the unit at the maximum distance from the shower stall or bathtub. In these places it will fog up and create inconvenience during water procedures.
If you have a new building and pipeline sockets have already been made in the wall, then the work is much simpler. What if the boiler is installed in a bathroom that is already in use? It is best to take the water supply from the sink. Disassemble the connection at the cold water supply point and install a tee there. Connect hot water to the existing shower mixer. This work can be done quickly by using external laying of pipelines and flexible hoses, or you can trench walls and hide communications. The second option is much better, but requires additional effort. In addition, it is not always possible to restore wall cladding with ceramic tiles to its original form. Decide for yourself which option to choose.
Step 2. Unpack the water heater and check the contents. What should be included in the delivery is indicated in the manufacturer's instructions. By the way, an approximate installation diagram is also given there. From this diagram, only one point is important for you - how to connect the safety valve. We have already mentioned that it is located in the same housing as the return one.
Step 3. According to your connection diagram, purchase materials. Count their number and nomenclature, including corners and ends. To seal connections, use FUM tape. It not only performs its tasks perfectly, but also prevents breakage of nuts or threaded fittings of flexible hoses. Keep in mind that these elements are made of a beautiful, but very fragile silumin alloy; at the slightest excess of permissible forces, it cracks.
Step 4: Prepare your tools. You will need a drill with a hammer drill, a set of locksmith wrenches or one adjustable one, a screwdriver, pliers, a tape measure, a level and a pencil. Most apartment owners have this tool at home; there is no need to buy anything.
Tools
Important. If you are fixing the water heater to a strong load-bearing wall made of brick or concrete, great, their physical strength allows you to hang such heavy devices. And if for some reason the boiler needs to be hung on an interior partition made of foam concrete, then certain difficulties arise. We will tell you how to solve them a little lower in this article.
Step 5. If you have an assistant, lift the heater with him and lean it against the wall at the installation site, mark the locations of the dowels with a pencil or felt-tip pen. Take it away and check the horizontal position with a level. Drill the holes and install the fasteners in place. You will have to hang the heater several times; it is difficult to guess the length of the fastener the first time. As soon as the device is fixed on the wall, you can release the assistant; all further work can be done alone without any problems. Be sure to check the reliability of the hanging. To do this, grab onto the upper part of the body; it should support your weight. No wobbling or large distances from the wall are allowed. Adjusting the distance from the wall is done by tightening the fasteners.
If there is no assistant, then you need to mark the center of the fixation bar (bracket). Draw a horizontal line on the wall under the level and mark the distances between the service holes on it. You will have to lift the boiler alone, and this is quite difficult.
Mounting strip and bracket
Measurements
Measurements on the wall. You need to find and mark the center
Fixing the brackets
Step 6. Remove the plastic plugs from the pipes. Please note that the cold water supply pipe is blue and the hot water supply pipe is red.
The plugs have been removed
Step 7. Start working by connecting cold water. Wind approximately 6–8 turns of FUM tape onto the threaded part of the outlet pipe, and carefully press it with your fingers around the thread. You need to wind it clockwise, otherwise, when screwing on the tap, the tape will slip and the thread will leak. Make sure that the tape does not cover the inlet.
Screwed tee
Screwing the tap
Important. When purchasing taps and adapters, make sure that they are connected without additional couplings. The more couplings, the more problems.
For example, if the inlet pipe has a thread, then buy a faucet that has a nut at one end and a fitting at the other. A valve is screwed onto the fitting; on the opposite side it also has an open threaded part. This means that one end of the flexible hose must have a nut, and select the second depending on the end of the pipe. We have given this example so that you understand the principle of completing pipelines with shut-off and other valves. The more different adapters there are, the lower the qualifications of the master. Keep this in mind when performing any installation work.
Step 8: Attach a valve to the stopcock. Control its position, this is very important. There is an arrow on the body indicating the direction of water movement, observe this condition.
General installation diagram
The arrow on the check valve is shown in red
Screwed check valve
To ensure that, before screwing in, check the functionality of the safety and check valves. Raise and lower the lever for forced opening of the safety valve several times, and use your finger to check the actuating force of the shut-off valve.
Screwed valve
Step 9. According to your connection diagram, connect the valve outlet to the cold water source.
Step 10. Connect the hot water outlet pipe to the mixer. If necessary, cold water from the boiler is also connected to it. To do this, install a tee at the inlet, after the tee another shut-off valve, and connect cold water from the valve with a hose or plastic pipe to the mixer.
Step 11 . The electrical part is assembled at the manufacturer, there is no need to touch anything there. Connect the outlet and plug it into it. When carrying out work on connecting electrical equipment, always comply with the Electrical Regulations.
Photos in the process of connecting wires
Installation is complete, check the operation of the boiler. First, open the hot water tap and turn on the cold water supply. Air should come out of the mixer; when the container is full, close the tap. Carefully inspect the entire connection for leaks, and if problem areas are found, fix them. Set the minimum water heating temperature and connect power to the boiler. Check whether the indicator light is on, whether the temperature relay operates, how the thermometer behaves. After turning off the boiler, it is advisable to check the water temperature with an ordinary alcohol thermometer and compare its readings with those installed on the body. This will allow you to more accurately navigate the actual heating of the water.
Open the tap and check the water temperature