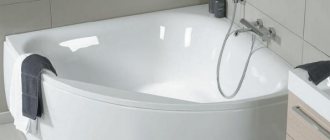
Acrylic bathtubs are popular among residents of Russia and beyond. They are lightweight, durable and inexpensive.
However, even with the most careful handling, scratches and chips may form on them, since acrylic has low resistance to mechanical and chemical influences.
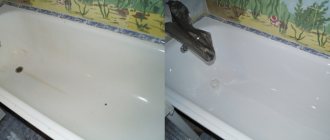
Such damage spoils the appearance of the bathtub, leading to corrosion and deformation. Read the article on how to remove a scratch on an acrylic bathtub without ruining it.
How to remove minor damage?
Before you begin removing minor scratches on your bathtub, you need to thoroughly wash and dry it. It should be taken into account that acrylic is a porous material, so it takes at least 7 hours to completely dry it. It is not enough to simply wipe the surface with a dry cloth. It is necessary to give the moisture time for complete evaporation.
Instructions for removing minor scratches:
The first stage of processing is sanding the surface with fine-grained sandpaper.
The skin should be the thinnest, and the grain size should be P2500 units. Only if these conditions are met will it be possible to rub and not scratch the surface.- If after grouting the surface is smooth and no roughness is felt on it, then the work was done efficiently.
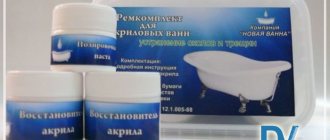
- The second stage is treating the damaged area with an abrasive polish. You can find special repair kits on sale, the average price of which is 600 rubles. The polish is applied to the surface of the bathtub and rubbed with a felt cloth.
- After 2-3 hours, the polish will be absorbed, after which you can begin the third stage of processing. It comes down to applying wax for acrylic baths (this component is also included in the repair kit).
- After an hour, the bath is washed using a liquid product.
If the size of the scratch does not exceed 0.5 mm, then simply rub it vigorously with felt. As a rule, such treatment is enough to remove shallow damage. Video tips will help you remove scratches on an acrylic bathtub:
Acrylic was scratched, but became as good as new: a simple solution from Cramer
How can you easily and quickly restore the flawless surface of an acrylic bathtub after scratches? If you “managed” to make large chips, potholes and other significant depressions in the acrylic bathtub bowl, then this is a reason to use the recipe from the article on repairing enamel surfaces . In the case of the repair kit from Cramer , which is discussed there, it does not matter whether the enamel is damaged or acrylic. If the problem really is shallow scratches on acrylic, then for these cases there is a simpler, specialized solution.
Scratches on acrylic are harder to see than to polish
When interacting with acrylic surfaces, you need to be attentive to small scratches in order to minimize the likelihood of their growth. To do this, you need to regularly inspect the bathtub or sink bowl from different angles and remove any defects that appear. To do this, you do not need to call any organizations to provide such services. It is enough to include preventive examinations among the procedures for maintaining cleanliness in the house.
Repairing scratches on acrylic
You can independently, quickly and easily restore the damaged integrity of the acrylic coating if you purchase the necessary products and tools in advance. select and purchase them right now. Or at any time after achieving a clear understanding of the contents of this article. And it's no more complicated than the actors' actions shown in Cramer's proprietary videos.
The specially selected agents and polishing ingredients in Cramer's Acryl-Star help restore color, remove stains and limescale while polishing the surface of the bathtub. Deeper scratches should be treated using the sanding paper included in the kit, and then the corresponding area should be brought to a mirror shine using paste.
Clear instructions with recommendations from the manufacturer
It’s worth taking a little more detail than the product description to understand exactly how the German company Cramer suggests following its instructions and why. Special cases are different and the effectiveness, practicality, environmental friendliness and reliability of the proposed means are manifested in different ways. In this article we will look at the “usual” option: a few scratches on acrylic, shown in the photo above in the text.
The basic rule for using Cramer products to restore the flawless appearance of acrylic surfaces may sound like this: please do everything according to the attached instructions. The rest has already been done and provided for by the manufacturer, and any worries about this can be considered unnecessary.
Before purchasing or repairing anything, it is advisable to take into account: improper care of acrylic can lead to undesirable results. The acrylic surface may become dull as its surface becomes matte, or more accurately, “gently scratched.”
- To clean acrylic surfaces from limescale, stains or dirt: apply Acryl-Star Cramer acrylic care product to a damp cloth or sponge and rub the wet surface thoroughly. Then rinse with warm water and wipe dry.
- To polish scratched areas: sand the areas where small scratches are found using sandpaper, and then polish them with the special cloth from the Acryl-Star kit, applying a little of this product to the surface.
- The unused part of the kit can be stored at temperatures from +5° to +30°C for 3 years. To maintain the ideal appearance of the bathtub during normal use, it is enough to use such a set once a season during general cleaning.
- You can use it without protective equipment, since the Acryl-Star composition has an acidity level acceptable for open skin, has a pleasant smell and is environmentally friendly.
When looking for a more universal care product in bathrooms for ceramic, enamel, acrylic, metal, painted (including powder coated) surfaces, you should pay attention to barcode correctors from Cramer .
If you want to completely get rid of the problems with acrylic bathtubs and replace them with enameled ones, then it makes sense to consider very high-quality and durable models from the German brand Kaldewei . Chrome surfaces can be present in both types of bathtubs, as well as in other bathroom equipment. To effectively care for them, Cramer specialists also produce such reliable and environmentally friendly products as, for example, Chrom-Star .
We wish you a clear understanding that there is no need to worry, worry and look for expensive specialist services because of such trifles as scratches on acrylic.
Technical information, videos and photos: Cramer
Author of the article: Valery Stobbe
How to repair chips?
If a chip has formed on the surface of the bathtub, it will not be possible to rub it with sandpaper; more serious repair work will be required.
To do this, you need to purchase a repair kit, which includes:
- sandpaper;
- polishes;
- reducing agent (putty);
- napkins;
- gloves and applicator.
Instructions for removing chips involve going through the following steps:
First you need to wash and dry the damaged area, then degrease it with white spirit or acetone.- The perimeter of the chip is covered with masking tape. This is done to ensure that the polish does not get on the undamaged area.
- Using 1200 grit sandpaper, sand the surface of the bathtub. This treatment will allow the putty to grip more firmly.
- The dust formed after sanding is removed with a vacuum cleaner. After treatment, use the alcohol wipe included in the kit.
- The putty is prepared according to the instructions for use, which are included with the purchased kit. Sometimes it is included in the kit ready-made.
- Using a spatula, apply the mixture to the chip so that it is completely filled.
- 30 minutes after the manipulations, it is necessary to remove the masking tape.
- After 24 hours, the treated surface is sanded with sandpaper and polished with felt.
You cannot use the bathroom before 5 hours. This is the minimum time that must pass for the liquid acrylic to set.
Direct polishing process
- Buy a primer. There should be instructions on the jar in what proportions to dilute it. After the paint is filled into the “gun”, it is necessary to spray it on each area, moving back and forth;
- After the first coat, wait until the paint dries (about 30 minutes), then go over again;
- Polishing after painting requires special care. Open a can of acrylic varnish and apply exactly 3 coats to the outside. As with paint, at least 30 minutes should pass after each layer;
- Once the final coat of acrylic has been applied, do not use the product for 48 hours.
It may be interesting: What criteria should you use to choose a toilet lid?
Small tips
Five tips for productive polishing:
- To prevent drops from the spray bottle from being sprayed beyond the limits, it is recommended to stop every time the direction changes;
- every six months it is recommended to wipe the product with urethane shine (sold in automobile stores and service stations);
- if you are using a spray gun for the first time, it is recommended to get used to the mechanism by practicing on a piece of plywood;
- rough and caustic detergents are contraindicated for any plumbing fixtures;
- It is better to use soft cleaning gels or a soft scrub.
Use personal protective equipment before polishing the product. Open all windows and doors. Use hoods and fans to remove toxic fumes. Pets and all family members must be removed from the premises during this period.
How to cover up cracks?
Getting rid of a crack is much more difficult than getting rid of a scratch, even the deepest one. This defect is end-to-end, so it can lead to water leakage in the bathroom and flooding of neighbors.
Another danger of a crack is its ability to increase in size. It spreads under the influence of weight, when using detergents and even when exposed to water.
Repair is carried out as follows:
- The defective surface is sanded.
- Using a drill, drill 2 holes: on one side and the other side of the crack. Its end should be in the center of the hole. This will create uniform pressure along the edges of the crack. It is necessary to control the force of pressing on the drill. The holes should not be allowed to be deeper than the crack itself.
- Then you need to open the crack and degrease it.
- The final stage of work is the application of the repair composition, its drying and subsequent grinding.
You should begin removing cracks immediately after they are discovered. Otherwise, they will spread out and repair will be impossible.
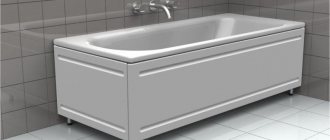
Features of acrylic plumbing
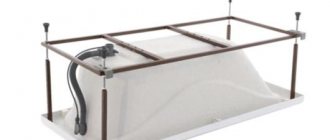
Acrylic bathtubs appeared on sale about ten years ago. The invention has successfully taken root in everyday life, not inferior to cast iron and steel tanks. All products are produced using two technologies: casting and extrusion. In order to increase strength, plumbing fixtures are coated with self-leveling epoxy resin and installed on specialized metal frames. The item does not require special home care or expensive cleaning products.
Important properties of an acrylic standard bathtub are:
- light weight compared to metal competitors, no difficulties in transportation and no special conditions for installation;
- increased flexible properties allow the production of products of different designs, shapes, sizes;
- the ability to choose any shade and color of the bathroom, which does not lose its brightness and richness over time when using care products;
- acrylic material has high thermal insulation properties, which allows the water to remain hot for quite a long period of time;
- special coating prevents the proliferation of germs and bacteria;
- durability, strength of artificial material, you can care for your new bathroom at home without chemicals.
The disadvantages of acrylic products are:
- careful and careful use is required, the surface is easily subjected to mechanical stress;
- When caring for plumbing at home, you should not use cleaning compounds containing chlorine, acetone and acids.
Cleaning an acrylic bathtub should be done regularly in order to extend the life of the product.
How to fix holes?
A hole can form due to a heavy object falling onto an acrylic bathtub. If it has sharp edges, then the likelihood of a through hole increases. Only small holes must be eliminated.
Repair instructions:
the bathtub must be cleaned, dried and degreased on both sides: internal and external;- fiberglass is attached to the reverse side using epoxy glue - its diameter should be 5-6 cm larger than the hole;
- the second fiberglass overlay is attached 2 hours after fixing the first one - its size should be even larger by 5 cm;
- the third segment exceeds the second by another 5 cm, it is also glued after 2 hours;
- after 1.5 hours, the inside of the bathtub is degreased and sanded;
- the damaged area is puttied and leveled;
- when the putty dries, it is sanded again.
If the hole exceeds 5 cm in diameter, then it will not be possible to repair it. The bathtub will have to be replaced.
When filling a hole, cracks may extend from it. To prevent them from spreading, they need to be drilled. Otherwise, they will go further, making the repair ineffective.
Small cracks in acrylic
Can I polish small cracks on the bottom of the bathtub? Definitely not! If there are cracks, then on real acrylic they extend through the entire thickness of the plastic. Yes, the crack is microscopic, so let’s sand it down to a reinforcing layer.
On combined plastic, it sometimes happens that only the acrylic film cracks. Then, of course, the cracks can be removed, but again along with all the acrylic.
Before you start restoring an acrylic bathtub, sink, tray, it is advisable to understand their quality, how and what they are made of. This is not the restoration of an old cast-iron bathtub, where even the most monstrous defect in the work can somehow be corrected.
It is very easy for an inexperienced person to ruin an acrylic product, and it will often be impossible to restore it properly. It is better to entrust polishing an acrylic bathtub to an experienced master so that you do not later regret about completely ruining your favorite bathtub. The masters of the Peter Sfera company do the impossible.
Prevention measures
Preventative measures to prevent scratches and chips on an acrylic bathtub:
- To care for your bathtub, do not use products containing acids or alkalis.
- Do not use abrasive cleaning compounds. Preference should be given to gels.
- Do not pour very hot water into the bath. Manufacturers do not recommend exceeding 60 degrees.
- After each use of the bathtub, it must be rinsed with soapy water and wiped dry.
- For preventive purposes, polishing gel should be applied to the surface 2 times a month. It will not only give it strength, but also refresh its shine.
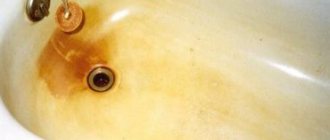
- The surface of the bathtub should be free of rust and limescale. When they appear, you need to clean them with safe compounds, for example, hydrogen peroxide.
- When carrying out repair work, the bathtub must be removed. If this is not possible, then it should be covered with polystyrene foam and covered with polyethylene. This will avoid scratches and chips if a tool or building material is accidentally dropped.
Following these simple recommendations will extend the life of your bathroom.
How to choose the roughness of the polishing cloth?
Sinks, shower trays and bathtubs made of acrylic can be sanded and polished. Depending on the depth of the damage, you need to choose the coarseness of the sanding paper.
If you try to smooth out large scratches over large areas with very fine sandpaper, you may end up wasting a lot of time. Damage is clearly visible on the matte surface of the floor. When the acrylic is matted with fine sandpaper, it will seem that all the scratches have disappeared. That this is not so will only be revealed during polishing when shine begins to appear.
You'll have to start again with sanding. When the acrylic is sufficiently hard and less refractory, you can try using a power tool at the lowest speed for work.
A plastic bathtub is not the iron hood of a car that removes heat. Acrylic can instantly float and melt.
Decent acrylic "Lucite International Inc." The manufacturer recommends operating at short-term heating not higher than 75-80°C. Then it will become deformed. This is really good plastic.
There are many brands of acrylic used for the manufacture of plumbing products with much worse properties. This is especially true for shower trays. Even the most expensive brands do not hesitate to use not the highest quality continuous cast acrylic for their production.
What cannot be used for restoration?
To remove scratches in the bathroom , do not use sandpaper with a grit rating below P2500 .
Even the P2000 is no longer suitable for repair work. Such paper will not sand, but scratch the surface.
Pumice stone and metal brushes are not suitable for removing scratches. Abrasive powders should not be used . They won't help solve the problem.
It will not be possible to correct the defect using ordinary putty. You need a professional composition based on acrylic.
Restore shine
Long-term use of an acrylic bathtub leads to gradual abrasion of its surface. Because of this, the bowl loses its original shine and becomes dull. In such circumstances, a wax composition can be used to eliminate the defect.
In addition to this method, special pencils are used to restore shine and eliminate minor scratches in the bathroom. Their composition includes polishing particles, which soften it upon contact with acrylic. This effect causes the polymer to spread, fill the problem area and eliminate the defect.
It is recommended to use the acrylic bathtub pencil immediately after scratches occur. It does not wash off with water.
Helpful information
Tips for removing scratches:
- If a scratch has just appeared, it can be treated with a camouflage pencil with a waterproof compound. They are sold in online markets and cost about 170 rubles.
- You should begin removing any defects immediately after they are discovered. This will avoid their increase in size and complex repair work.
- If there are a lot of scratches, restoring the bathtub will be problematic. It is much easier to call specialists who restore bathtubs with liquid acrylic. You can find many similar advertisements on the Internet. The average cost of such services is 2,500 rubles.
All the most important and useful information about cleaning the bathroom is collected in this section of the site.
What to do if there are cracks and damage on the bathtub
Sometimes too expensive European-made bathtubs may develop damage, cracks, or various chips. But you shouldn’t immediately throw away the product or replace it with a new one. Not everything is so bad, you can restore the bathtub with your own hands and not too expensive. To do this, just purchase liquid acrylic and use the tips.
- First of all, the crack should be widened. To expand, you can use a knife or sandpaper. The result should be a groove;
- Then the surface is degreased. Special detergents will help with this. Apply detergent to a moistened sponge, wipe the crack, rinse with water;
- we dilute the acrylic composition. Mix the powder with water, stir every 30-40 minutes;
- leave the mixture for 4-5 minutes to settle. The composition should be thick and also quite viscous;
- Carefully apply the mixture into the crack of the bathtub. Do not add too much; the mixture should be level with the surface. If it is a little higher, it doesn’t matter; after drying, it can be sanded down with sandpaper;
We polish the bathtub ourselves
Before you start, think about what you expect from your plumbing. Each bowl is made from a different material. The polishing method depends on this. So, why do they update plumbing?
- Replacement of plumbing. These are the most extreme measures if you have all the necessary finances;
- Re-polishing. This option is much cheaper, but it is better to hire professionals for these procedures. They will polish the surface a little;
- Inserts. The price is cheaper than refinishing or replacing all the utensils. It is recommended to install them on a new product, so that if something happens, only the liner can be replaced, and the outer part will remain intact;
- Self-finishing. It is recommended that you polish the item unassisted only if you are willing to take the risk. Sometimes the procedure can give not entirely desired results.
Subtleties of manual polishing
To polish a product yourself, you need to follow several steps. All recommendations apply to the following products:
- Cast iron;
- Enameled;
- Fiberglass.
To carry out the procedure we will need:
- detergents for cleaning enamel;
- palm sanding machine;
- sandpaper;
- insulating tape;
- paper (plastic) to protect walls from spray paint;
- in the case of an enamel bowl, you need to buy a binding material;
- personal protective equipment (mask, respirator, goggles, chemical protection suit, rubber gloves);
- spray;
- paint (primer or epoxy);
- acrylic solution or varnish.