Bracket installation technology
- Determine the density of the load-bearing wall using a small-diameter drill. If the wall is not dense, then powerful and long dowels will be needed for fastening.
- Drill through the plaster to the base (brick, concrete, other material), going 3-4 cm deep into it.
- Choose special anchors with a length of 8 to 12 cm.
- Be sure to insert a plastic or nylon dowel.
- Secure the bracket.
- Check the installed (attached) bracket for reliability: pull it with your hand - it should not move.
- Proceed to install the bowl onto the attached brackets.
Attaching the sink will not be a big problem if you do not disturb the order of work
It is important to choose high-quality brackets that match the type of bowl
Now you know how to secure a sink. Mounting on brackets is the most difficult installation option. They need to be matched to the interior of the bathroom and securely fixed, because there will be no other support for the sink.
Sink taps
Sink taps differ in the mechanisms of the device and are:
- With retractable spindle.
- With non-retractable spindle.
- With ceramic boards.
The first tap has a second name - a rod. The mechanism of the product contains a gasket at the end that rises when water is released. This device will allow the crane to serve for a long time and reliably.
The second type is taps with a non-retractable spindle. In theory, installing such cranes is not troublesome, which cannot be said about the first representative. This is because their sealant gasket is more durable and wear-resistant. It is less used, but the spindle threads are quite weak and unable to withstand time and frequent use. Because of this quality, there is a possibility of misalignment.
The third type of kit includes polished ceramic rings that replace the gasket. One ring is fixed stationary, the second rotates relative to the first. Closing the holes allows you to regulate the pressure.
The faucet mechanism with ceramic discs is quite wear-resistant, since deposits of salts and hard abrasives cannot get into the thin gap of the discs. If a blockage occurs, you can correct the situation by replacing the head and the gasket from the bottom.
Installation of a sink without brackets
A mounting kit must be included with the sink upon purchase; if for some reason it is not available or the quality leaves much to be desired, purchase such a kit separately. Focus on products from well-known brands so as not to worry about the quality of installation later.
Decide on the location where the sink will be installed and take measurements. It is usually recommended to install the bowl at a height of 70 - 85 cm from the floor.
At the selected height according to the building level, draw a horizontal line. Now we place the upper edge of the bowl to the set aside line and mark the attachment points. We drill holes according to the marks and insert dowels. We screw the pins into the dowels. The screwed-in pin should be 2 cm longer than the width of the washbasin. After final installation, tighten the nuts until they stop.
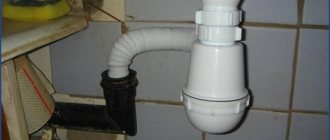
Installation of siphon and outlet tube
- Install the drain into the bottom of the sink. Use washers or silicone mastic. This way you will get a strong joint.
- Make sure that the drain and overflow slots fit together.
- Fix the clamping nut located at the bottom of the sink body.
You need to tighten the nuts with long-nose pliers while simultaneously holding the drain in place behind the grate.
If you have a complete siphon, it becomes possible to make an adjustment to the old pipe. If you want to install a drainage pipe with a diameter of 3.2 cm, make a recess in the wall for fasteners using a core drill for stone. The pipe is laid, tilting 0.6 cm every 30 cm so that its end is above the inlet funnel of the external sewer riser. The pipe should be fixed with clamps to the wall.
Installation of a wall-mounted sink with a cabinet
This option is good because you can hide all the plumbing connections in the cabinet.
At the required height, draw a horizontal line along the level. We try on the cabinet, see how it will fit with the siphon and mixer. If necessary, immediately measure and drill additional holes for plumbing in the back wall. Now we install the brackets and the cabinet on them. We described above how the brackets are attached.
We install a washbasin on top, connect a siphon and sewerage to it. If the bowl model provides for additional fastening to the wall, then drill holes in the right places and tighten the anchor bolts. Or glue the sink to the wall with silicone for greater reliability.
Choosing a vanity unit
When choosing a bathroom vanity, you need to follow some simple but important rules
First of all, pay attention to the interior of the bathroom. If all its elements, including plumbing fixtures, hanging cabinets and shelves, are made in a soft style with smooth lines, a strictly rectangular cabinet will be out of place
If the bathroom is decorated in a classic style, which is characterized by luxury and wealth, installing a sink with a cabinet in a minimalist style will not be acceptable in this case. Ideally, this piece of furniture should match the materials and colors of the overall interior design.
When choosing furniture, consider the overall color and interior of the bathroom.
In addition to design, it is necessary to pay attention to other important points, for example, the correct choice of fittings for the product. Handles, legs and hinges must be made of chromed metal
A bedside table with plastic gold-plated or chrome fittings usually loses its original appearance after a couple of months. When purchasing furniture with a colored coating, you should know that the paint on its surface must lie evenly.
The arrangement of the bathroom is also of great importance. For example, if the room has a heated floor, you should not buy furniture with a plinth; it is better to buy a sink cabinet with legs
Such a thing will not heat up from the floor, will significantly facilitate the cleaning process, and will provide the necessary ventilation of the product, which is important for rooms with high humidity.
In terms of furniture functionality, you can be guided by personal preferences. A good option is a cabinet under the sink with a laundry basket, which significantly saves room space. For small bathrooms, there are corner models that take up minimal space, while being quite practical and functional. It’s good if the shelves in the cabinet are adjustable in height, so they can be adjusted to the height of detergents and cleaning products. A roll-out cabinet is another interesting solution for decorating a bathroom. It can be moved to any place, but it has a significant drawback - the difficulty of installing a sink, because all communications (water supply and sewer pipes) are installed permanently. So, you need to choose this piece of furniture based on the purpose of its installation: it will be used to store all kinds of household accessories or simply hide the pipes to the sink.
Secrets of the master
In order to efficiently install a sink on a wall, it is worth learning some of the nuances of this process, without which the installed structure will not be as reliable and stable. These are tips from the best installation specialists:
- The wall structure has a significant disadvantage - it is visually open pipelines and fittings. The excellent aesthetics of the bowl is achieved thanks to a cabinet that matches the design, which will cover all these connections and the siphon. An additional advantage of this installation is a good place to store various necessary accessories.
- In practice, the entire set of fastening equipment should be included with the product. Check this issue yourself, because often: either the manufacturer forgets to complete the sink with fasteners, or their quality itself is not particularly high.
- To avoid moisture vapors from entering the space between the bowl and the wall, it is necessary to use a high-quality sealant, for example, silicone.
Upon completion of installation work, check the system drainage for leaks by filling the siphon with water. If you find a leak, make a tighter twist and an additional sealing layer.
- Install the bowl only after completing all finishing work. Be very careful when installing fasteners.
- The surface of the wall on which you mount the bowl must be strong and stable, otherwise use a supporting frame.
- If after installation the sink does not “move”, this is a clear indicator that the bowl installation procedure was successful.
A well-executed installation procedure is synonymous with excellent functionality and durability of the product. In view of this, before installation work, seek the support of an experienced specialist.
Step-by-step instructions for attaching a sink to a bathroom wall
Do not rush to immediately go to the store to buy goods; first, it is recommended to clarify all the installation details and prepare the mounting location. To work, you will need a drill with a hammer drill, a drill bit with pobedit, wrenches or one adjustable wrench, a tape measure, a level and a pencil.
Check the condition of the wall where the sink is attached. In most cases, bathrooms are finished with ceramic tiles; this is an excellent material in all respects. But only under one condition - the masonry was done by responsible tilers.
High-quality wall tiles
Hack workers do not apply glue over the entire surface; as a result, there are air chambers between the wall and the tile. It is strictly prohibited to install wall-mounted sinks in such places. If the tiles do not immediately crack, they will certainly form at the slightest additional load on the sink during use.
Poorly glued tiles come off the wall
It’s easy to find voids - knock on the tile as soon as you hear a “drumming” sound - there is no glue under it in this place.
Check the quality of the tile laying
One more rule. Never drill holes in the joints between tiles, these are the weakest points of the wall decoration. The distance between the holes and seams should be at least two centimeters.
Practical advice. When marking, move the intended location for fixing the sink to the wall a few centimeters left/right, up/down until you find the best option.
In the store you need to buy: shut-off valves according to the number of water pipes with standard threads, flexible hoses of the appropriate length, a mixer or an ordinary tap, a thread sealant (preferably FUM tape, but tow can also be used). If everything is prepared, then you can start attaching the sink. In the example, we will consider the option of installing a sink on studs, and all other methods are not much different.
Close the shut-off valve
Step 1. Mark the location of the sink. The average height is 80–90 cm, but you can adjust it to suit your own needs. Draw a line on the wall with a pencil and check it is horizontal.
Trying on a sink
Step 2. Remove the distance of the technological holes for the studs on the sink and transfer them to the wall.
Marking
Don't rush, don't make a mistake. If you drill holes in the wrong place, it is difficult to correct the mistake. The fact is that the distance between the two nearest holes cannot be less than three centimeters. This means that the sink will have to be moved the same distance, and this is not always possible. Additionally, in some cases, irregular holes will have to be sealed or they will be visible. Repairing holes in tiles is a big problem. As for sinks fixed in the corners of the bathroom, if the markings are incorrect, they can only be lifted up, and this makes the process of correcting errors even more difficult.
Practical advice. To avoid such unpleasant situations, we strongly recommend inviting an assistant for a few minutes while marking the mounting holes. Let him hold the sink in the desired position, while you use a pencil to accurately mark the location of the holes for the fasteners. All further work can now be done independently.
Step 3: Drill holes for the studs.
Drilling holes for plumbing studs
Use only a sharp drill bit, start drilling carefully, it will glide along the smooth surface of the tile. Remember that it is strictly forbidden to drill ceramic tiles; if the drill is switched to the “perforator” position, it will definitely crack. Switch the drill to the hammer position only after all the tiles have been drilled.
To make the floor less dirty, cover it against the wall with paper. Another way to prevent contamination is to work simultaneously with a vacuum cleaner. Hold the hose near the drill bit, all construction dust will be immediately sucked up.
The depth of the hole is at least 4–5 cm. There are cases when the drill hits the seam between the bricks, this is very bad. Especially if the masons did not completely fill it during laying or worked with low-quality mortar. What to do in such cases?
- If the wall in the bathroom is even brick, you will have to increase the depth of the hole until it goes through the seam. Before hammering in the plastic element, fill the hole in the seam a little with matches or toothpicks. When hammering the plastic, they will rest firmly against the walls and prevent the sink from wobbling.
- Make anchoring. This method increases the strength of fixation of various elements in foam concrete. To do this, you need to make a conical hole in the wall, the top of the cone on the tile. It is done due to the oscillatory movements of the drill. Then the hole is cleared of dust with air, a centering sleeve is inserted, the hole is filled with solution and the pin is immediately put in place.
Anchoring or gouging out a small hole in the tile to accommodate the drill bit
- Install the stud using glue. The compositions are made on a base of epoxy resins and are distinguished by high physical characteristics. The hole is cleaned of dust, filled with glue and a pin is inserted. It should be left in this position until the glue hardens.
The second and third options are more complicated, but much more reliable. If the sink is heavy, then use only them.
Drilling a hole
Holes in tiles
Step 4: Place the plastic stud pieces into the holes and hammer into place. The elements must enter with little force, otherwise they will rotate when the pin is tightened.
Installing the stud
Screwing in plumbing studs
Advice. Inexperienced craftsmen drill holes to a depth equal to the length of the hairpin. This is a mistake; the plastic will not fit the entire length into such a hole. The fact is that after drilling it will not be possible to completely remove dust from the hole. The plastic will rake it towards the end until it hits hard dust. To avoid such troubles, make a hole in the wall 1–2 cm longer than the length of the plastic part of the pin. The free pocket will hold all the remaining dust.
Step 5: Place the studs on the sink, insert the rubber or plastic spacers, and lightly tighten the mounting nuts. Check the position of the sink with a level and fully tighten the nuts.
Put the sink on stilettos
Washbasin installation
Tightened nuts
Step 6. Carefully seal the gap between the sink and the wall with transparent sealant and remove any excess.
Sealing the transition from the sink to the wall
Now that the fixation of the sink itself is complete, you can begin to assemble the plumbing equipment and fittings.
Frame structure for installing a washbasin
If the walls in your bathroom are not strong enough to install a sink, and you really want just such a model, then you can solve this issue by installing a frame structure. It is attached to the floor and walls and consists of profiles. The height is adjustable with legs, so that the sink can be installed at the desired height from the floor. All communications are hidden inside the structure.
The procedure is as follows:
- the frame is leveled and secured to the floor and wall;
- At the required height, screws are screwed in to secure the sink;
- cover the frame with moisture-resistant plasterboard and line it with tiles or any other finishing material;
- between the wall and the sink, a rubber washer is placed on the stud to reduce noise during operation;
- attach the wall-mounted sink to studs on top of the cladding.
A properly assembled installation can withstand a load of up to 400 kg, and this is not only a sink, but also other plumbing fixtures. In addition, you can make a niche in the design and use it as a shelf.
Removing the sink
If there is a need to use old pipes, you should unscrew the fastenings on the shanks of the faucet heads and disconnect the siphon with the outlet pipes. You can also remove the inlet and outlet pipes with a file where connecting new pipes will be less problematic and convenient.
If the sink pedestal is attached to the floor with screws or similar fasteners, unscrew it and remove the sink. If the plumbing has been used faithfully for a long time, its fasteners may have a coating of rust or corrosion. In this case, the product will have to be broken off due to difficulties in dismantling.
Specifics and models of wall-mounted sinks
The latest modern trend in sink installation is to mount the unit to the wall surface. This type of arrangement is one of the most familiar and favorite among Russians, since this type of installation has worthy and significant advantages. By installing the sink on the wall, you will save the desired meters of space, and the space under the sink is very convenient to use and keep clean.
Before you begin installation work, choose the model of wall-mounted sink that has the most ergonomic design. A separate model has specific design aspects, which, of course, affects the method of its installation. Therefore, it is so necessary to have at least some knowledge about the installation and specifics of connecting the device to the general water supply system.
An interesting solution is to install a sink above the washing machine; this saves precious space in the bathroom.
Detailed instructions for installing a tulip sink
Connecting the sink to water supply and sewerage systems is carried out using standard methods.
Marking the location for attaching the sink
Despite the fact that the bowl rests on a pedestal, it must be additionally attached to the wall. Before marking, a trial installation of the product is carried out. The stand should not wobble. After leveling the pedestal, mark the locations of all parts on the wall and floor. Using a building level helps to draw lines correctly.
Marking the sink mounting location.
Installing fastenings for brackets
At this stage, holes are formed. After drilling, the holes are filled with glue, then dowels are inserted there. To secure the brackets, use anchor bolts longer than 7.5 cm, because under the influence of load, ordinary self-tapping screws pop out of the wall with dowels.
Installing brackets for the sink
The installation hole of the fastener is aligned with the dowel. Screw in the bolt, ensuring reliable fixation of the part. Check the quality of the connection and move on to the next step.
Installation of brackets.
Install and connect the mixer
The washbasin is installed on the holders in two ways:
- The bowl is placed on supports, after which the wall is tiled. The gap between the washbasin and the tiles is filled with sealant. It is recommended to choose a product that contains antifungal additives.
- The composition is applied to the surfaces of the holders. Next, you can place the bowl and fill the joint with plumbing sealant. This prevents the sink from moving.
The mixer and sink are connected before installing the bowl. After mounting the product on the brackets, flexible hoses are connected to the water supply.
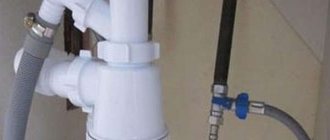
We connect the siphon to the sewer
To assemble a drainage system with your own hands, you need to perform the following steps:
- Connect the overflow. The hole is combined with a flexible hose, which is connected to the base of the siphon and secured with a nut.
- A grate, rubber seals, and a screw are placed on the grooves of the washbasin. Tighten the bolt, ensuring a tight connection.
- The drain pipe is bent and inserted into the sewer pipe. Raise the sink, move the pedestal, placing elements of the drainage system in it.
Connecting the siphon to the sewer.
Step-by-step installation instructions
https://youtube.com/watch?v=8d-LyqQfngQ
Mark the central horizontal line using a ruler, marker and spirit level. Installation will be carried out along its line
This will be, sort of, the upper limit of the bowl. It is important to consider the thickness of the side walls of the sink. They must be strong enough to withstand the pressure of the brackets
Measure the thickness and record the remaining parameters of the future installation on both sides of the bowl. Connect horizontally all the existing marks indicating the mounting height of the brackets. Finally, work begins on the sink itself. Turn the bowl over and fix the brackets on its outer walls.
- Move the sink closely to the horizontal and mark with a marker the places for mounting fasteners. This is done through recesses on the outside. Constantly check the alignment of all brackets and lines.
- Using a drill, make holes that are slightly smaller in diameter compared to the size of the fastening devices and dowel screws.
- Drive plugs or bushings made of durable plastic or nylon into the prepared drilled places, and screw the screws into them.
Support brackets are installed on this mount, on which the sink bowl is mounted. Mark the places where the device will be attached to the wall, drill and install the sink. Connect the outlet end of the siphon pipe into the socket of the sewerage system, install the mixer, and connect the water supply. Having made a light fastening “bait”, finish aligning the bowl horizontally. Then go through all the fasteners again and secure them.
Installing a faucet on a sink
To connect the faucet to the sink body, you need to follow these steps:
- Place a flexible washer onto the faucet shank.
- Screw on the nut.
- Install the faucet.
- Adjust the rods.
- Secure the faucet with silicone sealant.
Tip: it is better to choose stopcocks for sinks, as they facilitate maintenance, and the use of flexible hoses will simplify the connection.
When installing together with a tap, it is better to use pipes made of plastic or copper with a diameter of 1.5 cm. They are connected using connecting adapters. As practice shows, the use of short sections of flexible corrugated tubes makes work easier, since they are pliable and bend easily, allowing you to equalize any mismatches between the axes of the supply pipes and the valve shank.
Each tube has a connecting adapter at one end and a capillary or compression seal at the other.
To install the faucet, connect the corrugated pipes to the faucet shanks and fix them manually. Then attach the new pipework to the corrugated tubes and perform a solder or compression joint. Using a crank wrench, tighten the connecting adapters and check for leaks.
Tip: if you find a leak in a soldered joint, you need to stop the flow of water, drain it and clean the solder joint using wire wool. Apply flux to the cleaned element.
Features of operation depending on the model
The types of fastening for a sink to the wall differ greatly depending on the modifications of the device:
For suspended installations, installation is carried out directly to the wall, so gravity is directed not only to the mount itself, but also to the wall
Therefore, it is very important that the base is strong and thick. Usually there are no problems with this if the installation is carried out in the place designated by the builders.
The “Tulip” model will look good in a spacious bathroom. When installing between the planes of the sink, floor and wall, polymer gaskets are installed, gluing them to silicone sealant
This technique prevents the appearance of squeaks and ringing of ceramics in the event of a careless impact. Another important point is that fastening and pulling the bowl to the wall should in no case cause it to be lifted on its “leg” in order to avoid splitting
Device and functions
A sink drain is a plumbing device that connects the drain hole at the bottom of the bowl and the entrance to the sewer. It is a curved structure consisting of a drain pipe and a siphon. The drain is a mandatory element, the installation of which is carried out when installing a sink, bathtub or shower. It performs the following functions:
- Carries out timely and efficient transfer of “waste”, dirty water from the sink through the drain pipe into the sewer.
- Filters out light debris. The grate, which is placed on top of the drain hole in the sink, not only performs a decorative function, but also protects against the penetration of small debris and hair, thereby preventing the formation of blockages in the sewer.
Drain grate - Prevents the penetration of unpleasant odors from the sewer. The siphon for a bathroom sink is designed in such a way that it forms a “hydraulic seal”, a natural water barrier that prevents sewer odors from penetrating into the bathroom.
Important! The main feature of the sink drain system is a curved, sigmoid pipe. Thanks to its special shape, water never leaves the bend of the drain pipe, which is why a so-called “water seal” is formed, which locks sewer odors inside, preventing them from penetrating into the bathroom.
Types of sink brackets
The fasteners for mounting a washbasin on the wall must be able to withstand the weight of the plumbing fixtures with a margin. They are made from various metals.
special mounts designed for mounting a specific model. Often these are exclusive designer washbasins with an unusual shape. Brackets for such plumbing fixtures are included and can be made in the form of specially shaped pins, pipes that go around the sink, or unusual welded structures. Such fastenings are treated with special decorative compounds (ceramic or metal).
Brackets for standard wall-mounted sinks are made of cast iron or steel and coated with anti-corrosion paint. They are produced in the form of T-shaped or L-shaped racks, and can also be made in the form of frames with a sliding unit to adjust the size of the fastening. Brackets in the form of a metal frame into which the washbasin is placed are particularly reliable.
Construction of sinks
Shells vary in shape and size. They arrive on retail shelves made of earthenware, cast iron, steel, enamel, and plastic. In the design of each such product there is a cross part dividing the drain opening into four parts. It is this path that is the conductor of various types of abrasive, pieces of food and other debris that fill the siphon and then clog the entire structure.
Plumbing and household supply stores offer consumers specialized mesh screens designed to prevent blockages. These screens are inserted into the drainage path on the sink, and the number of times they are cleaned depends on the degree of solids accumulation.
The bottom of the sink structure has a pipe located in the siphon. Here is a place where various wastes are concentrated and are not washed away by the drain stream from the tap. The siphon is equipped with cleaning holes at the top and bottom of its body. They are closed with special plugs that are secured with bolts or threads. If necessary, the plugs are opened for subsequent cleaning of the siphon. Previously, the fastening threads were lubricated with grease or other material, but now, due to the progress of technology, this element is made of stainless steel.
Tools and materials
For installation you will need: a sink, a set of auxiliary materials and various tools. Make sure everything is at hand. Tools you will need:
- Gas key.
- Electric drill + drill with pobedit tip.
- Screwdriver.
- Building level.
- Hammer.
- Marker.
- Special tape for threaded connections or tow.
The choice of fasteners is important if you have to deal with installing a sink in the bathroom for the first time. Most models are mounted on metal brackets, which come in different shapes (including openwork forged ones) and sizes. Installation is carried out using powerful bolts and studs. It is not always necessary to mount the sink to the wall. Depending on the model, it can only be placed on mounting brackets.
There are several types of shells:
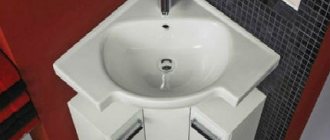
Depending on the variety, the methods of attaching the bowl to the wall also differ. Most often, in about 50% of cases, conventional suspended structures are installed, this also includes “water lilies”. The installation of “tulip” type models is somewhat different: the bowl rests on the “leg”, and the sink needs to be attached to the wall only for additional fixation.
Clearing the clog
To keep your sink in good working order, you need to prevent it from clogging by cleaning it weekly. For the most part, this applies to kitchen sinks; in our case, the product is in the bathroom, and you can clean it as needed, since the most that can get here is hair elements.
Tip: If the sink is clogged, take a plunger - a rubber piston attached to a wooden or plastic handbrake.
Cleaning the sink is done in this order:
- A plunger closes the drainage path by pressing firmly.
- A small amount of water is poured into the sink. The liquid layer should be 10-15 cm.
- The plunger rises above the water and quickly falls over the drain hole. Thus, the tool captures water with air and pressure throws them into the siphon along with disturbed solid particles and debris that interfere with the normal flow of water. As a result, the blockage falls into the sewer riser. The time it takes to clean the sink depends on the degree of blockage, but in frequent cases it takes about 2 minutes.
Using this principle, you can clean a clogged bathtub. But there is one caveat - before work you should close the upper water overflow hole. This can be done with a piece of cloth or the palm of your hand.
Preparatory work
The sink for the bathroom has been purchased, the necessary tools are ready, all that remains is to install the structure correctly. To do this, you need to prepare the wall on which the washbasin mounts will be mounted, and make markings so that the bowl is located at a height convenient for all household members.
The fastening for the sink to the wall must be installed after careful preparation of the surface. It is best if it has been finished (textured plaster, tiles or any other finishing material for the bathroom). If the wall is simply plastered, it must be treated with an antiseptic. There are many varieties of them in different price categories.
It is more convenient and easier to use liquid glass. It will perfectly protect the surface from exposure to water and at the same time destroy possible bacteria and fungi. After treatment, you need to wait a while until the surface is completely dry, then paint and begin installing the sink.
- Turn off cold and hot water.
- Stand at your full height in front of the installation site for the future sink.
- Select the upper limit for installing the bowl so that all household members can comfortably reach the sink.
- At the marked place, using a long ruler, pencil and level, draw a horizontal line along which the main work will be carried out.
- Check the dimensions of the sides of the bowl (measure it).
- Record the size with marks on both sides.
- Connect the marks with a horizontal line, thus obtaining the installation height of the sink brackets.
- Turn the bowl over and place it against the wall. Mark where the grooves for the brackets are.
Overhead and built-in sinks
An overhead sink is a sink that is installed on a flat and level base - a cabinet or countertop with legs. The bowl is made from a variety of materials - white and colored earthenware, natural and artificial stone, glass, metal. The shape can also be different: round, oval, rectangular. The advantages of overhead bowls include an interesting and original appearance, as well as the ability to be installed almost anywhere in the bathroom where communications can be installed.
Overhead bowls can be installed on any surface.
Built-in sinks cut into the countertop and are considered the most practical and ergonomic. Built-in washbasins are divided into 3 types according to installation method:
- The bowl is located under the countertop.
The bowl is mounted below the countertop. - The sides of the sink are located above the countertop and rest on it.
The edges of the bowl rest on top of the tabletop. - Semi-built-in model: the bowl partially cuts into the countertop and protrudes beyond it.
The semi-built-in washbasin is suitable for small baths.
Such sinks most often cut into the countertop, which serves as a dressing table. In addition, it is convenient to keep frequently used hygiene products on it. Another advantage of mortise sinks is that they are least susceptible to cracks, chips and other mechanical damage, since they are almost completely closed.
Read more: Installing a sink with a cabinet.
Features of installing a built-in washbasin
The installation of the sink begins after the water pipes and sewer lines have been installed to the location of the bowl. Let's look at the installation procedure using the example of inserting a sink with protruding sides into a wooden countertop.
Stage 1
First of all, you need to mark the tabletop for cutting the hole. Some manufacturers include a template with the bowl that makes it convenient to transfer the markings. If such a template is missing, you can do the following:
- The bowl is turned upside down and traced around the edge with a pencil.
Tabletop markings. - While the bowl is upside down, measure the width of the rim on all sides.
- Remove the sink from the table.
- Inside the drawn contour, another one is drawn, taking into account the width of the side.
The marking is ready!
Important! It is necessary to take into account the location of the hole for the tap (especially if the bowl is not round), and also move at least 50 mm away from the edge of the countertop.
Stage 2
Next, you need to cut a hole along the inner contour. The most convenient way to do this is with an electric jigsaw, but first you need to drill a hole in the tabletop so that the jigsaw knife can fit there.
To start cutting the hole for the sink, you first need to drill a hole for the jigsaw blade.
Then, carefully, trying not to go beyond the line, cut out a hole with a jigsaw.
Cutting a hole for the washbasin bowl.
Stage 3
The end of the cut is treated with sandpaper and 2-3 layers of sealant are applied to fill all the pores and make the surface waterproof.
The cut ends must be treated with sealant
Stage 4
A mixer and siphon are installed on the sink. After this, a tape of waterproof material is carefully glued along the side, which acts as a seal. Also, fastening elements supplied by the manufacturer are installed on the side at equal distances from each other.