Install before laying tiles
This method consists of initially placing the bath on the floor and firmly fixing it. Next, level the bath using a level. Later they begin tiling. Having chosen this method, it is important to understand that the tiles in the bathroom are laid from the edge of the bathtub, and not from the floor. A small indentation is made from the edge (a few millimeters are enough), and the resulting gap after completing the main work will need to be sealed with sealant or other moisture-resistant material. The tiles will extend slightly over the edge of the bathtub, and from the outside it will look as if the plumbing is connected to the wall.
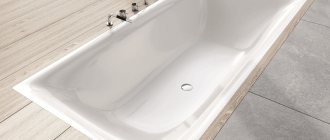
Installation of cast iron models
Installation of such a bathtub is carried out after leveling the floor and laying floor tiles. Please note that the tiles on the floor must withstand significant loads, so be sure to check this point with the seller.
USEFUL INFORMATION: Design options for a stylish bathroom: high-tech, modern, Scandinavian, marine
Installation of the product is carried out as follows:
- The bathtub is brought into the bathroom and placed on its side, the drain hole is located in the direction of the sewer. Before this procedure, experts advise covering the tiles with fabric to avoid scratches and mechanical damage.
- The siphon and supports are installed.
- The bathtub is turned over to its normal position and leveled in a horizontal plane.
- The font is installed in place, leaving approximately 1 millimeter between the side and the rough finish of the wall. Please note that tile is a rather slippery surface, so despite its weight, the bathtub may move during use. To avoid this, the supports are fixed to the tile surface with waterproof glue.
- The walls of the room are tiled. The contact points between the tiles and the side of the bathtub are protected from leaks by ceramic baseboards.
Please note that when installing cast iron and steel bathtubs, grounding must be done. To do this, it is better to invite a qualified electrician.
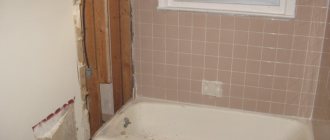
Installing the bath after laying the tiles
This method is more common than the previous one. It is often used in cases where you need to change the bathtub to a more modern and comfortable one. To begin work, you need to completely vacate the room and dismantle all the old plumbing. The actual repair process begins by cleaning the surfaces. The old tiles are removed and the paint is peeled off. The walls must be carefully leveled and primed before tiling. After cladding, other work can begin.
The floor also needs to be prepared. To do this, first level it with a screed, and then lay the tiles or choose another finishing method. Having completed the basic finishing work, you can begin installing the bathtub. If you have decided to install an acrylic bathtub, a frame for the bathtub made from a profile will be a big plus, since it allows you to install the plumbing not at the wall itself, but at a distance. This is very appropriate in large rooms.
If there is a need to cover pipes that run through the center of the walls or in the corner, you may need to install the bathtub in a box. To sheath the pipe in the corner you will need two walls (two more are formed by the walls of the bath itself), and for pipes in the center you will need three walls. If the bathroom is installed close to the wall, you need to be very careful at the tiling stage. After all, if you make a mistake when calculating the dimensions, the bathtub simply won’t fit. Then you need to remove the freshly laid tiles from the walls and start all over again.
After installing the bathtub, seal the joint with sealant or any other moisture-resistant material. For this it is better to use silicone sealants. They are sold in special tubes with a nozzle. To squeeze out the composition, you will need a special gun. However, it is inexpensive. As a result, we will get a sealed and high-quality seam.
In most cases, this method of installing a bathtub is chosen when installing an acrylic sanitary ware. The edge is not built into the wall, since acrylic is not a strong enough material to withstand the load from the tiles.
Description of the tile laying process
Main stages:
- The first step is to prepare the tile adhesive. This material can be found commercially in powder form. It is diluted with water (preferably at room temperature). The proportions must be indicated on the packaging, so when purchasing, be sure to pay attention to the package so that the letters are not erased. If the instructions are not visible, ask the seller for advice, or choose a different package. Carefully apply the finished composition to the surface of the screen. Work gradually, treating a small area first. The glue is smoothed over the surface using a special spatula with teeth.
- Tiles are installed on the prepared area. Do not forget about the markings, everything must be done strictly according to them. If you can see that the tile is installed correctly, then lightly press it all the way down. Continue lining in the same way.
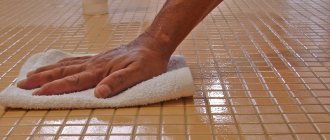
- The tile adhesive must dry out within a few days. Then you need to grout the joints. This is necessary so that the coating has greater tightness. If desired, the seams can be further treated with silicone sealant. It is sold in bottles that are convenient to use.
Now you know how to cover a bathtub with tiles with your own hands quickly and accurately. This method will help update the interior, give it more harmony and external aesthetics. In addition, with the help of finishing you can hide the sewer pipes located under the bathtub from your eyes. If you still have any questions about the cladding, try reviewing our video material and photographs again. We are sure that you will definitely be able to find answers that you previously missed.
How to properly tile a bath with your own hands
How to tile a bath
Tiling the bath screen
Installing a plasterboard box
Installing a plasterboard frame
Screen decoration with tiles
How to properly tile a bath
Tiling the bathtub
Installation of metal profiles
What's next?
Having completed the lining, the bathtub should be brought back and installed in the marked place. This method is good because laying tiles is quite convenient. After all, you don’t have to go around a bulky bathtub. But in case of an error, the tiles in the bathroom will be dismantled. Everything will have to be redone.
When performing any plumbing installation work, you need to know what the standard bathtub installation height is. The generally accepted norm is that the height from the floor is 0.6 meters. Of course, this standard is often violated, deviating from the figure to a smaller or larger direction. You should not place your bathtub at too high a height, as stepping over the high side every time will be problematic, especially for older people. The decision to install a bathtub at a low height will make bathing easier for elderly owners, but it can easily spoil the appearance of the room.
So which option is better - installing the bathtub before laying the tiles or after? To answer this question, you need to take into account such important points as the size of the room, the material from which the bath is made, its shape and dimensions.
Characteristics of ceramic tiles
Ceramic tiles for the bathroom have the following characteristics:
- Has a high wear resistance. This means that if you cover surfaces with it using all technologies, you can get repairs that won’t have to be redone for decades. At the same time, bathroom tiles do not fade or lose their pattern.
- It is resistant to water and moisture. It will not suffer from drops of water falling on it or from the vapors that are inherent in bathrooms.
- Ceramic tiles can always be washed or wiped down. If you do not use harsh abrasive substances, the risk of damaging it is minimal.
- Ceramic tiles come in a ton of variations in color, pattern, style, size and even shape. Everyone can find a tile for themselves. Creating a unique bathroom decor becomes easier with ceramic tiles.
Room size
If the bathtub is located in a fairly small room and takes up space under the wall itself, the best option would be to install it before tiling work begins. The fact is that the square footage of an already small room will decrease due to the thickness of the tiles, and the opposite walls will converge in such a way that the plumbing simply will not fit between them.
What are the differences between products made of cast iron, steel and acrylic?
If the repair sequence is correctly followed, it is possible to extend the period of comfortable use of the bathroom. It is very important during the work to pay enough attention to the wiring of sewerage and electricity; usually, to resolve such issues, they turn to specialists. Today, the option when plumbing is installed after finishing the walls and flooring is not uncommon. Most often, an old bathtub is replaced with a new one: steel, cast iron or acrylic. As a rule, owners rarely purchase a device of the same type that was used before repair; this fact is explained by the search for more convenient solutions.
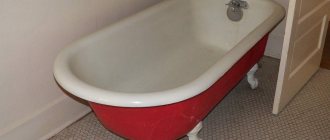
Acrylic bathtubs have an attractive design, but are fragile
When the shower is turned on and water is running, a steel product creates a lot of noise and quickly heats up and cools down. The walls of a cast iron bath take a long time to heat up and retain heat for a long time; it is very reliable, but its weight does not allow the product to be moved to the installation area without any problems. An acrylic product retains heat for a relatively long time, has an attractive design, is easy to install, but is sensitive to household chemicals and is fragile.
- Step-by-step instructions for laying ceramic tiles in the bathroom
- Installing a steel bathtub with legs - step-by-step master class
- Boar tiles for the bathroom and kitchen - secrets of laying unusual tiles
Bath material
Installing a bath before or after laying tiles - which is better? It also depends on the materials from which the plumbing fixtures are made. If you choose a cast iron model, be prepared for the fact that its heavy weight will prevent it from moving. Even for two or three people of moderate build, moving such a bathtub will be a difficult task. It is for this reason that it is advisable to install it before the start of facing work, and only after finishing it, start sealing the side.
Legs for a cast iron bathtub need to be strong and stable. As a rule, they do not allow you to adjust the height of the plumbing fixtures and look squat and reliable. For beauty, cast iron legs are often made in the form of monograms or decorative flowers. A cast iron bathtub does not deform when filled with water; its geometry does not depend in any way on the weight of whoever is in it.
If you have chosen a bathtub made of more pliable materials (steel or acrylic), be prepared for the fact that the shape may change somewhat under load, and the edge mounted in the tile may become loose and form cracks over time. Steel or acrylic models do not have the same durability as cast iron ones. Therefore, if you want to change the bathtub, the bottom row of tiles will have to be broken. If you install a bathtub without connecting it to the wall, you won’t have to do any extra work. To remove this structure from the room, you just need to remove the sealant.
Premises requirements
Before you begin installing plumbing equipment, you need to carefully prepare the room for work. The correct installation and operation of the bath depends on the quality of the preparatory work. By the time the new wash container is delivered, the bathroom should be in the following condition:
- The floor in the bathroom must be cleaned from the old finish to the concrete base and leveled to the building level.
- It is imperative to carry out high-quality waterproofing of the floor, extending onto the walls by 20-25 cm, using rolled, coating or painting materials. A so-called “waterproofing trough” is installed in the bathroom, which prevents leaks in the event of breakdowns of household appliances and plumbing equipment.
- Waterproofing with wall penetration
- The floor is filled with a new layer of screed so that the level of this room is 3-5 cm lower than in the other rooms. The entrance to the bathroom is equipped with a threshold that stops the flow of water in the event of an accident.
- They install a decorative covering, which is most often ceramic or porcelain tiles.
- The walls in the room are carefully leveled, but left without cladding.
Note! When renovating a bathroom, it is important to follow the correct sequence of technological operations. Installation is carried out exclusively on a leveled and tiled floor. But finishing the walls should be done only after connecting the plumbing equipment, so that there is a minimum gap between the wall and the washing container.
Shape and type of bath
If everything is more or less clear with the usual form, then what to do with models of more complex shapes? There are also corner whirlpool baths that not only have an overflow and drain, but also several additional fittings. In this case, you should not bury the plumbing in the wall. Sometimes the sophisticated electronic equipment that comes with this type of bathtub breaks down. You may need easy access to it. Therefore, it is better to install a structure of complex shapes only after finishing the facing work.
Installation methods
Installing a bathtub with your own hands is a responsible process of setting it to the required height and connecting the washing container to the sewer and water supply system. Installation can be done in a variety of ways, depending on the size, shape and weight of the equipment. Experienced professionals recommend using the following methods:
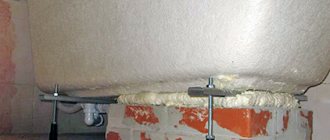
- On legs. The manufacturer always includes standard legs in the bathroom kit, which will be required to install the device. They are attached to the bottom of the wash container using special wedges, bolts, eyes or even adhesive sheets. Using legs is the simplest method that allows you to easily do the installation yourself. To do this, you need to turn the bathtub on its side, fix the supports, and then install it in the place where it will be used. In this way, cast iron models are installed that have sufficiently large weight, stability and rigidity of the walls.
- Installation on legs
- To the podium. If standard legs are not enough to provide stability and support to the bottom of the bowl, installation is performed on a brick podium. To make a support that exactly follows the shape of the bottom of the container, red solid brick is used, which is resistant to high humidity and intense weight loads. With the help of a podium, steel models are installed, which, due to their thin walls, are often deformed during operation, as a result of which the enamel coating peels off and cracks. The disadvantage of this method is the high costs and high cost of bricks.
Podium for corner bath - On the frame. To prevent deformation and strengthen the structure, bathtubs are installed using a metal or wooden frame, which evenly distributes the weight of water and people during use. Acrylic models, which are famous for their fragility and mechanical fragility, as well as angular or large-sized steel bowls are installed on the frame.
Frame installation
Please note that the correctly chosen method of installing a bathtub extends the service life of the product, ensures comfort and safety when using it. In addition, by performing installation, you can improve the performance of the model by reducing the noise and thermal conductivity of the walls using insulating material.
How to bring it into the plumbing room?
We have already noted above that cast iron products are very heavy, so you will have to call someone for help; there is no way to carry them alone.
First you need to measure the doorway. If it is narrower than the width of the font, you will have to turn it over so that the drain hole is on the side.
If the bowl doesn’t go through anyway, you’ll have to disassemble the door frame , otherwise there’s no other way. You should first lay cardboard or fabric in the bathroom so as not to scratch the coating. The bathtub can be placed vertically, leaning against the wall. But if space allows, it’s best to lay it horizontally on its side.
Installation of a plastic bath
Installing a plastic bathtub with your own hands is no more difficult than installing an acrylic one. Moreover, all the options described above are suitable:
- On the frame;
- On the legs;
- On bricks or other available supports.
When installing a plastic bathtub, you need to be especially careful and careful. Any incorrect movement or miscalculation in the places where the supports are installed can cause cracks to form.
Installation process of a plastic bath
Rules for installing a plastic bathtub Standard:
- It is important to distribute the load evenly. This means that the supports, legs or frame must be positioned symmetrically across the entire plane of the bathtub. This will avoid deformation;
- To strengthen the frame and legs, special corners are often used. The corner is a rigid metal part that ensures the strength of the connection between the support and the surface of the bathtub. Of course, you can do without it, but then during operation the structure may begin to loosen;
- The pipes are connected before the bath is installed. In other words, first the supports or frame are installed, then the siphon and other outlets are attached (the shower stall is connected, etc.), and then the bathtub is installed;
- The last step is to install the hood, mirrors and curtains. For the latter, you will need to additionally secure the cornice to the walls or ceiling.
Don't miss: The process of laying quartz vinyl tiles. Laying quartz vinyl tiles: do-it-yourself installation features
Installation of a cast iron bath
A cast iron bathtub is considered the most durable and reliable, but it is absolutely not suitable for installation in a small bathroom (where there is also a toilet in the bathroom). It is most advisable to install it in a private home, since the average weight of such a structure reaches 500 kg.
Fastening a cast iron bathtub to supports and frame
Step-by-step instructions on how to install a cast iron bathtub:
- First, the old equipment is dismantled (if necessary). Afterwards, to install a new bathtub, you will need to level the floor, perhaps completely replace the screed;
Leveling the screed on the bathroom floor under the legs - To install a cast iron bathtub, mounting on legs or bricks is most often used. The frame is suitable only if the guides are made of durable metal that can withstand high pressure;
- Metal legs with plastic attachments are attached to the bottom of the bathtub - they are needed to control the height of the bathtub and protect the floor. The supports are attached in pairs - first on one side, then on the other. They are additionally bolted together to tighten the connection;
- If necessary, the outside of the bathroom is covered with a screen.
Installed cast iron bathtub with legs
Installation of a steel bath
It is much easier to install a metal steel bathtub than a cast iron one. It is not that heavy and, depending on the size, is perfect for installation in a small bathroom. As with the installation of a cast-iron structure, the old bathroom is first dismantled, then the walls and flooring are cleaned.
Steel bathtub on supports
Next, the bathtub is placed on legs or a frame is built for it. When the preparatory work is completed, the connections to the sewerage and water supply lines are ensured. After this, the bath is installed in its place and connected to the central water supply system.
Installing a bathtub in a tiled bathroom
All the methods described above imply that the tiles will be laid after the installation of the bathrooms. But what if you need to install an iron bathtub or shower cabin in a tiled room?
Installing a bathtub in a tiled room
- We will be of the opinion that the tiles are at a certain level and do not need to be re-laid. Then the installation process is greatly simplified;
- You need to level the floor and check it with the rules. You can install the bathtub on legs, a frame or bricks. Regardless of the method chosen, it is best to ensure a minimum gap between the wall and the bathtub;
- After connecting the plumbing connections of the toilet, bathtub and other consumers, it is important to close the gap between the wall and the side of the bathtub. To do this, use a flexible plinth (made of aluminum or plastic), sealant or pieces of tile;
Silicone for joints - First of all, the gap is covered with a layer of sealant. A plinth is installed on top of it. If the option with tile cladding is chosen, then sealant is first applied to the gap, and after it dries, the tile is installed. For its installation, you can use waterproof plaster;
- All that remains is to install the fan in the hood, mount the column or boiler, remove the remaining construction debris and check the correct connection.
Installing a clawfoot bathtub
Installation of a cast iron, glass or steel bathtub on legs is carried out according to a scheme similar to the installation of an acrylic structure. Of course, depending on the size or shape, the distance between the supports may vary, but in general the technology remains the same.
Installing a corner bath
Installation of corner structures is the most difficult to implement independently. Let's look at how to install a Cersanit corner bathtub on legs with your own hands:
- The old bathtub is dismantled and the installation site is thoroughly cleaned. It is important that the angle of the wall and floor is strictly 90 degrees;
Removing an old bathroom - Adjustable legs are installed on the lower part of the structure. To connect them, there are special fasteners on the inner bottom side of the bathtub;
- The legs are fastened with bolts and tightened together using studs and threaded connections. Afterwards they are set approximately according to the level;
Attaching an acrylic corner bathtub to legs - After this, the sewer and water supply are connected, a siphon and other parts of the plumbing system are installed;
Installation of a corner bathtub with hydromassage - The bathtub is turned over and its level is checked. Please note that level measurements are made strictly diagonally.
Important installation details
- The legs are attached to the bathtub so that the outlet element of the siphon easily flows into the sewer pipe. If your siphon is made of cast iron, then you will need to screw a steel tube into it;
- The bathtub must be installed with a slope;
- It is important to take into account the parallelism of the sides of the bathtub relative to the floor;
- How to seal a bathtub? The sealing of joints is subject to mandatory inspection. Small spaces between the wall and the side of the plumbing need to be cemented with a triangular notch. And apply a layer of acrylic paint to the outer surface;
- The tightness of the contact points between the bathtub and the sewer system is also mandatory!
- If the bathtub is installed not against the wall, but in the center of the room, sealing the edges of the bathtub is not important at all;
- Large gaps are filled with brick, plastic plate or pipe with a special sealing layer;
- It is also recommended to connect the bath to an electricity normalization system. A professional installer makes this connection with copper wire or steel strip;
- Before using new plumbing, it is worth pouring about 10 liters of water into it. First hot, then cold;
- Installing a new hydromassage bathtub requires monitoring the installation of additional communications.
How to correctly set the desired height from the floor?
Now the font needs to be turned over, put on its legs and moved towards the wall. This will definitely require the help of a second person. This must be done very carefully so as not to damage the tile. Next, we connect the assembled drain to the sewer. This can be done using the corrugation included in the kit.
How to raise it higher? The height of the bathtub is adjusted by twisting the legs; for this you will need a wrench. Adjust the right near leg so that the near right corner is at the required height, the optimal value is 60 - 65 cm .
Next, place a level on the front side and adjust the left near leg so that the level shows the ideal horizontal line. Carry out the same manipulations with the far legs.
Push the bathtub and check that it is not “playing”. If adjustment of the legs is not provided, you will have to file them down or put in steel plates. A slope for draining water is provided in the design, so there is no need to make an additional one!
Examination
Next, the font must be checked. Fill it with water and then remove the stopper. Look under the drain, if there is water there, you need to tighten all the nuts well again , wipe off the puddle and repeat the procedure again. If history repeats itself, all that remains is to change the siphon.
Grounding
Many people forget about grounding, but in vain! After all, a font made of an alloy of carbon and steel conducts electric current, so it is necessary to equalize the potential. For this, a grounding conductor is used. On some bathtubs, for example models from the Roca brand, there is a special plate to which the conductor is attached using a regular bolt, but if it is not there, like with older products, you can clamp it with a leg nut, having first stripped one end of the wire.
It is better to use copper wire with a cross section of 2.5 mm2 . On the other hand, it must be connected to the grounding circuit of the apartment. Grounding the bathtub is the safety of your family ; it must be approached with all responsibility. Therefore, be sure to read our article on grounding bathtubs, where all the nuances are described in detail.
Sealing joints
The next stage of work is sealing the joint between the wall and the cast iron bathtub.
If the gap is small, just put on gloves, take silicone sealant and carefully work it along the entire joint.
Then wet your finger or rubber spatula and remove the residue. If the gap is quite wide, you will have to use sealing tape or a corner.
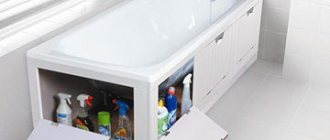
Screen
It is better to cover the space under the font with a special screen to make it look more aesthetically pleasing. There are many different models:
- sliding;
- mirrored;
- accordions;
- with shelves;
- from tiles.
Which one to install is up to you. Here you should be guided not only by aesthetics but also by ease of use.
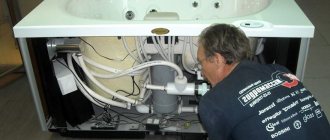
Siphon group assembly
Bathroom fittings are purchased separately. They are divided into two groups:
- Prefabricated;
- Whole.
In the first case, the siphon group is assembled on threaded connections from small plastic parts. All bends are rectangular.
In the second case, the siphon is represented by a curved pipe. All its bends are smooth, there are no threaded connections.
A one-piece siphon looks trivial, but it has huge advantages.
- The more threaded connections and parts, the higher the likelihood of leaks;
- Smooth curves do not impede the flow of water, draining occurs faster and the likelihood of deposits and blockages is extremely low;
Besides this, the siphon is not an object for demonstration, and no one will see it except you. Therefore, the objective choice is a siphon with a solid body.
Its assembly involves screwing the overflow system through the cuff.
Connecting drain fittings
The assembled siphon group must be secured at three points:
- Drainer;
- Overflow;
- Sewage pipe.
First, install the fittings in the drain hole. Fixation is carried out using a screw through the drain grate. The gasket is placed on the drain itself; it has a specific shape and provides sealing on both sides at once. TIP: Apply a little silicone sealant between the gasket and the bathtub body . Do not tighten the screw all the way.
Then, by adjusting the height of the corrugated pipe, the overflow is secured. Here the gasket is installed on the outside of the bathtub. It has a conical shape, and the “point” is directed “from the bath”. The screw is tightened all the way.
After this, press the screw on the drain hole.
TIP: the screw stops turning as soon as the plane of the drain grate begins to sag.
The last thing is inserted into the sewer, waste pipe. To facilitate this process, lubricate both the pipe and the entrance to the sewer with laundry soap.
Useful tips
Several other factors may influence your final decision about whether you need your bathtub installed before or after tiling. It happens that the apartment is still being renovated, but the bathroom needs to be used. Here it would be preferable to place it before laying the tiles, so that you can simply wash yourself.
If you have a limited budget that you are willing to allocate for renovations, the best option would be to tile an already installed bathtub, since this way you can save on the number of tiles. After all, it is not necessary to put it behind the bathtub itself. If you decide to use fitting and marking before starting work, be sure to take into account the characteristics of the material from which your bathtub is made. If a cast iron model does not react in any way to the amount of water in it, then acrylic and steel products can change shape. Therefore, when trying on a bathtub and marking the wall, fill an acrylic or steel container with water. Water should remain in the bath even when sealing cracks with sealant.
Work planning
Installation of a bathtub occurs in several stages, some of them are general, while others are included depending on the material of manufacture of the equipment itself.
- Preparing the room;
- Bath preparation;
- Assembly of the siphon group;
- Bath installation;
- Connection of drain fittings;
- Decorative design.
If the bathtub is metal, then the second point is omitted. The installation procedure itself is not complicated, but care is required when working with small parts. The main difficulty lies in connecting the siphon group.
There are two options for performing this action
- Make connections before installing the bathtub in its place. This is much easier, because access to the drain holes is not limited. And the process itself can be controlled visually. But during installation, you will need to be extremely careful not to damage the installed fittings. Considering that the bathtub is a large and heavy item, this is problematic.
- Place the bathtub in its place and level it. Only then connect the siphon group. The complexity of the process is seen in the fact that the work must be done by touch. It is impossible to see from both sides of the bathtub at once. But in return, the installer is able to handle the tub more freely.
We also recommend reading about PVC panels for the bathroom. This is an economical and quite aesthetic option for finishing the walls in the bathroom.
The second option seems more preferable. After all, anyone can brush their teeth with their eyes closed, without getting the toothbrush past their mouth. Therefore, we will focus on the second method.
For the work of installing a bathtub, installers charge 1500-2500 rubles. And the work there, with the base prepared, will not take more than half an hour. Therefore, we recommend installing the bathtub yourself.
Tools and materials for work
To carry out the work, you will need a number of special tools shown in the table.
| Name | Purpose | Place of application |
| Tools and accessories | ||
| Gas key | Siphon assembly | When installing a connection to the sewer network |
| Electric drill | Drilling holes to install retaining hooks | Installation of acrylic bathtubs |
| Concrete drill to fit dowels | Drilling holes to install retaining hooks | Ibid. |
| Set of locksmith tools | Installation of hydromassage equipment | For Jacuzzi type devices |
| Notched spatula | Applying tile adhesive to tiles | When performing facing work |
| Rubber spatula | Removing excess glue | When performing facing work |
| Construction level | Capacity installation control | Installing the container at the place of use |
| Ruler (rule) | Same | Ibid. |
| Materials | ||
| Corrugated pipe | Connection of siphon and sewer | Water drainage device |
| Ceramic floor tiles | Floor finishing device | Finishing work |
| Wall tiles | Wall decoration | Cladding works |
| Tile adhesive | Floor and wall covering | Finishing work |
| Silicone sealant | Sealing gaps and cracks when installing containers | Installing the bathtub at the place of use |
| FUM tape | Sealing of threaded connections | Installation of hydromassage equipment |
| Grouting material | Sealing tile joints | Laying tiles |
| Rags | Auxiliary material | Wherever it's needed |
Basic installation rules
Like any other professional, a plumber knows by heart the control rules for installing a bathtub and the installation requirements. Let's look at some of them:
- According to SNiP standards (building codes and regulations), the surface on which the bathroom structure is installed must be perfectly flat. It is recommended to pre-tile the floor;
- In order to protect the bathtub from damage as much as possible, its installation takes place last, that is, when the rest of the repair work has already been completed;
- Not only the location for installing the bathtub is selected in advance, but also the height of the structure. It should be taken into account whether tiles will be laid under the bathtub and what kind, whether the font will be placed on the floor or on a special podium, etc.;
- Every professional will tell you that the installation parts included in the kit are not always ideal for a particular design. For example, you bought a bathtub made of thin steel. After some time, the enamel near the legs will most likely crack. Here you should know about alternative fastening options - special corners with lining.
- Designer models are usually equipped with attractive legs. Therefore, the task of how to install your new bathtub is solved much easier. Here it is enough to buy the bathtub itself, place it on a flat floor and connect it to the sewer system;
- Otherwise, a brick “foundation” may need to be built.
Don't miss: How to remove old tiles in the bathroom.
How to carefully remove tiles from the wall and floor? Tools, stages of work, recommendations Even these examples are enough to entrust the installation of the bathtub to a qualified installer. You can make not just a base for a bathtub, but also complete its complete lining.
Tools and materials for work
If we talk about tools, we need to highlight the following:
- a drill to drill holes when installing the bathroom;
- gas key, which is used when connecting the sewer network;
- concrete drill;
- metalworking tools;
- various types of spatula for laying tiles;
- building level;
- rule or ruler.
Among the materials are the following:
- wall tiles;
- floor tiles;
- corrugated pipes;
- tile adhesive;
- silicone sealant;
- grout material;
- rags.