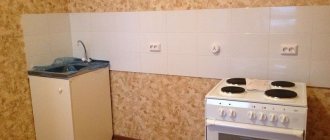
Tile is a self-sufficient material, but it and the grout in between should be protected from water and dirt, while simultaneously hiding imperfections in the joints. The solution to the problem was corners (trims, layouts) - a standard and popular finishing option to this day. They decorate and strengthen vertical, horizontal and inclined surfaces: inside and outside buildings. The corners protect the tiles from damage and hide imperfections in the edges, preventing two elements at an angle of 90° or less from grinding together. For designer interiors, they sell uniform options, including improved configurations. Something similar is used in an expensive classic setting. In other cases, a regular tile corner takes on aesthetic and practical functions. The planks are installed in all rooms where there are tiles on the walls.
Peculiarities
Corners for tiles perform protective, decorative and masking functions. The structure is usually installed immediately, but it also happens that it simply hides the broken part of the tile and at the same time prevents further destruction of the finish. The planks also protect against moisture penetration and the development of fungus and mold. Do not forget about the decorative purpose, because without borders a room with tiles on the outer corners would look “inadequate” in a modern way. Using corners, tile canvases and compositions are formed and transitions are designed. They are used with small mosaic fragments, large slabs on the floor of the balcony and bathroom. Ease of installation is also not the last nuance - anyone who has held the tools in their hands at least once can cope with the task. The hidden function is for human safety: without the corner, injuries would be possible. Consumers have access to a wide selection of parts for assembling structures.
Installation of ceramic plinth under tiles
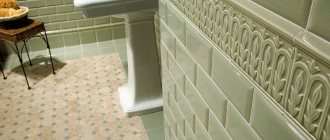
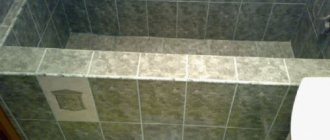
After installing the bathtub close to the wall and checking the horizontal level, a ceramic border is laid on its edges. A row of tiles is laid on the vertical shelf of the border, continuing the laying up to the ceiling. There is no doubt about the reliability of the ceramic border - its long service life has been tested by experience.
Corner for bathroom tiles on a ceramic bathtub
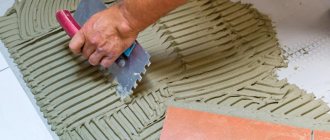
Before starting work, you need to calculate the amount of materials. You will need silicone sealant, which must contain antifungal substances, as well as mold protection products (1 tube), up to 2 kg, for tiles. The number of borders should be equal to the number of tiles, matching their length. In addition, several borders should be provided in reserve in case of defects or combat.
Places where ceramic borders are installed and glued must be wiped free of dust and degreased. The joints between the bathtub and the walls are evenly filled with sealant - this is necessary so that water does not leak through the resulting cracks. After the sealant has hardened, tile adhesive is applied to each tile corner on the back side using a spatula, then they are pressed tightly simultaneously to the edge of the bathtub and to the adjacent wall. The width of the seams between the corners should correspond to the seams between the tiles; for this purpose, special crosses are used for laying. This is necessary to maintain vertical lines on the side walls. Level the position of the borders by tapping with a mallet.
Next, proceed to laying the tiles in a vertical direction. The inner corner on both sides of the bathtub is also laid out using a ceramic corner. If you were unable to purchase one, you can make a bath corner by cutting a ceramic bath skirting board at an angle of 45° using a tile cutter. Then the cut is sanded on an emery wheel. The length of the borders obtained in this way must be adjusted in accordance with the length of the finishing material used to decorate the walls. Tile adhesive will adhere better if you pour water over the borders after the adhesive has completely cured. The gaps are treated with joint grout to match the color of the cladding and borders.
Advantages and disadvantages
Standard plastic corners have a minimal number of weaknesses, but it is worth noting their fragility. Nothing bad will happen with a little pressure, but if the impact is stronger, the damage can spread to the tiles.
The disadvantage of all types of products is the loss of relevance, because various coatings quickly go out of fashion. This indicator is relative, but when buying a corner you should still take into account how long the product will retain its original appearance. Corners also make tile repairs more difficult. There are many more advantages and they are more significant. Corners improve design, protect against damage, form compositions, prevent the penetration of water and insects, and promote hygiene.
The strips increase the reliability of fastening the cladding itself. At the same time, products are produced for different placement options: some products are mounted on walls, others on steps or floors.
Tile corner material
The choice lies between ceramics and two leaders in the modern materials market: metal and plastic. Metal products are usually aluminum and stainless steel, while plastic products are usually durable PVC. In terms of all characteristics, in general, materials can be placed in order from metal to ceramics, where the first type of product is better, and the last is inferior to the rest.
In terms of resistance to moisture, the leaders are PVC and ceramics. Availability: plastic. In terms of ease of installation and functionality, ceramics are inferior to “competitors,” as well as plastic in terms of decorative qualities. At the moment, the market offers corners with different types of surface, including color, texture, additional coatings, and reflective properties. Taking into account all the possibilities, PVC can be considered the most promising material: it is easier to give it the desired shape, including for decorative and technical reasons.
PVC
Corners made of polyvinyl chloride have waterproof properties and, due to their lightness, do not load the tiles. The material is easy to process, so consumers have access to an assortment for different interiors in all price categories, in different colors. Decorative options are also made from PVC. Plastic strips are convenient to use and easy to install - due to their elasticity and low density.
PVC planks can suffer from heavy impacts and constant exposure to heat or cold. After several years of use, yellowness and a grayish tint may appear. In order to avoid defects and damage, you should follow the instructions for caring for plastic products. For example, polyvinyl chloride is not afraid of 90% of external destructive factors. The material does not burn well, does not fade, and does not become moldy.
Metal
A universal material with many advantages and a classic color scheme. Corners made of different types of metal combine well with each other in one interior, especially in the kitchen and bathroom. Metal products are usually thin and light, so the integrity of the tiles will not be affected when edging.
In this regard, aluminum ones are most suitable - they are lighter than others. All materials have an anti-corrosion coating, are durable and resistant to ultraviolet rays. Metal is the most durable option. Planks made of this material have the ability to withstand a variety of loads and temperature contrasts. Metal corners have wear resistance, high impact and compression strength. Among the disadvantages are the high cost and the tendency to damage the outer layer of the material.
Corners are made from materials:
- aluminum;
- chrome-plated steel;
- of stainless steel;
- brass
Ceramics
Ceramic planks are used to create an aesthetically complete picture, in combination with the main tile material. Sometimes they are sold together with the cladding as one set. The material has low impact strength, but good compression properties. Ceramics heats up slowly, does not emit dangerous compounds, and does not warp from water. The glazed surface is highly hygienic.
It does not require special care and is used for about the same amount of time as metal. Among the significant shortcomings, the price is primarily noted. This is not the best option for budget repairs. In addition, difficulties arise during installation - the material is rigid. Ceramic products are difficult to process, difficult to cut, and require “special” glue. Sometimes self-installation fails.
Ceramics are prone to chipping!
Common sizes
The overall dimensions of the plastic corners are convenient to use - the shelf dimensions are 25x25 or 50x50 mm with a length of 2.5 m, and the material - polyvinyl chloride - is practical due to its resistance to corrosion and high humidity, resistance to harmful biological factors - mold, fungi and insects. Bathroom corners are inexpensive, have sufficient flexibility and pliability during installation, which is necessary for smoothing out small defects in cutting and laying tiles. Corners with increased flexibility are convenient to use when finishing oval and rounded bathtubs and rounded wall surfaces.
A narrow and thin corner has a purely technical purpose - it is used to align wall joints, while a wider strip can be used as an element of bathroom decor. Accessories corresponding to the size are produced for finishing corners (plugs, corners, adapters) - the components are necessary to ensure smooth transitions at the joints and ends of the corners during installation. For more advanced models of corners with a tight fit to the tiled surface of the walls, the edges are made rubberized.
Bath corner made of plastic
Varieties
For different types of joints, corresponding options for corners were designed. First of all, the width of the trim is important. Previously, the slats had points, but now there are plugs to improve performance and protect against injury. The main classification, in turn, distinguishes models for internal and external corners. The first type is usually more bulky and has a complex structure.
External type planks are a strip without additional devices and internal structure. At the same time, there are also extensive modifications, and they perform an additional aesthetic function. Corner structures are also distinguished by location/method of installation. Typically, the planks are installed inside buildings, but there are reinforced modifications for outdoor placement. Vertical and horizontal products differ significantly in profile shape. In addition to the corners of rooms, layouts are also mounted on:
- horizontal surfaces;
- steps;
- plumbing.
Interior
The use of internal corners divides the opinions of experts. Some of them are inclined to believe that internal joints look better without strips. In this case, the use is justified if the tiles were cut in the corners. In addition, for large rooms, the best option would be to have a wide wall plinth. The optimal place to use internal trims are toilets, showers and bathrooms.
The interior corner trim features a tile groove, a perforated rib and a concave face. Installation of trims begins after finishing one of the vertical surfaces. The finished coating is necessary so that the corner can be inserted behind the tile. Craftsmen sometimes simplify the task: they remove the back part and “put” the front part on silicone. Installation is then done after finishing the facing work, and the product will not interfere with assessing the conformity of the seams.
Outer
External joints in the interior are finished with a large number of fasteners. The outer plank will be a convenient solution, including if the tiles in the corner overlap. The external trim has a relatively simple design. The width is 7-11 mm, and the length of the element is up to 2.5 m. Installation of the outer corner in the vast majority of cases is carried out only in one standard way.
Manipulations with cutting and fixing to silicone are practiced only for profile repair. The very shape of the outer planks does not initially imply any changes. Installation of planks on external corners is done before the cladding is completed. Calculating the gap between tiled walls is not worth the effort, although it is possible. A series of mistakes will end with a complete redo of the walls. In turn, if there is no exact match in size, take a corner that is a little wider.
Washed down the front part at an angle
The most difficult way to lay tiles is in the inner corners of the floor surface. It is used by experienced craftsmen, as well as in cases where the angles deviate greatly from 90 degrees.
On the floor, work on laying tiles begins from the center to the corners.
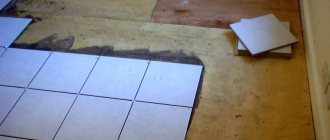
With the classic layout of tiles on the floor, walls and corners are approached in whole tiles, leaving a gap for laying edges. With this layout, there remains a distance between the whole tile and the wall surface that is greater than the width of half the tile, so laying the edges is not difficult even for beginners. All edges are rectangular in shape and, depending on the type and thickness of the tile, can be obtained either using a glass cutter or using a manual tile cutter.
The sequence of laying tiles on the floor surface is as follows.
- With the classic layout, the center of the floor is first determined and whole tiles begin to be laid from there towards the walls. Having finished laying the whole tile, they begin to lay the edges along the walls, while laying occurs up to the penultimate edge in the inner corner.
- The last two cuts, which will form the corner, require cutting at a certain angle along one of the smaller sides of the rectangle. With an internal angle of 90 degrees, and such an angle can be obtained when leveling walls using sheets of drywall, trimming occurs with an angle of 45 degrees of both mating edges.
As already noted, straight internal (and external too) corners are extremely rare, therefore, individual markings of edges are made in each corner.
Sawing down the corners of end tiles is a complex process that requires high precision tools.
To do this, the edge is applied flush to the corner and a line is drawn along the front side of the tile from the inner corner to the outer corner of the last intact corner tile. The same actions are carried out with another section, but along another wall.
It is best to cut tiles using this method of laying corners using an electric tile cutter mounted on a stationary bed and with a diamond cutting roller. Then the cutting line will be smooth and will not require additional processing.
However, such tile cutters are quite expensive, and their rental is also not cheap. For small amounts of cutting at an angle, you can use a manual tile cutter, but make the cut with a small tolerance. Tolerance is necessary in order to use a grinding machine to level the cut line and adjust the edge of the tile to the place of masonry.
When marking corner edges or solid tiles, it is necessary to take into account the width of the tile seam so that it does not stand out among the row seams.
How to choose
Main criteria:
- Material.
- Groove width.
- Profile.
- Size.
- Decorative.
- Colors.
Corner structures are an excellent alternative to burring joints. Installation will be much cheaper, and the appearance will be interesting in its own way. The first step is to determine the material of manufacture. PVC structures are constantly being improved, metal ones are designed for a variety of loads, and ceramic ones look organically with tiles. The panels are selected taking into account the thickness of the tiles. In this case, the profile shape of the corner structure must correspond to the method and place of application.
The size of the front part is individual, and the guidelines for choosing it are the dimensions of the room and its style. Other selection criteria, decorativeness and coloring are also closely related to design. Painted and textured products are much less common, so you can use them to highlight your home. The pattern and relief are combined with the style of the room, and if there is no design as such, they buy something modern and universal.
Tile groove width
The ideal value is +1 mm compared to the thickness of the tile. For 6 mm tiles, for example, trim No. 7 is suitable, etc. If the slabs differ in thickness, then the largest value is taken as a guide. The finishing material is chosen to be of the highest quality possible so that this does not happen. In the worst case, you will need to plan the joints and select elements of the same thickness for them.
It’s another matter if the original plan was to cover two walls with different types of tiles. But in this case, the thickness is controlled so that there is not too much difference. The discrepancy in size can be compensated for with a sealant, including a silicone-based one. There are also grooves of a special design to hide all defects and align the joints. Corners without a channel are selected in exact accordance with the size of the tile.
Color and pattern
Corners used to be sold in muted shades or classic colors: white, gray, black. Then bright and painted options appeared. Classic tones are used universally. Dirty and muted color options suit the appropriate setting - calm, simple or minimalist. Bright and even acidic shades are relevant for interiors with contrasting wall colors.
Monotonous planks are combined with tiles with the same repeating pattern. If the design is distributed over a large area and has abstract features, then any corners will do. As a rule, the background color of the tile is selected with a difference of 1-2 tones from the main color of the walls. In many cases, wide planks with a dirty color in medium lightness and a patterned monochromatic design - darker than the background - will be useful. There are no special restrictions, and everything is decided by the wishes of the residents, but too colorful painted options should be avoided.
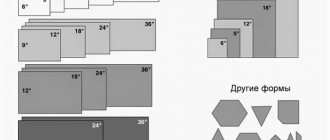
Form
Standard models have different profile shapes and surfaces, but at the same time some of the following parameters: 2500×7, 2500×9 or 2500×11 mm. The products have two different sides, the front - for decoration and protection, and the back - for connecting to the tiles.
There are 4 types of profiles: P-, T-, G- and H-shaped. L-shaped is also called corner, and is used at the junction of vertical and horizontal coverings. H- and T-shaped act as a dividing insert for connecting floor finishes at the same level.
The option in the form of the letter “P” is the most decorative; it is used at the final stage of work. Based on the shape of the surface, corners are divided into convex, concave, flat, textured, etc. The last two types are considered designer. Standard concave ones are mounted on internal corners, and rounded convex ones are mounted on external joints.
The shape of the corners should be as safe as possible so as not to harm small children!
Framing a single slope
We will start by framing a single slope. We chose a silver plastic corner. When choosing, it is important to consider the height of the corner cavity. It is better to purchase a corner into which the tiles will extend slightly.
For example, with a tile thickness of 8 millimeters, the height of the corner cavity should be 9 mm. In this case, the corner can cover the unevenness of the tile or its cut edge.
I note that this is not the only way to join a corner and a tile, but this is what I use.
Let's lay the corner and tile dry. The inner side of the slope will also be framed with tiles, but this tile will approach the corner from the other side.
When I have glued all the tiles on the inside of the slope, I will place the corner exactly to their end.
There is a small recess on the back of the corner, and it hides the edge of the end tile. So I set the corner to its entire height. I will make the necessary trimming at the top.
Since this wall is made of gypsum fiber, I temporarily secured the decorative corner with self-tapping screws. The corner of the doorway will also be framed from above, so I filed the corners at 45 degrees.
I draw your attention to the fact that this must be done very precisely. How to file a corner at 45 degrees? Well, of course, you need to use a miter box for this. It already contains the 45 degree angles we need.
File the corners with a hacksaw. Unlike metal ones, I file plastic corners with a blade without a hacksaw - this makes it easier for me to control the pressure and make a neat cut.
Let's return to our corner. Let's put the tile on the other side and see how it looks.
As you can see, the tile has slightly gone into the corner.
The corner will not only protect the tile from chipping, but will also allow you to hide the cut part there if necessary, and such situations do happen, and I will talk about them a little later.
Now let’s mark the attached tile for cutting. We draw the cutting line so as to take into account one tile seam.
I cut the tile according to the design and am ready to place it in the corner, but if I try to place it with the cut edge, then I am in for a surprise - the tile cannot fit into the corner like before when I inserted it with the factory edge. In addition, this narrows the tile joint, for which I left space. The reason is that the width of the edge of the tile in the cut part is greater than from the factory edge. And this is easy to check if you insert the tile as we originally measured. In this case, we will get the required joint between the tiles.
What should we do to hide the cut edge of the tile? And to do this, we will put a mark on its upper part at the width of the corner. At this mark, we must slightly cut off the back surface of the tile, in other words, make this edge a little narrower.
I use a block of sandpaper for these purposes. It is enough to remove 1-2 millimeters. After such processing, the cut edge will go deeper into the corner and hide its imperfections.
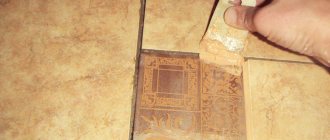
Elimination of defects
It is not always possible to do the job flawlessly, especially for beginners. Nevertheless, it is possible to remove some shortcomings. If you cannot lay a corner with ceramic tiles evenly, try to compensate for the flaws with mortar, for example, by raising the adjacent element to the desired level.
When pruning, it is not always possible to achieve a slope of exactly 45 degrees. If not enough material is cut, the excess can be easily sanded down until you have a smooth angle.
Another point is the presence of defects at the junction. There are two options to fix the problem. The first is that installation is carried out in the prescribed manner, and chips and gaps are covered with grout during the decorative finishing process. The second option is that after the mortar and fugue have dried, a plastic profile is glued to the corner to mask these wall defects. Its installation is done using silicone or liquid nails.
Finishing corners is not an easy job, but it can be done if you follow the tips presented above.