During a bathroom renovation, the question of updating old plumbing often arises.
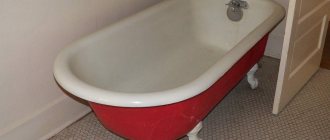
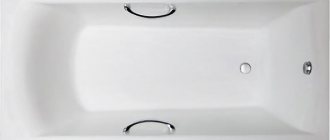
The first candidate for replacement is always a bathtub, especially if it is a cast-iron model that has been there since Soviet times.
After all, the industry offers the consumer a wide selection of other, more modern materials: acrylic, quarry , wood and even marble . Products made from them are often more practical than Soviet cast iron. But, of course, it also has its advantages .
But the question arises: how to dismantle and remove such a colossus? As they say - “break, don’t build.” Let us consider in detail all the nuances of this labor-intensive process.
What are the options?
There are 2 main ways to carry out work:
- dismantling while maintaining integrity:
- only the body itself (when it is not important to preserve the coating)
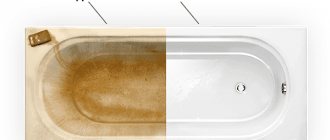
- font enamel (when the bathtub is planned to be used further for its intended purpose, for example, after restoration)
- destruction.
The first option is simpler from the point of view of dismantling itself, but it causes big problems when removing the product. After all, such a font weighs on average about 100 kg.
This method is worth using if you decide to restore the coating or do something with your own hands from the case itself.
You can breathe new life into an old cast iron bathtub. Craftsmen have come up with many options for its alternative use: flower beds, ponds, garden furniture and much more.
Safety precautions when dismantling the bathtub
During work, hazardous situations may arise. This may be caused by inconsistency in the actions of two people, or failure to follow the rules for working with a cutting machine or hammer. Most often, injuries occur in several typical cases. Let's take a closer look at them.
If the sides of the bathtub are tiled, remove the container from the mounts and lower it to the floor
The risk of injury may arise due to uncoordinated actions of workers. It is very important to accurately coordinate each action. If one of the assistants accidentally releases the bathtub, the second person will not be able to hold the product on his own and will be crushed by the cast-iron container. Most often, the hands suffer during the dismantling process. The limb can be pressed against the wall or pulled between the body of the product and the frame of the doorway. Particular vigilance should be exercised in this area, as this is one of the common causes of injury.
Care must be taken when lifting the edge of the tank. The bathtub may slip on the slippery surface of the tiles, and one person will not be able to hold it. In order to avoid this, it is necessary to lay an anti-slip gasket under the side of the sanitary container. This could be a rubber mat.
In the case where the edges of the product are firmly embedded in the wall, the dismantling procedure is somewhat more complicated, and additional sources of injury may arise. It is quite problematic to remove a layer of old tiles and cement mortar from the sides of a plumbing fixture so that the product can be pulled out freely. In this case, you can make the task easier by knocking out the supports of the structure one by one. After this, you need to apply force so that the container falls to the floor. Before disconnecting the structural supports, it is necessary to place a layer of shock-absorbing material under the bathtub on the floor to compensate for the force of impact when the tank falls.
When working with tools such as electric angle grinders and hammers, it is inevitable that a lot of small pieces of scale, metal shavings or splinters fly off, which can cause serious injury if they come into contact with the skin or eyes.
Particular care should be taken when breaking the body of a sanitary ware into small fragments. In this case, the enamel coating of the bathtub breaks off in large pieces, which, when flying off, can cause serious injuries. During work, not only the visual organs, but also all parts of the body should be protected from damage. To do this, you can wear work pants made of thick material and a jacket or thick long-sleeved shirt. Of course, in such clothes you can become covered in profuse sweat, but in any case this is preferable to injury.
Do not neglect eye and hand protection, as this will help avoid accidental injuries.
Increased injuries during dismantling activities can be avoided by following the necessary safety requirements.
Tools
To carry out the work efficiently, you will need the following tools:
- perforator;
- chisel;
- chisel;
- hammer;
- gas key;
- Bulgarian;
- sledgehammer;
- respirator;
- protective glasses.
The work ahead will be very dusty and dirty, so you need to take care of protective equipment.
At a minimum, you should take a respirator and safety glasses.
Progress
Once the most vulnerable point in the product has been found, the following steps must be performed:
- The first step is to move the bathtub a little away from the wall. To complete this task, you will need a chisel and a hammer, with the help of which the plumbing product is removed from the cement mortar around the perimeter. The optimal distance of the bathtub to the wall will be from 100 to 150 mm.
- Using an angle grinder equipped with cutting wheels, make several cuts on the bathtub. The master’s task is to deprive the product of its strength. The cutting areas on the bathtub should be its curved edges on both sides. They are used as stiffeners. If the work is done correctly, then strong blows to the bottom of the cast iron product will cause it to collapse.
- Break through the drain hole. There is no need to turn the bath over at this stage. The master only applies very strong blows with a sledgehammer to the drain from the inside of the bathtub. Judging by the reviews, after these steps the bath is divided into two separate halves. If this does not happen, then you will have to deal with its sides.
- Turn the bathtub on its side and cover it with old rags. Burlap also works well. The blows are applied to the outer part of the cast iron product. As a result, the previously broken drain hole in the bathroom should become even wider. After several blows in the bathtub, a long strip forms along its entire bottom.
How to dismantle it correctly with your own hands?
Below, we have provided detailed instructions for carrying out the work with all the nuances.
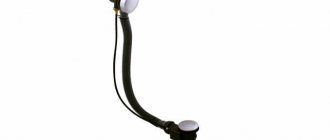
Remove the old siphon
The first step is to disconnect the siphon. As a rule, in old houses these siphons are made of cast iron, and under the influence of moisture and time, all connections sinter and corrode, so it is unlikely to be possible without special compounds that corrode rust. You can use, for example, WD-40 - popularly known as "Vedashka". You need to spray the connections and leave them in this state for 1 hour.
Then, using a wrench, you need to unscrew the nut, thereby disconnecting the siphon.
The diameter of the nut is most often very large, so for this work you will need a gas wrench.
If the nut does not give in and the “century-old layer” of rust is not corroded by any means, all that remains is to cut off part of the pipe with a grinder. Or not? There is one interesting life hack :
- insert the chisel into the hammer drill chuck (this is a special blade-shaped attachment);
- switch it to the “impact without drilling” mode;
- Press the chisel against the end of the nut and press the start button.
Most likely the nut will give way. Do this procedure several times until you can unscrew it with a key or by hand.
Release the sides
Often tiles in the USSR were laid from the side of the bathroom, or even a corner was made from it along the entire perimeter of the wall. In this case, pulling out the bathtub is simply not possible; first you need to knock off the tiles from the sides. For this, an already familiar hammer drill with a chisel is suitable, in impact mode without drilling.
Just go over the edges one by one. If you don’t have a hammer drill, it doesn’t matter. A hammer and chisel can also handle this, but the work will take much longer.
If it is built into the wall of a room?
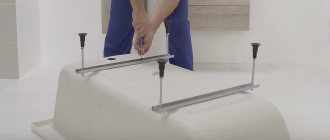
It also happens that the font is built into the wall, for example, as in the photo. In this case, you will need to remove the legs from the side of this wall. If you can’t unscrew them with a key, or they are firmly embedded in the floor, you can cut them off with a grinder.
Then place wooden boards or a sheet of plywood so as not to split the floor. All that remains is to press hard on the side of the bathtub; you may need the help of a second person, and it will fall down, falling onto the boards. If you can’t push through, you can try using a hammer drill to knock down the part of the wall on which the font rests.
All that remains is to turn it on its side and take it out.
Is it worth cutting off the legs?
Sometimes the legs are dull and deeply embedded in the floor. In such cases, all that remains is to cut them off with a grinder . Take a metal disc and carefully file the back legs first, and then the front ones. This is important because if the order is different, there is a chance that the font will fall on you.
It is better to file the legs at the base (floor). In this case, you will have additional handles that are convenient for transportation. Of course, you should first check whether they are firmly attached to the font.
How to take it out of the apartment?
Once you have released the bowl, place it in an upright position - firmly grasp the upper legs. Then tilt it slightly to make it easier for your partner to grab the lower ones.
The doorway in the bathroom is usually quite narrow . Therefore, it will not be possible to simply endure it. You must first place the front legs behind the doorway. Then move the font diagonally and only then insert the rear legs.
How do they carry it out if the legs are completely cut off? In this case, it will be easier to place the bowl on its long side on its side and gradually move it along the floor, pointing it diagonally into the doorway. After you have taken it out of the bathroom, you can grab one person by the front end, the other by the back (as if you were carrying a stretcher), this will make it easier to pull it out. Further removal is a matter of technology. What to do if there is no partner?
Is it possible to split or break it with a sledgehammer at home?
If you work alone and there is no one to help remove the whole building, a rational solution would be to remove it in parts. To do this you need to break the font. What is the best way to do this?
The fastest, but noisiest and messiest solution would be to use a sledgehammer:
- cover the font with a damp sheet or other large piece of cloth. This will help avoid dust and scattering of fragments.
- Then hit the side of the tub hard with a sledgehammer.
- If the cast iron does not crack, you can use some kind of wedge, for example, a crowbar. And hit him already. The font will definitely split.
- You can cut cast iron into pieces of almost any size.
The main disadvantage of this method is that it will take a long time to clean the space from small fragments and dust. And the noise, of course, will be very loud, because the shape of the bath vaguely resembles a bell.
Is it really possible to break without noise?
Many people often ask this question, because not all neighbors are sympathetic to repairs. Of course, you won’t be able to get rid of the sound completely, but you can make the work a little less loud:
- make several cuts on the body with a grinder;
- insert a piece of ground scrap into them;
- hit the crowbar with a sledgehammer.
The tub should crack.
Is it better to cut it with a grinder and break it?
There is another way to divide the font. It was cut with a grinder. Here, of course, you will have to suffer longer than with a sledgehammer. But there will be much less dust and fragments:
While working, pieces of enamel and scale will fly around, be sure to wear safety glasses and a respirator.
- install a metal disc on the angle grinder (grinder) (it is better to use 230 mm models, with them the process will go much faster);
- start cutting in the middle, sequentially moving from the sides of the bathtub to the bottom;
- when the matter comes to an end, you are already going to go to the bottom and close 2 cutting lines from the front and rear sides - ALWAYS place wooden blocks under the bathtub , otherwise the halves will come together and bite the disk.
- When the cut closes, the work can be considered complete. If the halves do not open, just press lightly on the bottom and it will immediately break.
During operation, the disc must be allowed to cool, so pause every 1-2 minutes.
The procedure can be carried out until the size of the parts satisfies you. What else can you saw and how to cut? It’s difficult to find an alternative to an angle grinder; you can, of course, make cuts along the sides using a hacksaw, but you won’t be able to cut further.
Preparatory stage
Find out who is obliged to handle the disposal of large cargo under an agreement with your management company. The fact is that you do not have the right to throw any bulky garbage and construction waste into a general container with household waste . To dispose of such waste, an additional container may be installed in the courtyard of the house, which is decided upon at a general meeting. Your management company can provide you with this service privately for a fee. If none of the options listed is available to you, you will have to take the garbage yourself to a place specially designated for this purpose, most likely outside the city limits.
Remove all items from the bathroom: washing machine, wall cabinets and shelves, mirrors, sink, toilet - in a word, clean everything.
Dismantle old faucets - if you are undertaking a major renovation, it makes sense to replace all the plumbing fixtures at once. Moreover, the service life of mixers is in most cases short.
Consider whether the bathtub will fit through the doors or whether they will also need to be removed from their hinges or even the entire door frame will need to be dismantled. Even if the bathtub fits into the passages in size, it is necessary to take into account that the bathtub may also have legs, which can easily damage the doors. In most cases, it is easier to remove the door from its hinges for a short time than to buy a new one later. If you absolutely do not want to do this, then try to protect the door covering from damage using some soft cloth or film.
Related article: Inspire curtains for modern interior design
In such conditions, paying for the service of dismantling and removing the bathroom is sometimes much easier than doing it yourself.
Where to put it with benefit?
You will be surprised, but even from an old, rusty bathtub you can benefit; see how to do this below.
Removal for scrap metal
You can scrap it and get some good money. Some companies even offer free dismantling and removal services, this will save you a lot of time and effort. Read more about how to benefit from this in our special article .
Second Life
If you apply a little imagination and “direct hands”, you can make truly amazing things from cast iron baths. Furniture, ponds and even barbecues. More useful inventions from a cast iron bathtub in our article.
Who is responsible for the removal and disposal of old bathtubs for free?
Disposal of a cast iron bathtub from an apartment (private house) can be done free of charge. To do this, you need to contact a specialized company that deals with the removal of different types of waste. Such companies usually have a personal fleet of trucks and their own staff of loaders.
Free recycling of an old cast iron bathtub, for example, is carried out in Yekaterinburg, in Moscow, St. Petersburg, Astrakhan, Perm, Samara, etc. – All-Russian service “Zabiraika”. The payment for the work performed by the employees of these companies is the cast iron bathtubs themselves, which the companies hand over for recycling.