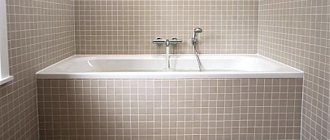
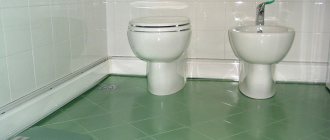
During a major renovation in the bathroom, even if the craftsmen try very hard and make the wall perfectly flat, when installing the bathroom, there will still be gaps between the wall and the font. This is quite possible due to the unevenness of the font itself and its side. If bathroom tiles are used when tiling a room, then the presence of gaps at the joints of the tiles is inevitable and the best option for sealing the joint and decorating it would, of course, be a ceramic border for the bathroom.
If your bathroom is lined with beautiful ceramic tiles and new plumbing has been installed, then using a plastic border can only cheapen the overall appearance. Therefore, to create a complete room design, it is better to use ceramic corners for bathroom joints, despite the fact that they are more expensive than their plastic counterparts and require much more time for high-quality installation.
Kinds
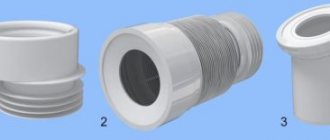
Tape
It is a polymer tape that folds along the long side. An adhesive tape is applied to the inside, similar to double-sided tape. During installation, it is necessary to use a hairdryer, which warms up the border to give it greater softness and elasticity. Without this operation, it is difficult to install a sufficiently rigid tape without gaps.
Plastic
Made in the form of a plastic triangular plinth with soft longitudinal edges - the name “dovetail” is found. Fastening is carried out using a sealant or glue with the general name “liquid nails”.
Ceramic
It is made from clay - the same one that is used to make tiles.
Advantages of the first two types:
- Affordable price;
- Convenience and ease of installation - anyone can handle it, without professional training.
- Absolutely resistant to moisture.
- Does not rot, is not destroyed by mold and mildew.
- The operating temperature range is +15°-50°C.
Flaws:
- The service life rarely exceeds 2-3 years.
- Smooth, flat surfaces are required, otherwise gaps will form that will have to be filled with sealant.
- Due to periodic exposure to water with variable temperatures, plastic loses its appearance - it becomes dull and turns yellow.
- Fastening with sealant or “liquid nails” is fragile and durable - this is especially true when using steel or acrylic bathtubs: when filling the bathtub with water and with a massive person, the structure deforms, which causes unacceptable loads on the adhesive joint.
It is advisable to use these types of borders because of their low cost - it is easier to remove the peeling one and replace it with a new one. It is better to use only sanitary sealant or “liquid nails” glue for attaching borders; they contain antiseptic additives that prevent the development of mold and mildew.
For a small room
If the bathroom is small, you want to choose a design that can at least visually expand its area.
It would seem that apartments in Khrushchev and small-family apartments have a completely hopeless design option for a small-sized bathroom.
Therefore, tiles in a bathroom in a Khrushchev-era building, as well as in a small family, should be selected taking into account certain rules.
So, it expands the volume of the room:
- small tiles and mosaics;
- light and cold shades;
- glossy surfaces;
- horizontal method of laying rectangular tiles on the walls;
- diagonal method of laying floor tiles;
- frieze or pattern along the walls.
Properties of ceramic products
Ceramics are made from annealed clay.
Ceramic borders are coated on the outside with enamel, glaze - a thin glassy substance obtained from exposure to high temperature. Basic properties:
- It has a low water absorption coefficient, because is a water-repellent substance.
- Has high resistance to most chemical and organic solvents. Detergents and cleaners do not damage the surface and do not leave stains.
- Long service life - ceramic products last for centuries.
- The surface has high mechanical and wear-resistant strength. During operation, it is allowed to use hard abrasive cloths for cleaning.
- It is a non-flammable material.
- Ceramic products are dielectrics and are used in the electrical industry as insulators.
- They do not attract dust - they have antistatic properties.
Thanks to these properties, ceramic borders are widely used for finishing work in places where it is necessary to isolate the flow of water - in bathrooms; in kitchens - for insulating countertops and sinks.
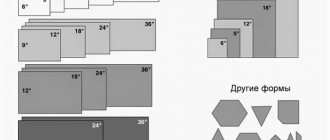
"Modular" installation method
- an interesting and complex method that requires great care from the master. Tiles for the bathroom and toilet, laid in this way, give a dynamic, non-boring pattern.
Features of the method:
- tiles are selected of one texture;
- a choice of contrasting colors is possible;
- the same elements laid out in a different order will give a completely different pattern;
- at least three standard sizes of tiles are used, and all sides of such a tile are multiples of each other;
- preference is given to special tiles marked “modulare”, adjusted in strict accordance with all sizes.
Advantages and disadvantages
Advantages of ceramic borders:
- High mechanical strength - resistant to deformation loads that occur when filling the bathtub with water and loads from a heavy person.
- They have a hard surface , so there are no scratches on it - you can use cleaning powders during cleaning work.
- Inert to most organic and inorganic substances - used with all types of detergents and cleaning substances.
- Waterproof product - absolutely not damaged by water.
- Wide temperature range of application from -60°C to 1000°C – can be used near heating devices, for example, near autoclaves or ovens.
- Good adhesion to most adhesives - tile adhesive, mastics, sealants, “liquid nails” and other types are used for their fastening.
- Long service life - over 25-50 years.
- Aesthetic properties - thanks to the various shapes and wide color palette, it can be used with a bathtub or tiles of different colors.
Flaws:
- Relatively high price - especially for borders with complex shapes, colors and sizes.
- Fragility is inherent in all ceramic products. Care is required during installation work and operation of installed curbs.
- Difficulty of installation - a person without the proper experience and knowledge will need several days to completely tile the perimeter of the bathroom.
Purpose of the ceramic border:
- Covering the joint between the bathtub and the tiles.
- Creating a tight connection to prevent water leakage outside the container.
- Formation of a single monolithic structure around the perimeter of the bath.
- Aesthetic design of the transition between tiles and bathtub.
The “running” or “bandaging” method
- also the simplest and fastest way. It has a benefit with uncalibrated tiles that differ in size, since it hides such a drawback.
Laying is carried out in horizontal rows. This arrangement of tiles in the bathroom is similar to brickwork: each row is shifted by ½ part of the tile relative to the previous one.
Note!
When using this method, you cannot take tiles of two colors or combine different textures: visually the floor will seem uneven.
Types
Along with ceramic tiles, several types of borders from the same material are produced:
Pencil
The name comes from the size and shape of the product: a pencil is a narrow ceramic rod, several tens of centimeters in diameter. The outer side has a semicircular convex shape.
Products are produced with imitation of glass beads assembled into a single whole. They are used to create visually isolated zones on a surface made of tiles. Used for edging ceramic decors and mirrors. They have a wide range of colors, including imitation metal coatings, such as gold or silver.
Frieze
A flat product that has the thickness and length of the tile used, 2-9 cm wide. The border is used for design solutions for tiling tiles of different colors. The outer surface imitates tiles and is available in a wide range of colors. Produced with smooth and textured surface.
These two types of borders are almost never used to cover the joint between the bathtub and the tiles, due to the fact that the edges of the bathtub are rounded. Because of this, the gap is much wider than the thickness of the above curbs.
Angular
It has the shape of a concave or convex fillet. In addition, corner elements are produced; they are mounted in the corners of the room and provide a reliable joint between the mating borders. Some manufacturers produce borders with pre-cut ends at an angle; they are called right or left cut. At the ends, to close the voids, special end products are used - plugs. This border has a narrowly targeted application - masking the tile-bathtub joints.
Shutdown
Once the ceramic border around the bathtub has completely dried, a few more finishing touches are needed to achieve the final effect. The seams between the tiles and the border must be additionally sealed with acrylic or silicone sealant, but this must be done as carefully as possible so as not to stain the tiles.
The ideal option to achieve aesthetic beauty would be to cover the seams with the same grout that was used to cover the tiles. But for this, before gluing the ceramic border, it is necessary to provide a gap of the same width between the modules, using special plastic crosses. In this case, your work will look perfect.
Important. Remember that ceramic baseboards for bathrooms absorb the most moisture, therefore, for grouting, you must use only moisture-resistant grout with antifungal additives. Choose the grout color according to your design style and your personal aesthetic preferences.
An excellent option would be a mosaic border in the bathroom, since such material is very easy to lay out due to the small size of the modules. Despite the fact that mosaics cost a little more than standard corners, they allow you to do high-quality work without any special experience. Also, a mosaic bathtub rim is often used when there are rounded lines, as it allows you to perfectly replicate any circle.
After studying the material presented above, you will be able to lay out ceramic corners yourself without the help of third-party specialists.
Installation
Consists of several stages:
- Calculation of the number of borders.
- Preparatory work.
- Installation.
Calculation of the number of ceramic borders
- The perimeter requiring closure is determined.
- The result obtained is divided by a size equal to the length of the border. Note: In this case, the same units of measurement must be observed.
- Calculated data are rounded up.
Advice: it is advisable to take 1-3 additional curbs in case they are damaged during installation work.
Preparatory work
- Assembling the tool:
- ruler, tape measure;
- rubber or plastic spatula;
- rubber protective gloves;
- mounting gun for sealant or glue “liquid nails”;
- grinder with diamond wheel;
- emery block or cloth;
- sanitary sealant, liquid nails glue, mastic or dry glue for gluing tiles in a volume of 1-1.5 kg;
- The surface in the work area is cleaned of dirt and tile adhesive residues.
- The surface is degreased.
- If necessary, markings are made for the location of the curb.
Adviсe:
- The spatula should be made of a non-marking material, such as white rubber or silicone. Blade width 20-40mm.
- One adhesive composition is selected - the most durable and reliable connection is provided by mastic for gluing tiles.
- If you use sealant or liquid nails, you need to make sure that they are sanitary, that is, they are not susceptible to mold or blackening from fungus.
- Ordinary vodka can be used as a degreaser.
The degreasing operation is necessary to remove sometimes invisible deposits. For example, when a detergent solution dries, it becomes transparent - invisible, but forms a film on which most adhesives will not adhere.
Installing a ceramic border under the tiles
Option 1 – one border is installed, without preliminary laying of tiles:
- Marking is carried out for the location of the curb;
- The location of the trimmed border is selected - in the case of a multiple ratio of the size of the bathroom with the dimensions of the border itself, this can be near the left or right corner.
- Installation begins from the corner, the adhesive is applied to the curb, which is installed in place with little effort.
- Excess glue that appears is immediately removed with a slightly moistened rag; if this procedure is left “for later,” it will be very difficult to remove the frozen glue, and the mastic will be almost impossible.
- Upon completion of the installation of the entire row, the seams are sealed - excess glue is immediately removed from the surface of the border or tile.
- End caps are installed with glue. The tiles are installed on top of the curb.
Option 2 – the border is mounted with tiled floors:
- The bathtub is lowered on legs or moved to the side.
- The border is placed under the tile - markings are made, including the location of the lower part.
- A temporary support is installed, for example, a wooden or plastic strip - necessary to prevent the curb from sliding under its own weight.
- The operations according to the previous option are repeated.
- After the adhesive has set, which usually occurs after 24 hours, the temporary support is removed.
- The bathtub is moved as close as possible to the wall, but no more than 15-20 cm.
- The location of the upper cut of the bathtub and the lower cut of the curb is monitored - a gap of at least 5 mm is required.
- Glue is applied to the bottom of the border row.
- The bathtub moves close to the wall.
- The bathtub rises upward using height-adjustable legs.
The last operation requires special care - even a slight distortion or an excessively raised structure can tear not only the curb, but also the tiles out of place. Control is determined by reducing the gap between the bathtub and the curb, as well as by extruded glue.
Option 3: the bathtub is installed in place, the tiles are laid.
Explanation. It is assumed that before laying the tiles, a place was marked for the future installation of the border.
If errors were made during marking, then the following actions must be performed:
- Option 2 can save the situation - the presence of adjustable legs.
- Using a border of a different size.
- Sawing the bottom of the tile using a grinder.
In terms of the sequence of operations, this option is no different from the first.
Installing a ceramic border on tiles
In terms of complexity, this operation is somewhat easier than the previous ones and is similar in execution to option 1. The difference is that the curb is installed directly on the tile and bathtub at once.
It is better to select the border according to the size of the tiles - marking and installation will be simplified. In the case of a single collection, the seams of the border should coincide with the seams of the tiles.
Tile laying process
Having carefully examined the various options for finishing bathroom tiles, let’s move on to studying the installation process itself using the example of tiling a bathroom floor.
To do this, let’s imagine that the tiles have already been selected, all materials have been purchased, and the necessary measurements have been made.
- We clean the surface: we remove the old covering from the floors: linoleum, parquet, tiles along with glue or mortar. After tapping the surface and hearing a dull sound, we also remove the old screed (this means that there are cavities under it and the base is not strong).
- Next, we prepare the surface for laying the tiles.
- If there are large differences relative to the horizon, it is necessary to level the surface. We do this with cement-sand mortar.
- After the screed has dried, prime the surface and dry it.
- We arrange waterproofing using bitumen pastes or a special mixture for plaster waterproofing.
- We prime again to increase the adhesion of the base to the future coating.
- If the differences in the horizontal floor level are small, you can use a special self-leveling mixture (leveling mass), which can remove the difference from 3 to 15 mm. When using leveling compound, surface priming is not necessary.
Advice!
Pay close attention to the quality of the base leveling. In the future, this will help you lay the tiles faster and save tile adhesive.
The base of the floor is now ready.
The bathroom options for decorating with tiles were discussed above and you have already chosen the appropriate installation method.
- We begin laying the tiles in the direction from the far wall to the doors. We also determine which wall will have a bathtub, shower stall, washing machine or furniture under which the cut edges of the tiles will be hidden. We carry out the work from the direction of the open corner (whole tile) to the wall with plumbing (cut tiles).
Advice!
It is necessary to clearly position the first tile, then the work will go faster and easier.
For this:
- We place two tiles in the corners at the required height and attach them to alabaster (it dries quickly and can be easily removed in the future);
- Wet the underside of the tile well with water (you can dip it in a container of water);
- Using a special (notched) spatula, apply diluted glue to the entire surface of the tile;
- we lay it in place, joining it with the lighthouse tiles, and leaving a gap between them using special identical crosses;
- we put the laid tiles in place, tapping them with the handle of a trowel;
- we check the correctness of the draft using a rule, a lath or a nylon thread, placing it on top of the lighthouse tiles, or we check the horizon with a short level;
- remove excess glue that appears after settling with a trowel;
- use a spatula to clean the seam between the tiles;
- we check the horizon again;
- We repeat the entire cycle until the end of the row, then remove the beacons and install them with glue.
- After all the tiles have been laid and the glue has dried, we begin grouting the joints:
- Use a dry cloth to remove any remaining adhesive from the surface of the tiles;
- Using a rubber spatula, fill the seams with diluted grout;
- let dry and remove excess.
Advice!
To make the seams neat, it is advisable to embroider them using a nail head or self-tapping screw.
As you already understood, the installation process is not complicated, but it requires care and attention. A well-chosen technology will ensure a long service life of the tile covering. Good luck!
Gallery
Source: eto-vannaya.club
Bathroom frieze
Prices
The price for curbs is determined by:
- Manufacturer's selling price.
- Trade markup of the wholesale and retail network.
- Depends on the region, transport distance from the manufacturer.
For example, a border with the name “White Corner M200” costs:
- Chelyabinsk, 27-45 rubles per piece;
- Novosibirsk, 33-43 rubles/piece;
- Samara, 31-45 rubles/piece;
- Moscow, 25-55 rubles/piece;