When you need to quickly and inexpensively update the interior of your bathroom, self-adhesive bathroom film comes to the rescue. This is a budget solution, and at the same time the material allows you to realize various design ideas. Where film is used, its types, advantages and disadvantages, as well as installation rules are discussed in this article.
Self-adhesive film for bathrooms, how to choose
Self-adhesive wallpaper for the bathroom is a finishing material, on the back of which an adhesive base is applied and protected with special paper. The film is sold in the form of rolls ranging from 45 to 95 cm wide and up to 15 meters long.
Any pattern can be applied to the film
Self-adhesive wallpaper comes in four types:
- Cork: Their structure resembles natural cork finishes. The surface of the material is additionally coated with a wax-based composition. PVC film. Consists of artificial materials. Diverse in color, pattern and texture. Features an increased service life.
- Satin: Such wallpaper for decorating a bathroom is also called fabric.
- Self-adhesive film: Convenient because they have their own adhesive coating. The most convenient and suitable option for finishing bathrooms. Color variations can be very diverse, from monochromatic to complex patterns and ornaments. It is also possible to imitate natural materials such as wood or natural stone.
Types of wallpaper for the bathroom
The surface of the film can be:
- matte;
- glossy;
- rough;
- metallized.
The metallized surface allows you to create certain visual effects: mirror, fluorescent, stained glass (transparent or shaded) and patterns with a 3D effect. Before choosing a film, you need to pay attention to the manufacturer. Companies that have been manufacturing for many years tend to provide higher quality products.
In what cases is it important to use self-adhesive film?
Especially with a limited budget for renovations, the question arises: is it possible to glue self-adhesive film in the bathroom? Will it turn out that it will immediately lose its appearance or, under the influence of moisture, will lag behind the walls or other surfaces?
We assure you - it will not work. The adhesive base adheres quite firmly to the base, especially with a high degree of adhesion.
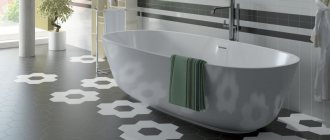
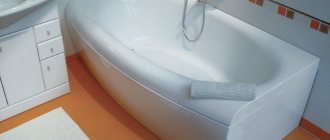
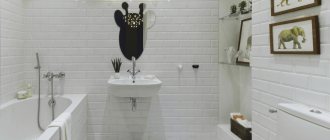
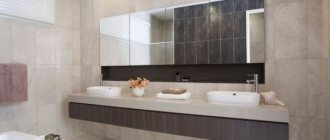
You can cover all the walls or one of them with film. The photographic canvas looks especially impressive. Using this solution can completely change the interior of your entire bathroom. If the marble-like floor tiles are chosen well, then the whole room takes on a completely different look.
The film can also be used for decorative purposes. Usually in such cases, a pattern is selected, fragments of which can be cut out and pasted onto a plain ceramic tile. In general, a good option for creating the effect of novelty and mood.
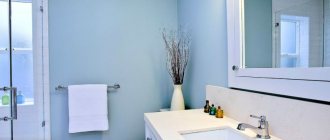
You can also use self-adhesive film to highlight certain areas. For example, around the sink or a place for towels and bathrobes. You can paste over the shelves for all sorts of little things.
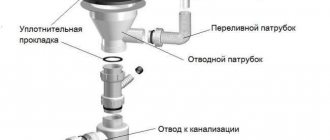
Quite often, the material is used to decorate protective boxes covering plumbing. In this case, it makes sense to pay attention to this point - if the sheathing is made of plasterboard, a thin layer of plaster will have to be applied to its surface.
Decorative film in interior design
It’s not difficult to cover the walls in the bathroom with film, but will the effect of such a solution please you, especially considering the fact that film has no equal as a decorative element?
Decorating bathroom walls with film
Self-adhesive film allows you to effectively decorate pipes in the bathroom. This solution will look very impressive if you choose the right material. In a rustic interior, pipes are usually wrapped with a beautiful structural rope, but they can also be hidden under a film that imitates wood. For an interior in Japanese or Chinese style, pipes are made into something like columns, covered with red film and decorated with black hieroglyphs. Combinations of films of various shades and textures and changes in their geometry allow you to effectively zone the space. Often the film is combined with other finishing materials, for example, with tiles or liquid wallpaper is used for the bathroom. To highlight areas more susceptible to moisture.
How to stick film in the bathroom
When working with a self-adhesive roll, you will need a little skill, but in general, installing the material is not particularly difficult. To work you will need:
- mounting knife for slicing;
- scissors for correction;
- pen or pencil for markings on the material and wall;
- ruler and measuring tape;
- felt spatula or squeegee;
- hairdryer
A hairdryer is necessary to warm up and properly bond the adhesive base to the surface. A felt squeegee will be needed to adjust the application. The item is specially designed for working with paper and film that are subject to mechanical damage.
Before you begin installing the self-adhesive film, you need to prepare the surfaces:
- Uneven walls need to be sanded, otherwise all defects will appear through the thin film.
- If the surface is made of wood, it is sanded and varnished.
- Metal surfaces require a primer. It is better to treat with mixtures with an acrylic base in two layers.
- Drywall is well puttied and cleaned.
- Do not forget to clean the prepared wall from dust and degrease using water and neutral agents. After this treatment, the self-adhesive film will adhere well to any surface.
Advice! Self-adhesive film will successfully decorate not only walls, but also pipes in the bathroom.
How to properly stick finishing material:
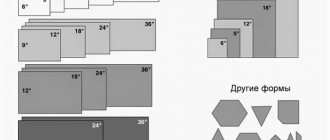
- First you need to cut the roll into suitable pieces. Special markings with squares on its reverse side help with this; they are very convenient to navigate.
- When taking measurements, it is recommended to leave a 2-centimeter margin on each side.
- If the film has a special ornament or imitation tile, it is cut out along the edging lines on the front side.
- They begin to attach the film to the surface, gradually separating the layer of paper. First, unfasten a piece of 3-3.5 cm, carefully apply the adhesive part to the treated, clean and dry surface.
- The attached part must be immediately smoothed with a squeegee or felt spatula. We direct the movements from the center to the edge, so the surface is leveled and random air bubbles come out.
- Then we act extremely carefully: with one hand we detach the paper backing, and with the other we immediately smooth the film in different directions so that all the air bubbles come out.
- What to do if a few bubbles still remain, but the entire film is already glued? Simply pierce them with a thick needle and gently smooth them out with a squeegee.
- What if the film adheres unevenly and a crease forms? You need to sharply tear off part of the film and reattach it.
- Do not allow the roll to stick together; separating its parts without damage is quite problematic.
- It will take several hours for the adhesive layer to dry completely.
- If you have pasted over a rounded or embossed surface, then it is recommended to use a hairdryer to dry the film. The heated air will help the material distribute evenly.
Advantages and disadvantages of the material
Like any other finishing material, self-adhesive film has its pros and cons that need to be taken into account before deciding in favor of a simple budget repair.
Advantages
- The material is available in a wide range of colors and textures.
- The cost of film is an order of magnitude lower than other finishing materials.
Using film to cover bathroom walls is a fairly budget option
- Good quality characteristics that make this wallpaper for the bathroom quite a practical option.
- Pasting work takes a minimum of time and effort, does not require special equipment and can be easily done independently.
- The pasted surface does not require additional care.
- Possibility of finishing various types of surfaces.
Flaws
- Despite the simplicity of pasting, preparing the surface is a rather labor-intensive process and is not always possible for a person without special experience.
Special skills are required to work with film
- The film is highly waterproof, but this is not only a plus, but also a minus of the material. Since the wall under such a coating does not breathe, which means that diaper rash and mold may form.
- The service life, as a rule, does not exceed 10 years. But this can also be a plus for those who like to change their interior frequently. Simple installation and low price allow you to carry out cosmetic repairs more often than usual.
Justification of choice
Considering all the technical properties of self-adhesive film, experienced painters recommend purchasing it if you need to quickly and inexpensively carry out cosmetic repairs. This is a new material that is just beginning to gain popularity. In essence, self-adhesive wallpaper is a film that has, on one side, a surface on which an adhesive composition has already been applied in the factory, and on the other, a protective film. It protects the paper base not only from moisture, but also from dust and dirt. Rolls of different widths are available for sale (from 45 cm to 90 cm).
The range of self-adhesive wallpaper is presented in three types:
- Cork wallpaper. Their structure is one to one with the surface of natural cork. For additional protection, the front layer is covered with a special wax composition and then with PVC film. It is this that makes it possible to use such material when decorating walls in the bathroom.
- Satin self-adhesive wallpaper looks like a fabric covering. Their use in the bathroom gives the opportunity to create amazingly beautiful classic interiors.
- Plain films also have quality characteristics. This material has practically no disadvantages, with the exception of one circumstance - it is one hundred percent artificial finish.
The beauty of all textures is clearly shown in the following photo.
Preparatory work.
Decorative film can be applied to almost any surface. It doesn’t matter what it is - cork, glass, plywood, tile, wood or metal. You can stick it on putty or unprepared drywall, but the material will not last long on such a surface.
Leveling the wall surface before pasting with decorative film
The success of the repair depends, first of all, on the correct preparation of the walls. The old coating is completely removed from them, leveled, puttied in two layers, cleaned with fine abrasive sandpaper and primed.
When the surface is completely dry, mark a horizontal line on the wall along which the first canvas will be glued. Usually they try to place this mark in the most inconspicuous place, since the first and last stripes will fit differently than the others. If liquid wallpaper or decorative plaster for the bathroom is used in combination with a finishing film, the preparation of the walls in these areas does not need to be done so carefully. The mixtures themselves do a good job of hiding minor surface defects. It is enough to prime the walls.
Installation features
Self-adhesive wallpaper can be applied to any surface. It adheres perfectly to glass or plywood, tiles or metal. But in order to stick the film to the wall, its surface must be carefully prepared.
- First, the old finish is completely removed.
- The surface of the wall is carefully leveled with putty. The wall is plastered in two layers.
- After the putty has completely dried, the surface is cleaned with fine sandpaper.
- The final stage is priming the wall.
Before gluing, the self-adhesive film is cut. It is made from the reverse side. To make the process easier, manufacturers apply square markings on the reverse side.
Note! It is necessary to cut self-adhesive wallpaper with a special construction knife. Experts do not recommend doing this with scissors, holding the material in a canopy.
Material calculation
In order to calculate the required amount of film, you need to know the width and footage of the roll in advance. Room measurements are taken without taking into account windows, if any, doors and the space behind the bathroom. First, find out how many strips of material will be needed to cover all the walls. To do this, the perimeter of the room is divided by the width of the roll. Then they calculate how many strips can be obtained from one roll. To do this, its footage is divided by the height of the walls with an increase of 5-10 cm for trimming.
Before purchasing the film, carefully calculate the required footage. When using wallpaper for the bathroom with patterns or a geometric design, in addition to the stock, the height is added to the adjustment - 35-45 cm. The total number of strips that will be required to cover the entire room is divided by the number of strips in one roll and the required amount is obtained number of rolls for repair. If the bathroom has ledges or niches, add one more roll to the total. Methods of covering surfaces with decorative film. The temperature in the room being repaired must be at least 10 degrees. If the film was previously stored at lower temperatures, it is advisable to keep it warm for at least two days. After completing the preparatory work, they begin cutting the film and gluing it.
Features of material cutting
As a rule, the film is cut from the reverse side, on which square markings are applied for convenience. But in some cases, when, for example, the selected film is designed to imitate tiles, the markings are carried out taking into account the front design. Additional instructions for working with a certain type of material are always indicated on its reverse side.
It is more convenient to cut the material according to special markings
The panel is cut to length using a special construction knife. It is not recommended to cut the film by weight or with scissors.
Care
Do not use solvents: they may ruin the drawing.
To keep the film clean, it is enough to periodically wipe it with a damp cloth. To clean dirt, use detergents, but only non-aggressive ones.
It is better to use non-aggressive detergents to clean stains.
Surface pasting
Glue the film from top to bottom. The protective layer is removed a few centimeters from the upper edge of the first strip. The film is applied to the wall and leveled. Gradually remove the paper protection by 5-6 cm, pressing the adhesive surface to the wall. When the entire strip is pasted, it is smoothed with a rubber spatula from top to bottom and from the center to the edges, trying to get rid of all folds and air bubbles at once.
Important! Any wallpaper for bathroom walls is glued end to end, but the film is always glued overlapping.
It is better if the edges of the covering panel are facing the light source in the room. Otherwise, the seams will cast a shadow and become more noticeable. It is recommended to avoid joints of strips in corners.
If you are gluing decorative film for the first time, you will need an assistant. Important! The decorative film sets completely after a few hours. Soon after gluing, the material can be torn off with a sharp movement and re-glued.
If some air bubbles do form, they need to be carefully pierced with a thin needle and smoothed out. It is almost impossible to remove folds and irregularities from an already glued surface; the strip is torn off and glued again. If the film is pasted on a convex surface, it is preheated with a hair dryer so that it becomes more elastic.
Specifications
When listing the general technical characteristics of self-adhesive wallpaper used for finishing bathtubs, experts draw attention to the following properties:
- They are difficult to scratch.
- They are not afraid of high humidity thresholds.
- Temperature changes do not cause deformation of the glued sheets.
- The films are quite easy to care for (they can be washed with water and a cloth).
- Drops of water flow freely from them.
- The coating lasts for 15-20 years.
- A huge variety of color solutions allows you not to limit your imagination when decorating bathrooms.
Note! When purchasing self-adhesive wallpaper, it is important to carefully read the instructions from the manufacturer. For example, some films cannot be glued to a limestone base. This means that before working with them, the base of the bathroom walls will have to be completely cleaned.
Caring for decorative film
Self-adhesive film does not require special care and is easy to clean even with mild cleaning agents. You should refrain from using compositions with abrasive particles and those containing solvents, they can damage the design.
Decorative film does not require special care
Alternative solutions
In addition to film, for inexpensive renovations in the bathroom, paints, plastic panels or waterproof wallpaper for the bathroom are used. The paints chosen are water-based acrylic or silicone. Wallpaper must be moisture resistant, which means only washable, vinyl or liquid wallpaper is suitable. But they are all inferior to film in certain respects.
Washable ones do not have such a wide choice of colors and textures. Vinyl, due to its high cost, may not fit the renovation budget. And liquid wallpaper can be difficult to apply without some experience. Self-adhesive wallpaper for the bathroom is an excellent option when repairs need to be done quickly, inexpensively and with your own hands.
Pros and cons of using self-adhesive film for the bathroom
If your bathroom has lost its appearance, and there is no time and nothing to do a full renovation, then self-adhesive film will be the optimal solution. Let's figure out what advantages and disadvantages this finishing material has.
- One of the main advantages is the price . This option will be affordable for almost every buyer. Compared to other types of decor, this material will cost you pennies.
- Large selection of colors and designs . You can easily choose the texture to your taste, and if not, you can order production according to your own design.
- Practicality . This material is waterproof, which is very beneficial for a room such as a bathroom.
- Easy to clean . You don't have to put a lot of effort into caring for the film; you just need to wipe it with a damp cloth.
This film is quite cheap and has a large number of varieties.
Of the minuses, there are the following disadvantages:
- Features of gluing . To apply this material to the wall you need a perfectly flat surface. Any irregularities will spoil the appearance of the oilcloth and may even compromise its integrity.
- Life time . Over time, the film tends to wear off, especially in those places where it comes into contact with various objects, for example, if it is a shelf.
Materials and tools
For those who have tried to glue wallpaper with their own hands, self-adhesive film will do the same. There is nothing complicated here. To do this, in addition to the film itself, you need to have a simple set of tools in the form of:
- Pencil, felt-tip pen or pen to make markings;
- A long meter ruler or other measuring instrument;
- Mounting knife for basic cutting;
- Scissors for auxiliary cutting;
- An industrial hair dryer to warm up and consolidate the result of the process;
- A felt squeegee or felt spatula to adjust the application of the base material. The squeegee is made in the form of a rectangular felt or felt block. It is designed for careful handling of thin paper or film that is vulnerable to accidental mechanical damage.
Pasting with film of different materials
Self-adhesive film is suitable for finishing wooden frames and wall panels. Before gluing, it is necessary to thoroughly clean the surface, remove old coating, dirt and dust. The surface should be degreased. To do this, you can use water with any detergent. It is advisable to try to level the wall as much as possible, sand all the protrusions and recesses, otherwise all these flaws will be noticeable under the oilcloth.
Preparing walls before wallpapering work
Many owners stick the film directly onto the tile cladding. Today you can even find oilcloth material that is specifically designed for mounting on ceramic tiles. It is very easy to apply this coating: the oilcloth is moistened with water, and then pressed against the wall and carefully smoothed. This durable film finish lasts a long time.
When covering furniture with film, there are also usually no difficulties. The oilcloth lays flat on wooden surfaces coated with varnish. If there are unevenness or pores on the coating, it is advisable to first level such a surface with a primer.
Experienced craftsmen recommend using an acrylic-based primer. This enhances the adhesion of the material to the surface of the base.
As a rule, on the reverse side of the self-adhesive film there are already applied markings in the form of squares. You can additionally draw the cut lines with a pencil. This will allow you to get more even fragments of material. It is convenient to use a tape measure and a mounting knife. It is necessary to take into account an allowance of 2.5 cm, but at the same time ensure that the pattern on the oilcloth is aligned. When working with patterned film, it is advisable to cut the fabric from the front side.
Oilcloth with a pattern
Many people prefer oilcloth with imitation tiles to cover bathroom walls. To prepare pieces of material, you can use either side of the canvas, and then simply combine the pattern on the wall.
To paste a film on metal or glass, the base must be moistened with water. To fix the oilcloth on whitewashed walls, you need to cover the surfaces with glue using a brush. If you do not apply the adhesive to the wall, the film may subsequently separate from the base along with the plaster. It is better to coat both the wall itself and the adhesive film with glue. After pasting, the oilcloth is smoothed with gauze.
Moistening the canvas before attaching it to the wall
Pasting a room usually starts from the corner and gradually moves towards the window. The glued film is placed on the surface, starting from the top. During the work you need to monitor the combination of the pattern. The fabric is ironed with a roller or piece of fabric. It is important to prevent air bubbles from appearing.
To prevent the canvases from coming apart, it is better to glue them slightly overlapping. At the joints, do not forget to coat the film with glue and carefully smooth it with a roller . Excess adhesive mixture must be carefully removed with a clean cloth, without leaving stains.
Thin strips of paper or old wallpaper coated with glue are fixed to the seams. When the paper is dry, it is slightly moistened and removed from the surface of the walls.
Recommendations for choosing design solutions
With the help of film, you can create a special atmosphere of comfort in the room according to your taste. To help you choose a solution, we will try to give you some recommendations.
- The color scheme of the film should be combined with the main interior of the room.
- Its color should not contrast with other other items, but correspond to the overall design style.
- A bold, bright white film emphasizes the “sterility” and impeccable cleanliness of the bathroom.
- Warmth and comfort will be created by the yellow color and its shades.
- For a variety of design solutions, combinations of bright and dark tones are used.
- To visually expand the volumetric space of a room, it is not necessary to paste the entire room, but to decorate some of its zones.
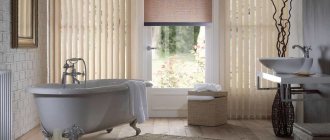
- An excellent solution to this issue could be an image of a sea, wild or exotic landscape on the wall near the bathtub.
- A film on the ceiling, where a piece of the sky is depicted, will give many a feeling of serenity.
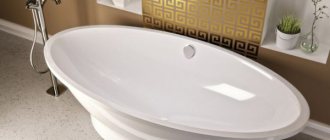
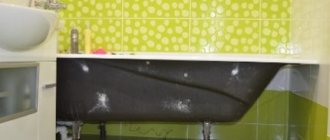
- An old cast iron bathtub can be visually updated with a matte film.
- An excellent design solution would be to design risers for columns in Asian style. This could be a general red background, with black cut out hieroglyphs on top. This combination when combined will give a wonderful accent effect.
Gluing process and recommendations
The reverse side of each roll has specific instructions and a step-by-step diagram of the work.
- Starting the process, the paper backing is separated a little, by 3-5 centimeters, from the prepared pieces of canvas. The edge of the film, already directly with the adhesive base, is very carefully applied to a dry, smooth surface.
- The glued part is carefully smoothed using a squeegee or felt spatula according to the pattern from the center to the edges. During this process, internal bubbles are released and the surface is leveled.
- Next, very carefully, slowly, remove the backing with one hand, and at the same time, with the other, the glued surface is smoothed alternately in different directions to remove bubbles and level the overall canvas.
- If, after finishing the work, you see several bubbles, you need to imperceptibly pierce them with a thick needle or a thin sharp knife, and then carefully smooth them out with a squeegee.
- If during the pasting process you do not notice a crease that has formed, it must be immediately removed immediately. To do this, a piece of film with a fold must be sharply torn off and then re-glued.
- The film will be finally ready in a few hours after all the work is completed.
- The corners on the surface are pasted over by cutting part of the film at the right place at 45 degrees. Then this edge is folded and glued exactly at the corner.
- When arranging joints, convex surfaces or round edges, they resort to heating the film with a construction hairdryer. This is done so that the film becomes elastic when heated and easily lays on an uneven surface, clearly following its contours.
- If the film needs to be pasted over various objects in the form of bathtubs, mirrors, glass, metal or synthetic surfaces, it is applied to a wet base, observing all the basic rules.
Self-adhesive film is a unique modern material. She does not require special care. To maintain its appearance, it will be enough to wipe it from dust from time to time with a damp soft cloth soaked in water. In case of simple stains, add a little neutral detergent to warm water.
In case of severe contamination, you can resort to alcohol or vodka. When caring for film, do not use abrasive cleaners or strong aggressive solvents in the form of:
What is adhesive-based film
Self-adhesive bathtub film is a rolled material that can perfectly replace washable vinyl wallpaper or ceramic tiles.
It has a protective impermeable siliconized base. The front side of this material is represented by PVC film, covered with a protective polyester layer. This fact makes it possible to improve the performance qualities of this material and additionally gives it a unique shine.
Its inner working side is impregnated with special glue. The adhesive base is closed and protected by a layer of special paper, which can be easily removed while working with the film.
Advantages
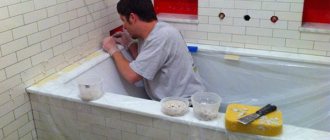
The procedure for covering a wall with self-adhesive film
This adhesive coating has numerous advantages such as:
Among other advantages, it is important to note that this material can perfectly adhere to:
- Tile or wood;
- Plywood or glass;
- Cork or drywall;
- Plaster or metal surface.
Flaws
Bathroom design using self-adhesive film
A requirement to obtain a high-quality output result is careful preparation of the surface on which the film is to be glued. This condition must be met at the preparatory stage. Since the film itself is very thin, and if it adheres tightly to the working surface, grains of sand, cracks, unevenness and other defects in the leveling technology will be very clearly visible.
In addition to this nuance, the disadvantages include the inability to pass air through it. This state of affairs makes it possible for moisture and condensation to accumulate on its surface, with the ensuing consequences in the form of mold formation.
As a facing material for interior work, this film is not durable and has a short service life of up to three years. However, given its low cost and simple installation, it becomes possible to update the interior quite often. With expensive coatings, many people cannot activate this option.
Manufacturers today produce self-adhesive film in the form of small rolls from 2 to 15 meters in length. The width of these products is 45; 67.5 and 90 centimeters. You can see them on the finishing building materials market:
- With various designs, geometry of ornaments or patterns;
- In plain, glossy or matte finish;
- Any color and shade range;
- Stained glass and transparent;
- To imitate the texture of wood, ceramic tiles, all kinds of fabrics;
- With 3D or fluorescent effect;
- With a metallized or mirror coating to obtain a specific perception and a special visual impression.