(4 votes, average: 4,00 out of 5)
Over time, the tiles in the bathroom fade, the grout loses its color and stains appear on the walls, which are difficult to get rid of. But you can transform your bathroom design without much expense or effort if you know how to update old tiles.
Bathroom redesign
The approach to changing the design of a bathroom can be divided into thorough and superficial. In the first case, for example, you can change the layout in the bathroom, connect or disconnect it with the bathroom, or replace the entire interior. Of course, this option requires considerable investment.
Most often they resort to the following options: decorating tiles, applying designs to them, repairing existing damage, and much more. This approach allows you to modernize an existing design, make it brighter, more positive, etc.
And it requires significantly less financial costs. Below we will consider possible options for this budget approach.
Hide household chemicals
Have you ever wondered how everyday life can spoil the interior? Assorted jars, colored soap, children's toys on the sides of the bathroom? It's time to remove this colored “noise” in order to get that same interior “from the cover”. Try finding minimalist containers for shampoo or shower gel, and put children's toys in a basket and put them away in a cabinet.
Photo: Instagram kufura
- Bathroom, toilet
13 accessories that spoil the interior of your bathroom
Vinyl tile stickers
You can easily and quickly turn familiar tiles into a stylish design element using vinyl stickers. They are very different in color, shape, theme (marine, children's, eco-motives, etc.). Therefore, finding suitable ones will not be difficult.
IMPORTANT: vinyl sticker is an excellent and budget option to hide a chip or crack on bathroom tiles.
The stickers are made from moisture-resistant self-adhesive vinyl film. Important qualities: it does not darken over time, does not fade or lose its original appearance for more than five years. This film is resistant to temperature changes.
It does not require special care. Moreover, in most cases, they can be peeled off and re-glued, which is also a definite plus.
ATTENTION: the surface to apply the sticker must be dry, clean and level. Place a piece of tape on the surface of the sticker in an inconspicuous place, smooth it with your finger, then remove it. If you see pieces of paint or rust on the tape, the surface is not suitable for gluing.
When preparing to apply the film, first thoroughly clean the tiles with a sponge and warm soapy water to remove all dirt. To remove greasy stains, you can use special cleaning products and alcohol. Then wipe dry with a clean cloth. And wait until the surface is completely dry.
If you need to stick small stickers, for convenience you can mark the locations with a pencil. Instructions for applying small stickers:
- peel off the paper protection;
- Place the adhesive side against the tile and press with your fingers;
- smooth from center to edges using a soft cloth or spatula. Make sure that the sticker does not move during these actions.
Large stickers are more difficult to apply. It is recommended to do this using mounting film.
Instructions for applying large stickers:
- lay the mounting film on a completely flat surface, for example, the floor;
- transfer the sticker to the film. In this case, the adhesive side of the film should be adjacent to the sticker design;
- Using a soft cloth, carefully smooth out any wrinkles;
- remove the paper protection from the sticker without touching the mounting film;
- Apply the sticker to the place of application on the tile, press with a rag or spatula.
Be careful not to spoil the paint on the drawing. HELP: if air bubbles appear under the film, pierce them with a needle and smooth them with a spatula. - remove the mounting film and press the sticker onto the tile.
Hang a new curtain
What could be simpler and cheaper? Sometimes one small touch can transform a bathroom beyond recognition. The main thing is to avoid oilcloth curtains with images of dolphins and sea inhabitants, as well as curtains with large, catchy prints. Try looking for curtains with geometric patterns or solid colors. You can definitely find the right ones in the mass market.
Photo: Instagram 42m2.ofhappiness
Applying patterns
You can update the tiles in the bathroom by painting them with drawings and patterns. Not everyone has the talent of an artist, but this is not necessary. There are several ways to apply a pattern to a wall:
- You can use a projector to display an image, trace it, and color it.
- Scale grid. In this case, it is necessary to divide the applied image into squares. Then, using a large ruler or building level, divide the drawing surface itself in the same way. It is important to maintain proportions! Then, step by step, square by square, copy the image from the picture onto the surface. If it’s difficult, you can enlarge and print fragments, and then transfer them using carbon paper.
- Self-adhesive film is also an excellent option for applying patterns to tiles. With its help you can make a stencil and create small patterns with a clear outline. You can order a stencil, for example, from an outdoor advertising company.
There is an option to prepare it yourself. To do this, use a photo editor to make an outline of the desired image, enlarge it to the desired size in the ProPaster program, divide it into squares, print it, and cut it along the outline with a utility knife.Apply the finished stencil to the wall. And then color with foam rubber, a spray gun or an airbrush. Afterwards, carefully remove the self-adhesive paper.
- Draw by hand if you have confidence in your abilities.
Drawing with paints
To paint a design on a tile, you first need to prepare the surface itself.
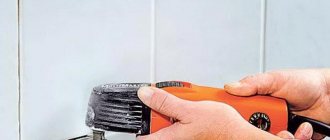
- Clean the surface from dirt using a metal sponge and cleaning powder. You can even use sand. These actions will make the tile clean, remove greasy stains, and slightly disturb the smooth surface layer.
- Sand the tile. The paint will not stick to a smooth surface, so we make it rough. Using a block or sandpaper, carefully walk over the tiles. Also sand the seams using a sanding mesh.
- Primer of tiles.
First, rinse the surface with warm water to remove any dust or streaks. Then apply the primer and let it dry. After this, lightly go over the tile again with a sanding mesh or sandpaper. IMPORTANT: Epoxy primer is most suitable. - Now you can apply the drawing. Use coloring compounds on mullet and glass. They are durable and colorfast. Apply them using a roller. You can also use an aerosol can of car enamel. In the latter case, keep it at a distance of at least 30 cm from the surface.
- Drying. This process should take three days.
Place a small table
We often see this idea in Scandinavian bathrooms. It is worth adopting if you have a fairly spacious combined bathroom. On a small table it is convenient to place scented candles, glasses of wine (no one has canceled romantic evenings with a bubble bath) or a book (if you like to relax in warm water with an interesting book). In addition, this is an additional convenient place to store decor.
Photo: Instagram julia.veselova
- Doors and partitions
Which door to put in the bathroom: types, materials and standard sizes
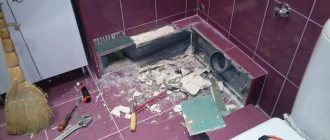
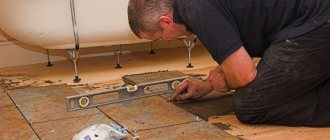
Replacement of damage
If the tile is damaged, it can be replaced. For this, the same tile or another one, but identical in size, is suitable, on which you can then apply a vinyl sticker. Or, alternatively, replace a few tiles.
The procedure for replacement is as follows:
- remove damaged tiles;
- Apply glue to the wall and distribute it evenly;
- place the tile and tap it until it snaps into place;
ATTENTION: leave assembly crosses at the seams, then the seams will be of the same thickness.
- After the glue has dried, remove the mounting crosses and fill the seams with grout.
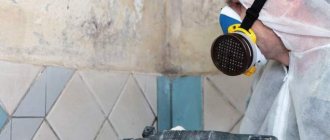
Preparation
The first step to any renovation is to prepare the coating. Without a number of mandatory measures, the result will not be of sufficient quality. You need to act sequentially:
- First, you need to evaluate the tile covering for defects, chips, methods of elimination, and possible restoration options;
- Carry out restoration of seams, completely or partially replace grout;
- The surface of the tile must be brought into a perfectly clean condition, all traces, plaque, rust, and water stains must be removed;
- Degrease the surface using alcohol solutions and degreasers;
- Sand the glaze layer and uneven surfaces;
- Prime if necessary.
After all the preparatory work has been completed, proceed with the repairs. It is important to treat every area with high quality. If fungus appears on the walls, it would be a good idea to use antibacterial agents.
Before starting work, the walls need to be thoroughly dried. Any material will not fit well on a wet surface.
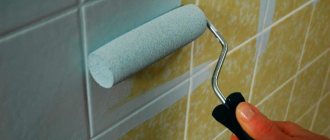
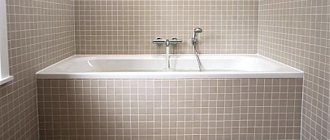
Full painting
One approach to updating tiles is to paint them entirely in an identical or different color. Next, we'll figure out how to do this.
Basic Rules
- Be sure to thoroughly prepare the surface: wash, degrease, dry.
- Sanding tiles is an important and necessary process, otherwise the paint “will have nothing to cling to and nothing to stick to.”
- Don't forget to apply the primer and let it dry thoroughly.
IMPORTANT: Painting must be done in two layers. Give each layer time to dry completely. In hard-to-reach places you can use a brush.
Required Tools
Prepare:
- sandpaper;
- soft cloth, brush and sponge;
- detergent and cleaning agent;
- primer for increased adhesion;
- brushes and rollers;
- paint for wet rooms;
- water-based acrylic varnish.
We also recommend watching - How to paint tiles in the bathroom?
Buy a set of accessories
Soap dish, toothbrush cup, soap dispenser - which ones are in your bathroom? Update these accessories, choose ones that match the color and style of the bathroom interior, and see how little things can change the entire interior.
Photo: Instagram dsmango
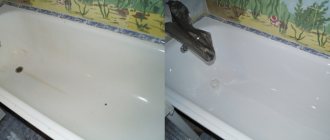
Renewing seams
Simply updating the grout lines can help give tiled bathroom walls a fresh look, as over time they fade and become unsightly.
Special markers, pencils or paints will help restore color.
If this is not possible, for example, there are cracks in the seams, then it is necessary to completely change the grout.
Rules for cleaning damaged areas
- The damaged area is removed with a sharp object.
- The seam must be well cleaned. It is recommended to use a vacuum cleaner for this.
- If the damage is minor, make a local replacement.
Complete replacement
Remove old grout using a sharp object, such as a scraper. Be careful not to damage the tiles. Then clean the surface of the joints: first with a brush to open small fragments of grout, and then with a vacuum cleaner to remove dust.
After this, use a sponge and water to rinse the seams and leave until completely dry. And only apply new grout with a spatula to a clean, dry surface.
Update textiles
Towels play an important role in the bathroom interior.
You can experiment with color if you want to add brightness to the room, but be careful as these “spots” can look tacky in small spaces.
Photo: Instagram dsmango
Overlapping tiles with another material
You can update the walls in the bathroom by covering the tiles with plastic panels. They are resistant to moisture and elevated temperatures. Before fixing, it is important to sand the tiles well so that the panels last well and for a long time. A material such as mural is perfect - stylish and effective, durable and practical. Liquid nails and glue are used to secure the ceiling.
ATTENTION: When installing plastic panels in the bathroom, you should not use alcohol, it can damage the plastic.
How to finish the floor
For finishing the floor, a good alternative to tiles in the bathroom are porcelain stoneware, linoleum and special enamel, which is applied over a concrete coating.
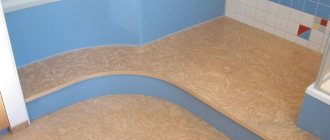
Self-leveling enamel
Such floors are called seamless. They do it like this:
- First, the base is repaired.
- Then a non-woven material with a printed image is laid on it.
- Then they are coated with a special polymer composition, which includes epoxy or polyurethane resins. This is a transparent mixture, the applied image is visible underneath it. The composition polymerizes, forms a durable and wear-resistant coating that is insensitive to moisture.
The only drawback of the material is that the floor is cold and needs additional heating.
In the first few days, the surface emits an intense odor, so you need to devote some time to airing.
Vinyl laminate
For the flooring in the bathroom, a moisture- or water-resistant laminate is used. The first is made from a wood-chip base, impregnated with wax and treated with antibacterial additives. It tolerates high air humidity provided there is good ventilation and minimal contact with water.
Waterproof laminate is a good solution for those who want to give up cold tiled floors.
Waterproof laminate is considered more durable. It has water-repellent properties. If liquid hits the surface, it is absorbed and does not destroy the top layer.
Separately, vinyl laminate is distinguished. It is made using a different technology based on a composite mass. The similarity with the standard material is expressed in the locking connections, which are located at the ends.
PVC panels
They differ from panels for wall decoration. More often these are vinyl sheets, sometimes in the form of individual tiles, which are mounted with special glue, less often - in the form of rolls. Quartz-vinyl tiles also fall into this category. Quartz filler improves the performance characteristics of the material.
Concrete covering
The technology is reminiscent of polymer self-leveling floors. However, a pattern is not applied to the concrete base; it is simply filled with epoxy resin. Such floors look good in a loft-style interior, as they fit into the industrial concept.
There are different finishing options. Concrete floors can be smooth and polished or textured and slightly rough. For safety, it is better to choose the latter option, since the risk of slipping is eliminated.
Coating repair
There can be many reasons to change the design of a bathtub: outdated design, desire for novelty, defective coatings. Repair and maintenance will bring the appearance of the bathroom to its original state. There are several ways to update old tiles without having to completely replace them.
Cracked tiles should be replaced where they occurred. This manipulation must be carried out with those parts that are cracked or peeled off. You need to act sequentially:
- Remove the grout around the element to be replaced;
- Moisten the seams with water and wait for the solution to soften;
- Using a spatula, remove the damaged part;
- Clean the area from any remaining glue;
- Prepare the fixing compound and treat the tiles with it;
- Secure in place;
- Rub the seams.
Using this principle, you can partially replace fragments and update the design. It is not at all necessary to choose exactly the same fragment; you can give preference to contrasts.
For restoration, you can clean the top layer, treat it with a primer, and paint it. Use film, appliqués, and other methods. There can be many ways to carry out repairs with your own hands, it all depends on taste, conditions, wishes, and budget.
Think about what exactly you want to see in your space, what budget you are willing to spend on making changes. This may determine whether it will be targeted growth or the creation of a mirror wall.
Do-it-yourself voluminous decor
You can effectively update your bathroom design with an original decorative element. You can get creative. Beads, shells, stones or faux moldings. They are placed pointwise or used for applications. When using them, first think about how you can take care of their cleanliness.
For decoration, you can use both natural elements and various imitations. It is convenient to attach them with waterproof glue, silicone, or sealant. In some cases, the surface of the product is pre-painted and coated with waterproof varnish.
Such details look interesting in certain corners. Surface decor around mirrors, individual walls, corners.