Communications passing through the bathroom most often present an unattractive sight. The simplest solution in this case may be to invite a repairman. However, if you have the skills to work with tools and have an idea of how to make a box for pipes in the bathroom, then you can do it yourself.
Box made of moisture-resistant plasterboard
What type of material to choose
There is only one solution for improving communications - covering it with a decorative box. Occasionally, when the pipe distribution is dispersed over the surface of the wall, it is possible to use a false wall. In most apartments, the layouts are not particularly spacious. When the risers are located in the corners or in the case of compact localization of the wiring, the best solution would be to use a bathroom box. This way you can get the most compact arrangement, creating the illusion of a more spacious room.
Sewer and water pipes without a duct look unsightly
There are two more questions that need to be resolved before starting work - what can the bathtub box be made from and what size should it be. The main requirement for materials is resistance to high humidity:
- Moisture-resistant drywall;
- PVC wall panels;
- Plastic channel box.
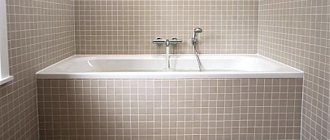
Pipes hidden in a plasterboard box
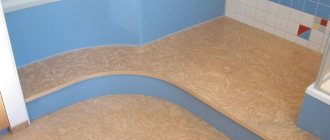
Pipes are hidden under the frame for PVC panels
Pipes in a plastic channel box
As for the dimensions of the bathtub box, they should be determined by the principle of reasonable expediency. The pipes must be completely covered with decorative walls with a small margin. The size of the internal empty space should provide, if repairs are necessary, the possibility of access through a removable hatch to key components (audits, gasket installation locations, threaded pipeline connections).
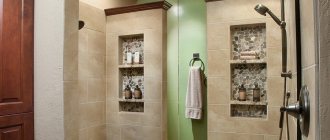
Pipe box with inspection door
Sheathing the box with plasterboard
- First, plasterboard panels are prepared, which are cut exactly to the dimensions of the rectangular edges of the box. Please note that moisture-resistant plasterboard must be used for bathrooms.
- Secondly, the material cut into pieces is secured to its destination with self-tapping screws.
- After all this, finishing is done.
As you can see, there is nothing complicated in this process. But this was the technology for installing a non-demountable box for the bathroom. As mentioned above, it is necessary to provide a small inspection hole in the structure of the plasterboard profile of this device, with the help of which inspection and preventive work can be easily carried out.
How can this be done so as not to disassemble the entire structure in emergency situations? Of course, you can install hinges on one of the racks on which a small door is hung.
In order to make it, you will need a rectangular metal frame made of plasterboard profiles, covered with a piece of plasterboard. That is, it should be a full-fledged door. But doing all this is quite difficult.
Related article: How Roman blinds are attached to curtains on plastic windows: features and nuances (photos and videos)
There is an easier way. A piece of plasterboard sheet cut exactly to size is attached to the permanent frame. Subsequently, the box itself will be lined with ceramic tiles. But the tiles on the front part of the box must be placed in such a way that they do not overlap the places of attachment to the profiles, that is, the screws.
Frame installation diagram
Why is this necessary? In case of an emergency, the screws can be unscrewed and the front panel removed. But this option does not look very nice, since the fastener heads are visible.
Therefore, for decoration and to give a presentable appearance, the gaps left for fasteners are decorated with special strips (and become invisible).
Sheathing of a horizontal box
In principle, this design is not much different from the vertical one in terms of complexity and production. The only thing that experts pay attention to are some additions.
Eg,
- The floor in the box should be slightly higher than the surface of the base of the floor of the room itself.
- In the box you need to leave a small hole at the bottom (preferably more than one). If there is a leak in the pipelines, water will first begin to seep through these holes. This will help prevent troubles associated with flooding of neighbors on the lower floor.
Full box
Disadvantages of drywall
A do-it-yourself bathroom box is most often made from moisture-resistant plasterboard. This is due to the low cost, availability and ease of processing of the material. To finish the assembled structure, moisture-resistant paints or tiles can be used.
When purchasing material, you should pay attention to the color of the sheet - moisture-resistant drywall has a green outer paper layer.
The main disadvantage that should be taken into account is the relatively low mechanical strength. When making a box for a bathroom, a sheet of drywall is quite easy to accidentally break. In addition, the resistance of the material to prolonged exposure to moisture is quite limited. Only the outer paper layer is impregnated with protective compounds. When cutting a large sheet, the resulting edges will be unprotected.
Appearance of moisture-resistant drywall
The most critical is the formation of puddles on the floor near the wall of the box under the bathtub. In this case, quite a long time may pass from the moment water appears to detection. Through micro-slits at the junction of the box wall and the floor, moisture can seep inside. When installing the box in the bathroom, you can protect the bottom edge of the drywall sheet from getting wet using a strip of silicone sealant.
Step-by-step process for installing a box in a bathroom
A plasterboard bathroom box is a simple design consisting of a metal frame and pieces of plasterboard, but when installing it you need to take into account some points.
Design and drawings
No design is complete without a drawing, which will indicate the placement of the profile frame. Design cannot be neglected.
Example of a plasterboard box project
You should not think that you can download a standard project from the Internet, since in each specific case, everything is calculated individually.
The box must have a technical hatch, so to install it, reinforcement from profiles is installed.
To prevent condensation from appearing inside the box, a ventilation hole is provided at the top.
You need to choose a rigid profile, since the structure must be rigid, otherwise the tiles may crumble over time.
We advise you to look at: how to choose a profile for drywall of good quality and at an affordable price.
When you create a project, mark on the drawing all the connections and their types.
What tools and materials will be needed for the job?
Making a decorative box for a bathtub is not the most difficult, but still quite a labor-intensive process. In addition to the drywall itself, you will need a number of auxiliary materials:
- Galvanized metal profiles - the frame is assembled from them;
- Fasteners - self-tapping screws and dowel-nails for connecting elements of the supporting structure, fastening it to the surface of the floor and walls, fixing sheets of drywall;
- Silicone sealant - for treating joints with the floor;
- Serpyanka and putty - they are necessary for masking screw heads and sealing sheet joints (used when preparing the surface of a bathroom frame for painting);
- Inspection hatch – for performing maintenance.
Assembling a frame from a metal profile
The set of tools that will be needed to complete the work is not that large. It is quite possible to get by with the necessary minimum, consisting of a screwdriver with a set of bits, a hammer drill, a construction knife and metal scissors.
Necessary tools for making a box
Selection of material and necessary tools
The first step is to prepare the tools that will be needed for installing the plasterboard box and the material.
We will need:
- hammer drill or impact drill;
- plumb line;
- laser level;
- screwdriver;
- roulette;
- pliers;
- construction knife;
- iron scissors;
- spatula;
- hammer;
- roller;
- construction bucket;
- whisk
Material:
- the choice of material should be approached wisely, since the room is damp and subject to constant temperature changes - therefore, moisture-resistant drywall;
This is what moisture-resistant drywall looks like with a light green or green color
- primer must be purchased with antiseptic components and with deep penetration;
- the frame for the box should only be made of a metal profile, since the wooden blocks may soon rot, and the entire structure will have to be redone.
Execution of the frame
Work begins with marking the walls, floor, and, if necessary, the ceiling. The size and location of the lines will indicate the position of the walls of the box. To prevent frame distortions, the markings must be checked with a level. Situations should be avoided where the walls of the plasterboard box in the bathroom will interfere with the opening of the furniture door or the entrance door.
Frame components are mounted level
If all the rules are followed and the markings are done correctly, you can begin assembling the frame of the box for the bathtub. Metal profiles are cut to the required size using metal scissors. First, the sections are attached to the floor and walls - they create reference points for attaching the frame. Then, the vertical posts of the supporting frame of the box under the bathtub are installed. The assembly is completed by installing the top guide, which combines all the elements into a single rigid structure. To service metering devices and sewer inspection, auxiliary guides are installed. In the future, they will serve as the basis on which the inspection hatch will be attached.
The frame is assembled from metal guides
The profiles are connected to each other using self-tapping screws (“seeds”). There is a notch on the surface of the metal that prevents the tip of the screw from slipping. Resting against these recesses, you can easily install the fasteners.
Assembling the frame
The frame is assembled around pipes laid on the floor
It is necessary to provide places for passing pipes in the frame
Useful tips
- If the box is installed on heating pipes, it is necessary to ensure the outflow of thermal energy through specially cut holes in the top panel.
- Before installing plasterboard panels, it is imperative to chamfer the edges to ensure a high-quality finish of the joints.
- Before laying the tiles, the box must be treated with a primer.
Door on frame
Frame covering
Standard sheets of drywall are cut to the required, pre-calculated size. It's a fairly simple process:
- The sheet is laid on a flat surface (in extreme cases, cutting in a vertical or slightly inclined position is allowed);
- Using a tape measure, the required size is measured and small marks are made on the surface with a knife;
- A metal ruler or a flat, long wooden strip is applied to the resulting marks;
- A construction knife is used to make a cut along the guide;
- The drywall breaks off along the resulting line;
- The resulting edge is trimmed with a knife if necessary.
The frame is covered with plasterboard
Cut sheets of drywall are attached to the frame using self-tapping screws. The sheet is pressed tightly, the screw is screwed first into the sheet and then into the metal profile. As a result, the entire area of the frame (except for the space provided for the hatch) must be sewn up. To facilitate puttying, the fastener heads must be recessed when screwing. To avoid cracking at the edges, fastening must be done with a slight indentation (2-3 cm).
We check all elements for evenness
We use mineral wool for sound insulation
Ready frame
Fastening drywall sheets
Fastening sheets of plasterboard to the frame occurs in the following way:
- drywall is cut to the required size;
- attach the gypsum board pieces to the frame and cut them exactly along the profiles;
- cut technological holes for ventilation and for the hatch;
- you need to screw it with black metal screws;
There is no need to leave the head of the screws or screw them in deeply
- The screw pitch is 15-20 centimeters, the screwdriver must be set to low speed.
Preparation for finishing
In order to protect the material of the bathroom box from exposure to water, all joints and junctions are treated with sealant. It is best to use silicone with fungicide additives that prevent the development of mold. The junctions should be sealed especially carefully for the box under the bathtub, where access will be difficult.
Surface preparation before tiling is limited to treatment with a primer solution. The entire area of the box under the bathtub and along the walls in an open space is covered with the working composition using a brush or roller. Perforated corners are fixed into the internal and external corners, and then the tiles are glued using specialized compounds. These can be either dry mixtures that need to be diluted with water, or ready-to-use mastics. Sometimes, to save consumables, the box under the bathtub is coated with paint instead of tiles. Preparation for this type of work involves gluing the joints of individual sheets with sickle tape. A leveling layer of putty is applied over the reinforcing tape and recessed fastener heads.
At the end of the finishing process, an inspection hatch is installed. Its installation is carried out using standard mounting lugs. It is necessary that the hatch dimensions coincide with the hole left for it, and its size is sufficient for servicing.
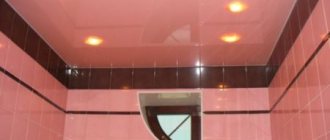
Tiled plasterboard box with hatch
We design the door for the box in the bathroom with our own hands
We provided reinforcement in the frame from profiles for installing a hatch. You can buy it, there are two types:
- A plastic structure with a magnet that is glued directly to the ceramic tiles with liquid nails.
- An invisible hatch, which is installed in the hole and finished with tiles. In this case, you need to very accurately calculate the size of the hatch; it must be the size of the tile.
It’s up to you to decide which design to choose; it all depends on the budget for repairs and the complexity of execution.
We recommend watching the video: how to make a homemade hatch for tiles
Application of finished polymer products
The pipe box in the bathroom can be assembled using plastic materials - finishing wall panels and channels. In the first case, the sequence of work is almost identical to that already discussed - the frame is assembled and its sheathing is performed. Installation of plastic panels is carried out using construction adhesives “liquid nails”. To make the entire structure look neat, the joints and corners are masked with decorative strips. The inspection hatch is installed in its seat in the bathroom box, secured with fastening tabs to the surface of the panel profiles.
A good solution is to use standard plastic channels to make a bathroom box in which you can hide the pipework. For this purpose, both specialized products and air duct elements are used. The advantage of this method is that there is no need to perform additional operations (assembling the frame, cutting the material, finishing). It is enough to choose a plastic box for the bathroom that is suitable in color for pipes of the required dimensions and fix them on the wall using a hammer drill.
Difficulties arise when it is necessary to cover the sewer riser. Finding shaped parts from which you can make a bathtub box for pipes of the required size can be quite difficult. Another point to consider is the installation of metering devices. It will have to be done either open or using a plastic box.
Regardless of what material is chosen for the manufacture of the box, all operations (cutting, installation, finishing) must be performed carefully. Otherwise, there is no point in undertaking the work; the best option would be to invite a hired craftsman.
The pipes are hidden in a box made of PVC panels
Nuances of box construction
When making a box that covers pipes, you need to not only take care of its appearance, but also pay attention to functionality.
Water pipes
To provide access to valves, water meters, reducers and other elements of the water supply network, it is necessary to provide technical openings. To do this, you need to cut a hole in the drywall, which can be done either before fixing the sheets, or after assembling the structure. When masking water pipes, the hatch can be placed on the side surface of the box, so it will not be very noticeable. In places where communications exit beyond the plasterboard structure, holes are made, which should be larger in size than the diameter of the pipes. To prevent vibration transmission, the gap is filled with a strip of polyethylene foam or other suitable material.
Sewerage
If a box in the bathroom is built to disguise the sewer network, then it is necessary to provide a hatch for access to the inspection. It is a coupling on a pipe with a hole that is closed with a lid or outlet. The inspection is intended to clear blockages in the sewer network. Access should also be provided to the junction of the internal wastewater disposal system and the central riser.
In this case, it is better to place the hatch on the front surface of the box, and you can close it using plastic doors. You can make a cover yourself by cutting it out of plasterboard and covering it with ceramic tiles, which are identical to the finish of the bathroom.
The second way to hide in a box
Often the option of decorating pipes is simply not suitable - there are too many pipes and they are not located in the most convenient way. Here another method of camouflage will come to the rescue - arranging a box, inside of which all the pipes will be located.
Stage #1. Choosing the shape and size of the structure
The shape and size of the future box, behind which the pipes in the toilet will be hidden, completely depends on the characteristics of the pipeline. Each specific case will have its own nuances.
The number of pipes in each bathroom is individual. As well as their location - the placement of the box completely depends on this factor
The same applies to the size of the box - the fewer pipes, the easier it will be to disguise them.
The most basic condition is to maintain a distance of 3 cm from the outermost point of the most protruding pipe or water meter, if one is installed in the toilet room.
A convenient option is when all communications are located along one wall of the toilet - this way you only have to work with this part of the room
Placing the pipeline along one of the walls of the toilet is the most convenient option. If desired, it will be convenient to disguise all communications by installing a false wall made of plasterboard. And the top can be decorated with the same finishing material as the rest of the walls in the room.
In addition to the false wall, the shape of the box for masking pipes can be:
- rectangular or square, extending from top to bottom or from left to right;
- angular or complex in shape in the form of a polygon to maximize the usable space of the toilet room;
- stepped, when several boxes of different heights are installed in one room;
- round.
The most difficult thing is to implement a multi-level stepped design - you first have to make a sketch on paper and calculate the length of each of the boxes. Then calculate the amount of materials required and, having purchased everything you need, begin installation work.
Image gallery Photos from Rectangular box shape Complex pipe box shape Multi-level box option Round box shape
Stage #2. Making a box
You can make a structure for masking the pipeline in the toilet room yourself or invite craftsmen.
If the premises are undergoing a full-scale renovation with the involvement of a construction team, then you should immediately discuss with them the issue of constructing a box behind which the pipes will hide.
Regardless of the type of material chosen for arranging the box, one should not forget about the inspection window - access to the pipes should be as simple as possible
Among the materials used in the manufacture of boxes, the most often are the following:
- plastic panels;
- moisture-resistant drywall;
- moisture-resistant MDF panels or plywood;
- sanitary roller blinds, roller blinds, blinds.
If drywall requires additional finishing with tiles, wallpaper or other material, then all other options are used as a finishing coating.
Image gallery Photos from Colors of plastic panels Drywall for the box MDF panels for the box Plumbing blinds for the toilet room
To install panels or blinds, you need to build a frame. To do this, use a metal profile or a wooden block. Self-tapping screws, construction mesh and putty will also be useful for leveling joints. Tools: level, tape measure, screwdriver, grinder, pencil
Before you start installing the walls of the box, it is better to cut out the parts from cardboard and check if everything is as planned
When the material is selected, you need to build a frame by securing metal profiles or wooden blocks with self-tapping screws. Panels or sheets of drywall will have to be mounted on this base.
If the box is lined with plasterboard sheets, then it will have to be tiled on top, mosaic or wallpaper glued - the same material as on the walls of the toilet room
Advantages of a plastic pipe box in the bathroom
The box covering the pipes can be made of various materials, however, the most popular are options made of plasterboard or plastic panels. Both of these solutions are wonderful in their own way, although a PVC box, from a functional and practical point of view, is superior to its plasterboard counterpart. First of all, it compares favorably with the following advantages:
- no need for subsequent decoration of the structure. Panels, unlike plasterboard, for their intended purpose are finishing materials that perform the function of finishing;
— the ability to quickly dismantle the box without damaging the material. This useful feature is especially relevant for various pipelines that have threaded or fitting joints. Such places very often break down and leak, so access to them should not be difficult;
— ease of installation of PVC boxes. Self-assembly of the structure is quick and does not require special or expensive devices and tools;
— ease of repair and good deformation resistance. The plastic used for the production of panels is very flexible, but at the same time very durable, which makes the material more resistant to damage. If the panel is damaged, it can be quickly and easily replaced with a new part;