What finishing material should you choose for bathroom walls? Most will answer that the best option is ceramic tiles. But this type of finishing is quite expensive. If the renovation budget is limited, it is worth choosing more affordable, but equally moisture-resistant materials. For example, MDF panels for the bathroom. Such repairs will cost much less, especially since the panels can be installed yourself.
MDF panels are a universal material that is suitable for renovation of any premises. Since the range of panels and their colors is very diverse, you can easily choose the material for finishing living rooms or office premises. And moisture resistance and resistance to temperature changes allows us to recommend MDF panels for the bathroom or kitchen.
What are laminated MDF panels
MDF is a sheet material made from fine wood chips pressed under high pressure and temperature. In fact, the abbreviation MDF is not deciphered in Russian (for those who tried to decipher it by type of chipboard or OSB, I personally am one of them), the board is called Medium Density Fibreboard - medium density fiberboard, and MDF is a transliteration of the American abbreviation into Russian .
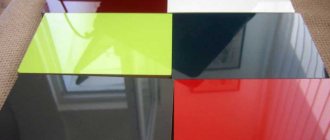
Variety of MDF panels
The binding component of wood chips is carbide resins (synthetic resins), by adding various components you can give MDF the properties of fire, bio- and moisture resistance. Laminate is made from MDF - this is the most striking representative of laminated MDF.
How can you decorate the walls of a bathroom?
Choose a material that tolerates humidity well
When choosing a material, it is important to remember that the toilet room is subject to fairly high humidity.
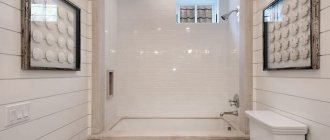
The most popular representative for finishing walls and floors is tiles, because they have excellent moisture resistance.
Of course, such work will not be cheap, but there are other options.
The finishing of the toilet can be done:
- plastic panels;
- MDF panels.
When renovating a toilet, they first start with covering the walls, then work on the ceiling, and then install the flooring.
Which MDF to choose for toilet cladding
There is a large selection of types of MDF panels, especially when it comes to lamination patterns. The panels also differ in size: there are long and narrow, and there are tall and wide sheets. Here I will look at how to finish a toilet with large MDF sheets, which greatly simplify the work (even though they are quite heavy and bulky).
The advantages of large sheets are that a large area is immediately covered and there is no need to fuss with small sheets; accordingly, the speed of work increases. The disadvantages include: bulkiness (it’s better to work together here), inconvenience of dragging a large sheet into a small toilet, especially if there is a door; without a door it’s much easier.
Large MDF panel
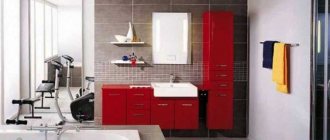
Sale of wall panels for bathrooms
offers the opportunity to buy MDF wall panels for the bathroom of excellent quality that will last for many years. We have the widest selection of textures and colors available, which allows us to implement any interior solutions. In addition, we offer favorable prices for
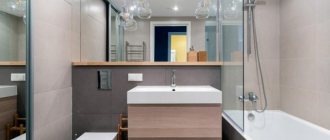
The main advantage of most modern finishing materials is their ease of use and installation, and moisture-resistant wall panels for the bathroom are also highly resistant to getting wet.
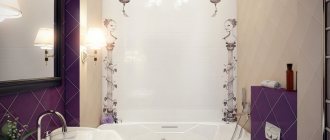
Panels for finishing bathrooms have a wide range of models - there are moisture-resistant wall panels for tiles that imitate wood and natural stone.
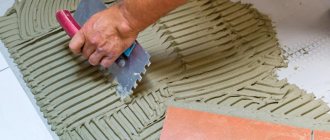
Preparing the base
The base is prepared as usual - it is cleaned of dust and dirt, everything that falls off is removed. This is necessary so that the glue on which the panels are glued adheres securely. If there is wallpaper in the toilet, it is not necessary to remove it if it is securely glued to the wall, but if tiles are laid, it must be removed.
I recommend: How to best secure the foundation of a brick shed
This completes the preparation for the panels. Of course, if you have large unevenness and differences, they will be reflected in the final finish, you may need to plaster the walls (the easiest way to do this is → “as a rule”). Also, if the surface is a bare concrete wall, it must be → primed with a deep penetration primer (the link describes how to prime surfaces). If the wall is brick, you will again need to do plaster. In other options, the panels can be mounted directly on the base, for example, on fairly even and smooth GGP (tongue-and-groove slabs - a gypsum building material for installing partitions).
Options for wall cladding with slabs made from pressed wood fractions
First of all, it should be noted that the geometry of MDF, fiberboard and chipboard panels can be different. There are slatted, tile and, in fact, sheet wall materials, and this variety applies to both regular and waterproof brands. The first option is most similar to a glued board, and such planks can be mounted both horizontally and vertically; in the first case, the space visually expands, and in the second, the ceiling seems slightly higher. Tile panels look like wooden tiles, and they can be used in a similar way, that is, mounted on glue. And finally, sheet metal is the most typical and familiar option for many in large dimensions.
Marking for MDF panels
First of all, let's decide on the type of panels and their sizes. Because the design you like may appear on different types of panel sizes and you will have to choose according to the design. Measure the total area of the walls (walls, not floors) and, based on the sizes of the selected panels, after consulting with the seller and making a 10-15% reserve for cutting, purchase the required number of panels.
Some stores can even help you lay out the panels for your bathroom. We decided on the panels, mentally laid them out on the walls of the toilet, and measured everything. Now let's see what else you will need to cladding a toilet with MDF panels yourself.
Types of panels
There are several types of wall panels:
- Sheet wall panels. Due to its size, finishing work is less labor-intensive due to the reduction in the number of joints. Their dimensions are 1.25 x 2.50 meters and thickness is from 3 to 7 millimeters.
Sheet wall panels
- Stacked slatted panels. They look like long planks, and their dimensions are as follows: width 130 - 280 millimeters, length 2500 - 3800 millimeters, and thickness 8 - 14 millimeters.
Stacked slatted panels
- Stacked tile panels. They are square in shape, making it easy to lay out any design or pattern. The most common sizes are from 30 x 30 to 95 x 95 centimeters.
Stacked tile panels
Tools and materials
In addition to the panels, we will need:
- “Liquid nails” glue is beige, solvent-based, but can also be water-based with strong fixation.
Solvent-based “liquid nails” glue and a gun for it
- Corners for decorating panel joints in corners. There are special corners made of MDF; in extreme cases, you can also use plastic corners.
Decorative corner made of MDF
From the tools:
- Glue gun.
- Stationery knife (construction knife).
- A jigsaw and a cutting blade with fine teeth (for laminate). You can use a hacksaw with fine teeth, but it will be slower.
- Tape measure and pencil, of course.
Installation of cladding
If there is a flat surface, it is possible to install the cladding using special glue.
Waterproof MDF panels are glued to the walls horizontally or vertically, depending on the size of the room and the preferences of the apartment owner. Vertical installation visually increases the height of the ceiling, horizontal installation increases the area of the bathroom or kitchen.
After purchasing a sufficient amount of finishing material and connecting elements, the walls are measured and panels and moldings are cut to size. The starting molding is installed vertically or horizontally, then the panels are glued to the wall one by one. The glue is applied in thin strips over the entire surface of the elements at an equal distance from each other. The joints of the panels and the junctions with the ceiling and in the corners of the room are covered with decorative moldings.
We glue MDF panels to the walls in the toilet with our own hands
It is also important to prepare a site for cutting sheets, some place in the nearest room (room).
Marking the first sheet
Mark the first sheet. According to the convenience of work. The disadvantage of large panels is that they do not have any joint edge, and the sheets are simply glued together. This is not particularly noticeable with large panels and it is necessary to either carefully cut the sheets or join them with factory-made edges.
To carefully cut a sheet, stick masking tape over the cut area and draw a cutting line along it, use a hacksaw
I recommend: Tongue-and-groove blocks - wall-constructor: comparison of silicate and gypsum blocks
Cut with a jigsaw.
Mark the sheet and cut it with a jigsaw
You should stock up on at least two stools, since cutting a large sheet is not very convenient. It should be laid on a couple of stools.
Having measured and cut the sheet, we try it on again! Does everything fit, trim if necessary. Here it should be taken into account that the sheets are large and dragging them into the toilet that we are making is not very convenient.
If there are gaps between the corners and the sheet, then make sure that they overlap with the corners. Also, here you don’t have to worry too much about the edges being rough or missing somewhere to the corner of the wall, since all this is covered by the corners.
We glue the MDF panel to the wall in the toilet
Having measured everything, we peel the sheet away from the wall, without having to pull it out, and apply glue to the wall.
Apply glue to the wall
It’s better to apply glue pointwise, in 1-2 cm heaps. We don’t skimp on the glue; solvent-based glue is the cheapest. If you use solvent-based glue, be careful not to smear it on the front side of the sheet and everything around it (especially the floor), because removing it later will be problematic and sometimes impossible.
Glue the sheet, pressing it well to the warp. Please note that the sheet will not be glued completely, but only pointwise, and somewhere it will sag when pressed - this is not a problem, this is a feature of the panels.
Press the sheet for about 5 minutes, gluing it well. Then you can leave it to dry and proceed with further marking and gluing of sheets. We glue the largest areas first, then measure out the smaller ones and glue them. We need to work on this basis.
You can join large sheets using joining corners, as in the photo below.
You can join large MDF panels using such joining corners, choosing the color and symmetrically installing them on opposite walls.
But the joints of large panels are not so noticeable that they can be used.
That's it, we covered the entire toilet with MDF panels. Now it’s time to install and fasten the corners.
Glue the corners
It's time to finish our trim and glue on the corners. We measure the height of each corner and cut the corners to size. An important detail is the junction of the corners. If everything is clear with plastic corners, they are simply cut to fit each other with a utility knife, then with MDF corners you will have to tinker a little longer.
How to adjust the corners to each other
It is best to cut plastic corners into the joint not at 45 degrees, but as shown in the photo below.
It is better to cut corners for gluing MDF corners not at 45 degrees
It will turn out better and more beautiful by cutting off one edge of the corner and leaving the other. This way the joint will turn out more even than when cutting at 45 degrees, and it’s easier this way.
I recommend: DIY cesspool
An important nuance - it is better to glue plastic corners with solvent-free glue
. This way you won’t stain the panels when you apply glue to the corner and press it, squeezing the glue out from under the corner (which will definitely squeeze out).
So, everything is clear with plastic corners - they are simpler. Let's move on to the MDF corners.
To trim MDF corners, you will additionally need a miter box.
This is a miter box
The miter box allows you to cut corners at 45 degrees, etc. Let's measure one corner with a small margin.
You need to know how to cut corners on a miter box. This is described in the article about → how to make a joint in a 45 degree corner on ceiling plinths, I recommend that you read it. Everything is approximately the same, only the MDF corner needs to be bent like a corner, pressing the edges of the corner to the edges of the miter box. In general, after reading the article at the link it will become clear.
It is also better to glue the corners with water-based glue, and not with solvent-based liquid nails.
Attaching an MDF corner to a corner
Installation Features
In order to attach models of various sizes to bathroom walls, no special skills or abilities are required. By and large, the installation of wall MDF is very simple, but it has its own nuances. Many panels are attached to the sheathing, which greatly simplifies the installation process. In addition, if the walls of the shower room are smooth, then finishing can be done without prior preparation.
However, if there are defects in the wall surface, they must be corrected. The wall should be primed, plastered, or gypsum board blocks used. The latter option allows you not only to level the surface, but also to create a new one. After preparation, you need to take measurements of the room. In addition, it is necessary to let the moisture-resistant panels sit for several days in the bathroom. This will allow them to acclimatize and get used to new conditions.
After which they will acquire qualities that correspond to the temperature regime of the shower room, as well as the level of humidity. It is best to attach sheet panels of various sizes to the wall using a special frame - sheathing. This makes it possible to connect communications, for example, wiring for lighting. This method is suitable for coatings with small defects that need to be hidden. Wall MDF is mounted using self-tapping screws, special brackets, clips or nails.
Installation is carried out starting from the corner of the moisture-resistant product. It is worth knowing that a smaller hole will be better in terms of subsequent operation. In addition, if you get tired of the lathing option, then after some time you can remove it without unnecessary problems. This is suitable for people who like frequent changes of interior style in the bathroom. It is worth noting separately that the installation of wall panels can be carried out both on a frame with a metal base, and on a structure with another material.
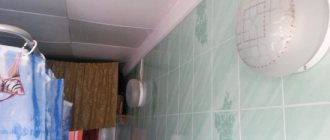
Bottom edge decoration
The most dangerous part of MDF is where it meets the floor. It’s good if there is a tiled edge along the edges of the floor - this is the best option.
Trimming of tiles at the bottom along the edges
If there is no such flanging and if it is possible to do it, it is better to do it; if not, then you need to protect the lower edge of the MDF from moisture penetration. Installing a plastic skirting board in a toilet is not the best option, but it is possible.
You can use the same corners: plastic or MDF. Or use special corners, shown in the photo below.
Plastic corner
Advantages and disadvantages
It is worth noting that not everyone can afford expensive materials for decorating the walls in the shower room. MDF panels for the bathroom are an effective way to get out of this situation. They are distinguished by their availability, strength, and durability. They are convenient to mount on the wall. Sheet products are made not only from wood sawdust, but also from other wood components that are specially processed.
MDF panels for walls are in stable demand in the domestic market. They are usually used instead of tiles in the shower room. Sheet wall products are in no way inferior to ceramic counterparts, while significantly benefiting in price.
In addition, MDF has an attractive appearance, it is made like a rectangle, and has no gaps at the edges or at the ends. Strengths of moisture-resistant wall panels:
- ease of installation;
- long service life;
- ease of processing;
- affordable price;
- good thermal insulation;
- high strength;
- environmentally friendly material;
- ease of operation;
- a wide range of.
In addition, it is necessary to note the ability of sheet models to be combined with other finishing materials. They can be mounted on the wall together with stone, under tiles, and can also be used with other types of finishes.
The dimensions of the panels allow the products to be used in any shower room, regardless of its size. Moisture-resistant MDF is equally suitable for both small rooms and a large bathroom.
However, it is worth noting that sheets also have their drawbacks. This is an absolutely normal phenomenon, since today it is difficult to imagine any material without weaknesses. In addition, with proper skill, you can avoid creating unpleasant situations. Currently, MDF products have the following disadvantages:
- low impact resistance;
- poor resistance to scratches;
- fire hazard.
According to their characteristics, moisture-resistant sheets for the wall are distinguished by high performance qualities. As for the shortcomings, here it is worth taking them quite seriously. However, the degree of risk should not be exaggerated, because weaknesses can be minimized, for example, by not attaching sheet products to the wall near the workspace. For other indicators, the material, in principle, does not need recommendations.
Plastic wall coverings
Plastic panels are easy to care for.
When using some materials, the space in the toilet is reduced. Usually their area is already small, so covering them with plastic panels will be the best option, because their presence only slightly affects the size of the room.
PVC panels also have the following advantages:
- are not afraid of wet cleaning;
- are cheaper than other finishing materials;
- there is a large selection of colors;
- it will take a little time to cover the walls of the toilet with plastic panels;
- the work can be easily done with your own hands;
- no wall alignment required.
There are some disadvantages, but they are few:
- when ignited, vinyl emits acrid smoke;
- a few centimeters of the wall will still “go away”.
When choosing plastic, we pay attention to both color and pattern, as well as quality.