Repair and decoration
04/25/2018 Anastasia Prozheva
Finishing a bathroom with plasterboard is convenient, practical and affordable. Is it possible to use drywall in such extreme conditions that prevail in the bathroom? After all, gypsum does not tolerate high humidity and poor ventilation. What if we add a parka? Yes with the whole family? Will drywall be able to withstand this?
Of course, an ordinary plasterboard sheet will not cope with this. Still, technology does not stand still, and new products are replacing old offers. Considering the versatility of plasterboard sheets, manufacturers have offered a special moisture-resistant product that can also cope with the bathroom. And now about everything in more detail.
What is the difference between moisture-resistant drywall and regular drywall?
In order for the buyer to quickly and easily distinguish moisture-resistant cardboard from regular cardboard, the cardboard on it is painted green. Of course, the shade of green may vary depending on the manufacturer and the color rendering quality of the cardboard itself. Since cardboard is a completely edible “dish” for all kinds of fungi and mold, various substances are added to its composition that protect the material from microorganisms. They are also supplemented with water-repellent impregnations, which, in fact, provide the very moisture resistance that we need.
So, moisture-resistant drywall has been laid in the bathroom. Eh, now the sea is knee-deep - you can splash around as your heart desires.
That’s right, but it won’t hurt to deal with excess humidity in the bathroom. If the bathroom has a plaster finish, then there should be a high-quality hood. If there is no high-quality natural ventilation in the bathroom, then you need to install forced ventilation, such as a fan. Moreover, if you install an exhaust fan, make sure that there is also an influx of fresh air. Otherwise, you will get reverse draft at those moments when the fan is “resting”.
Often, the operation of a forced hood is controlled by a light switch. When the light is on, the hood is working. As soon as it goes out, the fan stops working. This saves electricity, which is good in itself. However, quality ventilation requires more time. Especially when the air is filled with steam after taking a hot bath.
Related article: How it’s fashionable to glue wallpaper now: popular trends (photos)
It is better to remove water from the floor immediately, without once again testing the coating for moisture resistance. It's still plaster after all. After taking a bath, it is better to wipe the floor and walls with a dry cloth if large drops remain on them.
Partitions in the bathroom: the correct arrangement
Sheets of plasterboard in the bathroom can be used not only to construct walls, but also to create partitions.
At its core, the structure is a metal frame sheathed on both sides with plasterboard. The void inside it is usually filled with soundproofing material, most often mineral wool.
If electrical equipment will be built into a plasterboard partition in the bathroom, then you need to purchase a special moisture-repellent and fire-resistant material - GKLVO, if plasterboard partitions in the bathroom are simply a way to separate one area from another, for example, a toilet from a washbasin without additional lighting, then you can use GKLV.
If you decide to make a partition from gypsum board, then before purchasing materials you need to calculate their quantity, and you need to buy with a small margin.
To construct the structure you will need:
- rack profiles;
- soundproofing material;
- guide profiles;
- GKLV or GKLVO;
- dowel-nails;
- self-tapping screws;
- reinforcing tape.
Sequence of work
Marking. It is definitely needed. It is necessary to accurately calculate the location line of the partition. Having drawn a line on the floor surface, you should apply the same to the ceiling.
Fastening guide profiles. An element that is equal to the length of the partition must be attached to the floor, then cut out a rack profile equal to the height of the room.
It must be inserted from the first side of the guide element, and using a level, set it at a right angle and make a mark on the ceiling. Similar manipulations should be done on the other side.
As a result, two marks will appear on the ceiling that need to be connected by a line. You need to attach the upper guide element along it.
The side rails are installed between the upper and lower ones, fixing them to the wall. At the end, you should get a closed perimeter with a necessarily vertical plane.
The device of the rack element. Before starting work, it needs to be cut into parts that will be equal to the height of the room minus 15 mm.
When installing the rack element inside the guide, it must be fixed with self-tapping screws on the first side, top and bottom, maintaining a pitch of 0.4 - 0.6 mm.
Parts adjacent to the wall must be secured with dowel nails; other racks are fixed with self-tapping screws and a press washer.
GKLV (GKLVO) side cladding. The sheets must be laid end-to-end and fixed to the profile using self-tapping screws with a countersunk head.
The screw head must be hidden a little in the material so that it does not protrude above its surface.
Laying insulation. The insulation is placed inside the frame after the sheathing of one side is completed. It is better to carry out manipulation with glasses and gloves.
If necessary, layers of insulation can be cut to completely fill the entire internal frame space.
Covering the second side. It is carried out similarly to the first one.
Decorative finishing. It can be done after gluing the joints, puttingtying the seams between the sheets and priming the entire surface of the partition.
How to properly finish a bathroom with plasterboard?
Drywall likes a solid foundation. Of course, if the walls are smooth, the sheets can be glued directly to them. If there are doubts about the quality of the surface, then it is best to use a frame.
Important! When choosing to mount drywall directly to the wall, you need to take care of waterproofing. After all, moisture passing through drywall can penetrate the adhesive composition and weaken it. Insulation from a pair of plasterboard boards will not be superfluous in the case where a frame is used.
In order to protect drywall from moisture, its edges are wrapped around the entire perimeter with a water barrier or treated with mastic. Particular care must be taken to insulate the joints at the ceiling and floor levels. Experts recommend treating the material in the above manner and, in addition, covering its entire surface with a water-repellent agent. This will significantly extend the service life of plasterboard boards.
Features of sheets made of construction cardboard and gypsum
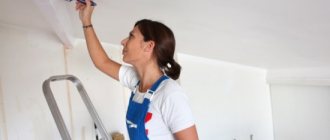
We paint gypsum board with our own hands
Construction cardboard, laid in layers, serves as reinforcement for the hard but brittle gypsum. By weight, paper makes up about 8% of the composition. Fine asbestos more than 90%. The technical characteristics of the materials are different. What they have in common is their hygroscopicity. GKL absorbs:
- moisture from the air;
- paint;
- primer;
- water;
- other liquids, including dirt.
The paint protects the gypsum board from swelling and destruction. By creating an aesthetically pleasing appearance for the room, applying drywall paint will simultaneously increase the lifespan of the walls.
Drywall is produced with improved qualities due to various additives:
- ordinary;
- moisture resistant;
- fire resistant;
- soundproofing;
- increased plasticity with microfibers.
Regardless of the type, drywall is prepared for painting in the same way. Additives impair the vapor permeability of the material and increase its cost. Therefore, sheets of special plasterboard are used in damp rooms and boiler rooms with good forced ventilation.
How to make a plasterboard ceiling?
Since the ceiling takes on the lion's share of moisture (rising steam and drops of condensation), it only needs to be sheathed with moisture-resistant material. It is processed in the manner described above.
I recommend reading: DIY plasterboard ceiling.
The paint that will cover the ceiling must also be resistant to high humidity. The same applies to putty.
Lamps intended for bathrooms must be reliably protected from moisture to avoid short circuits. All wiring is laid using corrugated pipes. This will protect the cable from external moisture and possible fire. As a bonus for your efforts, you also receive additional cable insulation from possible contact with metal structural elements of the frame being installed, as well as from possible mechanical damage.
Important! When the cable is laid in a corrugated pipe, it is quite easy to replace the old wiring later. And at the same time, the finishing materials of the walls and ceiling will not suffer at all.
Drywall Knauf - brand features
There are many brands on the construction market that produce moisture-resistant drywall. The production technology is always approximately the same - but of course, gypsum board sheets from different manufacturers may differ in quality. Practical resistance to moisture depends on many aspects - on the quality of raw materials, on compliance with all rules during manufacturing, on the moisture-resistant impregnations used.
The greatest demand in Russia is GKLV from the German company Knauf. KNAUF plasterboard has some features that set it apart from its competitors.
- The material retains all its properties at humidity levels up to 90%.
- The gypsum core and cardboard layers are treated with high-quality hydrophobic impregnations.
- Drywall is resistant to mechanical stress - you can not be afraid of being damaged by an accidental blow.
- GKLV easily tolerates accidental direct exposure to moisture.
- Knauf products are environmentally friendly materials, the manufacture of which does not use toxic chemicals. In particular, natural starch plays the role of a binding composition here.
- Moisture-resistant material from a German manufacturer has good fire-resistant properties. Such drywall does not burn at all, but only chars when exposed to high temperatures for a long time.
See also: How to assemble a crib-house from bars with your own hands?
The Knauf company produces plasterboard sheets of all common dimensions, so for any purpose you can find a suitable material among the product line. If necessary, Knauf can be easily processed and brought to the desired size.
Knauf is a quality proven over the years. It is also worth noting that the German company produces many other building materials that combine perfectly with each other. Thus, if during repairs you use, for example, adhesives from Knauf, it would be wise to choose drywall from this brand - you can be sure that when working, the two materials will fit together and will not complicate the repair.
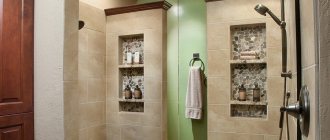
Niches and boxes
The bathroom is perhaps the most saturated with all kinds of communications. For laying pipes, special boxes are often installed, which make it possible to hide the serpentine weaves of metal or plastic from view, and at the same time make the cleaning process easier. At the same time, you need to ensure that access to important nodes is easily accessible. Bringing in a water supply for the sake of aesthetics is a big risk of losing money if something ever leaks.
Related article: Bathroom layout - options and solutions
Boxes, niches and other structures in bathrooms are allowed only using moisture-resistant materials.
Tools
The entire list is divided into devices for surface preparation and painting. You will need:
- Plastering set: spatulas 50 and 500 mm, mixer for kneading the mixture, grater with mesh or sandpaper;
- Auxiliary equipment: electric drill, mixer attachment;
- Painting tools: roller 200-300 mm, brushes 50-80 mm, paint tray, masking tape.
Do-it-yourself paint can be applied using a spray gun, which allows you to get a more uniform layer and also reduce material consumption, but such equipment is not always available.
The list is adjusted as necessary.
Pipeline installation
Imagine a situation in which pipes with hot and cold water are hidden behind a plasterboard partition. What happens if you put them “as they are”? Let's get a look. In summer, the supplied water is much colder than room temperature. Condensation forms on the surface of the pipe. Where will he go? It will gradually evaporate from the pipe and be absorbed into the drywall.
How to avoid this? Quite simple. It is enough to put thermal insulation on all pipes. In this case, condensation will not form. And for us this means that the wall will remain dry and comfortable for a long time. This is what we are trying to achieve.
Recently, few people use metal pipes when replacing pipes. But still. If you wish to use metal pipes, they must be covered with several layers of paint and insulated. This can be a “shell” made of foam insulation, foil or mineral wool.
For plastic, thermal insulation will also not be superfluous. You just need to add noise-absorbing materials to it. Then the operation of the sewer system will occur quietly and unnoticed. You can combine these two operations with one movement of your hand. It is enough to wrap the pipe with mineral wool, which will eliminate noise and save heat.
Attention! Polystyrene foam is not suitable for this situation. It has a high density and does not protect against noise.
Surface sanding and priming
Painting drywall in a room
Without additional processing, all areas of wall putty will stand out, regardless of the type of paint and the number of layers. Before painting the drywall, apply a coat of finishing putty. All irregularities and protrusions must be sanded with sandpaper. Then a layer of primer. If depressions of more than 0.5 mm remain, the treatment must be repeated.
Advice! To work with drywall, choose gypsum-based mixtures. They are homogeneous with the composition of the sheets. This ensures good adhesion and uniform shrinkage.
To ensure an even gloss of the paint, use putty to cover the entire surface of the walls or ceiling. The number of layers depends on the surface roughness. A thick layer of plaster can shrink and crack. Apply several thin coats if necessary and prime each coat. Each layer of material must dry completely.
The surface of gypsum board and gypsum putty absorbs moisture differently. All untreated areas of the wall will stand out with spots of paint with a different sheen and shade. This is not visible under the wallpaper. For painting, careful preparation is necessary for the entire wall surface.
Finishing work on drywall
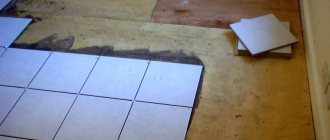
As in any other room, any finishing work can be done on drywall. You can glue tiles, wallpaper, putty and paint – you can do everything. The main thing is that the finishing material is intended for rooms with high humidity.
If the above rules are followed, then structures made of plasterboard sheets will serve for a long time.
The only thing you need to remember is that when removing the finishing material, the protective layer of cardboard is damaged. Therefore, further operation of the structure is impractical.
Paint selection
The paint coating on the walls must have several important qualities: strength, durability, water resistance, and non-toxicity. The following types of material are suitable for this definition for the premises in use.
- Water-based paints. They are produced on the basis of water, are practically odorless, and do not fade. The only drawback is that they are not very resistant to moisture.
- Acrylic. They have the same qualities, but are more resistant to high levels of humidity.
- Alkyd enamels. Creates a strong, durable and waterproof coating. Disadvantage: they have a strong odor and require ventilation.
- Silicone. The polymer base allows you to get a color that is resistant to most external influences. The disadvantage is the higher price compared to analogues.
When purchasing paint, pay attention to the ratio of dye to the required volume. Initially, you need to immediately purchase and tint all the material. Otherwise, you won’t be able to get exactly the same shade the second time! In this case, the calculation is carried out based on the need to apply at least 2-3 layers!
So, how to paint plasterboard walls after all the preparations are completed?
How to cover bathroom walls with plasterboard?
- For the walls you need moisture-resistant plasterboard with a thickness of 12 mm. The number of sheets is calculated based on the total area of all surfaces with a reserve for scraps and scraps.
- The walls and ceiling are leveled by installing a metal profile frame. The base for niches, arches, boxes and shelves is immediately constructed. The profile is set by level. Where necessary, substrates are used. Dowels and screws are used for fastening.
- Transverse profile bars are screwed to the installed support posts in increments of 60 cm. The result is a frame lattice to which sheets can be attached.
- In places where it is necessary to create a curved surface, the sides of the profile are carefully trimmed. This makes it easy to bend the strip at the desired angle. For arches, you will need to make many notches at short intervals so that the curve of the contour is as smooth as possible.
- Drywall is marked and cut. Then they are secured with self-tapping screws to the profile structure. Hardware is selected with a flat head. When screwed in, they are pressed flush into the sheet. When joining several sheets. They are placed by moving them along the seam so that the joints are spaced apart. This will give greater strength to the surface.
- To install the ceiling, you first need to find the lowest point and, starting from it, mark the level on the walls.
- The guides are attached at a distance of 10 cm from the actual ceiling. This space will be used for wiring electrical cables and installing lamps.
- Plasterboard is being sewn on.
- Now you need to clean the surface of the walls and ceiling from dust and small particles. The joints are primed and treated with putty. The same must be done in the corners and where the screws are screwed in.
Related article: Warm floors without screed: polystyrene boards and dry aluminum, plates and water laminate, heat spreaders
Finishing a bathroom with plasterboard is the easiest and fastest way to give the walls the necessary geometry. And as a modeling material for niches and boxes, it has long had no competitors. Anyone who knows how to hold a drill, level and screwdriver can handle its installation.
Pipe cladding and communications laying
A peculiarity of the bathroom is the presence of water supply and sewerage pipes, one type of which can interfere with its aesthetics. Most of us wonder how to hide these communications “out of sight.” This problem can be solved very simply - by installing a gypsum plasterboard box, which can be made collapsible or equipped with doors for access to the pipes during their inspection and maintenance.
Before finishing the bathroom with plasterboard, you need to treat all metal water supply and sewerage systems, covering them with a primer and several layers of paint. To avoid the appearance of condensation, which will lead to corrosion, and also to reduce the noise level of water in the pipes, they must be carefully insulated by wrapping them with mineral wool.
The box is installed using the following technology:
- Measurements and markings. It is important to remember that the distance between the pipes and the walls of the box should not be less than 3 cm, and in places where meters, valves and “audits” are located, inspection doors will need to be installed. When taking measurements, remember the thickness of the drywall for the box; this value must be taken into account when determining the boundaries of the structure.
- Frame installation. The most suitable material for this is a galvanized metal profile. First of all, we attach the strips to the walls using dowels and screws. We install racks (one or more) that will form the front edge of the box. We attach them to the ceilings using hangers or simply bending the edges. We install guides on the ceiling and floor and reinforce the entire structure with jumpers.
- Sheathing. When deciding what to cover the bathroom with, we chose plasterboard. This material is also suitable for us when arranging a communication box. It is better to cut the elements from a single sheet so that the edges of the side strips do not protrude beyond the frame profile - the front part of the box will cover them. We attach the sheathing parts to the frame with self-tapping screws at intervals of 25 cm. Remember that the structure must have inspection holes with doors, which can be made from plasterboard or purchased in a store.
Before you start covering the bathroom with sheets of plasterboard, you need to lay all the necessary communications under it. Now we know how to properly prepare and protect water and sewer pipes, it remains to talk about electrical wiring.
Installation of wiring must be carried out by laying it in a special protective “corrugation” - a pipe that will prevent the access of moisture and will also prevent the occurrence of possible short circuits and fire.
Back to contents↑
Partition manufacturing process
The entire process of installing a partition made of plasterboard sheets comes down to the following:
- marking and installation of the frame;
- sheathing with sheets simultaneously with insulation and sound insulation;
- surface putty;
- door installation;
- finishing.
Frame making
First of all, markings are made for attaching horizontal load-bearing profiles to the floor and ceiling of the room. It is more convenient to draw a line first on the floor, and then, using a plumb line, mark two extreme points on the ceiling near opposite walls, through which you should also draw a line. Both lines must be strictly parallel and on the same vertical. The quality of the work performed depends on the correctness of the markings. Therefore, you should not use a building level. Its length is limited, and an error may occur when drawing the vertical line. In this regard, there is no alternative to the plumb line.
A supporting profile is attached to the floor and ceiling. Its length must exactly match the length of the partition.
The fastening step can be from 40 to 60 cm. Self-tapping screws or dowels are used as fasteners, depending on the material of the floor and ceiling.
At the next stage, vertical profiles are installed near the walls and the future doorway.
The length of the profiles is taken 10 mm less than the distance between the bottoms of the supporting profiles. The racks are inserted into the cavities of horizontal profiles and, after checking the verticality, they are fastened together using special screws for metal profiles (in everyday life they are called “bugs” or “flea beetles” due to their small size and high consumption).
To determine the number and installation location of the remaining vertical racks, two factors must be taken into account:
- the edges of the plasterboard should lie exactly in the middle of the profile;
- The width of the drywall sections should not be less than 20 cm.
The last point deserves special attention. For example, if the width of a whole sheet is 120 cm, and the opening is 130 cm (the insert will be 10 cm), then the whole sheet must be cut so that the insert is larger than 20 cm.
One of the racks should run in the middle of the sheet.
Transverse horizontal inserts between the posts are made at the joints of the gypsum boards. It is necessary to provide for the installation of adjacent sheets “staggered” so that the horizontal seam is not continuous over the entire surface of the partition, that is, if the first large sheet is attached at the bottom, and a short segment goes from above to the ceiling level, then the next sheet is placed, on the contrary, on top, and the segment is placed below.
A lintel must also be installed above the doorway.
If the partition is made on a double frame made of ceiling profiles, then short transverse jumpers must be installed between the vertical posts to increase the rigidity of the frame.
Cladding the frame with plasterboard
Sheathing with sheets of plasterboard is carried out starting from one of the sides. Having finished one side, sheets of mineral wool are placed in the gap between the posts. Cotton wool can be either rolled or in the form of panels.
Mineral wool has high water absorption, so it must be separated from the gypsum board with a layer of vapor barrier material.
It has already been said that the panels must be attached “staggered”. There should be a solid panel above the doorway.
The large distance between the internal and external cladding slabs allows the necessary communications to be laid inside the partition. This can be either water and sewerage pipelines, or lighting electrical wiring.
putty
The requirements for puttying the partition surface depend on the finishing options. If painting is planned, then you must first putty the joints between the individual gypsum boards, and then the entire plane to obtain a flat surface.
The partition in the bathroom made of plasterboard is ideal for tiling with ceramic tiles.
Before gluing the tiles, there is no need to carry out any additional work, except that in any case the surface of the drywall must be primed with a primer with antiseptic additives. If you use a regular primer, mold or mildew may appear in places where moisture accumulates, which are then very difficult to remove.
A special mixture with high strength is used to seal joints. Additionally, the seams are covered with fiberglass reinforcing tape.
Installing doors is beyond the scope of this article. This process is described in sufficient detail on a variety of resources and is also not difficult to complete independently.
In construction terminology, plasterboard is dry gypsum plaster in the form of rectangular sheets. This material was invented by the owner of a small paper mill in America almost a century ago. To make drywall, thick, viscous gypsum dough is mixed and placed between two sheets of thick cardboard. When professional decorators renovate a room, they select materials that are most suitable for the conditions where they will be used.
The bathroom is the most difficult room in the house due to the humid microclimate with temperature changes and insufficient air circulation.
- Drywall and its components must be from the same company.
- Before creating the frame, be sure to cover the rough surface with a water barrier.
- All joints are reinforced. All fastening points are covered with moisture-resistant putty for joints.
The wall is ready for finishing. If everything is done correctly, the surface will be smooth, durable, and able to withstand a certain load. After erecting the structure, be sure to cover its surface with an antiseptic composition. The joints of sheets, screw heads, external and internal corners are additionally primed and sealed with putty using sickle. The installation sites for plumbing fixtures are treated in the same way.
To create partitions from gypsum plasterboard in bathrooms, you will need the sheets of plasterboard themselves, guides and rack profiles for the metal frame, fastening building materials - corners, self-tapping screws, as well as damper and reinforcing tapes, putty mixture and antiseptic primer. However, whatever the type of partition, it will in any case be unique and will serve as both a useful addition to the room and its decoration. Drywall, such a popular material for home construction, can also be successfully used to install partitions in the bathroom, and this will be a winning, practical and interior solution.