In Russia, bathtubs are traditionally more popular among homeowners than shower cabins, because they are more convenient to use for washing, washing, or performing other household work. Steel models are considered the most practical and affordable, so they are purchased more often.
To install a washing container with your own hands, you need legs for a steel bathtub, which act as a kind of supports that accept and distribute the load. Manufacturers complete their products with different types of racks, with different mounting methods. We will tell you about all the types of legs and the technology for self-installation of a steel bathtub in this article.
Choosing a location
This issue must be approached very thoroughly, guided by the following recommendations:
- The bathtub should be located at the optimal distance from the water supply and drainage. This will avoid laying additional pipelines.
- Installing a cast iron bathtub on legs next to one of the walls saves room space, makes it more stable, reduces possible vibration and the risk of water splashing throughout the room.
Cast iron clawfoot bathtub against the wall
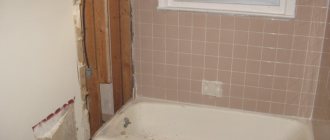
Preparing the premises
Before installing a cast iron bathtub, you need to carry out a number of measures that will ensure the safety and comfort of using the product:
- Leveling the floor leveling compound or cement screed. This will avoid additional adjustment of the bath level.
Leveling the floor before installing the bath - Laying pipelines for water supply and drainage.
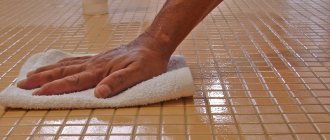
- Laying floor tiles with a high rigidity index. To gain strength, it is recommended that subsequent work be carried out after some time.
- Laying tiles on walls premises. The tiles are allowed to be laid completely or partially along the height of the bathtub if it is adjacent to the wall.
Laying tiles before installing a bathEach method has advantages and disadvantages. In the first case, in the future there will be no problems with replacing the bathtub with a new one. In the second, the occurrence of leakage between the vessel and the wall will be minimized.
Where to buy wedge legs for an old cast iron bathtub
We repeat again: legs for old bathtubs can be purchased from us in St. Petersburg only by pickup. For all out-of-town purchases there is Russian Post and similar services (see below).
Buy legs for an old cast-iron bathtub in St. Petersburg
It is periodically possible to buy non-adjustable legs for an old cast-iron bathtub only privately for cash. You can pick up the bath feet yourself by prior arrangement in the northern part of St. Petersburg (Kalininsky, Vyborg or Primorsky districts). We have not organized our own courier delivery of legs for old bathtubs in St. Petersburg and the Leningrad region and most likely will not, because... This is not our business, but rather a good service!
URGENT delivery of legs for old bathtubs by commercial courier service to any city
The non-state courier service “ SDEK ” will deliver our bath feet from St. Petersburg to any city and place. See the cost of courier services here cdek.ru (we don’t advertise to them, so automatic redirection to their website is not configured). This service was recommended to us by a customer who often uses their services for work. We used it on his recommendation and for him. See reviews about delivery times in our new VKontakte group. Delivery will most likely be more expensive than the parcel, but the speed of delivery is excellent. Another plus: you transfer only the cost of the legs to our account, and pay for delivery upon receipt!
Buy non-adjustable legs for old bathtubs in other cities through Russian Post inexpensively
Delivery of legs for an old bathtub to another city is possible through, for example, Russian Post with 100% prepayment of the cost of the legs + 100% prepayment of the cost of parcel forwarding services , as well as additional services (assessment, inventory, urgency...) at the request of the buyer. When sending a parcel, we are required to pay the tariffs for everything at once. The service is not new, but it is not automated, so you have to do everything manually and go to the post office on your own two feet. Leave a request by e-mail to our senior master. In the response letter we will send you the Sberbank card number. We will send the parcel within 24 hours (Sundays are a day off at the post office) and a scanned copy of the shipping receipt.
How much to pay for ordering legs with delivery?
| Item payable | rub. |
| Cost of legs | 000 |
| Cost of Russian Post services (max) | 000 |
| Box/package cost | 80/45 |
ATTENTION!!! Service for calculating the cost of delivery of a parcel WITHOUT PACKING COST!!! with legs from St. Petersburg to any city you are interested in https://pochta.ru/parcels. You yourself fill out the form about the parcel and the recipient “St. Petersburg! On the page you will be prompted to save the file blanks.pdf. Download it and send it to us! This will eliminate errors when filling out the postal form by us.
See delivery times for legs for old bathtubs here https://www.russianpost.ru/rp/servise/ru/home/postuslug/termsdelivery They also have a lot of useful information on their website about terms and additional services for the delivery of parcels, letters and parcels to cities and regions.
How to write us an address without using the mail site service.
This is how the post office will require me to fill in the recipient's address. This is in case working with pdf documents is too difficult for you.
Tools and materials
During the installation process, you will need safety glasses, clothing and shoes, a hat, and gloves. For the preparatory stage - a hammer drill, a hammer, pliers, keys, screwdrivers. Directly for installation you will need bolts, nuts, drain fittings, a corner for masking the joint between the wall and the product, and legs.
Usually the bathtub already comes with supporting elements. However, if they do not fit or you need to replace the legs in an old product, you can purchase them separately.
Set of legs for cast iron bathtubs
The choice of supports is quite large - from standard Soviet ones to decorative ones. When choosing, everyone is guided by their own taste and price category. If the supports do not carry a decorative load, then it is better to choose universal legs for cast iron bathtubs. They fit almost all types of vessels and are designed to bear significant weight.
Choosing supports for a steel bath
To install a steel bowl with your own hands, you need to take care of reliable supports in advance. When purchasing a new bathtub, it is better to immediately ask the seller about the type and method of fastening the legs that come with it, and, if necessary, select more suitable and presentable elements. The choice of supports for installing a steel container is carried out in accordance with the following criteria:
- Model weight. The heavier the bathtub, the stronger the legs must be for installation. As a rule, the supports indicate the maximum load for which they are designed.
- Model volume. The larger the volume of the bowl, the more water can be placed in it. For baths with a large volume, stronger legs with rigid fastenings are used.
- Drain location. The mounting stops must not interfere with the connection of the siphon.
- Bottom shape. The supports are selected to match the shape of the bottom of the bowl. The tighter the legs are to the surface of the bathtub, the better.
It is interesting that when choosing supports and fasteners for installing a steel wash basin, the weight of a person is not taken into account. The fact is that this indicator is so small compared to the weight of the water and the bowl itself that it can be neglected.
Installation
Conventionally, the installation process can be divided into several stages:
- Transporting the bath . After the place has been prepared, the bath itself needs to be moved into the room. This process is highlighted as a separate stage, because It has a pretty decent weight. It is recommended to carry it very carefully so as not to damage the doors, floor tiles and the product itself.
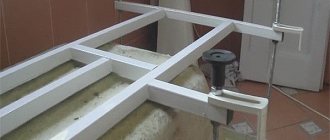
- Attaching the adjustment screws . Before installing the legs on the bathtub itself, it is recommended to first attach special adjusting screws with fixing nuts to them. They must be placed below the support. It is better to do this at this stage, because... attaching them while lying under the bathtub is quite problematic.
- Turning the bathtub.
Turning the bathtub over to attach the legsBasically, all cast iron bathtubs are installed on special legs, which are included in the kit. But first they need to be screwed. Solving the question of how to install legs on a cast iron bathtub is not particularly difficult. It is enough to turn the product on its side and carefully place it on the floor. In this position, screwing the legs to the bathtub is quite simple.
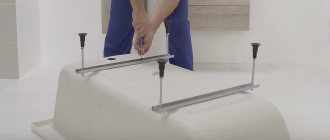
- Attaching legs to the bathtub. Now directly installing the legs on the bathtub.
The process of attaching legs to the bathtubTo begin with, two supports are firmly fixed. Here there are several options - mounting on wedges and on coupling bolts. In the first case, the installation process is carried out in several stages. The wedges are driven in with periodic tapping from the middle of the bath and then to its edges. In the second case, everything is even simpler. The manufacturer provides special lugs at the bottom of the bathtub, to which the legs are attached and secured with a bolt and nut. Sometimes you can see small deposits of metal on the supports in the seats. This is a manufacturing defect that can be easily corrected by processing with a grinding machine. The reliability and safety of fastening depends on the tightness of the connection between the surface of the product and the support.
Legs for bathtubThe wedge-shaped parts to be joined may move apart when the bolts are tightened. This leads to gaps at the support points, which is extremely undesirable. Therefore, if you decide to screw on the legs for a cast iron bathtub with your own hands, pay special attention to the strength of the connection.
- Turning the bath over to its original position . Next, the bathtub is turned over and placed on its legs. Because Since there are only two supports attached at the moment, some kind of support must be provided to ensure stability. Its length should be at least 60 cm. Moreover, if the installation is carried out by a person without work experience, then it is better to add something else for insurance.
- Alignment by level. The next step is to install the remaining two legs and level the surface of the bathtub along a horizontal level 50 cm long.
The bathtub needs to be leveledDue to the high rigidity of the cast iron bathtub, it is enough to manipulate from the end that is most noticeable due to its connection to the wall. The level is placed in the center of this side.
The manufacturer can equip the product with adjustable legs. In this case, the alignment process consists of screwing in and out the screws to the required length. At the end of the adjustment, the product must be exactly in place, the gap from the wall is allowed to be 1 mm. Then you just need to tighten the fixing nuts.
Adjustable legs for cast iron bathtub
A more difficult question is how to level a cast-iron bathtub with non-adjustable legs that are rigidly fixed to the bottom.
In this case, several methods are proposed - sawing or sharpening the legs, or placing special metal plates under them. The last method is easy to implement. However, the first two are more reliable and will not create additional inconvenience when cleaning under the bathroom.
You can file or sharpen the legs with a grinder, after first lifting the bathtub and placing it on a brick support. Then the level is checked and so on until the bathtub is perfectly positioned.
However, in some houses or apartments, the bathtub is installed on a floor with low or medium hardness, for example, wood. In this case, it may be pressed under the weight of the product. Therefore, the question arises of what to put under the legs of a cast iron bathtub.
Leveling a bathtub with non-adjustable legs
These can be metal inserts with a thickness of at least 5 mm and a diameter of about 50 mm. However, aluminum is not suitable in this case, because... it is quite soft.
After installing the bathtub, you need to waterproof it at the junction with the wall. If the tiles were laid completely over the entire wall, then you can put a plastic corner on an adhesive base, border tape, fillet or ceramic plinth. If the bathtub was installed against a concrete wall, then the tiles can be laid slightly overlapping on the side of the product.
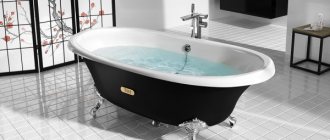
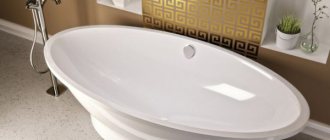
Features of steel baths
Bathtubs made of steel replaced heavy cast iron products, which were difficult to transport, bring into the apartment and install . Due to the fact that steel is a more malleable metal, the model and size range of washing containers made from this material is very diverse.
Steel bath
The features of steel bathtubs are:
- A light weight. A steel washing container weighs 4 times less than a cast iron model of the same size. The lightness of the product reduces the load on the legs and floor, making it much easier to install such a bathtub yourself.
- High resonating ability. Steel has a high resonating ability, which is why a lot of noise is created when water is drawn into the bath. To reduce noise, the bottom of the bowl is treated with polyurethane foam or other insulating material.
- Fast cooling. Steel has a higher heat transfer coefficient, which is why the water in it cools much faster than in cast iron. To eliminate this defect, treat the bottom of the bath with heat-insulating material or polyurethane foam.
Note! On the one hand, the light weight of a steel bathtub is an advantage, allowing the bowl to be mounted on universal supports. On the other hand, due to low weight as a result of poor installation, the wash container may wobble, slide or exhibit other signs of instability.
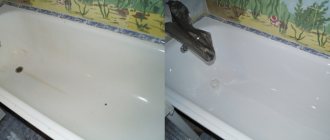
Connecting drain fittings
After completing the installation work, you need to connect the drain fittings. Experts recommend purchasing a siphon with a metal grid rather than a plastic one. This is due to the fact that the latter are softer and can bend when tightening the screw. As a result, the sealing ring will not be pressed sufficiently, and water will leak in this place.
The standard bathtub is equipped with a drain at the bottom and an overflow to protect against excessive water accumulation. First of all, the lower part of the siphon is secured using rubber gaskets for sealing. The product is fixed by screwing the screw into the nut at the inlet of the plastic pipe.
Bath drain connection
The same manipulations are carried out to connect the overflow.
Then the outlet of the drain fittings is inserted into the sewer system and fixed. It is recommended to lubricate all joints with silicone sealant.
Final diagnostics and testing
If all of the above installation and connection manipulations have been carried out, then before final fixation of the product it is recommended to carry out a small diagnostic. To begin with, stand in the bathtub and walk around it. If it wobbles, creaks, legs move apart, the floor is pressed, etc., then something was done incorrectly. The supports must be able to withstand the load of the bathtub and the person in it. Therefore, you need to double-check everything again and fix the legs more firmly.
Bathtub with legs
It is also mandatory to check the drain by collecting a small amount of liquid into the vessel. If nothing is leaking, the drain opens and water drains. There should be no drops or leaks at the joints. If such malfunctions are detected, you need to check the correct assembly of the siphon elements and additionally treat the joints with silicone sealant.
In principle, installing a cast iron bathtub does not require special knowledge, skills and abilities, the main thing is to follow the instructions exactly.
Cast iron clawfoot bathtub against the wall Leveling the floor before installing the bathtub Laying tiles before installing the bathtub Set of legs for cast iron bathtubs Turning the bathtub over to attach the legs The process of attaching the legs to the bathtub The bathtub must be leveled Adjustable legs for a cast iron bathtub Leveling a bathtub with non-adjustable legs Connecting the bathtub drain Bathtub with legs
Red clawfoot bathtub
Pink clawfoot bathtub in the bathroom interior
Bath siphon
Functions of the legs
Legs are metal supports that are used to install cast iron bathtubs on the bathroom floor. They usually come complete with a washing container and are made of the same material. The legs are assigned the following tasks:
- Support. The legs, with the help of which you install a cast-iron sanitary bowl with your own hands, carry and evenly distribute the weight of the product on the floor surface.
Bath legs - Decorative. Supports made in the form of lion's paws or stucco with heraldic motifs complement the appearance of the washing container, bringing the luxury of a classic style to the interior.
- Spacer. Temporary spacers help craftsmen level the bowl to make it more convenient to install it on a frame or brick podium.
Important! Currently, in construction stores you can often find multifunctional supports that combine decorative qualities, adjustable height and strength. They are called universal and are suitable for most models of old and new cast iron bathtubs. If the bowl was not supplied with factory legs, do-it-yourself installation can be done using them.