For the manufacture of shower trays, various materials are used, the properties of which determine the characteristics of the finished products. Today we want to talk about steel models, consider their advantages and disadvantages, and also pay attention to how to install a steel shower tray with your own hands.
Shower tray made of steel 80x80 cm.
Types of pallets
Products are semicircular, square, rectangular, triangular. You need to choose a shape based on the size and layout of the bathroom. The most convenient are angular, triangular models with high fencing.
By material
Most often, models are installed from the following materials.
Instagram @gaia_miacola_architetto
- Artificial stone and ceramics. Such structures can be quite heavy, but at the same time fragile. They are placed on the floor, leveling feet or a raised concrete platform.
- Acrylic. Acrylic models have thin walls, so during installation you will need to reinforce the bottom.
- Cast iron. These are durable massive bowls covered with enamel. Usually they are mounted directly on the floor, securing the legs or frame with concrete.
- Steel. Lightweight, durable, but noisy bowls. They also require a frame or foundation, since the bottom bends under the weight of a person.
Shower tray RAVAK Elipso PAN
By installation type
Installing a shower enclosure with a tray can be done in several ways. Depending on the chosen technology, several designs are distinguished.
Instagram @acasadiguido
- Recessed into the floor. This is how products with low sides are mounted. They are level with the tile or slightly above it.
- Built into the podium. The base is cast from concrete or laid out from brick. As a rule, structures with thin walls that need additional strengthening are built in this way. As well as monolithic structures that do not have a niche for a siphon.
- Floor-standing. Such models are installed on a solid frame or adjustable legs. In the first case, the surface should be well leveled, only small differences are allowed.
Shower tray Ifo SILVER
- Plumbing equipment
Installing a shower cabin with your own hands: detailed instructions in 6 steps
Foundation structures
At first glance, it seems that the cabins do not need a foundation. It is enough to adjust the legs to start using the product. But actually it is not. The factor of the installation height of the pallet comes into play. The drain hole must certainly be located above the sewer outlet. So that the drain leaves the pan safely.
The frame and foundation are not needed in most cases. But it should be noted that most products are specially designed so that replacement will be required over time. Of course, we want to avoid this for as long as possible. The design shows 100% exactly what bad things can happen.
Is it necessary or not?
As a rule, the need to build a foundation is determined instantly. To do this, just measure the level of the sewer pipe. The drain hole of the pan should be slightly higher. The greater the difference, the better the flow. Usually a slope of 3 centimeters per meter of distance (pipe path) is considered sufficient, but in practice there may be other ratios, and the water will still drain well.
Below the pan there is usually a place for placing a siphon, so no constructive solutions are provided for in the foundation for the drain. I would like to draw the attention of readers to the fact that in high (deep) pallets the drain is not located too high. Because most of the vertical is spent on the formation of walls. It’s not for nothing that this tray is called deep: you can wash clothes and wash children in it. There is often a seat in the corner.
Recessed cabin tray
In 90% of cases, a deep tray has a durable frame made of a metal profile. At first glance this is good, but in practice it turns out that the foot pushes the pallet between the guides. And since plastic becomes brittle over time, this is just enough for a crack to appear. That is why sometimes deep pallets are placed on the foundation. As for the small ones, this is prescribed to them from birth: the thin flat bottom breaks easily, as many owners have been convinced of. The effect does not appear at the very beginning, but greatly worsens over time.
Preparing for installation of shower trays
Regardless of the type and design features, you need to start by preparing the space for the cabin. We'll tell you how to do everything yourself.
Necessary materials
To work, you may need a screwdriver, saw, jigsaw, waterproofing, construction level, marker or pencil, drill, pliers, sealant, spatula or brush, glue, cement, sand or bricks.
Shower tray RAVAK Aneta PU
Preparing the floor and walls
- By the time the shower is installed, make the sewerage, wiring and water supply pipes. Subsequently, the defects will be difficult to correct.
- Check the quality of the wiring. It should have a minimum number of twists and be protected from moisture.
- Position the pipe as close to the drain hole as possible.
- Before starting installation, close all water supply and sewer outlets with plugs to prevent construction debris from getting into them.
- Mark the level at which the mixer will be located.
- Level the surface so that the differences are no more than 1-2 cm. Subsequently, you will only need a slight slope of the cabin towards the drain.
- Waterproof the area where you will place the pallet. Not only the floor, but also the walls are 20 cm above the level of the watering can. The easiest way to do this is with coating or impregnating mixtures.
Instagram @professionalnyiremont
Instagram @remont_vannoy_05ru
Instagram @tiler43
- Plumbing equipment
How to make a tile shower without a tray: detailed instructions
How to mount a pallet with your own hands
If you decide to make the bottom of the shower stall with your own hands, then select moisture-resistant brick as the base.
- Sewerage and water supply wiring is being installed.
- A waterproofing layer is laid.
- The installation site is treated with mastic and film.
- Brick sides are built using a moisture-resistant mortar. They should be higher in height than the overhang of the drain ladder. Its level determines the height of the homemade pallet. The vertical line of the sides corresponds to the walls of the cabin.
- The inside of the bottom is filled with a self-leveling concrete mixture. Its layer is 6-8 cm. This creates a slope towards the drain hole so that the water leaves.
- The dried structure is treated with primer and mastic.
- The last coating layer is a mixture of cement and ceramic tile adhesive.
- The dry structure is processed with sandpaper.
- A moisture-resistant material for cladding is selected. It is recommended to use mosaic. It will help hide the unevenness of the bottom.
If a structure of great height is erected, then steps for the cabin are built.
How to make a podium for a shower enclosure
Let us remind you that such a platform will be needed for products that do not have room for a siphon and for those that need additional reinforcement. For example, for thin-walled acrylic models. The structure must be installed after all communications have been installed and pipes have been connected.
Concrete
- Place the product in the installation location and outline it with dotted lines.
- Add 2-3 cm to the outlined lines.
- Remove the floor covering in the designated area and prime the screed underneath.
- Cover the surface with a layer of waterproofing: coating, impregnating or pasting.
- Build formwork of the desired shape and, if necessary, a frame made of reinforcement. Separate the drain area with drywall or boards.
- Prepare a solution of cement, sand and water at 30-40°C in a ratio of 1:3. You need the consistency of thick sour cream.
- Pour the mixture into the formwork, leaving space for the cabin and level the surface.
- Spray the prepared area every day if it hardens too quickly.
- Treat the surface again with waterproofing.
After three weeks or a little earlier, you can continue work. A step is sometimes added to high platforms with deep bowls. It is also made from concrete. The concrete formwork itself is finished with mosaics, tiles, waterproof plaster or painted with silicone paint.
Instagram @remontistroy.ru
Instagram @art__objects
Instagram @ivanmaslovspb
Instagram @nikolaileshcuk
Instagram @nikolaileshcuk
Instagram @konstantinseleverst
Brick
Brick, like concrete, is not afraid of moisture. It is durable and easy to install. Instead, you can use foam blocks and aerated concrete.
- Circle the location of the cabin with a pencil or marker, adding 2-3 cm.
- Dismantle the floor covering in this area, prime and waterproof it with any material.
- Make formwork of the required height from brick. Build steps if necessary.
- Seal off and close the drain to prevent fill from getting into it.
- Prepare cement-sand mortar in a ratio of 1:3 and fill the site.
- Flatten it and wait for it to dry. Afterwards, remove the drainage barrier.
- Waterproof the site.
Instagram @svet_a_r_t
The work process can be simplified by using only bricks or foam concrete blocks. They are laid out around the perimeter, as well as in the middle, so that the acrylic bottom stands on a support and does not sag. The blocks are fixed to the floor using tile adhesive.
Aquatek shower tray
- Plumbing equipment
How to make a shower tray with your own hands: materials, types, installation steps
Preparatory activities: what to consider
Even before purchasing a pallet, you should decide on its shape, material and installation location. And if form is a matter of taste, then other aspects should be approached with special attention. Having chosen the place where you plan to install a shower, check the following parameters:
- Communications supply. If we are talking about a hydromassage cabin, then in addition to water and sewerage, an electricity supply will be required. Select a separate electrical wiring line and do not forget to equip it with an RCD.
- Distance from risers. The dream of placing a shower in a remote corner of the apartment may be difficult to realize. The sewer system must have a sufficient slope for the unhindered outflow of water, and if it is long enough, the floor level will need to be raised.
- Correct angles. When planning to install a shower in the corner of the room, make sure that the walls are clearly perpendicular. If the corner is even the slightest bit sharp, the tray will not fit into the space provided for it. An obtuse angle is not so critical, but a deviation of more than 6 mm per meter is undesirable.
- Base. The smoother the floor, the easier it will be to position the pallet. This parameter is not critical, but if the floor has not yet been finished, it is better to correct the unevenness with a screed.
- Waterproofing. Particular care should be taken to waterproof the base when you plan to install a shower tray on a wooden floor. In this case, the wood is impregnated with antiseptic solutions, and a roll of waterproofing material is laid on top, extending onto the wall 20 cm high.
The further algorithm of actions will depend on the selected pallet material. Each of them requires its own approach, and deserves consideration in a separate section of the article.
Sequence of installation of different pallets
To do everything right, use the tips in this section. Some materials will quickly deteriorate if their characteristics are not taken into account. For example, this often happens with acrylic.
Acrylic
If the bottom of the product is not reinforced, it can be reinforced with foamed polystyrene. A sheet of material is laid on the foundation. Another option is a support frame made of steel strips welded together or connected with brackets.
- Place the tray on the floor and mark the drainage area with a pencil on the floor.
- Pour or glue the foundation.
- Remove the bowl and connect the siphon to the drain pipe. Its edge should not touch the floor.
- Fill the siphon with water to check for leaks. Seal any detected defects.
- Coat the junction of the sleeve and siphon pipe with epoxy sealant. If they have paronite or polymer gaskets, no sealant is needed.
- Apply glue to the foundation and carefully glue the tray onto it.
- If the kit includes legs, attach them to the pallet at the same level. Make sure that their length is not less than the length of the siphon.
- Install the product on a foundation, podium or legs.
- Use a level to check the evenness of the tray.
- Degrease and seal the joints with the wall with silicone sealant.
You can use the shower after ten hours - after the sealant and glue have dried. Watch a video on how to install a shower tray yourself. It clearly outlines similar instructions.
Cast iron
Foundations for cast iron bowls are almost never made. An exception is cases when the distance from the bottom to the floor is less than the height of the siphon. To raise the tray, it is enough to lay bricks or foam blocks around the perimeter. In this case, ordinary masonry mortar is used. In other cases, the structure is installed directly on the floor, on legs that are already attached to the bowl.
- Using a level, determine differences and, where necessary, place steel plates or other objects under the legs.
- Connect the siphon and coat the joints with epoxy glue.
- A little later, add water and check for leaks. If there are, eliminate them.
- Fix the legs with cement mortar diluted in a ratio of 1:3. Formwork can be made from matchboxes.
Instagram @lm.plumbing.services
The cast iron pallet is not glued to the wall. You can use the cabin after ten hours - when the epoxy sealant has dried.
Shower tray RAVAK Perseus Pro
Steel
You can also strengthen the bottom of a steel tray with a sheet of expanded polystyrene foam on a podium or with a homemade frame. Typically, a steel stand does not come with legs.
- Make a frame: concrete or brick foundation.
- If the podium was filled with a cement-sand mixture, wait until it dries and waterproof it.
- Attach the siphon and check the functionality of the drain. Fix leaks if any.
- Install the tray and level it using a level.
- Attach it to the foundation with mortar or glue.
- Degrease and seal all joints with epoxy sealant.
The video contains visual instructions.
Advantages and disadvantages
Steel products have many advantages:
- Firstly, they are significantly stronger than acrylic and plastic models. So if in your family there are people weighing well over 100 kg, then you will not find an alternative. A shower cabin 800x800x1975 mm with a steel tray is the minimum you need!
- Secondly, most of the models are installed in almost an hour and a half. It goes without saying that from time to time difficulties arise at the stage of leveling the base, but if you purchase a structure with legs, you can adjust its position by rotating several screws.
- Thirdly, the trays can be used both as an independent plumbing fixture and as part of a shower stall. The second option, of course, is preferable from the point of view of comfort, but if you need to equip a shower with minimal money, then just a tray with plastic curtains around the perimeter will be enough.
As for the disadvantages, they are as follows:
- Tendency to corrosion when the enamel or passivation layer of dark steel is damaged.
- Limited number of design solutions.
- High volume of sound when a jet of water falls.
But we can compensate for the last minus by applying a layer of polyurethane foam to the underside of the pallet before installation. The remaining shortcomings can be fully tolerated by properly using the structure and avoiding damage to the anti-corrosion layer.
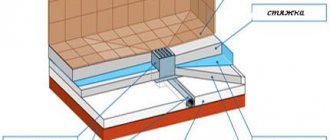
Installation of ceramic and cast stone pallets
The second most common choice after acrylic in factory-made shower cabins is occupied by ceramic and cast stone (marble) trays. They are massive and strong enough to be used without reinforcement, legs, etc.
If they have cavities for installing a siphon and a drain pipe, then you can simply lay them on the floor of the bathroom and mount the walls of the shower stall on them.
Waterproofing the floor under the shower tray
But more often these products are solid, without internal cavities, only with a drain hole. Then to ensure drainage they have to be placed on a pedestal. The most common procedure for constructing a pedestal is as follows:
Example of a brick foundation for a ceramic tray
The ceramic tray looks fragile, but can last for many decades. Here is a foundation option for this case. We proceed from the fact that the frame for this type of pallet is made only around the perimeter, which gives very broad prospects in terms of control.
- You need to lay the bricks to the required height along two walls and one sidewall.
- The front part is used to access the siphon and control leaks. You can cover it with a decorative panel.
In case of big worries, place the pallet on two rows of bricks, in one of which there is a hole for control access and dismantling (if such a need arises). It is not necessary to mount it tightly, no one does that. Instead, a plumbing corner is placed on three sides between the tile and the tray, mounted with silicone sealant. If you want to hang the curtain from the sides, leave small protrusions along the width of the brick row. Place a board there and raise the threshold to the desired height.
This is sometimes necessary in cases where the corner is homemade and curtained. Then there is a certain reserve for moving matter so that it does not crawl out and water does not flow onto the floor. There are some other options.
A frame made of a metal tube is often placed under a purchased ceramic tray. It only covers the perimeter. For this type of structure, this is a completely suitable solution, as long as the weight of the entire cabin does not press on top. For example, Leroy Merlin reports that the pallet weighs only 3 kg. The frame is good if the cabin weighs a little. For obvious reasons, the threshold in this case is much more difficult to organize.
Option #3 - making your own pallet
An inexpensive shower tray for your home or bathhouse is suitable for those who want to save money or people who prefer original designs. Self-installation of a shower tray gives you the opportunity to choose any design shape, color and cladding material.
The base is prepared from concrete screed (or plastered bricks) lined with ceramic tiles. As the walls of the shower stall, special translucent panels are used, which can be bought ready-made, or ordinary shower curtains.
- You need to start by laying the drain pipe and installing the drain neck. It is better to take plastic products: they are easy to install and last a long time.
Important! Water drains naturally, so a slight tilt towards the sewer pipe is necessary.
- Initial concrete floor screed. You can use two options: fill the entire area of the shower room or only the area under the planned tray.
Installation of enclosing sides. They are necessary to prevent water from spreading throughout the room.
The sides can be either concrete poured with formwork, or brickwork, plastered several times. In any case, the resulting structure will need to be faced with ceramic tiles
- Concrete screed inside the pallet.
The bathroom is a place of relaxation, where a person puts himself in order. It should be practical and have a pleasant aesthetic design. A shower cabin is an ideal way to save space in the bathroom. A very important point in installation is the installation of the shower tray. Let's look at detailed instructions on how to properly install different models.
Manufacturers are ready to surprise the most sophisticated owner, offering many shapes, sizes and design options. One of the first classifications is the division of models by shape. These can be square, oval, round, triangular, rectangular products. It is worth choosing the shape and size of the tray that will distribute the space in the bathroom as ergonomically as possible with the appropriate level of convenience.
Another classification is related to the material used. Today you can purchase a pallet from:
- cast iron;
- acrylic;
- marble;
- ceramics;
- become.
In this case, the tray can be installed using several methods, using a metal frame, a pedestal or a flat surface (for ceramic models). It is worth noting that marble products are very fragile and can be damaged by impact during the installation stage, so all work must be carried out as carefully as possible. A ceramic tray can also crack from an impact.
Marble pallets have a beautiful appearance and will fit into any style of bathroom interior: from retro and classic to high-tech
It is worth noting that cast iron and steel models can be unpleasantly cold in the morning, which cannot be said about acrylic products. The latter are today modified with the addition of quartz dust. As a result, the structure becomes stronger and more durable. Such models are called quaril models.
Marble pallets have an impressive appearance and heat up quickly. They provide a pleasant tactile sensation upon contact with the skin. Ceramic models heat up slowly, but are practical for everyday use and durable. The prices for these solutions are significantly higher than others.
Pallets also differ in depth. When choosing, you can use the following guidelines: very flat (6-10 cm), flat (10-18 cm), deep (25-35 cm).
What materials are shower trays made from?
Manufacturers of sanitary products make pallets from the following materials:
Ceramics
Steel.
The most popular are acrylic shower trays. The durable color and shine of acrylic are attractive, as well as the surface quality, resistance to UV radiation and good noise-absorbing properties. The acrylic tray is mounted on a metal frame, which is supplied together in the kit.
Ceramic trays are the most durable. Shower trays do not make noise under an elastic stream of water and the surface is not slippery.
Compared to other types of pallets, steel pallets are considered lighter in weight. Therefore, installation must be done on a metal frame.