When finishing bathrooms and toilets, part of the space is occupied by a load-bearing sheathing, to which each strip of material is attached. This problem can only be solved using frameless fastening technology. We will look further into how to glue PVC panels in the bathroom correctly and reliably.
Calculation of material quantity
Self-calculation of PVC panels is not difficult. It is enough to correctly calculate the area of all walls or ceiling surfaces, and then subtract the area of doors and windows.
The result obtained is divided by the area of one finishing element, after which a margin of 10-15% is added, which is necessary for the installation of overlaps and cuts.
The calculation is carried out according to the formula: S cladding / l panels * h panels
It is also very important to correctly calculate the number of mounting profiles that will be used to install PVC panels:
- profile “internal corners” - measuring the height of internal corners in a room;
- profile “external corners” - measuring the height of external corners, the perimeter of window and door openings;
- molding “universal purpose corners” - the sum of the lengths of all external and internal corners;
- “ceiling plinth” profile - measuring the ceiling perimeter;
- “starting” profile - the sum of the height of the corners to begin installation and the length of all joints.
At the final stage, the total number of fasteners that will need to be used during the cladding process is calculated. The use of a pair of dowel-nails is necessary when installing one meter of mounting rail on brick or reinforced concrete bases. The consumption of nails and screws is one piece per 30 cm, and staples or clamps are one piece per 40 cm.
Installing a lathing frame around the perimeter involves adding a pair of slats to each wall, and the dimensions of such elements should be equal to the height of the wall when installing finishing panels horizontally, and the length of the wall when installing vertical cladding.
Marking
The sheathing must be attached strictly level, which will prevent distortions of the cladding. In order not to measure each batten, markings should be made on the surface prepared for the sheathing:
- the lowest row of sheathing is located a couple of centimeters above the floor level, and the starting point is marked here;
- from the marked point, using a building level, draw a horizontal line along the entire perimeter;
- in a similar way, a line is drawn in the under-ceiling space, along the edge of the cladding;
- a starting beacon is installed at a distance of half a meter from the bottom marked line, and all subsequent marking elements are placed with the same interval up to the top;
- in accordance with the displayed beacons, strictly parallel lines are drawn along the entire perimeter.
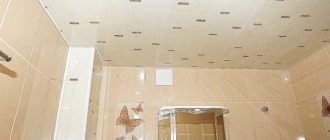
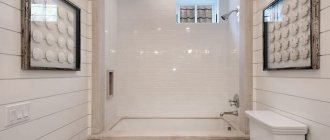
Bathroom interior with PVC finishing
The panels are fixed to the sheathing in a perpendicular direction, so the horizontal frame is sheathed vertically, and the vertical frame, on the contrary, horizontally.
Marking for vertical sheathing involves drawing the first starting line directly in the corner, in the direction from floor to ceiling, using a plumb line, with subsequent lines marked at a distance of half a meter from each other.
Surface cleaning
Installing plastic or PVC panels using liquid nails allows you to avoid such difficulties as installing a lathing frame and greatly reducing the usable area of the room.
However, in this case, it will be necessary to devote time to better preparing the surface for cladding, including thorough cleaning, putty and primer.
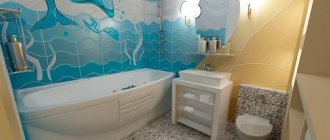
Preparing the wall in the bathroom
During the cleaning process, you need to remove all old finishing materials, clean the surface from rust, mold and mildew.
After the surface is completely cleaned, it is recommended to treat it with special antiseptic compounds, which is especially important in a room with high humidity levels.
Recommendations for adhesive fastening
Gluing the panels is quite simple if you follow some tips and choose the right products. The glue that is used is the one applied with a special heat gun; for example, so-called “liquid nails” interact well with PVC surfaces.
The decorative coating is also perfectly attached using Moment-Montazh or Titan adhesives. In addition, polyurethane sealant has good adhesive properties, which does not expand during use.
When choosing an adhesive, you should consider the following qualities:
- After drying it should become transparent.
- The quality of surface bonding must be high.
- The glue must be resistant to cold, humidity, alkalis, temperature changes and exposure to sunlight.
- It must have the property of durability.
- It should set in a short time.
- It must be environmentally friendly.
- The glue should not have a strong, unpleasant odor; Formulations with increased toxicity should be avoided.
Kleiberit products
Among the good proven products is “Kleiberit 636”, it is safe for health, resistant to water, applied on one side, and dries quickly.
“Moment Crystal” is also excellent for decorative coating. It perfectly withstands low temperatures, water, has the property of transparency and quickly glues surfaces.
Procedure for gluing panels:
- Clean the walls of old wallpaper and paint.
- Level the surface.
- Degrease the entire surface of the wall to which the panels will be attached.
- Degrease the inside of the PVC product.
To attach the PVC panel to the wall, glue is applied pointwise
There are products that are not recommended to be used; It’s better to do a test first and see how the glue behaves.
In particular, you should not use the “Moment”, which can lead to swelling of the surface or delamination of the panel.
Today you can find on sale a special glue designed specifically for plastic panels; it is best to use it. It is quite economical in cost and consumption. The glue is not applied to the entire surface of the panel, but only at 5 points - in the center and in the corners. This will be enough to keep the panel firmly on the wall.
Putty and primer
The bathroom is a specific room, so it is necessary to use special construction and finishing materials that increase adhesive characteristics and serve as additional protection against high humidity.
Applying the finishing coat of putty in the bathroom
The primer and putty must be:
- antifungal;
- moisture resistant;
- moisture-proof;
- moisture-repellent;
- deep penetration;
- strengthening the surface;
- increasing adhesion to other materials.
Primer of walls
Before applying putty and primer compounds, you should make sure that all dust and dirt are removed from the surface, and that high-quality degreasing is carried out.
It is important to note that a deep penetration primer solution is first applied, after which has dried, the surface is puttyed or leveled, and then the re-priming process is carried out.
How to choose glue for work?
There are a huge number of offers on the market from a variety of manufacturers. Adhesive compositions vary in properties, characteristics and price. When choosing which glue to use to glue PVC in the bathroom, consider three main criteria for a good adhesive composition:
- Transparent after drying.
- Neutrality to chemicals, resistance to temperature changes.
- Fast setting and long lasting action.
Important! Experts do not recommend using universal adhesives. It is advisable to find an adhesive that is used for a specific material.
So, what glue should I use to glue PVC panels in the bathroom? Let's look at the most common types of adhesives:
- “Kleiberit 363.” Glue for plastic. It perfectly fixes the panels, is moisture resistant, and hardens very quickly.
- “Moment Crystal”. Compared to Kleiberit, it is more expensive. But with its help you can fix PVC panels to any type of surface. Another advantage is transparency.
- “Emphikol 34012.” This is a highly specialized product designed exclusively for working with PVC. Its advantages: strength, viscosity, colorlessness.
- "Liquid Nails". A unique product that glues even materials that are poorly compatible with each other.
Important! The high cost of glue is far from a guarantee of high quality installation. It is much wiser to carefully study the labeling and all the information associated with it - the material for which the composition is intended, the smell, the degree of resistance to moisture, the hardening time, the presence of antibacterial additives.
Adhesive for PVC panels in the bathroom
Most often, the installation of plastic finishing panels in the bathroom is carried out using the “liquid nails” composition, which allows you to save the usable area of the room.
This installation method has many advantages:
- no damage to the plastic;
- no corrosive changes;
- quick drying with the ability to easily adjust the position on the surface within a few minutes;
- resistance of the adhesive to high humidity and frequent temperature changes.
However, a feature of the neopropylene composition is chemical aggressiveness, so all work must be carried out using a respirator and protective gloves, and at the final stage the room must be well ventilated.
Currently, neopropylene and acrylic “liquid nails” are used, but the second option is safer and more environmentally friendly, and therefore is often recommended by experts for use in residential premises.
Don't plan to spend a lot on decorating your bathroom, but want it to look neat? Moisture-resistant wall panels for the bathroom are a cheap material that will allow you to create an interesting decor.
Types of PVC panels for the bathroom and their properties are described here.
Read all about the pros and cons of finishing a bathroom with wall panels in the following article.
Types of glue watery nails
You can install PVC panels using “liquid nails” glue.
- The product Watery Nails 601 can glue a huge amount of c. Designed for indoor work. You can adjust the glued ones within 10 minutes.
- Liquid nails 901 can be called universal.
Designed for gluing strong heavy structures. Work with them can be carried out both inside and outside. Not afraid of water, strength does not depend on weather conditions. It also has a drying time of up to 10 minutes, which is enough to correct incorrectly glued surfaces. - Liquid nails 915 are intended for work in conditions of high humidity - in bathrooms, showers. It can be used to glue plastic wall panels, as it is intended for interior work. Thanks to it, a waterproof and strong connection is created.
Applying glue
In this section we will look at how to glue PVC panels onto liquid nails. Before starting cladding work, it is necessary to remove the PVC panels from the packaging so that the material gets used to humidity and temperature. “Liquid nails” are applied to the wall surface in dots, in a grid or in zigzags.
Material consumption per wall
The plastic PVC panel is pressed against the wall surface and rolled with a rubber roller. During the first three minutes, you can quite easily adjust the location of the facing element, and the time for complete drying of the glue is about a day.
After installing the last facing element, all seams formed between the ceiling and the wall, as well as other surfaces, must be sealed with conventional silicone sealant.
How to glue plastic panels to the wall
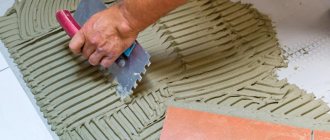
The process of gluing PVC boards is quite simple and can be done independently. Preparatory work and the quality of the glue play a big role here. This is what will ensure that the finish is firmly attached.
First, you should thoroughly clean the walls of dirt, paint, and the like. The surface should be as smooth as possible, since small pits and scratches can significantly reduce the bond strength. If there are defects on the wall, then they must be thoroughly puttied. At the end of the work, it is necessary to coat the surface with a primer and allow the wall to dry.
Before starting work, PVC panels must be cut from the front side so that everything turns out neatly. Fastening is done from a corner or door. The glue itself is applied in dots or dotted lines. If liquid nails are used, then it is better to apply a mesh to the inner surface of the slab. After this, the plate is pressed firmly against the wall; during operation, the panel should not bend too much.
If there are any joints after gluing, it is better to treat them with silicone sealant. Only after finishing the work can the protective film be removed from the material. To make the room look good, you can install ceiling and floor skirting boards.
Carefully and tightly glued PVC panels will decorate the bathroom for many years and protect the walls from excess moisture.
Fastening panels
So, let's look at how to glue plastic panels in the bathroom. As a rule, finishing a bathroom with plastic PVC panels is carried out in the following way:
- The ceiling cladding is made using galvanized CD profiles and direct hangers. This type of lathing well compensates for surface irregularities that are traditional for buildings with slab floors, and also allows for hidden wiring of the lighting system to be placed.
- wall cladding is made using plastic sheathing and fixed with clamps. It is not advisable to use a wooden version of the lathing in the bathroom, since wood can quickly deform under the influence of temperature fluctuations and high humidity.
Lathing under the panels
One should take into account the fact that fixing plastic finishing panels using adhesives can negatively affect the repairability of the finish.
Ceiling plinths based on modern foam plastics are perfectly installed even in the presence of curved surfaces, and the resulting cracks can be easily eliminated with ordinary putty.
Not so long ago, bathroom panels gained popularity in our country. All thanks to the low price and good decorative capabilities. Bathroom panels for tiles - you can see photos of the finish in our selection.
Why you need a safety valve for a water heater, we will tell you in this material.
Subtleties and nuances of laying the coating
Thanks to the ideal geometry of the created cladding, installation of PVC tiles is quite simple. Even a novice master can cope with laying finished squares. And this process can hardly be called styling. After all, PVC tiles are glued rather than laid.
Selecting the necessary tools
In addition to purchasing the tile itself, you need to purchase a deep-action primer to improve adhesion and mounting adhesive on which you will “plant” the coating.
The tools you need to prepare to perform the work are:
- level;
- perforator;
- scissors or construction knife;
- container for mixing glue;
- notched spatula or brush;
- rubber roller;
- a simple pencil;
- roulette.
If you purchased not a self-adhesive tile, but one equipped with a tongue-and-groove system, you must also prepare materials for the sheathing: a metal profile with dowels or wooden slats with self-tapping screws.
To create the sheathing, it is most convenient to use a metal guide profile or thin wooden slats
But since the lathing will be installed in a room with high humidity, if you plan to use wooden slats, they must first be treated with moisture-repellent impregnation.
It will protect the wood from moisture penetration and will prevent the formation of mold and fungi on its surface. If the base is significantly curvature, it should be leveled by applying a continuous layer of plaster.
Preparing the base for installation
It is impossible to achieve a presentable, flat surface of glued tiles without first preparing the base. The preparation of the base base includes operations such as removing old flaking coating and cleaning from dust and dirt.
If there are significant protrusions on the wall, they must be removed using a chisel or hammer drill, and large recesses should be covered with fresh plaster mortar
The cleaned and leveled base is coated with two layers of deep action primer. In this case, the second layer is applied only after the first has completely dried. The primer composition will provide high strength to the glued units.
To create the sheathing, the slats are placed around the perimeter of the room, maintaining a step of 40 cm. Before fixing the sheathing, it must be aligned with the vertical and horizontal planes, guided by the building level.
A frame of metal profiles is created using the same technology: UD profiles are fixed around the perimeter of the working surface, and CD profiles are placed across
The guide profiles are fixed to the wall using dowels.
To get the desired pattern from the tiles and avoid mistakes when laying them, you must first mark the work area using a level and tape measure.
Laying work begins only after the second layer of primer has completely dried. While the solution dries, the tiles are brought into the room and left so that the temperature of the material becomes equal to room temperature.
Sequence of laying lamellas
One of the conditions for installing PVC tiles is compliance with the temperature regime. The minimum permissible threshold is +18°C. The tiles are laid starting from the center of the wall and gradually moving towards the corners, forming row after row. Patterned tiles are laid from left to right, and similar products are laid in any direction.
To mark the starting point for the installation, use a tape measure and a simple pencil to mark the center of the wall with two perpendicular lines. The point where the contours intersect will act as a guideline for where to start laying. If necessary, minimize the cutting of tiles at the corners, the center can be shifted slightly.
When installing slabs on the sheathing, they should not be placed close to the floor and ceiling. There should be ventilation gaps in the finished structure, which can easily be masked with decorative skirting boards.
Due to the wide variety of shapes and color options when laying tiles, you can experiment by creating an original pattern or creating something like a mosaic
To glue self-adhesive tiles to the wall, remove the protective paper from the back of the product, and then apply the sticky side to the surface.
Using a coating on which glue must be applied independently, the work is performed in the following sequence:
- The element is turned over with the wrong side facing you.
- Apply a thin layer of glue to the back side using a notched trowel or wide brush.
- The element with an even layer of glue applied to it is applied to the wall.
Installation of slabs equipped with a tongue-and-groove system is carried out by fixing them to the frame using self-tapping screws. Having installed the first tile, “wind up” the second element and snap the lock into place.
After gluing each panel, it is necessary to expel the air from under it. This can be done using a rubber roller, rolling it over the cladding with a little force. Excess glue released when pressing with a roller on the outer coating must be carefully removed with a stationery knife. Do not wipe off the remaining glue with a napkin - this can only worsen the situation.
It is necessary to expel the air after gluing each tile, otherwise it will not stick well and the coating will soon come off.
When laying tiles, it is important to ensure that the side edges of adjacent elements fit snugly against each other. Ideally, after completion of the work, there should be no visible seams at the joints.
Compliance with this condition is important not only from an aesthetic point of view, but also from a practical point of view. The seams between the joints of the cladding of a room characterized by high humidity can act as potential sources of moisture penetration under the cladding. And this is fraught with the spread of fungi and the appearance of an unpleasant “damp” smell.
If trimming of tiles is necessary, it is carried out at the installation site using scissors or a construction knife. To soften too thick a coating and thereby make cutting easier, use a hair dryer.
Video installation guide:
On average, it takes up to three days for the adhesive to set. After this period, all that remains is to wipe the surface with a cloth soaked in soapy water, rinse with clean water and wipe dry.
Basic installation errors
Despite the simplicity and convenience of installing plastic panels, some installation errors can make the finish short-lived and unattractive:
- bending finishing elements;
- removing the protective film before installation;
- cutting panels with the wrong tool or cutting from the wrong side;
- use of organic solvents or aggressive chemicals for care.
PVC panels are a practical and convenient finishing material, but non-compliance with installation technology becomes the main reason for obtaining a result that differs significantly from the desired one.
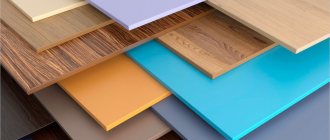
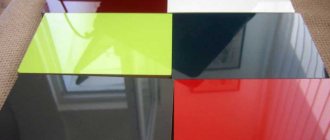
Types of panels for home decoration
Modern hardware stores offer a wide range of PVC panels. Each type of material has its own external and qualitative characteristics. They are distinguished according to two main criteria:
- material. For the manufacture of wall panels, not only PVC is used, but also MDF and wood. However, for the bathroom it is preferable to glue PVC panels, since they do not swell when exposed to moisture and are easy to clean;
- view. There are sheet, tile and slatted materials. Tiled and slatted options are lightweight and easy to install on a ceiling or wall due to their small size. But sheet panels are used only for gluing walls, since one sheet can cover a large piece of area. On the one hand they resemble plywood, and on the other they imitate wood or tiles.
The correct choice of material is an important stage during repairs. It needs to be not only beautiful, but also of high quality and practical.