Until recently, the construction market could offer a rather limited range of materials that could be used to decorate the joint between the bathtub and the tiles. The standard option was to seal this space with cement mortar. Enamel paint was usually applied on top. This method has become very popular among the population. However, in order to preserve this finish, one condition had to be met - the absence of movement of the bathtub. You can figure out how to seal the joint between the bathtub and the tiles by considering various methods.
Thanks to the rapid development of chemical production, today it is possible to find more suitable materials that will reliably protect the joint between the bathtub and the tiles. The manufacturing process of such products is carried out in accordance with modern production technologies. This allows you to seal the joint more efficiently.
Joint design options
In the process of equipping a bathroom, it is necessary to perform a number of sequential actions. Due to this, water will not get into the joint. Many experienced specialists offer many options for solving this problem in accordance with a specific situation.
You can completely prevent water from getting into the joint by installing a bathtub with one side walled directly into the wall. After sealing the bathtub into the wall, it is necessary to treat the joint with a special grout. The main advantage of this solution is the complete exclusion of moisture from entering the joint.
The bathtub is not always stationary. Therefore, the masonry at the junction may be damaged. Due to any unforeseen situation, tile repair may be necessary. It will need to be removed and reinstalled. It is not always possible to select tiles from a similar collection so that they look organic. For this reason, replacing tiles is often a rather painstaking and time-consuming task.
It is better not to mount the bathtub into the wall. To seal the joint between the bathtub and the tiles, you should use modern materials specially designed for this task. There are several popular options:
- tile grout;
- cement mortar;
- finishing the joint with foam;
- sealant;
- installation of curbs.
Each of these methods has its own advantages and disadvantages. They can be mutually exclusive with a certain combination of methods. If we consider the process of finishing the joint between in more detail, we can understand this situation better.
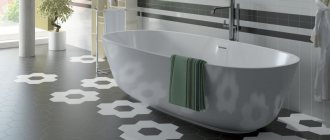
Bathtubs made of acrylic are lightweight, so disruption of the junction of the bathtub and tiles as a result of displacement of the structure is unlikely. The back walls of bathtubs are usually made flat, so there is no need to cut a groove in the wall for them.
To ensure high-quality sealing of the seams between the acrylic bathtub and the wall, it should be securely fixed at the installation site. To do this, the bathtub is glued to the floor with sealant.
Preventing Gaps: Recessing the Bathtub into the Tile
When installing plumbing equipment, gaps form between the surfaces of the product and the walls. The size of the gap increases if the geometry of the room is broken (for example, the right angle between the partitions is not maintained) or if the tiles are laid in poor quality. The gap is partially reduced by adjusting the legs and changing the angle of the bathtub towards the wall. There are several methods to completely remove the gap.
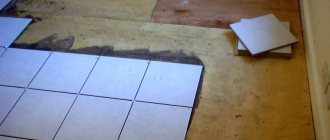
To eliminate the gap, the bathtub is installed flush against the wall and the tiles are laid with emphasis on the side. The technology is used when carrying out major renovations indoors. It is difficult to install a container in a room with smooth walls using this method.
In this case, the craftsman needs to cut slots in the finishing material glued to the walls and insert the sides of the bathtub into the grooves. It should be remembered that a rotating abrasive disc destroys the top decorative layer of the tile and breaks the integrity of the masonry.
Advantages and disadvantages of the method
Advantages of the technology:
- saving space in the room;
- reduction in air humidity levels;
- reducing the risk of water soaking concrete walls and flooring under the bathroom;
- recesses cut into the walls allow the installation of an extended tank;
- reducing the risk of mold and fungi that release toxic substances into the air;
- increased joint tightness.
Preventing gaps reduces the risk of water soaking the walls.
Negative aspects of the technique:
- not applicable for acrylic bathtubs;
- there is a risk of through faults appearing in a thin partition;
- To remove the container, it is necessary to destroy the tile layer.
Required materials and tools
To carry out installation work in the bathroom you will need:
- angle grinder or tile cutting tool;
- building level;
- silicone based sealant;
- solution container;
- auxiliary profile or wooden block;
- hammer drill
To carry out installation work, you need a tile cutting tool.
Step-by-step instruction
Installation algorithm:
- Attach a horizontal support block to the wall at a height corresponding to the side of the bathtub.
- Mix the solution and lay a row of tiles on the front partition of the room.
- Wait until the adhesive mixture hardens, and then remove the thrust profile.
- Install the bathtub into the resulting niche and adjust the position with screw elements on the supports.
- Lay the tiles on the side walls, using the side of the container as a base stop, and use plastic wedges to adjust the gap.
- After the cement mixture has hardened, fill the gap with a waterproof sealant.
If the bathtub is installed in an already renovated room, then horizontal lines are marked on the front and side walls, and then a groove is cut with an abrasive tool. The width of the groove corresponds to the thickness of the bathtub flange with a margin necessary for installation and subsequent adjustment of the bathtub. It should be taken into account that the length of the container is limited by the distance between the finished walls. It is not always possible to fit the bathtub into grooves on 3 sides.
The gap between the bathtub and the walls is filled with waterproof sealant.
The resulting cracks are sealed with cement or sealant or covered with tiles, borders or mosaics.
Methods for sealing the seam between a bathtub and tiles
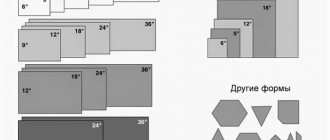
- Gap sizes: small - up to 1 cm, medium - from 1 to 3 cm and large - over 3 cm;
- Bathtub materials: metal, cast iron or acrylic. Depending on changes in temperature and load, they may be subject to deformation in different ways;
- Requirements for the final appearance.
Methods for sealing the joint between the bathtub and the tiles:
- Using grout. This is one of the most common methods for small seam sizes. The prepared mixture is carefully applied to the joint and leveled with a spatula. The most commonly used color is white, but you can also match the color of the seams between the tiles. To be on the safe side and prevent rust or mold from appearing in the seam area, the joint should be treated with a fugue gloss.
- Using cement mortar. This method is more often used in cases with large gaps. To prevent cement from falling through the slot onto the floor during work, you can make formwork from the bottom of the bathtub on the desired side - lay a horizontal board that will support the mortar. In turn, until the cement dries completely, the board can be supported with improvised vertical piles from below. After the work, the concrete must dry, and then apply the border tape.
Advice! This method allows you to make a joint at an angle to allow water to drain.
- Using polyurethane foam. For such work, only waterproof polyurethane foam is applicable. Before starting work, be sure to clean the edges and treat them with a degreaser. The can must be shaken before applying foam. This sealant must be applied carefully, as it is quite difficult to remove. Then, when the foam dries, cut it evenly using a stationery knife. The sealed seam on top can be decorated with a border or tiles.
- Using silicone sealant. The method is used for small gaps. To prevent mold from appearing in the seam area over time, it is better to use sanitary sealant. Silicone should be applied to the cleaned, grease-free surfaces of the edges of the bathtub and tiles, and use a spatula to shape the seam into the correct shape. Allow the sealant to dry, then remove the residue with a damp cotton cloth.
Important! During drying, the sealant releases harmful substances, so after repair work, the room must be ventilated.
- Using tape with sealant. A tape made of semi-plastic or semi-rubber perfectly performs a sealing and decorative function. They glue it with silicone. When the joint is treated with silicone and is ready for gluing, the protective film should be removed from the tape and heated slightly with a hairdryer. Then, focusing on the fold line, you need to attach it to the seam and press firmly.
- Using a curb. The border can be plastic or ceramic. The first is cut with a knife, the second with a grinder. The plastic border is fixed with glue, is inexpensive and quite convenient to use. The main thing is to take correct measurements and do the work carefully. To prevent glue from sticking out at the edges of the border, before starting work you can cover the borders with construction tape, which will be easy to remove. When fixing a ceramic border, you need to use special adhesive mixtures or cement mortar.
- Combined method. Here you can use foam, sealant and tape at the same time. After the foam has dried and been cut, its rough surface can be treated with a sealant, onto which tape is glued for decoration.
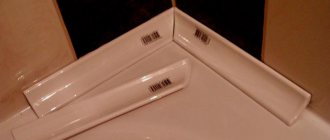
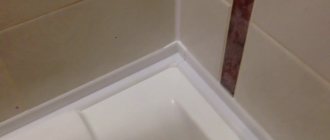
Flexible self-adhesive border
Self-adhesive borders are purchased in rolls, and the package often includes a plastic spatula.
The tape already contains a sealant, so this border is highly moisture resistant, but at the same time looks very aesthetically pleasing. Before gluing the border, the surfaces are thoroughly cleaned and dried.
The protective film is removed from the tape, after which the border is pressed against the joint with the adhesive side.
To form an angle, use a plastic spatula.
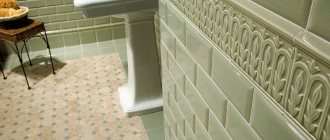
Ceramic tiles or ceramic border
With this method, the joint between the bathtub and the tiles can be sealed with the tiles themselves, including border tiles. As a result, you will get a monolithic connection, which is unlikely to please you much if you plan to change the bathtub in the near future.
Ceramic baseboards usually fit quite well into the bathroom, complementing its interior. Modern manufacturers allow you to match it to the tile or bathtub. The border is glued according to the same principle as the plastic one, but you will have to cut it with a grinder.
After completing the work, it is recommended to go over the joints with grout.
Plastic border
A plastic border is convenient because it has a relatively low price, but at the same time provides an aesthetic appearance. It is attached with glue, and at the final stage the corners are installed. The complexity of the process lies only in the measurements. To avoid staining the surfaces of the bathtub and tiles with glue, apply protective tape.
Ceramic baseboards and tiles
When decorating bathroom walls with ceramic tiles, the corner between the wall and the bathroom can be closed using a standard baseboard purchased with the main coating material.
An excellent method for cases when renovations are carried out with a bathroom installed - no special calculations are needed, you just need to try on the bottom row of tiles and cut them to the required distance.
The method is almost similar to the previous one, when the space between the wall and the bathtub is covered with tiles cut to size. However, the side of the bathroom should be quite wide, otherwise chips will appear on the tiles.
But there are also disadvantages - the finish deteriorates when the bathroom is subsequently replaced. However, the use of ceramics provides another important advantage - it is laid with mineral glue, and jointing is done with mineral grout. In such conditions, the fungus starts very rarely.
There is also a method when the bathtub is “embedded” into the tiled covering. But this requires preliminary fitting and special accuracy. Markings are made on the wall of the upper and lower edges of the side with the bathtub installed.
The plumbing fixture is then removed from the room, and the cladding is carried out below and above the marked lines. After installation, the joint is sealed with regular tile grout.
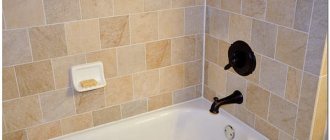
Tile grout
Connecting the bathtub close to the wall allows you to seal the joint with minimal effort and expense. Having ensured high-quality fixation of the bathtub, it is enough to seal the gap with white grout, or one that matches the shade of the tile. Long-term color retention and moisture resistance are the key advantages of the method. Additional treatment in the form of a fugue-gloss coating will significantly increase the level of protection against external contamination and rust. However, the conditions for a tight fit to the tile around the entire perimeter and stable fixation of the bathtub are not always feasible, so they resort to more reliable options.
Sequencing
- clean the joint from dirt
- for adhesion, lubricate the surfaces to be treated with water using a thin brush
Don't miss: Renewing the grout between bathroom tiles. Don't know how to update the grout on your bathroom tiles? Step-by-step instructions and best methods
- prepare the mixture according to the instructions (but in the end the mixture should be thick)
- apply the grout with a rubber spatula, tamping it well
- remove excess grout with a spatula
- the next day, treat the seam with an antifungal agent
- can also be treated with a fugue-gloss to enhance waterproofing and protect the joint from yellowing
Application of the solution
The traditional solution to seal the joint with a cement-based mortar has a right to exist. The cost-effectiveness of the long-known method ensures its continued popularity. To decorate the gap in the bathroom, you can use the remaining tile adhesive or apply a sand-cement mortar yourself. Sealing the joint with plaster is also appropriate. A sufficiently thick consistency of the solution is an essential condition for a high-quality result. The joint sealing process includes the following steps:
- The surface of the bathtub and adjacent tiles is thoroughly cleaned of dirt.
- The treated area is wetted with water to increase adhesion.
- A plastic mesh used for plastering or puttying corner surfaces, fixed at the junction of the tile and the bathtub, will help eliminate the possibility of the mortar falling under the bathtub. The absence of serpyanka can be successfully replaced by other available materials fixed under the edge of the bathtub.
- After applying a small amount of solution, tamp it down.
Warning
To increase the level of moisture resistance and give the bathroom interior an aesthetic appearance, the joint needs subsequent finishing. Experts suggest treating it with water-repellent impregnation or epoxy resin. The final design of the bath is done using tiles or self-adhesive tape.
Sequencing
- wash the side of the bathtub and the tiles
- attach sickle tape or plastic mesh along the seam for plastering the walls so that the mortar does not fall through
- prepare a thick solution
- moisten the side, tiles and mesh with water to increase adhesion
- apply a thick layer of mortar to the seam using a narrow spatula
- compact the solution
- wait for it to dry (usually a day)
- sand the surface using medium-grain sandpaper
- clean the seam from dust and debris
- for additional waterproofing, paint the seam with waterproof paint or treat it with epoxy or special impregnation
- for beauty, put a ceramic border, plastic plinth or self-adhesive tape on top (see below)
Silicone sealant
To seal a small gap between the tiles and the bathtub, silicone sealant is used as the main installation material. Gaps reaching sizes up to 3 cm require pre-treatment of the joint with polyurethane foam. Purchase a sanitary sealant that will prevent future mold from appearing in the bathroom . The sequence of work to seal the gap is as follows:
- The surfaces of the tiles and bathtubs adjacent to the joint are treated with a solvent for the purpose of degreasing.
- Paper tape pasted along the joint will prevent contamination of the bathroom and tiles.
- After making a hole in the tube, attach the supplied tip to it.
- Having secured the tube in a special gun, silicone-based sealant is carefully distributed over the joint.
- The designated area between the tiles and the bathtub is filled in a single movement. It is impossible to apply an additional layer to the frozen mass.
- Prepare a soap solution and a brush of suitable width.
- A brush dipped in a soapy solution is passed over the silicone joint to give it a smooth surface. Movements must have a strict direction. Chaotic strokes will lead to the formation of an uneven surface.
A rubber spatula can be used to notice the brush. As a last resort, you can smooth the seam between the tiles and the bathtub with your finger or spatula. After the silicone joint has dried, the paper tape is removed. If it is missing, remove excess installation material from the bathtub and tiles using a damp cloth. Important
Working with solvents requires that the room be well ventilated. A mask and gloves will protect against the negative effects of chemical fumes and prevent skin damage in case of contact with a caustic substance.
Sequencing
- clean surfaces
- degrease with solvent
- wait for it to dry (usually a day)
- stick masking tape or tape on the areas adjacent to the gap so as not to stain them
- make a hole in the cylinder, put on the tip and insert the sealant into the gun
- slowly and carefully seal the joint with sealant in one pass
- level the seam using a rubber spatula or a thin brush dipped in soapy water
- let dry (dries in about a day)
Instructions for sealing gaps using different methods
There are several ways to seal seams:
- budget option using cement, requiring further finishing work;
- using grout to match the color of the tiles, suitable for narrow joints or wide gaps, which are pre-filled with durable material;
- adhesive tape, which is attached over the cement layer;
- plastic overlays or corners;
- silicone sealant or polyurethane foam;
- tile border (the most labor-intensive and durable method).
Pouring with cement mortar
To perform the work you must:
- Clean surfaces from salt deposits, traces of dirt or oil.
- Install a block or stick a synthetic mesh to keep the building mixture from falling into the gap between the walls and the bathtub body.
- Prepare a solution of cement and sand that has a thick consistency.
- Moisten the surfaces of the walls, mesh and bathtub with water, which increases adhesion.
- Fill the gap with mortar using a trowel or putty knife.
- Level the material and wait for the moisture to evaporate for 24-36 hours.
- Clean the surface with fine sandpaper, taking care to protect the bathtub enamel.
- Remove dust and saturate the cement with an antibacterial primer.
- Apply a layer of waterproof paint or epoxy mastic, which increases the protection of the material from water.
- Install additional finishing elements (for example, plastic or ceramic border).
To complete the work, it is necessary to fill with cement mortar.
Using tile grout
To seal a narrow gap with grout you need:
- Choose a material that matches the color of the tiles or grout used on the main joints.
- Clean dust from the gap and wipe with a damp sponge.
- Mix a small portion of the solution and fill the joint with a rubber spatula, remove excess grout from the side of the bathtub and walls with a spatula.
- Sequentially fill the joints around the perimeter of the bathtub, and then wipe the surfaces along the seam with a damp sponge.
- After 24 hours, apply an additional antibacterial coating and varnish composition (fugue-gloss) to the grout, which improves water resistance and prevents yellowing of the grout.
Tile grout is used to seal narrow cracks.
Adhesive tape
Algorithm of actions when using border tape on an adhesive base:
- Wipe surfaces free of dust and oil.
- Unwind the roll and peel off the protective layer applied to the adhesive backing.
- Apply the tape evenly around the perimeter, making cutouts in the corners. To improve the quality of waterproofing, apply an adhesive composition (for example, liquid nails) to the surface of the bathtub side and walls. It should be taken into account that adhesive tape is designed for 1-2 years of operation (other protective materials can withstand 5 years or more). The technique is suitable for quick renovation of a room, since it does not require the use of tools (except for a knife and scissors for cutting workpieces).
Adhesive tape is applied around the perimeter of the bathroom.
Plastic corners
Installation procedure for waterproofing from a plastic profile:
- Preliminarily waterproof the gap with silicone sealant, grout paste or another method.
- Degrease the surfaces on which the pad will be glued.
- Mark and cut the workpieces with trimmed edges on a carpenter's miter box.
- Apply a layer of clear silicone caulk or liquid nails, and then press the corner firmly to the wall and tub surround.
- Remove excess glue with a rag and place a weight on the surface (provide insurance against ballast falling into the bathtub or onto the tiled floor).
- After the glue has polymerized, remove the weight, inspect the joints, carefully fill any gaps with sealant.
Plastic corners are designed for finishing the edges of the bathroom.
Filling with silicone sealant
To treat a joint up to 5 mm wide with sealant, you must:
- Purchase a manual mounting gun and sanitary-type material containing antibacterial additives.
- Wipe and degrease the surfaces, apply masking tape delimiting the sealant line.
- Cut off the cylinder cap and install a conical tip with a pre-cut front part.
- Install the reservoir into the mounting gun.
- Fill the joint line with sealant in one pass.
- Level the roller of material with a brush dipped in soapy water.
- Remove the adhesive tape and wait 24-30 hours for the sealant to cure.
Silicone sealant is a material used to create a moisture-proof layer.
Using polyurethane foam
To seal a joint with foamed polymer material, you must:
- Purchase waterproof polyurethane foam, the amount of material depends on the width and length of the gap.
- Wipe the edges of the bathtub and the wall with solvent, apply concrete contact to improve adhesion. Sandpaper should not be used, since damage to the enamel can lead to corrosion of the bathtub metal.
- Shake the can and place it in the gun.
- Carefully fill the gap with foam material.
- Wait for polymerization and trim off the excess with a construction knife.
- Since the material does not provide complete waterproofing, the surface must be covered with a layer of paint or a tiled or plastic border must be laid.
The joints can be sealed using polyurethane foam.
Plastic skirting board
To install a plastic skirting board you will need:
- Select finishing material according to shade. The baseboard and tiles can be the same color, but a white corner can be used to highlight the edges of the bathtub.
- Attach a guide profile to the previously cleaned and degreased wall (taking into account the dimensions of the baseboard, which should fit tightly to the side of the bath). Mounting without a profile is allowed. In this case, the baseboard is glued to the bathtub body.
- Install the corner elements, and then insert the pre-cut blanks into the guide profile or glue them to the side of the bath with sealant.
- Remove traces of adhesive with a rag and install end caps.
- Place a load (for example, boards) on the baseboard, providing protection against falling into the bathtub.
- Wait for the glue to polymerize and remove the load.
- Inspect the protection received and cover any cracks with transparent sealant. It should be noted that if the seal is broken, water vapor gets under the baseboard, causing mold to form.
The plastic baseboard is selected according to the shade of the bathroom.
Tiled border
For installation you need:
- Cut blanks from facing tiles or prepare already made elements. Since installation starts from the corner, it is necessary to pre-treat the edges of the elements to be joined with an abrasive tool.
- Clean the surfaces of the walls and bathtub from salt deposits and wipe with a degreasing compound.
- Apply tile adhesive or liquid nails to the back of the border, and then install the element in place.
- Remove remaining adhesive mass with a spatula or dry cloth.
- Install the elements sequentially around the perimeter and wait for the glue to harden.
- Fill the seams with a grout mixture matched to the color of the tile covering.
The border can be made from facing tiles.
Using polyurethane foam
The use of polyurethane foam greatly simplifies the process of removing the joint between the bathtub and the wall. When purchasing a container with the composition, make sure that it has moisture-resistant properties. Before starting work, make sure to protect your hands with gloves. If there is no protective barrier and foam gets on the skin, thoroughly rinse the body area with water, preventing it from drying out. Similar to the grouting process, the surface of the tile and bathtub in the joint area is pre-cleaned. The key to a quality result is careful actions when applying the material. Avoid contact of foam with foreign areas. After it has completely dried, the excess from the bathtub and tiles is removed by cutting with a stationery knife. In conclusion, they resort to one of the most suitable finishing methods - tiles, tape or border.
Sequencing
- clean the area
- treat with an antiseptic and let dry
- sand the side of the bathtub with medium-grain sandpaper for better adhesion
- degrease the area with solvent
- seal the seam with polyurethane foam - work slowly, squeeze out a little at a time, as the foam increases
- after drying, trim off the excess with a utility knife
- paint with white nitro paint or to match the color of the tiles
- you can cover the joint with a tiled border or a plastic corner
Use of borders
When the sealing of the joint is completed, it can be covered with a border. This decorative design of the joint will provide an attractive appearance to the bathroom. Curbs can be made from different materials.
Plastic plinths are especially in demand. It is relatively inexpensive. It is convenient to use when finishing a joint is necessary. There are many different models on the market to choose from. The design that is attached to liquid nails has become very popular.
To make a joint between the tiles and the bathtub in the corner, you will need to cut the baseboard at an angle of 45 degrees. To ensure that plastic decorative elements last longer, do not use aggressive chemicals or abrasives.
Installing a plastic skirting board is a simple and practical solution for sealing the joint between the bathtub and the tiles. This option is suitable for all types of bathtub finishing. To securely fix the side, the fastening areas should be treated with transparent sealant. Liquid nails can be used. If the gaps are small, you can install plastic corners.
Ceramic plinth is a more expensive solution. It will cost significantly more. The advantages of using such material include:
- long service period;
- color retention for a long time;
- resistance to chemicals;
- no scratches appear on the surface.
Among the disadvantages of ceramic skirting boards is the insufficient variety of shades offered. Docking is carried out in the same way as in the case of plastic skirting boards.
Advice! Trimming ceramic products is done with a grinder. For this work you will need a diamond blade. If you use a fragmented disk, you can cause the edges of the baseboard to chip.
Most often, the joint between the bathtub and the tiles is sealed with a special tape. This is due to the ease of installation and low cost. The work is carried out in the following sequence:
- first you need to clean and degrease the surfaces;
- remove the protective coating from the tape;
- heat the tape with a hairdryer;
- Carefully seal the gap by pressing the tape to the joint.
If you follow all the recommendations exactly, the joint can be sealed very efficiently. In this case, the surface of the tiles and the bathroom will not be damaged. When using tape, as in the case of plastic corners, you can create a harmonious bathroom interior.
Grouts and other sealing compounds
In order to seal the junction of the bathtub with the wall, various construction mixtures and solutions of liquid or paste consistency are often used. Such materials include:
- cement mortar;
- grout for tiles;
- polyurethane foam;
- silicone or acrylic sealant.
Important. Liquid or semi-liquid compositions are used only in cases where the distance between the bathtub and the adjacent wall is small.
- Cement mortar is the simplest option, which is used to quickly seal the joint between the bathtub and the tile. Before applying cement mortar, both surfaces must be thoroughly cleaned and degreased. Before application, the work area must be thoroughly wetted to ensure uniform drying and good contact of the cement with the surface. If the joint between the bathtub and the tiles is too wide, then you can use tow to pre-seal it so that the solution does not leak into the gap.
Important. The disadvantage of this method is that it is not aesthetically pleasing and cannot be used with acrylic bathtubs, since acrylic is deformed during operation, which causes cracking of the putty. This joint between tiles and bathtub can be used with cast iron bathtubs when the wall surface is planned for painting.
- Tile grout is used more often, but this method is only applicable in cases where the joint between the bathtub and the tiles is very small. The use of grout is also not recommended with acrylic bathtubs and is used in cases where the laying of tiles starts from the side of the bathtub.
- Polyurethane foam is used in the presence of very large gaps. Before using it, the surfaces must be thoroughly cleaned and degreased. After the foam has dried, the excess must be cut off with a stationery knife. This method can be used to seal the joint between an acrylic bathtub and tiles, since the foam is resistant to deformation, but this method also has its drawbacks. After the foam has dried and its excess has been removed, the composition has a porous structure that is capable of allowing moisture to pass through, and this joint between the bathtub and the wall must be additionally closed by painting or applying adhesive curb tape.
- Silicone or acrylic sealant is used most often today and is considered the most reliable and aesthetic type of seal. However, this method is only applicable to small gaps, the size of which ranges from 1 to 5 mm. Before sealing seams in the bathroom with sealants, it is necessary to thoroughly degrease and dry the surfaces, since sealants will not stick to a wet surface.
Important. For metal and acrylic bathtubs, the bathtub is insulated from the wall using silicone sealants, since after drying they remain elastic and withstand deformation. Acrylic compounds are used for cast-iron bathtubs, since acrylic hardens when dried, and a cast-iron bathtub does not deform under the influence of temperature.
Applying new grout
Speed is very important in this matter, so you will have to work quite intensively, ideally with an assistant. This rush is due to the fact that the compositions for treating tile joints dry out very quickly, so delay can lead to high consumption of these materials.
Applying new grout
The consistency of the resulting solution should be liquid so that the solution does not dry out too quickly. It is necessary to apply the grout using a rubber spatula. The material must be thoroughly rubbed in, filling the entire seam space. This way you can achieve much more efficient traction.
Don’t be afraid to go over the grout a little; after it dries, the excess can be removed with sandpaper, but a seam that is too small will very quickly require replacement.
In order to form a seam normally, it is better to use a construction tool. It can also be purchased at every hardware or hardware store at a very reasonable price. The set contains several attachments of different shapes that will help give the seams the appearance you need.
If you are not new to this business, but do not have such a tool at hand, then you can use a metal rod of the appropriate size with a rounded end. The use of sharp instruments is not permitted. You can also use the plastic handle of an old brush.
Applying grout
When forming seams, it is necessary to hold the tool in such a way that it touches the edges of the tiles that are laid nearby. After applying the grout material, it is necessary to remove excess from the surface of the tile. To do this, you can use a clean sponge, the same tool you used to apply the grout, or a simple rag.
Now you need to wait about a day and carefully examine the resulting seams. All irregularities can be sanded with sandpaper, after which you need to wash the tiles.
The main thing here is not to let the material dry out completely, since such grout is very difficult to remove from the surface of the tile material. To clean the tiles, use a damp cloth.
Now you know how to replace the grout between tiles and can handle this operation yourself.
Applying grout with a spatula
Return to content
Decorative borders
In order for the gap between the bathtub and the wall to look beautiful and at the same time effectively perform its function, today decorative borders are often used, which are made from materials such as:
- polyethylene;
- plastic;
- ceramics.
Don't miss: Is it possible to lay tiles on plywood? Laying rules. Is it possible to glue tiles to a plywood base? Instructions for installing them on such a floor yourself
Each of these types of borders has its own characteristics and before sealing joints in the bathroom using them, it is necessary to study their properties and installation methods in detail. All these materials have a common feature: in order for the sealing of the junction of the bathtub and the wall to be high-quality, the surfaces must be thoroughly cleaned and degreased using solutions such as white spirit.
- Self-adhesive polyethylene tape is a common sealing option because it is easy to install and the fastest option. Very often, this tape comes with a plastic or rubber spatula to facilitate installation. This option is used if the joint between the bathtub and the wall does not exceed 3 mm.
Important. Before purchasing tape, make sure the packaging is sealed. Before isolating the bathtub from the wall with such tape, make sure that it has not expired, since the adhesive composition retains its characteristics for about two years.
- The plastic border is the most popular because the seam between the bathtub and the wall is very beautiful due to the decorative nature of the product. The material is not expensive, is quickly installed and does not require special tools or skills. In stores you can see a large number of decorative solutions and colors, which allows you to choose the ideal product for your interior. Before making corners in the bathroom from plastic, you need to purchase ready-made versions of the corners and make them butt-to-edge with straight elements. To install such corners, acrylic sealant or silicone is usually used, which also acts as glue.
Important. Finishing between the bathroom and the wall using plastic borders can be done in two ways, before finishing the main wall with tiles and after. In the first case, the corner is installed on the wall and tiles are laid on top of it. In the second case, the joint between the tile and the bathtub is sealed on top of the tile. For both options, different forms of borders are used and this must be taken into account before finishing the room.
- Ceramic borders are less popular due to the complexity of installation and time costs. However, this option looks very beautiful and perfectly complements the interior of the room. Today, there are a large number of options and colors that can be used to highlight the location of the edging in an original way. Before sealing the seams in the bathroom with such material, it is necessary to install and securely fasten the bathtub itself, then lay the ceramic border using tile adhesive, and only then install the ceramic tiles on the wall surface.
Important. The seal between the bathtub and the wall is carried out using moisture-resistant tile grout or sealant. This method is not recommended for use when installing acrylic bathtubs due to their deformation during operation. In order to avoid difficulties at corner joints, before sealing the corners, you need to purchase ready-made corner products, which usually come complete with straight modules and significantly speed up the installation process.
As you can see, each of the seam sealing options has its own characteristics, advantages and disadvantages, but the information we provide will help you choose the most suitable method for you. Shelf instead of border
You can find a compromise between aesthetics and functionality. Let's say you have a large gap between the bathtub and the wall. Repairing it takes a lot of work and money. And then you will also have to think about what decorative elements to cover it with.
You can get out of this position using a shelf. It is more functional, and for aesthetic reasons it can even surpass curb design. On one side it will rest on the side of the bathtub, and on the other – on the profile frame.
But you still need to remember the following details when arranging the shelf:
- Metal will not be the best choice for shelf material, as it is susceptible to rust and corrosion, despite careful surface treatment. It is better to select materials that will have high rigidity and moisture resistance.
- The shelf will still need to be lined, at least for waterproofing purposes. This will prevent moisture from getting into the cracks between the shelf and the bathtub or wall. For cladding, tiles that will withstand exposure to water are ideal.
How to choose the right method?
When choosing a method for sealing a joint or a combination of them, you should consider some nuances:
- When using cement mortar or polyurethane foam, some problems may arise, since a metal bath, for example, made of steel, changes slightly in size at different temperatures. Due to this, new gaps will form. But for bathtubs made of acrylic and cast iron, such methods are quite suitable;
- Self-adhesive border, despite all its good characteristics and low cost, does not have a very long service life. On average, it will have to be replaced within a year;
- Silicone sealant is the most reliable;
- The choice of method depends on the width of the gap.