Options for mounting the sink to the wall
Wall-mounted washbasin models can only be mounted on durable permanent wall structures made of concrete or brick, or on special frame structures.
The washbasin can be mounted on the wall in several ways:
- The washbasin bowl can be mounted in a wall-mounted countertop or cabinet lid. The cabinet or tabletop itself is mounted on brackets or anchors. This method of fastening has increased reliability.
Installation of a washbasin on a wall-hung cabinet - Practicality and popularity of fastening with brackets. Usually the brackets are almost invisible, and the original designer mounts serve as an additional decorative decoration.
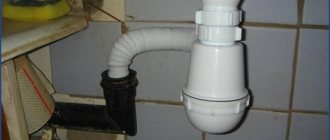
- Models of sinks with holes provided on the back side, which act as brackets. Attached to the wall with anchor bolts.
Attaching the sink to the wall using bolts - Some craftsmen attach sinks using homemade fasteners: they drive pipes or fittings into the wall. But here it is important to correctly calculate the fastening based on the weight of the sink and the strength of the wall.
Advice. A properly secured bracket should not move under force. Once you are sure that the bracket is securely fastened, you can install the sink. The washbasin is fixed with additional clips or plumbing sealant.
Basic recommendations for purchasing the necessary items
Even if you strictly follow the technology, this does not guarantee a good result; the fact is that the fittings for the kitchen sink must meet a number of requirements, which we will consider:
| Suitable design | All components must correspond to the design of the sink; be sure to make sure that both the type of connection and the size of the fasteners are suitable for your sink. It is best to purchase everything comprehensively, then sellers will independently select the necessary design options in accordance with the characteristics of the sink |
| High quality products | As for the mixer, it is better to choose options made of brass - they are heavier in weight and much more reliable than structures made of powder alloys; there should be no flaws on the surface. As for the selection of a siphon, it is better to choose either an option made of polypropylene (its price is low) or brass - this type of structure is more expensive, but can withstand hot water |
| Availability of sealing materials | To ensure system reliability and functionality, all connections must be secure. To seal threaded connections in flexible hoses, a special Unipak compound is used, and to seal sewer units, silicone sealant with antifungal additives is used. |
| Set of necessary tools | In fact, you only need a few simple tools to carry out all the work at the proper level: a plumber's wrench for clamping connections and two screwdrivers - flat and Phillips |
A special wrench fits any size of plumbing fastener and replaces a whole set of tools
Advice! It is not worth saving on quality, since not only the comfort of use, but also the durability of the assembled system depends on the reliability of the fittings - any malfunctions can lead to leaks and flooding.
Types of sink brackets
The fasteners for mounting a washbasin on the wall must be able to withstand the weight of the plumbing fixtures with a margin. They are made from various metals.
- special mounts designed for mounting a specific model. Often these are exclusive designer washbasins with an unusual shape. Brackets for such plumbing fixtures are included and can be made in the form of specially shaped pins, pipes that go around the sink, or unusual welded structures. Such fastenings are treated with special decorative compounds (ceramic or metal).
Special spring-loaded frame mount for sink
- Brackets for standard wall-mounted sinks are made of cast iron or steel and coated with anti-corrosion paint. They are produced in the form of T-shaped or L-shaped racks, and can also be made in the form of frames with a sliding unit to adjust the size of the fastening. Brackets in the form of a metal frame into which the washbasin is placed are particularly reliable.
Steel L-shaped brackets Tip. When choosing a bracket, consider its load-bearing capacity and size: it must withstand heavy loads. Pay attention to the method of fixing the washbasin on the bracket, because simply placing the sink on it is unsafe for use.
Cast iron steel and acrylic, what is the difference
What should you choose - a steel, cast iron or acrylic bathtub? To make the right choice, you need to know about the features of hot tubs:
- Cast iron . Such designs are very durable and reliable. Such fonts are most often installed in rooms due to their properties. However, it is worth knowing that they are heavy, so you should install and fix them with extreme care.
- Steel . Unlike cast iron they are light in weight. Such bathtubs are wear-resistant and durable, but have a very low level of sound insulation. But this problem can also be overcome - since steel structures are usually placed on a podium made of bricks, it can be treated with a thick layer of installation foam, which will ensure noise absorption.
- Acrylic . Relatively recently appeared on the market of building materials for swimming pools. It is very popular due to the variety of shapes and colors. Installing a washing container makes it possible to create an original interior of the room. Acrylic bathtubs retain heat well; thanks to the acrylic coating, there is no slipping. Acrylic bowls, like steel ones, are fixed on a brick “cushion”. When installing a podium for a font made of acrylic, it can also be covered with polyurethane foam. With its help, the heat will remain in the bowl longer.
Installation of a sink without brackets
A mounting kit must be included with the sink upon purchase; if for some reason it is not available or the quality leaves much to be desired, purchase such a kit separately. Focus on products from well-known brands so as not to worry about the quality of installation later.
Decide on the location where the sink will be installed and take measurements. It is usually recommended to install the bowl at a height of 70 - 85 cm from the floor.
Studs for installing a sink
At the selected height according to the building level, draw a horizontal line. Now we place the upper edge of the bowl to the set aside line and mark the attachment points. We drill holes according to the marks and insert dowels. We screw the pins into the dowels. The screwed-in pin should be 2 cm longer than the width of the washbasin. After final installation, tighten the nuts until they stop.
Preparatory work
Have you already decided on the most suitable sink design and are you going to install it? Take your time! First you need to do some preliminary work, which is as follows:
- turn off all water;
- decide which corner in the room is best suited for the bowl, taking into account the piping under the mixer;
- correlate the parameters of the sink with the place prepared for it, try to see its final appearance and position.
Bracket mounting
Before installing the brackets, it is necessary to check the strength of the supporting surface. To do this, markings are made with a nail. If the surface is loose, then increase the drilling depth and select fasteners with a larger diameter. It is difficult to securely fasten the brackets in soft plaster or concrete, so the depth of fastening under the soft layer should be at least 25 mm. In such cases, anchors are selected individually with a length from 50 to 120 mm.
- Mark a horizontal line as indicated above.
Marking - We measure the thickness of the walls of the washbasin, which will rest on the bracket. We put this distance down from the horizontal line and make a mark.
- Connect these marks horizontally. This will be the height of the brackets.
- We attach brackets to the sink.
- Now you will need an assistant for fitting. We place the sink with brackets against a horizontal line and, through the recesses, mark the places where the fastenings will be. All lines must match. It is important.
Determining locations for brackets - We drill holes in the designated places. Select the diameter of the drill so that the dowel or mounting screw fits into the finished hole with difficulty. We hammer the dowels or bushings under the screws with a hammer.
- We mount the brackets. We install a sink on them, install a faucet, connect the sewer and water pipes.
- Check the horizontal position and tighten all the washers.
- We check the tightness of the system by opening the water.
- After all the manipulations, the sink should sit firmly, without moving, which means you did everything correctly.
Advice. Seal the gap between the wall and the sink with plumbing silicone sealant. This will protect you from the appearance of fungus if water gets into the gap.
Important Notes
Notes to consider before starting work:
- To connect the kitchen sink to the sewer system, it is not recommended to tightly tighten all connections using a wrench, as this can damage the rubber sealing gaskets and waste time and effort.
- If, when checking the tightness of the connections between the cuff and the sewer pipe, a stream of water oozes out, then you need to remove the cuff, dry the surfaces that are to be connected, and then lubricate the dry cuff with sealant and make the connection again.
- When connecting a double sink, you must use a special siphon with an outlet to two pipes.
Double sink connection diagram
Following simple rules will undoubtedly help every interested owner install a kitchen sink or bathroom sink in their home without calling a plumber. You can either connect the sink to the sewer system or connect the water supply to it with the installation of the mixer absolutely independently.
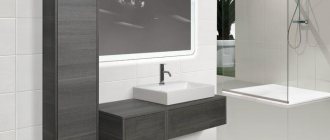
Installation of a wall-mounted sink with a cabinet
This option is good because you can hide all the plumbing connections in the cabinet.
At the required height, draw a horizontal line along the level. We try on the cabinet, see how it will fit with the siphon and mixer. If necessary, immediately measure and drill additional holes for plumbing in the back wall. Now we install the brackets and the cabinet on them. We described above how the brackets are attached.
Sink with cabinet
We install a washbasin on top, connect a siphon and sewerage to it. If the bowl model provides for additional fastening to the wall, then drill holes in the right places and tighten the anchor bolts. Or glue the sink to the wall with silicone for greater reliability.
How to determine a poor siphon connection?
If the siphon connection is poor, you may experience an unpleasant odor from the sink. There may also be increased humidity in the pipe leading to the siphon and the appearance of puddles under the sink.
When connecting the sink to the sewer system, experts do not recommend over-tightening the connections with a wrench, as this may damage the rubber sealing gasket.
connecting the overflow and drain from the sink
If during the process of checking the tightness a stream of water flows between the pipe and the rubber cuff, then the second element must be removed and the connection area dried. Next, the dried cuff needs to be treated with sealant and put in place.
Special Notes
Before connecting the sink to the sewer, you need to take into account some notes, namely:
- When connecting the kitchen sink to the sewer, there is no need to over-tighten the connecting elements with a wrench. If you do not take this feature into account, the rubber sealing gasket may be damaged, then it will need to be changed and tightened again;
- When checking the tightness of the connection in the area between the pipe and the cuff, a trickle of water may leak out. If this happens, then you need to remove the cuff and dry the surface of the connection area. Next, the dry cuff is lubricated with sealant and the elements are reconnected;
- if you plan to connect two sinks to the sewer system at once, it is recommended to buy a special siphon equipped with two outlets for sewer pipes.
By following simple rules during the installation process, you can quickly and easily connect the sink to the sewer with your own hands without the help of a plumber. It is also easy to connect the water supply to the plumbing fixture.
Frame structure for installing a washbasin
If the walls in your bathroom are not strong enough to install a sink, and you really want just such a model, then you can solve this issue by installing a frame structure. It is attached to the floor and walls and consists of profiles. The height is adjustable with legs, so that the sink can be installed at the desired height from the floor. All communications are hidden inside the structure.
Frame structure for attaching the sink
The procedure is as follows:
- the frame is leveled and secured to the floor and wall;
- At the required height, screws are screwed in to secure the sink;
- cover the frame with moisture-resistant plasterboard and line it with tiles or any other finishing material;
- between the wall and the sink, a rubber washer is placed on the stud to reduce noise during operation;
- attach the wall-mounted sink to studs on top of the cladding.
A properly assembled installation can withstand a load of up to 400 kg, and this is not only a sink, but also other plumbing fixtures. In addition, you can make a niche in the design and use it as a shelf.
Installation of a wall-hung sink: video
https://youtu.be/8d-LyqQfngQ
Sink installation: photo
Brick frame
In addition to attaching an acrylic bathtub to the wall with brackets and corners, you can resort to a more radical method. It allows you to firmly fix the structure, eliminating the possibility of it loosening. This method involves the construction of a brick frame.
In this case, a wall of the required height is erected from blocks and cement mortar. It should be taken into account that there should be a distance between the bottom of the bath and the floor. A brick wall should not be monolithic. There should be a hole in it that provides access to the siphon.
Using bricks and cement mortar, a niche is built in the bathroom. A bathtub will be installed in it. You can begin construction work only after purchasing the bathtub. The niche is created specifically for the specific dimensions of the plumbing fixtures. This method involves inserting bolts into the wall on which the bathtub will rest on the opposite side.
It is recommended to lay a layer of polyurethane foam between the bottom of the bathtub and the base of the room. In this case, it will be almost impossible to damage the back of the bowl. A special mounting film is also laid down. When installing a bathtub in a prepared space, you need to fill it with water. This way it will fit better in the niche.
The bathtub is installed in the created niche only after the solution and foam have completely dried. All seams are then treated with sanitary silicone.