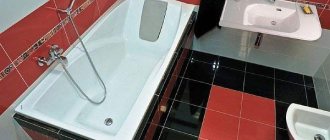
The modern range of plumbing equipment is amazing in its volume. In the catalogs of well-known manufacturers, you can find a lot of different options that differ in shape, size, color scheme and material of manufacture. Today, buyers highly value not only affordable prices, but also high quality, reliability, and long service life. Triton baths meet these requirements. The company's products are made from high-quality raw materials, which guarantee reliability and durability for many years of operation. Buyers who have tested Triton products in practice claim that these are the best products that correspond to their pricing policy.
Manufacturer
Triton asymmetric acrylic bathtubs are distinguished by their durability and accessibility to potential consumers. These products are produced by a domestic company, which dates back to 2001. The main task of the manufacturers was to create high-quality equipment that could compete with leading companies.
Thanks to modern technologies, it was possible to create high-quality models that have held leading positions in the plumbing accessories market for more than 10 years. Today it is considered a fairly successful and promising brand.
There are many shapes and models of bathing bowls on sale, which differ in cost and size. Thanks to this, it is possible to select products based on financial investments and basic requirements.
Advantages of acrylic plumbing fixtures
To produce these products, modern equipment and high-strength consumables are used. Experienced engineers offer a variety of options and solutions that allow you to get unusual bathtubs with many additional functions.
Positive reviews of Triton acrylic bathtubs prove their popularity among customers. They reflect the quality and style of these products.
Acrylic alloys have a number of positive qualities. These include:
- retains heat for 8 hours;
- has excellent sound insulation;
- not afraid of mechanical damage;
- the surface can be cleaned well using conventional care products;
- does not absorb harmful compounds from water;
- minimum weight;
- simple installation;
- snow-white surface.
Another advantage is its plasticity. Acrylic can take any shape during the execution of the model. To maintain the specified parameters, a frame is manufactured that follows the lines and bends of the product.
Installing a bathtub on bricks
No factory frame? No problem! We can install an acrylic bathtub on bricks. This option is even more reliable compared to the method of installing a bathtub on a factory-made frame.
The support can be solid or columnar.
Installing a bathtub on a solid brick base
An example of installing an acrylic bathtub on a brick
. First step. We temporarily install the bathtub in the place of its future installation and project a drain hole onto the base. This will give us the opportunity to leave a gap in the substrate to connect the drain.
Second step. We lay out the bricks over the entire supporting part of the container. We select the height so that the sides of the bath rise above the floor by no more than 600 mm. At the same time, we take into account that we will still have a 2-3 cm pillow made of polyurethane foam.
The bricks are laid on traditional cement mortar.
Third step. We assemble a frame made of sheet plywood around the perimeter of the brickwork. The height of such sheets should exceed the masonry by the thickness of the foam substrate. Don't forget to leave the drain hole unfilled.
Fourth step. We evenly foam the surface of the substrate with polyurethane foam, without going beyond the boundaries of the frame. We immediately apply pre-prepared sheet plywood onto the foam. We use moisture-resistant sheets 10 mm thick.
Foaming the bottom
Installing a bathtub on a brick
Fifth step. We tightly plug the drain of the acrylic bathtub. At the same stage, we prepare about a liter of water and wooden supports to regulate the level of installation of the container.
Sixth step. We pour the previously prepared water into the container and place the bath on the substrate according to the building level.
Seventh step. While the polyurethane foam has not hardened, we adjust the evenness of the installation of the bathtub using supports. As a result, the water in the container should be evenly distributed around the drain, and the level should show “0”.
Eighth step. Having aligned the bathtub, pour water into it to about half the volume. Under the weight of water, the foam will not be able to lift the container, and the bath itself will take on the required slope.
Ninth step. Let the foam dry and remove the bath. If the edges of the container must be recessed into the wall, first outline the outline of the edge on the surface, and then make a recess in the wall for the edge of the bath. A hammer drill will help us with this. If a groove is not provided (this is not recommended if the walls are made of blocks, plasterboard or other lightweight material), at the level of the lower cut we simply fix a beam impregnated with an antiseptic, or a steel corner. We will additionally strengthen the supporting bar at the end with stops.
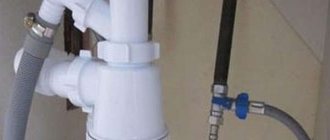
Tenth step. We return our container to its place and connect it to the sewer. We fill the gaps between the container and the bricks with foam. We install a decorative screen and baseboards.
Example of a bathtub installed on bricks with mosaic finishing
Find out how to properly care for an acrylic bathtub at home from our new article.
Installing an acrylic bathtub on brick supports
Installing an acrylic bathtub on brick supports
First step. We bring the container into the bathroom.
Second step. We mark the base at the location where the brick supports are installed. The most correct option is to erect the pillars closer to the edges of the bend of the acrylic bathtub. If the container is long, an additional support can be erected in the middle.
Third step. Having outlined the places for laying the supports, we begin to prepare the cement mortar. We don’t prepare too much - we have to lay out no more than 20 bricks, so we don’t need any extra expenses.
Fourth step. Let's start laying. We place the support for the back of the bathtub at a height of 190 mm, and the pillar for the front edge of the tank is erected at 170 mm. The height of the middle support, if needed, is selected according to the situation, depending on the design of the bathtub being installed. The difference in height of the pillars will provide conditions for efficient drainage of water from the container.
Laying bricks
Laying bricks
Important note! Many modern acrylic bathtubs initially have a sloping bottom to ensure water drainage. If you have such a bathtub, set all the supports level, focusing on the top part.
Fifth step. We give the masonry about a day to dry and install the bath. We place the container slowly, moving it tightly towards the walls. We fill the gaps between the bricks and the bathtub with sealant.
If desired, you can additionally fix the bath to the wall using dowels and a metal profile. This type of fastening is used quite rarely, but still occurs.
Having made sure that the installation of the bathtub is correct, stable and even, we connect the sewerage system, install the mixer, mount the decorative screen and lay the baseboard on the bathtub.
Video - Installing an acrylic bath using a combined method
Video - How to install an acrylic bathtub yourself
Types of models
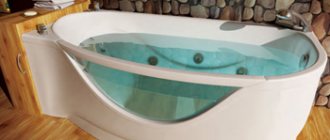
Today there are many varieties of Triton bathtubs on sale. They have additional equipment in the form of hydromassage or silicone elements. Asymmetrical shapes of products are in particular demand.
The choice of models should be made taking into account the size of the room and the style in which it will be decorated. For proper installation you will need at least 5 m2. It is recommended to pay special attention to the frame structure.
According to the stylistic direction, all Triton bathrooms are divided into the following groups:
- classic;
- standard;
- original;
- elegant.
According to their form they are divided into:
- rectangular;
- corner;
- square.
Diversity of the model range: from discreet classics to elaborate forms
Model “Michelle”
The characteristic features of Triton brand products are the optimal combination of strength and style at an affordable price. The plasticity of the polymer allows you to create products of a wide variety of shapes and sizes. The collection includes models for a spacious bathroom and for a small room.
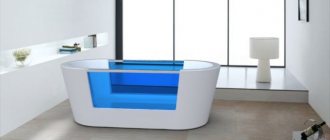
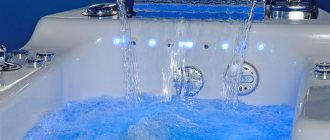
The company produces bathtubs, the internal geometry of which follows the anatomical structure of the human body and provides maximum comfort. Most models are equipped with an anti-slip massage surface. In addition, it is possible to install additional options: chromotherapy, lighting, hydro and air massage.
Bathtubs are equipped with curtain rods, curtains, faucets, headrests, and front screens. offers asymmetrical, corner, rectangular bathtubs.
Asymmetrical models are at the peak of popularity today. They are ideal for small bathrooms. They help save usable space while providing increased comfort for bathing. The collection of the sanitary ware brand "Triton" presents a line of models with asymmetrical shapes.
| Model | Dimensions, mm | Peculiarities |
| Michelle | 1700×960 | The anatomically shaped cup widens at the shoulders and tapers towards the legs, providing maximum comfort. Due to its ergonomic shape, it allows for efficient use of space. |
| Isabelle | 1700×1000 | The oval-shaped model is equipped with a convenient shelf and nozzles for water massage. |
| Kylie | 1500×1010 | A product of original design in the shape of a sail. Will fit into the interior of a small room. Equipped with a decorative magnetic screen. |
| Bella | 1400×760 | Compact bathtub with a depth of 420 mm. Suitable for modest sized bathrooms. |
| Scarlet | 1670×960 | Comfortable bathing bowl with wide sides. The basic package includes hydromassage. |
| Pearl Shell | 1600×1040 | Bathtub with a diagonally positioned bowl and a raised bottom. |
| Breeze | 1500×960 | Anatomically shaped product with comfortable back support and armrests. |
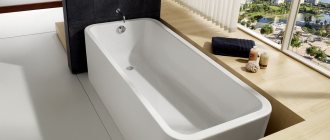
Rectangular acrylic bathtubs are a timeless classic with a modern twist. These models fit perfectly into small rooms, taking up little space. At the same time, buyers will receive the maximum possible usable capacity of the bowl.
| Model | Dimensions, mm | Peculiarities |
| Caesar | 1800×800 | Spacious bathtub with hydromassage and polyurethane headrest. On the wide side it is possible to install a three-position Niagara mixer. |
| Standard | 1700×700 | An inexpensive product with a laconic design without additional options. |
| Diana | 1700×750 | Bathtub "Diana" Triton is made in a classic design. The product is supplied assembled and completely ready for installation. |
| Emma | 1500×700 | A practical model with a comfortable backrest angle and the ability to install a headrest. |
| Julia | 1600×700 | Compact hot tub at a reasonable price. |
| Perseus | 1900×900 | Wide, anatomically shaped bowl with lighting and optimal placement of massage nozzles. |
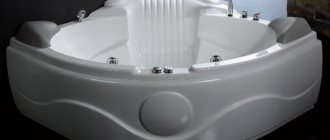
Corner baths, with modest external dimensions, demonstrate an impressive useful volume of the bowl. These models fit compactly into the corner of the room and add originality to the interior.
| Model | Dimensions, mm | Peculiarities |
| Victoria | 1500×1500 | The model is made by hand molding. Made from highly durable material. Produced in any color of the client's choice. |
| Cindy | 1250×1250 | A practical bathing bowl with compact dimensions and a wide rim. The depth of the bowl is 445 mm. |
| Troy | 1500×1500 | Bathtub with a comfortable seat and a spacious 300 liter bowl. The model is equipped with a reinforced steel frame. |
| Lily | 1500×1500 | An elegant model with a grooved bottom and a bowl capacity of 420 liters. Equipped with wavy sides where you can place all the necessary hygiene items. |
Rectangular baths
This type of model is intended for large rooms. As a rule, it is located in the center of the bathroom. The package includes hydromassage. The length of the bathtub ranges from 150 to 170 cm.
Bidet mixer: 100 photos of modern models, recommendations for installation and selection of sizes- Bathroom faucet - tips for choosing and the best ideas on how to choose the best model (100 photos)
- Shower faucet: tips and recommendations on which one to choose and how to install the faucet (85 photos)
The grooved bottom of the product reduces slipping on the surface during bathing. The cost of such a model ranges from 10 to 12,000 rubles.
Corner acrylic bathtubs
This type is intended for small spaces. Triton corner baths are located in the corner parts of the space.
There are additional levels in the form of ledges and thresholds. They are made according to the position of the human body during bathing.
The bottom of the structure has 3-layer protection against rapid cooling of the liquid. Acrylic can cope with high temperatures. The model can be upgraded by adding a multi-level hydromassage. The body has a simple control panel for the speed of the massage jet. The photo of Triton acrylic bathtubs shows popular models.
Installing a bathtub in a tiled bathroom
All the methods described above imply that the tiles will be laid after the installation of the bathrooms. But what if you need to install an iron bathtub or shower cabin in a tiled room?
Installing a bathtub in a tiled room
- We will be of the opinion that the tiles are at a certain level and do not need to be re-laid. Then the installation process is greatly simplified;
- You need to level the floor and check it with the rules. You can install the bathtub on legs, a frame or bricks. Regardless of the method chosen, it is best to ensure a minimum gap between the wall and the bathtub;
- After connecting the plumbing connections of the toilet, bathtub and other consumers, it is important to close the gap between the wall and the side of the bathtub. To do this, use a flexible plinth (made of aluminum or plastic), sealant or pieces of tile;
Silicone for joints - First of all, the gap is covered with a layer of sealant. A plinth is installed on top of it. If the option with tile cladding is chosen, then sealant is first applied to the gap, and after it dries, the tile is installed. For its installation, you can use waterproof plaster;
- All that remains is to install the fan in the hood, mount the column or boiler, remove the remaining construction debris and check the correct connection.