Where to start fixing a leak
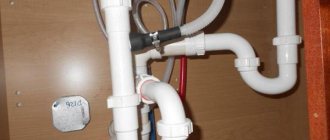
Standard situation - it was discovered that a pipe is leaking: what to do in such cases? The first step is to determine exactly where the pipe is leaking. If a sink, washbasin or bathtub drain is leaking, the cause of this phenomenon is usually a poor-quality connection of the drain hole, siphon and entrance to the pipe.
In this case, to fix the problem, you will need to tighten all the threaded connections through which the sewer pipe flows. Sometimes it helps to replace the gaskets at these joints.
Causes of leaks in pipes
A water pipe break can happen for the following reasons:
- pitting corrosion due to defects and structural inhomogeneities in the metal pipe;
- pressure drops in the cold and hot water supply system (CW, DHW);
- long-term operation without replacing worn areas;
- damage to the thread during repair or assembly;
- oxidation or breakdown of reinforcement, aging and cracking of elastic gaskets;
- improper installation of the cold water, hot water or sewage system;
- depressurization of joints;
- mixer breakdown;
- weak tightening of nuts on connections;
- a sharp shift of the shell, creating a lateral load on the siphon.
The cause of the leak affects its location, intensity and difficulty of detection.
For example, if the gasket is defective, the joint between the drain and the siphon under the bathtub may leak only when the bowl is filled, since increased pressure is created on the weak point.
If a pipe leaks at the connection
Using the caulking method for cast iron pipelines
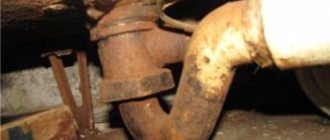
If leaks are detected at the junction of cast-iron sewer pipes, you should prepare for a rather complex procedure for eliminating the problem (read: “How to repair a crack in a cast-iron sewer pipe - reliable and proven methods”). In this case, much depends on the quality of the docking work.
If caulking is carried out with lead, the procedure is as follows:
- Clean the joint area until clean metal appears.
- Caulk the gap using lead cones. This is done with a blunt chisel, since in this case it is quite easy to seal the gap with soft lead.
What to do if the pipe in the toilet is leaking:
- Clean the joint from the old mortar using a narrow chisel and hammer. You need to act carefully so as not to damage the pipe.
- After removing the old seal, the gap must be thoroughly cleaned.
- For new driving, use tarred strands and an aqueous solution of cement in a ratio of 10:1 to water. Before driving, the strands are treated with a special substance, which includes cement and asbestos in a ratio of 7:3. While kneading, add a little water: the finished solution should be like plasticine.
Eliminating water leaks at the drainage point
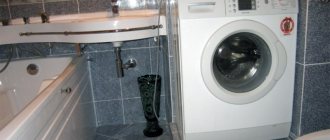
If your bathtub is leaking, you need to first find out the reason.
Such a nuisance can happen due to depressurization of the siphon or its failure (for example, a crack). If the siphon, or, as it is also called, the piping, does not work for long and is in good condition, then the problem of water leakage can be eliminated by simply replacing the gaskets. In this case, it is advisable to also use a sealant.
Often the cause of a leak is that the upper part of the drain is “loose” and the resulting gap allows water to pass through. In this case, you just need to unscrew the siphon mount and apply sealant to the joints of the parts. Currently, silicone sealants specifically designed for plumbing systems have appeared on the market. We can recommend, for example, Silicone-915 or KI Meg Silicone E sealant. They dry quickly enough (10-20 minutes), do not lose their properties both at low and high temperatures, up to 150ºC, and are not susceptible to fungus.
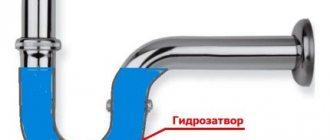
Siphon diagram.
When applying sealants, you must adhere to the following rules. The surfaces to which the sealant is applied must be dry, clean, and free of mechanical damage. Metal surfaces must be degreased. The width of the sealing seam can be 6…35 mm wide. You can level the seam and seal it within 5 minutes immediately after application. After complete hardening, you can remove the unevenness, carefully trim off the excess, being careful not to damage the seam itself. All work should be performed with rubber gloves, avoiding contact of the sealant with the skin.
Related article: Plastic corners for walls, colored and white
If the visible part of the drain is not damaged, it is well strengthened, but it still flows from under the bathtub, then in this case it is better to replace the trim with a new one. When choosing a new waste/overflow system, you need to consider what material your bathtub is made of. Some siphons are designed only for thin-walled plumbing equipment.
When installing a new harness, you must first completely assemble it by hand, and last of all, attach it in assembled form to the drain and overflow holes.
Repairing leaks at pipe joints using cement
What to do if a pipe is leaking, and the only possible materials available are cement?
In such a situation, work is carried out as follows:
- The pipe junction area is cleaned, with the obligatory removal of the old seal. To avoid damaging the pipes, it is better to refrain from using heavy tools.
- Next, you need to get a wide gauze bandage. Cement is mixed with water to form a slurry. A bandage is immersed in the resulting solution.
- The same cement mortar is used to treat the joint between the pipes, and then wrap a bandage there.
- The hardening of the seal usually lasts for two hours, after which it can be sanded and painted.
In cases where a leak was detected directly on the pipe body, a completely different algorithm of actions will be required.
Installing the bandage
If a pipe in the bathroom is leaking, a temporary solution to the problem is to install a bandage. Before this, you need to determine what type of damage you will have to deal with (fistula or leakage), and where exactly it is located.
The rubber band is applied as follows:
- A rubber gasket is installed in the emergency section of the pipe.
- After pressing tightly to the pipe, fixation with a clamp is applied.
You can easily purchase a clamp in a store, but it happens that you don’t have it at hand at the right time. In this case, you can make the clamp yourself, or use wire, a harness, rope or hose instead.
The bandage rubber can be an old rubber boot, from which the boot is cut off. The same goes for a rubber hose and a bicycle tube. The width of the bandage is made depending on the diameter of the pipe being repaired.
Using a wooden wedge in the bathroom
There are situations when a high-pressure leak occurs, but there is no possibility of shutting off the water: how can you prevent the pipe from leaking? A bandage usually doesn’t help in such a situation either.
If the leak is caused by a fistula, it can be eliminated using a small wooden peg in the form of a wedge. The size of its tip is made the same as the resulting hole in the pipeline.
The peg with its sharp end is inserted into the fistula, after which it is hammered in with a hammer. This temporary measure allows you to gain time needed to call emergency services.
How to clean a drain hole
Both the hole itself and the weight blocking the drain are often cleaned.
Let's see how this can be done.
- Remove all screws from the sink drain hole.
- Remove the entire plunger mechanism from the pipe.
- The weight should be properly cleaned by placing it in apple cider vinegar or regular vinegar for a while.
- The drain itself is simply washed with water.
- Now insert the plunger mechanism into place.
- Secure the drain hole with screws.
Clean the lid lifting mechanism.
- Unscrew the overflow cover from the bathtub.
- Pull the lift lever and plunger out of the overflow pipe hole.
- Threaded lifting lever.
- Plunger.
Often water leaks into the drain hole because the weight in the closed position does not reach the drain hole. This problem can be solved by lengthening the lift arm.
Sealing a pipe in a toilet
A leak in a pipe can also be eliminated with an adhesive bandage.
The procedure in this case is as follows:
- The water in the pipe is shut off by a valve.
- You will need a hairdryer to dry the damaged area.
- The selection of dense flexible sealing material of the required dimensions is carried out. It can be rubber, plastic, fiberglass, etc.
- To glue the fabricated patch to the leak site, you will need epoxy glue.
When using fiberglass, the cut piece should be enough to wrap the pipe at least 5-6 times. The width of the bandage should exceed the diameter of the pipe by at least one and a half times. It is more convenient to apply glue to the bandage with a brush or spatula.
After wrapping the bandage fabric around the pipeline, it is secured with a tie or clamp until it dries completely. The glue usually dries within 24-72 hours. The air temperature must be at least + 15 degrees.
Replacing and repairing a siphon under the sink: 5 useful plumbing tips
There is no need to do any special chemicals, since the possibility of extending the lever is provided on the lever itself. Simply unscrew the nuts and move the plastic part of the lever to the desired position.
How to adjust the length of the lift lever in the mechanism for lifting the drain cover.
- To decrease the length, move the nut up, move the plastic piece, and move the second nut up. To lengthen the lever, all the same steps are performed in reverse order.
- The lift arm that leads to the pivot arm is threaded.
- First nut.
- Plastic element.
- Lever to plunger.
There are, of course, lifting levers of other designs, however, the method of changing the length of the lever remains approximately the same.
Scheme of the lifting mechanism for draining
As for the lifting mechanism that is used to lift the drain cover, it is shown in the following drawing.
When you turn the handle, the spring is compressed, after which the drain hole opens. Otherwise, the spring is released and the lid opens, blocking the drain. The specific mechanism may differ, but the general principle of the mechanism remains the same.
- A rotary handle is used to open or close the drain cover.
- Turn the handle.
- Back view.
- Front view.
- Pad.
- Cover for overflow pipe.
- Pen.
- Earring.
- Overflow pipe.
- Spring.
- Lifting lever.
- Pipe wall.
- Drain cover.
- Sealing ring.
- Flange.
- Drain.
- Rolling lever.
- Nuts.
- To the shutter, which is located under the floor.
Typically, the bottom of the lift arm is a spring. In this case, the handle with which the lid lock is controlled interacts with the lifting lever. At the end of this lever there is a spring, which is in contact with another swinging lever.
When you turn the handle, the lever presses on the spring, and the lid rises, opening the drain. As soon as you turn the handle in a different direction, the pressure is released from the spring, causing the lid to “automatically” close. The device, frankly speaking, is very primitive, but effective.
The lever mechanism can also be cleaned if desired. In addition, the sink drain cover is often equipped with a rubber seal, which wears out quickly and also requires replacement.
If you lift the lid, it is easy to pull the swing arm out. To put it back, you need to carefully turn the lever so that it fits into the horizontal plane of the drain pipe.
- The lever is pulled up and to the side and inserted in the same way.
- Lid.
- Flange.
- Drain.
To get the levers, you need to unscrew the mounting screws in the right places. These levers are then easily removed, similar to how a plunger mechanism can be removed. To change the force with which the spring presses on the lever, it is enough to change the length of the lifting lever. To do this, you need to turn the nut that secures the spring. As a result, the lid will tightly close the drain hole and there will be no leaks for you.
Do not forget to clean all parts of the mechanism using regular table or apple cider vinegar, which perfectly dissolves mineral deposits. All levers should move smoothly and without problems.
If a metal pipe is leaking
It often happens that a pipe in the bathroom leaks: what should you do to avoid flooding the apartment and the neighbors below?
In this case, proceed as follows:
- The first step is to shut off the water supply.
- Cut off the damaged section of the pipeline using a hacksaw or grinder. The cut is made with an indentation of 30 cm in both directions.
- Unscrew the threaded connection of the pipeline adjacent to the damage site.
- Threading is carried out on the cut off fixed end of the pipe. It is convenient to use a gas wrench to hold the end of the pipe.
- The coupling is screwed onto the threaded end.
- A measurement is made of how long the new pipe should be, taking into account the threaded section.
- To make the insert, use a pipe of exactly the same diameter as the old one. The manufactured segment must be equipped with threads at both ends.
- To connect the new section to the pipeline, a coupling is used, which can be held using a pipe wrench.
Before screwing on the coupling, it is necessary to seal the threaded sections of the section using flax, sealing putty, or a special tape-fuser. In addition to repairing metal pipelines, leaks on pipes made of other materials can be repaired in the same way. If it is not clear what to do if a pipe is leaking, it is best to turn to professional plumbers for help.